Social Media
- TRY IT FREE TRY IT FREE
- 1. Adobe Premiere Tips+
-
- 1.1 export premiere pro
- 1.2 premiere editing
- 1.3 premiere pro export for instagram
- 1.4 premiere pro compress video
- 1.5 export avi premiere pro
- 1.6 4k video from adobe premiere
- 1.7 gopro video from adobe premiere
- 1.8 best format to export from premiere pro
- 1.9 adobe video maker
- 1.10 premiere to avid
- 1.11 adobe premiere export mov
- 1.12 import mkv to adobe premiere
- 1.13 premiere prores
- 1.14 Adobe Premiere vs Final Cut Pro
- 1.15 Best Premiere Pro
- 2. Youtube Tips+
-
- 2.1 youtube video editor
- 2.2 youtube video editor app
- 2.3 youtube video editor free
- 2.4 youtube video editor online
- 2.5 youtube music editor
- 2.6 avs video editor youtubers
- 2.7 easy video editor for youtube
- 2.8 y2mate mp4
- 2.9 youtube clip editor
- 2.10 youtube video format
- 2.11 youtube srt
- 2.12 mxf youtube
- 2.13 youtube video maker free
- 2.14 youtube video maker app
- 2.15 youtube converter dailymotion
- 3. Facebook Tips+
- 4. Instagram Tips+
- 5. Twitter Tips+
- 6. Whatsapp Tips+
Download YouTube Subtitles to SRT or Add SRT Files to YouTube
by Christine Smith • 2026-01-21 18:55:27 • Proven solutions
Anyone can download YouTube SRT subtitles with the right tool. So, learn how to get srt files for YouTube with the best methods in the industry. YouTube is an innovative social media platform in the form of a video sharing site. Millions of videos get viewed and uploaded daily by users. The platform is excellent for video creators and entertainment seekers, and YouTube delivers enhanced user experience with subtitles or, in other words, known as closed captions. It enables a better understanding of the video to native as well as a non-native speaker. Hence, if you need to download subtitles of a YouTube to SRT, it’s accessible by implying a few simple steps. Read this content to find out how you can do so.
- Part 1. What is SRT
- Part 2. How to Download YouTube Subtitles to SRT File
- Part 3. How to Add SRT Files to YouTube Videos Easily
- Part 4. How to Add SRT Files to Your Videos on YouTube
Part 1. What is SRT
Some people are not aware of SRT file extension even after viewing videos with subtitles many times. SRT refers to SubRip Subtitle File, specially created as a subtitle file. This file format consists of subtitles details, start and end time code, sequential number of titles, etc. It only contains the text data and not any video or audio data.
You can read such files through a text editor like Notepad++. YouTube videos also have the support of SRT files, and if needed, you can convert this file type into other formats. Whatever subtitle you see in a YouTube video, you can save them in your computer as YouTube SRT files. The process is too easy for a user having their YouTube channel. If you aren’t familiar with the studio features, then this can seem strenuous to you.
Part 2. How to Download YouTube Subtitles to SRT File
YouTube creator studio is featured with the option of download subtitles to SRT files with few clicks. Save any subtitle to your computer anytime you want. This tool helps you to download SRT files effectively, which will not consume more than 10 minutes.
Step 1: Sign in to YouTube Creator Studio.
Open YouTube in your browser and log in to your channel. Now, go to the creator studio and select the video containing the subtitles you want to download.
Step 2: Change of Language.
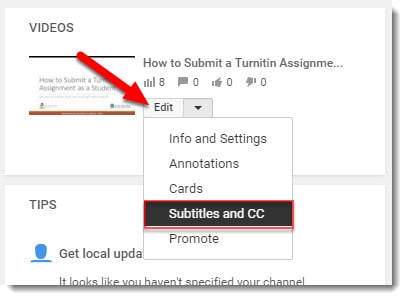
Click on Edit. It will open a drop-down from where you have to choose Subtitles and CC. Now, the studio will ask to select a language. If the video is in a foreign language, select your native (preferred), the default language is always English (Automatic). This step will start loading the subtitles.
Step 3: Download Subtitles.
After everything goes well, click on Actions and then choose the .srt format. Your file will get saved in the .srt file extension.
Aren’t these steps of YouTube SRT as easy as a cakewalk?
Here are some more brilliant tools you can choose from to add SRT to YouTube without any mistake.
Part 3. How to Add SRT Files to YouTube Videos Easily
Many possible ways are there to add SRT files to YouTube, but the most comfortable way we will recommend is using Wondershare UniConverter (originally Wondershare Video Converter Ultimate). It has a collection of features such as converting a file to different formats, creating GIFs, extracting audio from a video, and many more things. This application also works as a video compressor, CD Ripper, CD, VR converter, etc. It allows users to add subtitles to a video file. You can edit the subtitles too by changing font colors, size, transparency, and position.
 Wondershare UniConverter
Your Complete Video Toolbox

- Add, download, and edit subtitles with an all-in-one embedded subtitle tool.
- Convert videos to 1,000+ formats, like AVI, MKV, MOV, MP4, etc.
- Edit, enhance & personalize your video files
- Stream your videos from Windows or Mac to other devices, including Chromecast, Roku, Apple TV, Xbox 360, or PS3
- Supported OS: Windows 10/8/7/XP/Vista, Mac OS 10.15 (Catalina), 10.14, 10.13, 10.12, 10.11, 10.10, 10.9, 10.8, 10.7, 10.6
Video Tutorial on How to Add Subtitles to Video with Wondershare UniConverter
Step 1 Import source video to UniConverter.
Initialize Wondershare UniConverter on your computer, go to the Toolbox category present in the left pane of the main interface, click the Subtitle Editor tile from the right window, and select and import the video you that want to add the subtitles to and publish on YouTube.

Step 2 Add SRT file to the video.
Pause the video playback to avoid any distractions. Now, click the Import button from under the preview window, click the Add from the menu that pops up in the Subtitle field, and import the SRT file that you earlier obtained from the Internet to the program.


Step 3 Set custom preferences and attributes.
If the text of the subtitles is incorrect, you can select the inconsistent one from under the preview window, and correct it in the Subtitle text box that is present at the top of the right section. Furthermore, you can even adjust the display duration of the text in the Start Time and End Time fields.
To personalize font settings such as its type, color, and size, you can use the options present under the Font section. The Outline Width and Opacity sections let you set the width of the outline of the captions and their opacity level respectively.
The Position section has the Top, Middle, and Bottom buttons that allow you to specify where on the screen the captions should appear. After you have customized the settings. Next, click and open the Subtitle menu from under the added video, and either select the Keep all subtitle track(s) radio button, or the one with the name of the SRT file itself under the Embed subtitle(s) section to allow the viewers to enable or disable the subtitles as needed during the playback, or burn the captions into the video that cannot be disabled respectively.


Step 4 Produce the YouTube video with subtitles.
Optionally, set a destination folder in the File Location field, and click the Save to produce a new clip with the subtitles. Once the process completes, you can use your preferred procedure to publish the video to your YouTube channel.

Part 4. How to Add SRT Files to Your Videos on YouTube
You can increase the number of audiences on your video by adding closed captions. More audience will find connect with your content and find it reliable.
Using a pre-written YouTube SRT file, you can add subtitles by following the given steps:
Step 1: Sign in YouTube Studio.
Open the YouTube studio beta in your chosen browser and sign into it with your Google email. Ensure you are using the account with which you have created your channel.
Step 2: Add Subtitle.
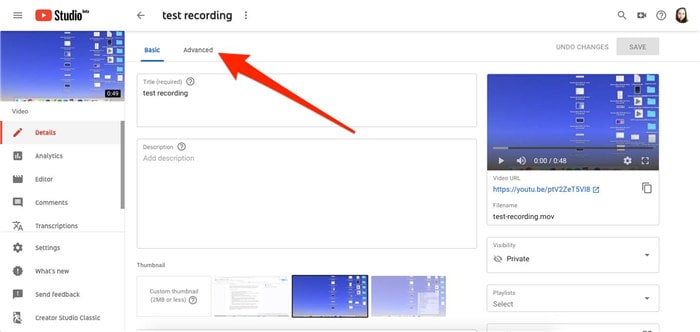
You can add subtitles by selecting videos from the left sidebar. Click on the title or thumbnail of the video you want to add title and then choose Advanced located at the top of the screen.
Step 3: Upload the File.
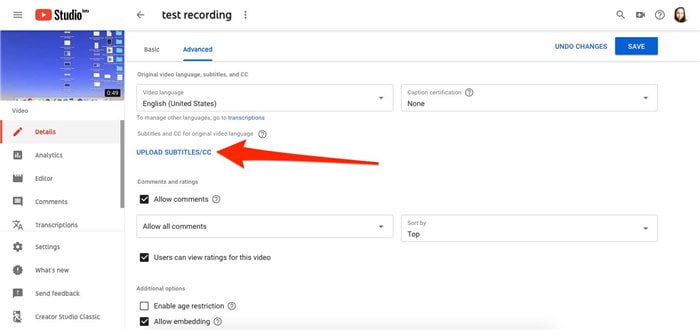
The "Original video language, subtitles, and CC," select the drop-down video language and then click on "Upload Subtitles/CC." Now, you have to upload the file and select the subtitle type with or without timing. Select the right folder, open it, and at last save to finish.
Adding Subtitles Manually:
Step 1: Open YouTube studio or Video Manager.
If you are using a YouTube studio, click on the ‘Creator Studio Classic’ present on the left. Otherwise, open the video manager clicking on your account, and go to Creator Studio > Video Manager > Videos.
Step 2: Setting up language and adding a subtitle.
Next to the video you want to add closed captions, hit the drop-down menu next to the edit option. Select Subtitles/CC. Also, choose the language, as shown. Click to add new subtitles or CC buttons: play or pause the video to add a closed caption.
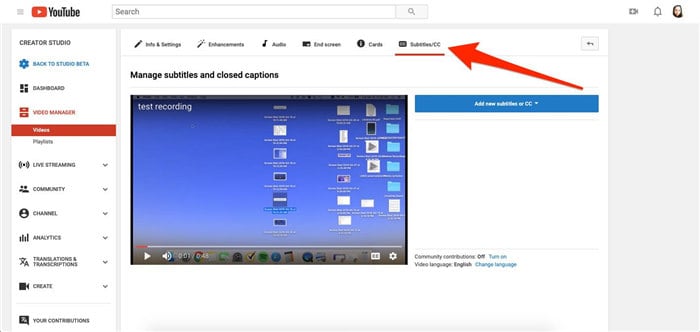
Step 3: Type and Modify.
Type the subtitles in the given text box. After that, click on the add icon. Repeat the steps as required. Change the format of the closed captions to make your video more attractive to the audience. Add color, transparency, and decrease font size according to your choice.

Conclusion
I hope you have a detailed explanation of downloading YouTube to SRT and uploading closed captions to your video content. The steps are easy to perform on any kind of video. Once again, we would reiterate that Wondershare UniConverter is the only tool you need. Lastly, make sure you know YouTube supported closed captions format to avoid errors while uploading them.


Christine Smith
chief Editor