Social Media
- TRY IT FREE TRY IT FREE
- 1. Adobe Premiere Tips+
-
- 1.1 export premiere pro
- 1.2 premiere editing
- 1.3 premiere pro export for instagram
- 1.4 premiere pro compress video
- 1.5 export avi premiere pro
- 1.6 4k video from adobe premiere
- 1.7 gopro video from adobe premiere
- 1.8 best format to export from premiere pro
- 1.9 adobe video maker
- 1.10 premiere to avid
- 1.11 adobe premiere export mov
- 1.12 import mkv to adobe premiere
- 1.13 premiere prores
- 1.14 Adobe Premiere vs Final Cut Pro
- 1.15 Best Premiere Pro
- 2. Youtube Tips+
-
- 2.1 youtube video editor
- 2.2 youtube video editor app
- 2.3 youtube video editor free
- 2.4 youtube video editor online
- 2.5 youtube music editor
- 2.6 avs video editor youtubers
- 2.7 easy video editor for youtube
- 2.8 y2mate mp4
- 2.9 youtube clip editor
- 2.10 youtube video format
- 2.11 youtube srt
- 2.12 mxf youtube
- 2.13 youtube video maker free
- 2.14 youtube video maker app
- 2.15 youtube converter dailymotion
- 3. Facebook Tips+
- 4. Instagram Tips+
- 5. Twitter Tips+
- 6. Whatsapp Tips+
How Premiere Pro Export for Instagram in Easy Steps
by Christine Smith • 2026-01-21 18:55:28 • Proven solutions
If you have footage that you want to share with people around you, it would be a great idea to use Premiere Pro export for Instagram to give the clip a professional touch before it rolls out. Therefore, in the following sections, you will learn about the best, and most recommended Premiere Pro Instagram settings. In addition to this, you will also learn how to bridge the gap in case you come across any issues related to file format, recognition, and compatibility.
- Part 1. Best Premiere Pro Instagram Settings for Exporting Videos
- Part 2. What to Do If the Video Format Is Unrecognizable
Part 1. Best Premiere Pro Instagram Settings for Exporting Videos
Since Adobe Premiere Pro is one of the most used programs for post-production tasks, it has several features and options that the video editors use to produce industry-standard outputs. These exported footages can be used for commercial purposes, public broadcasting, or sharing on social networking platforms for promotions, awareness, and even for fun. You can follow the steps given below to set up the best export settings for Instagram Premiere Pro can offer:
Step 1: Create a New Project and Sequence Preset.
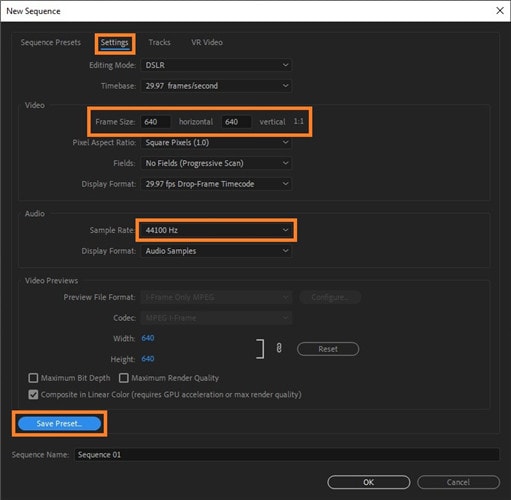
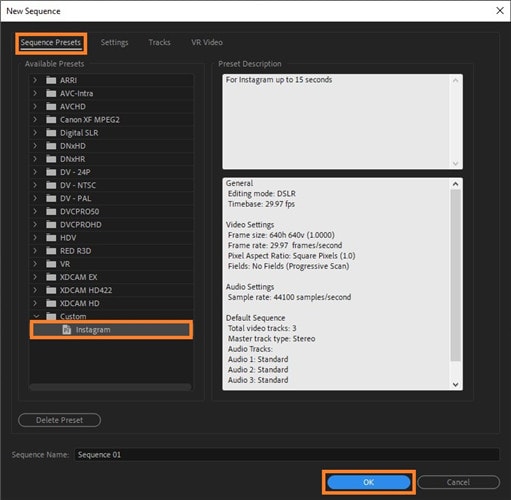
Launch Adobe Premiere Pro (CC 2019 for this example), go to File > New > Project, and define project settings as per your preference. Next, go to File > New > Sequence this time. On the New Sequence box, ensure that the Sequence Presets tab is select from the top, expand Digital SLR > 1080p from the left pane, and select your preferred framerate (DSLR 1080p30 for this example). Go to the Settings tab from the top, set the Frame Size values under the Video section for both horizontal and vertical to 640. From the Audio section, select 44100 Hz from the Sample Rate drop-down list, click Save Preset from the bottom, enter a name and description for the preset in their corresponding fields on the Save Sequence Preset box, and click OK. Back on the Sequence Presets tab, ensure that the preset you created is selected (Instagram here), and click OK to select the preset and get to the main window.
Note: Saving sequence preset is optional. You may need to do so only if you are planning to post videos on Instagram regularly and don’t want to go through all the configuration steps each time you want to use Premiere Pro Instagram settings.
Step 2: Import the Clip and Add to Timeline.
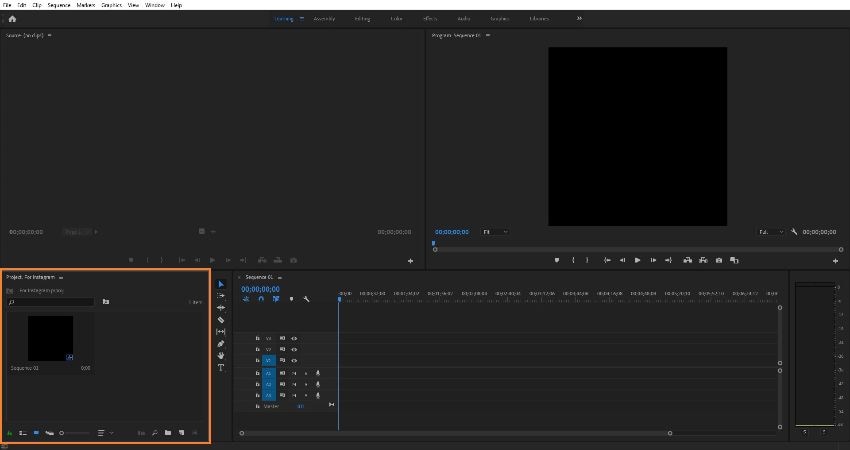
Double-click anywhere inside the Project window at the lower-left section, select and import the clip you want to export Premiere Pro for Instagram, drag the footage to the Timeline in the right, and click Keep existing settings on the Clip Mismatch Warning box that appears.

Step 3: Add Marker and Set Timeline Work Area.
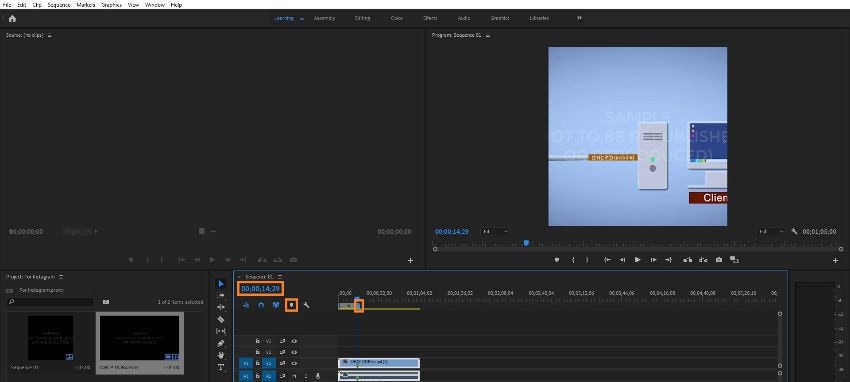
Click the Time from the Timeline pane's top-left corner, type 14:29 (because Instagram can only accept videos that are 15 seconds long), and press Enter. Click the Add Marker icon from below the Time, drag the work area handle from the right toward the left and let it snap to the marker you added earlier. Now, drag the clip handles toward the marker as well to trim off the excessive footage to reduce the total duration to 14:29 seconds.
Step 4: Configure Export Settings and Export.
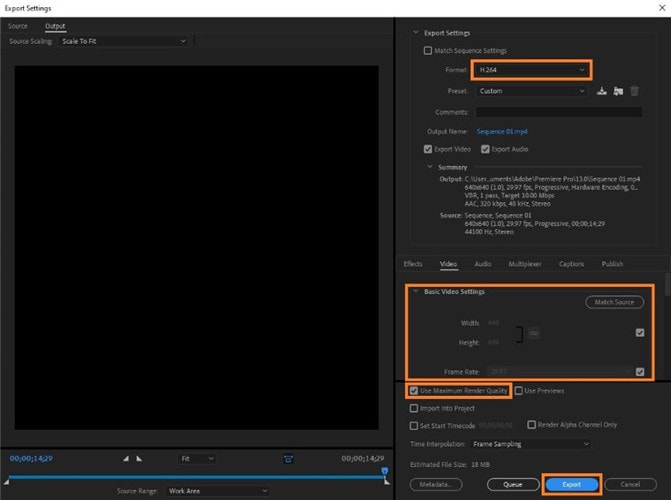
Go to File > Export > Media. From the right pane of the Export Settings box, select from the Format drop-down list, ensure that both Width and Height values under the Basic Video Settings on the Video tab are set to 640, check the Use Maximum Render Quality box, and click Export to use Premiere Pro export for Instagram.
Part 2. What to Do If the Video Format Is Unrecognizable
If you want to use Premiere Pro Instagram settings as explained above to export the footages to be published on the app but got stuck because Adobe Premiere Pro fails to recognize the format of the source footage you want to import to it, you need an efficient tool that is capable of reading the unknown file types, and then can convert them to something more common like MP4, AVI, etc.
One such software that supports more than 1,000 extensions and is around 30 times faster than its competitors is UniConverter by Wondershare. Wondershare UniConverter (originally Wondershare Video Converter Ultimate) is not merely a universal converter; it is also packed with other built-in apps such as a screen recorder, video compressor, optical media burner (including Blu-ray discs), etc.
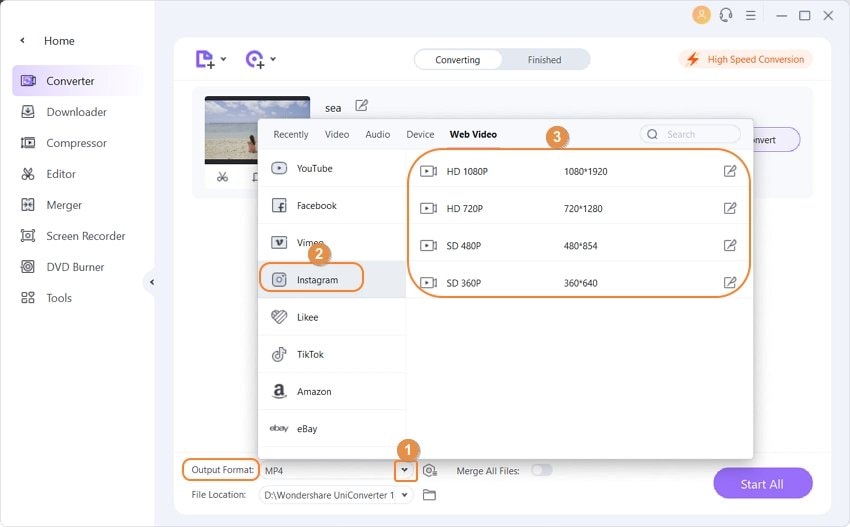
The best part is, with Wondershare UniConverter, you don’t even have to use a complex and resource-intensive application like Adobe Premiere Pro export for Instagram compatible output videos. Since UniConverter also has its own built-in video editor and even a pre-configured preset named “Instagram,” you can save your decent amount of time that you would otherwise spend in creating and setting up a preset and sequence with Adobe Premiere Pro.
 Wondershare UniConverter - Your Complete Video Toolbox for Windows/Mac

- Convert 1,000+ videos to Instagram supported format with super fast speed.
- Compress and resize videos for Instagram without any quality loss.
- Crop, trim, add watermarks, apply effects, and more other video editing features to make your videos attractive.
- Download videos from 10,000+ online video sharing sites by pasting URLs directly.
- Transfer videos from PC/Mac to iPhone/iPad/Android devices easily and quickly via USB cable.
- Supports batch processing for converting and compressing multiple files at a time.
- Toolbox with additional functions like Screen Recorder, GIF Maker, Fix Media Metadata, and more.
- Supported OS: Windows 10/8/7/2003/Vista/XP, Mac OS 10.15 (Catalina), 10.14, 10.13, 10.12, 10.11, 10.10, 10.9, 10.8, 10.7, 10.6.
Conclusion
Although using Premiere Pro export for Instagram is a smart way to produce a video output that can be published to the app, it requires an in-depth understanding of how the codecs, framerate, sampling, and rending work. To avoid such troublesome configurations, it would be wise to use a pre-configured and efficient tool like Wondershare UniConverter, especially if you are not from an IT or video editing background.
* Some of the above codec formats may need to be supported by system.


Christine Smith
chief Editor