FCP
- TRY IT FREE TRY IT FREE
- 1. Convert Videos to FCP+
- 2. Tips for FCP+
-
- 2.1 FCP iPad Alternatives
- 2.2 Export FCP Videos
- 2.3 FCP vs Sony Vegas
- 2.4 final cut pro alternative
- 2.5 final cut pro android
- 2.6 apple video editing
- 2.7 final cut pro free
- 2.8 final cut pro apk
- 2.9 final cut pro review
- 2.10 final cut pro rotate video
- 2.11 Adobe Premiere vs Final Cut Pro
- 2.12 how to split clip in final cut pro
- 2.13 imovie vs final cut pro
- 2.14 prores codec for windows
- 2.15 prores 4k
- 2.16 prores mp4
- 2.17 quicktime prores
- 2.18 premiere prores
- 2.19 prores
- 2.20 final cut express
Export to ProRes in Adobe Premiere Pro in Easy Steps
by Christine Smith • 2026-06-23 14:38:59 • Proven solutions
With Adobe Premiere, ProRes can be exported quite easily. The only thing you need to keep in mind is what types of Apple ProRes Premiere Pro support and what adjustments must be made manually to get the expected output. With that said, here you will get basic information about the ProRes codecs, how Adobe Premiere Pro works with ProRes, and what to do to export ProRes Premiere Pro can use for the post-production process. While reading this, you will also learn about one of the best alternatives to Adobe Premiere Pro that can export ProRes more easily and quickly.
- Part 1. Does Adobe Premiere Pro Support ProRes
- Part 2. How to Export to ProRes from Adobe Premiere Pro
- Part 3. Best Premiere Pro Alternative to Export ProRes You Can't-Miss
Part 1. Does Adobe Premiere Pro Support ProRes
A simple, quick, and straightforward answer to the question are, “Yes, it does.” Although ProRes is an Apple proprietary product that was first introduced in 2007 with the official release of Final Cut Studio 2, considering the advantages it offers, such as keeping the files smaller in size while still retaining higher picture quality, Adobe joined hands with Apple. The codec can now be used with the major post-production and encoding tools by the vendor, namely Adobe Premiere Pro, Adobe After Effects, and Adobe Media Encoder.
Quick Info
ProRes is an intermediate codec that contains visuals in uncompressed form. This makes it easy for the post-production applications to edit the footages without giving any overhead to the processor or GPU. Once the editing is done, the videos are exported to a distributable, more recognizable format like MP4, MOV, etc. for broadcasting.
Work Process (with Adobe Premiere Pro)
When it comes to exporting a video to ProRes with Adobe Premiere, a certain flow needs to be followed to get optimum results. This workflow, along with the reason for each phase, is briefly explained below:
- Video footage is imported to Adobe Premiere Pro
- Assuming that the video is not already recorded in ProRes, it is transcoded to ProRes 422 or ProRes 422 HQ if required (Some professionals even prefer creating proxies)
- The ProRes 422 file is then edited as needed
- Post-editing, the video is exported to a globally accepted format like MP4, MOV, etc. using better compression-oriented codecs such as or .
Part 2. How to Export to ProRes from Adobe Premiere Pro
Considering the above process in mind, and assuming that you have already imported a video to Adobe Premiere Pro, the steps below explain how footage can be transcoded to ProRes for further editing:
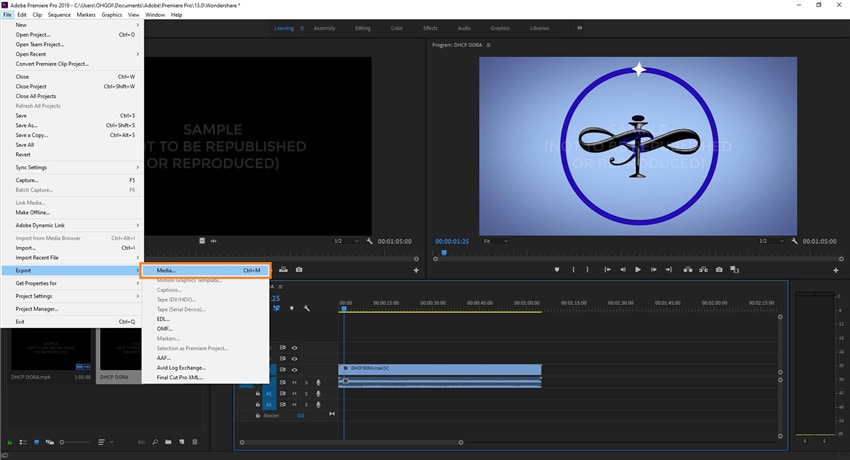
Step 1: Click File and Open the Export Settings Box.
Click File from the menu bar at the top of the Adobe Premiere Pro window, go to Export from the drop-down menu, and click Media from the submenu that appears to open the Export Settings box.
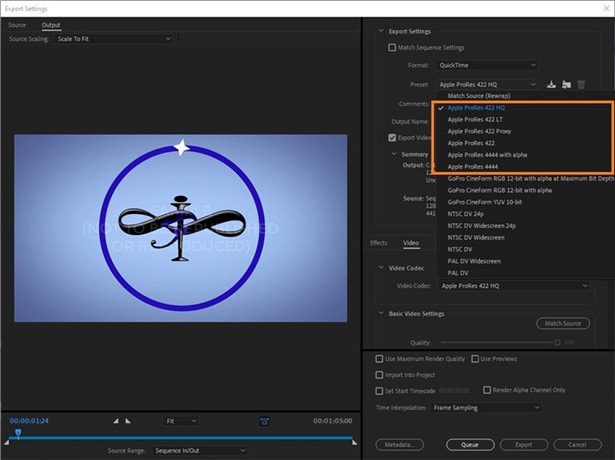
Step 2: Select Quick as Format and a Preset.
Select QuickTime from the Format drop-down list. Notice that ProRes 422 HQ is selected by default in the Preset field. (in Adobe Premiere Pro CC 2019). You can either leave it selected or choose a different one as needed from the drop-down list (ProRes 422 for this example).

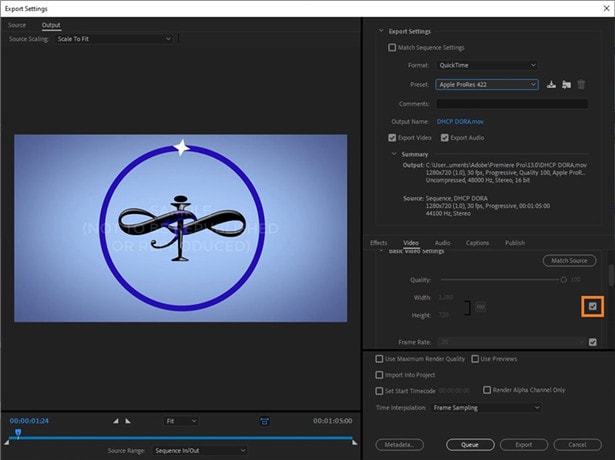
Step 3: Verify the Codec and Make Other Adjustments.
From under the Basic Video Settings sections, uncheck the common box for Width and Height (if already checked), and define a custom resolution (1920 x 1080 here) (or leave the box checked, and the figures intact if no changes are necessary). Along with this, also ensure that other options are configured according to the settings given below:
- Frame Rate is set to 25 or 30 (as per your preference)
- Field Order is set to Progressive.
- Aspect is set to Square Pixels (1.0)
- Use Maximum Render Quality and Use Previews boxes are checked.
If any of the options aren’t set to the values listed above, you must make the required modifications before proceeding.
Step 4: Click Export.
Once everything is in place, click Export to export the video to ProRes, Premiere Pro can make edits to.
Part 3. Best Premiere Pro Alternative to Export ProRes You Can't-Miss
Although with Premiere, ProRes can be created, you need to go through many menus and configure several options manually before the transcoding is initiated. To overcome this hurdle and save some time, another, rather a better alternative to export ProRes called Wondershare UniConverter (originally Wondershare Video Converter Ultimate), is available. Wondershare UniConverter has built-in ProRes presets that are easily configurable, even if you don’t have an in-depth understanding of complex technical terms like Progressive Field Order, QuickTime format, etc. In addition to this, the rendering speed that Wondershare UniConverter offers is around 30x faster than other post-production tools.
 Wondershare UniConverter - Best Video to ProRes Converter
- Convert videos to ProRes codec and other 1000+ video formats like MP4, MOV, AVI, etc.
- Convert video files with optimized presets for Final Cut Pro, iMovie, iPhone, iPad, and more devices.
- 30X faster conversion speed than any conventional converters.
- Edit video files with trimming, cropping, cutting, merging, adding subtitles, etc.
- Burn videos to DVD with customized free DVD menu templates.
- Download or record videos from 10,000+ video sharing sites.
- Industry-leading APEXTRANS technology converts videos with zero quality loss or video compression.
- Versatile toolbox combines video metadata editor, GIF maker, video compressor, and screen recorder.
- Supported OS: Windows 10/8/7/XP/Vista, macOS 11 Big Sur, 10.15 (Catalina), 10.14, 10.13, 10.12, 10.11, 10.10, 10.9, 10.8, 10.7, 10.6.
To export ProRes using Wondershare UniConverter, all you need to do is, install the program on your Mac computer, and follow the steps given below:
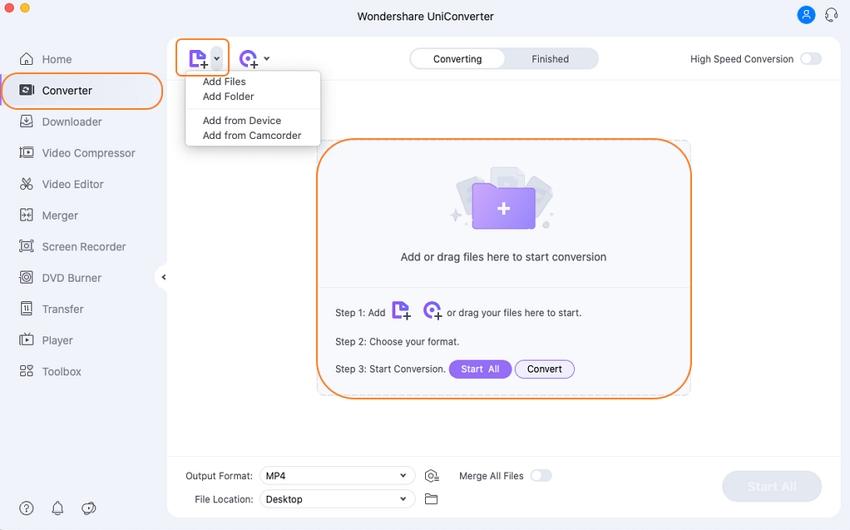
Step 1 Hit Add Files and Import Footage.
Download and install Wondershare UniConverter on your Mac. Launch the program, confirm that the Converter tile is selected from the top, click the Add Files symbol from the center, use the box that opens to select the footage you want to export to ProRes, and click Load from the bottom-right corner of the box.
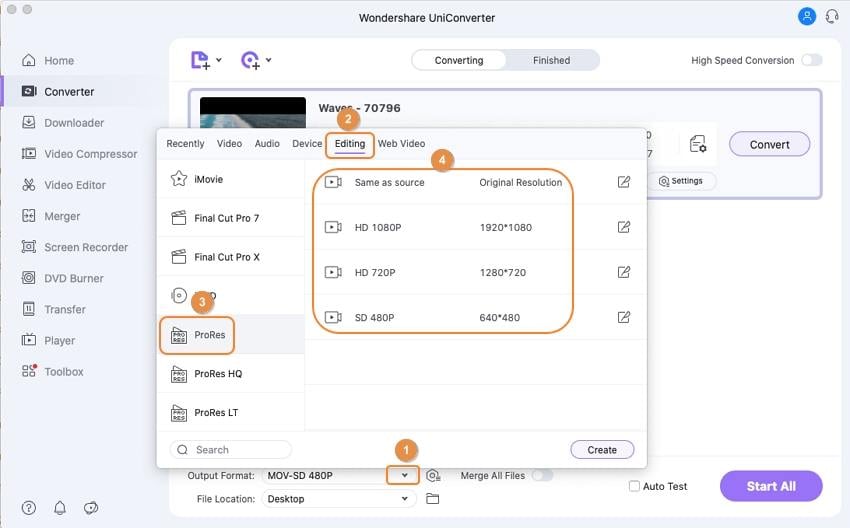
Step 2 Select ProRes as an Output Format.
Click and open the Output Format menu from the bottom of the Converter window, go to the Editing tab from the top, select ProRes from the left pane of the menu, and select your preferred resolution on the right.
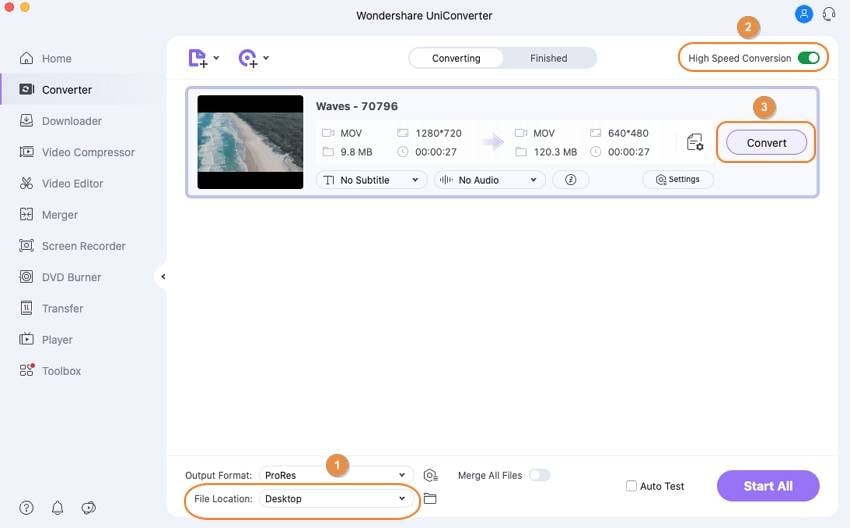
Step 3 Manage Destination Location and Export to ProRes.
Choose a destination location to save the ProRes file to (or leave the File Location folder selected) in the Output field from the bottom of the window, and you can enable the High Speed Conversion to convert your video at high speed without quality loss. Finally, click Convert to export the video to ProRes; Premiere Pro can edit for final distribution.
Conclusion
Adobe Premiere has a built-in export feature that can transcode footage to Apple ProRes Premiere Pro can use for editing. However, there are many settings and options you need to check and modify before starting with the conversion. On the other hand, the Mac version of Wondershare UniConverter makes such things way easier by allowing you to select a preset that has all the settings already configured according to the Premiere ProRes codec.
* Some of the above codec formats may need to be supported by system.
- 10 Things About Prores You Should Know
- How to Create DVD Using Final Cut Pro on Mac
- 2 Simple Ways to Burn VLC Files to DVD
- How to Convert DTS to AC3 Easily
- Best Way to Turn HEIC to JPG on Google Drive in 2026
- How to Open Djvu File and Convert DjVu Files to PDF Online
- 5 DPI Converters You Should Know
- How to Convert Video for Instagram Online Free
- How to Convert and Compress 3GP Video for WhatsApp
- How to Convert WMV to Instagram in Easy Steps


Christine Smith
chief Editor