FCP
- TRY IT FREE TRY IT FREE
- 1. Convert Videos to FCP+
- 2. Tips for FCP+
-
- 2.1 FCP iPad Alternatives
- 2.2 Export FCP Videos
- 2.3 FCP vs Sony Vegas
- 2.4 final cut pro alternative
- 2.5 final cut pro android
- 2.6 apple video editing
- 2.7 final cut pro free
- 2.8 final cut pro apk
- 2.9 final cut pro review
- 2.10 final cut pro rotate video
- 2.11 Adobe Premiere vs Final Cut Pro
- 2.12 how to split clip in final cut pro
- 2.13 imovie vs final cut pro
- 2.14 prores codec for windows
- 2.15 prores 4k
- 2.16 prores mp4
- 2.17 quicktime prores
- 2.18 premiere prores
- 2.19 prores
- 2.20 final cut express
How To Rotate Video in Final Cut Pro in Simple Steps
by Christine Smith • 2026-03-20 10:03:06 • Proven solutions
Once you understand the tricky part, learning how final cut pro rotates video isn’t as tough as it seems. Here you will learn how to rotate the video in Final Cut Pro X that is abbreviated as FCPX (or Final Cut Pro as FCP). In addition to this, you will also learn about an alternate program that you can use in case you don’t have access to a Mac computer, or you find FCPX a bit expensive and are looking for a cheaper but equally efficient application to edit videos for commercial purposes or your personal use.
- Part 1. How to Rotate Video in Final Cut Pro (Step-by-Step)
- Part 2. Best Alternative to Final Cut Pro for Rotating Video (Recommended)
Part 1. How to Rotate Video in Final Cut Pro (Step-by-Step)
Being one of the most admired and definitely most preferred programs by the professionals, Final Cut Pro X (an updated variant of Final Cut Pro) is a feature-equipped and robust industry-standard post-production video editing software that allows you to edit raw footages of movies, advertisements, or any other such clips that have been recorded for commercial gains. The step-by-step instructions given below explain how to rotate clip in Final Cut Pro in the easiest possible manner.
Note: Final Cut Pro X is used here for training purposes. Terms Final Cut Pro X, Final Cut Pro, FCPX, and FCP are used interchangeably throughout this article.
Step 1: Create a New Project
Launch Final Cut Pro X on your Mac computer, right-click anywhere inside the upper-left pane of the interface, click New Project from the context menu that appears, in the box that pops up, type a name of the new project in the Project Name field, leave everything else to default to keep things simple, and click OK.
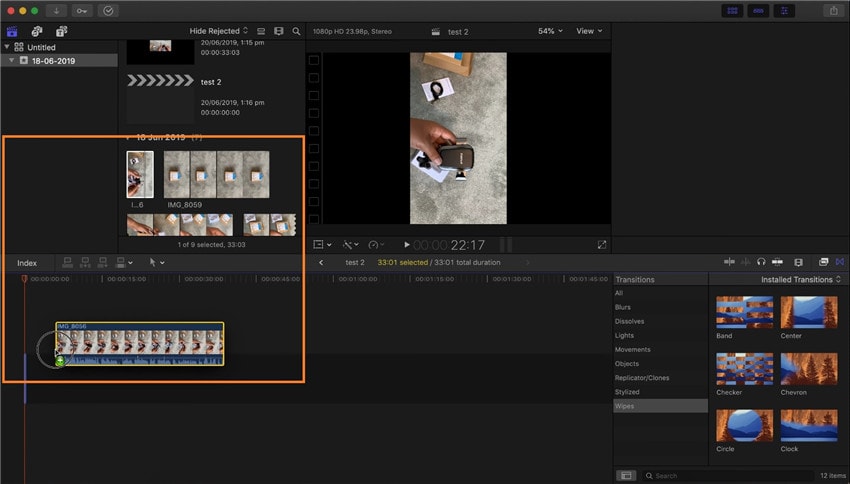
Step 2: Drag the Raw Footage to the Timeline and Set Canvas Preferences
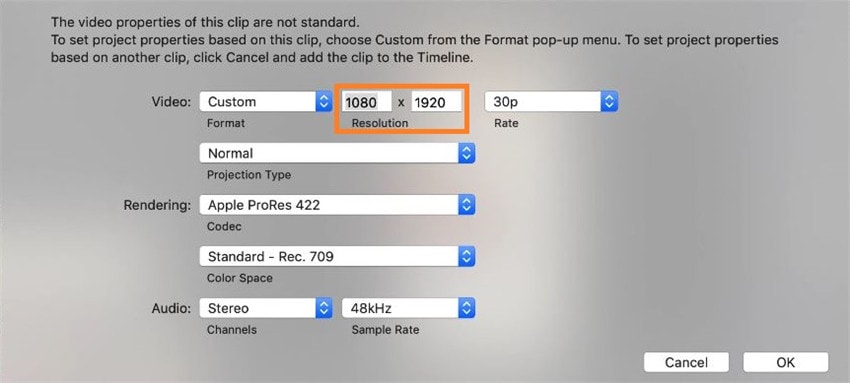
Click and drag the clip you want to rotate from the Media Bin at the upper-center pane to the Timeline at the lower-left section of the interface, swap the values in the Resolution fields in the Preferences box that opens up (from 1080 x 1920 to 1920 x 1080 here), leave all other settings to default, and click OK.
Step 3: Enter Rotation Value and Scale the Video
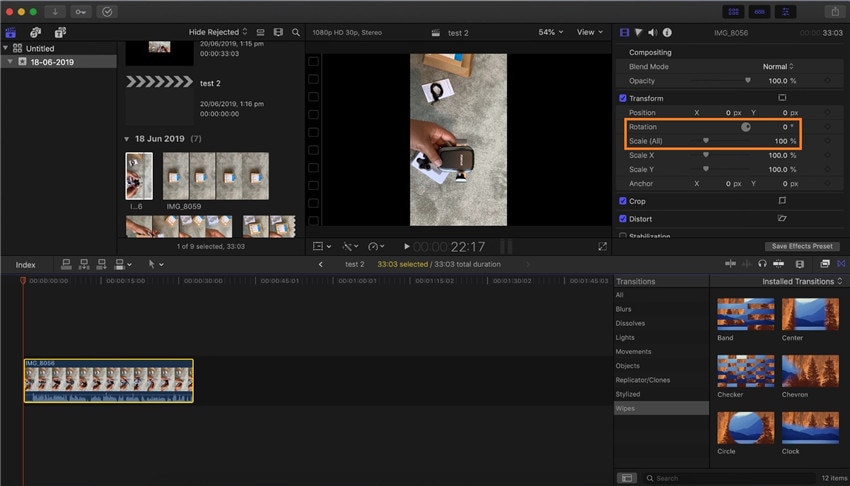
From the Transform section in the right pane, enter a value in the Rotation field to change the angle of the video (900 for this example), use the Scale (All) slider to increase or decrease the overall display size of the video as needed to fit the screen, and click anywhere else to rotate clip in Final Cut Pro X.
Once you are done making necessary changes, you can go ahead and export the modified clip to your preferred output format.

Tips
If you want to use Final Cut Pro to burn DVDs, just move to How to Create DVD Using Final Cut Pro on Mac >> to learn more.
Part 2. Best Alternative to Final Cut Pro for Rotating Video (Recommended)
As mentioned above, Final Cut Pro X is a highly expensive program and is available only for Mac users and macOS operating systems. But what if you don’t have that kind of budget to invest in FCPX, or don’t have access to a Mac computer altogether? Don’t worry! Wondershare has your back. There is a product by Wondershare called UniConverter that is as efficient as Final Cut Pro X is. Also, the software is way cheaper than its competitor, FCP, and is available for both Mac and Windows computers. This means, even if you don’t have a Macintosh computer or enough budget to by FCPX, you can still edit the videos and give them a professional touch. Wondershare UniConverter (originally Wondershare Video Converter Ultimate) offers more than what its name suggests. This means, in addition to being a universal converter for almost all media types with more than 1000 supported formats, the tool also has a plethora of other built-in programs like video editor, screen recorder, streaming audio and video downloader, audio CD ripper, etc. that make this application a one-stop-shop for all audio, video, and image-related tasks.
 Wondershare UniConverter
Your Complete Video Toolbox for Windows/Mac

- Rotate video files in 90/180 degrees easily with one click on Windows/Mac easily.
- Reduce video size by trimming or cropping unwanted videos.
- Convert video to over 1000 formats, like AVI, MKV, MOV, MP4, etc.
- Convert video to optimized preset for almost all devices.
- 90X faster conversion speed than other common converters.
- Burn GoPro video to playable DVD with an attractive free DVD template.
- Versatile toolbox includes fixing video metadata, GIF maker, DVD burner, and screen recorder.
- Supported OS: Windows 10/8/7/XP/Vista, macOS 11 Big Sur, 10.15 (Catalina), 10.14, 10.13, 10.12, 10.11, 10.10, 10.9, 10.8, 10.7, 10.6.
The steps are given below explain how to rotate a video using Wondershare UniConverter easily:
Step 1 Click the Add Files Icon and Import the Source Footage.
Start Wondershare UniConverter on your Mac or Windows computer, make sure that the Video Converter tile is selected from the top, click the ![]() icon (Folder icon) from the center of the interface, locate and select the source video using the Open box, and click Open from the bottom to import the clip.
icon (Folder icon) from the center of the interface, locate and select the source video using the Open box, and click Open from the bottom to import the clip.
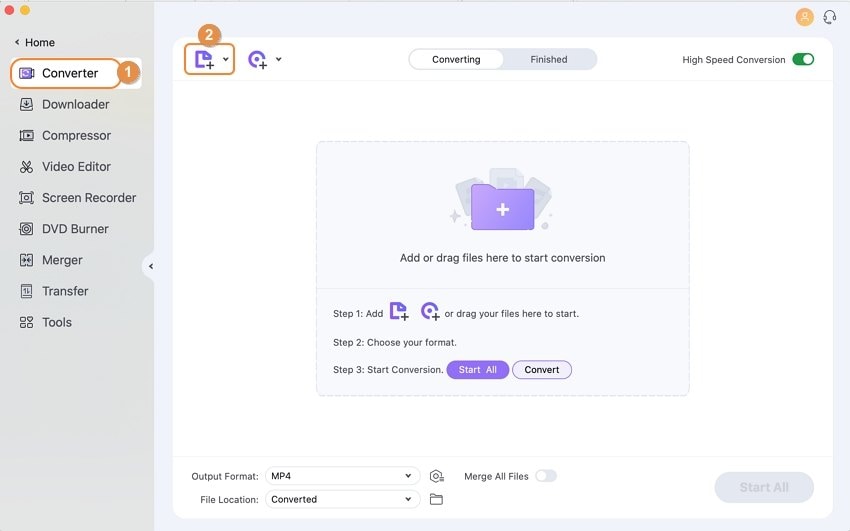
Step 2 Click Crop and Rotate the Clip.
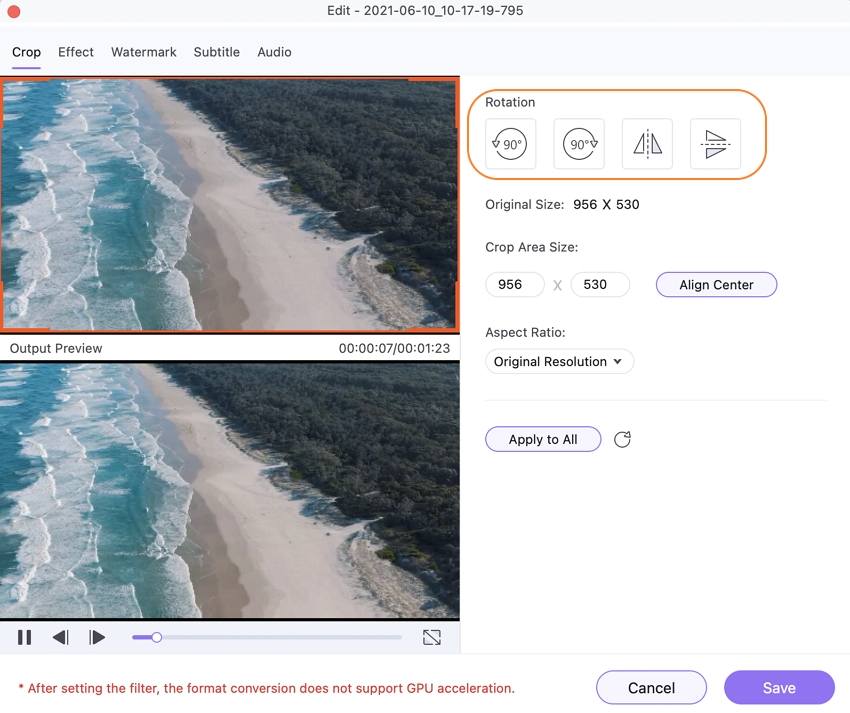
After the source footage is imported, click the Crop icon present below the thumbnail in the left, ensure that the Crop tab is selected from the top of the box that opens up next, and click your preferred angle from the Rotation section in the right pane. Optionally, you can define your preferred values in the Crop Area Size fields (left to default for this example), choose your preferred aspect ratio from the Aspect Ratio drop-down list (left to default for this example), and click OK from the bottom.
Step 3 Define Output Folder and Convert the Video.
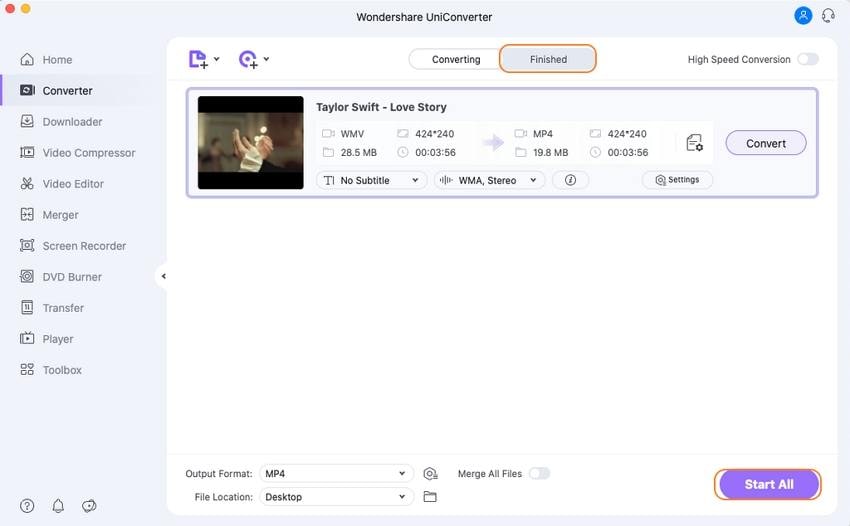
Once you are back on the main window, choose a destination folder from the Output field at the bottom to save the modified video, and click the Start All to create a new clip with the new settings.
Alternate Step: Select a Device-Specific Preset
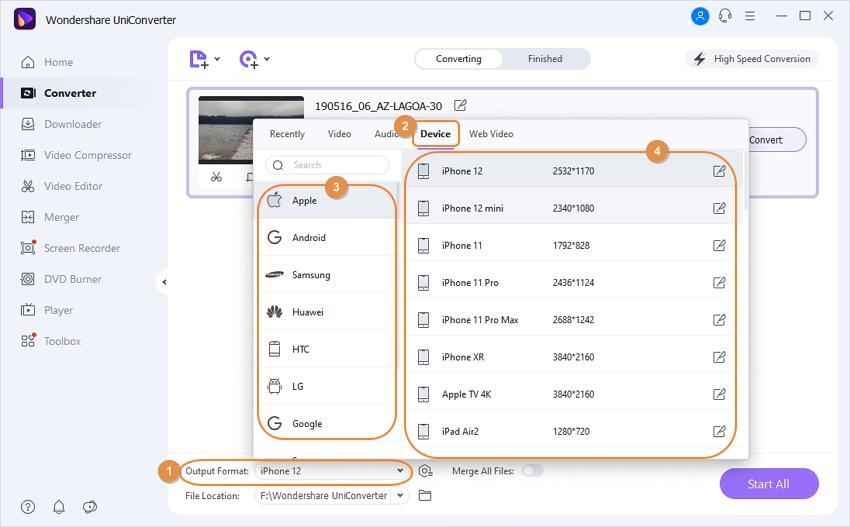
Alternatively, after importing the raw footage to UniConverter, you can go to the Output Format: the menu from the top-right corner of the interface, go to the Device tab from the top of the menu, select your preferred vendor from the left pane (Apple for this demonstration), select the target device you intend to play the video on from the right (iPhone Xs, Xs Max for this demonstration), and click the Start All once on the main window to export the video with the new display dimensions.
Conclusion
So now you know how to rotate the video in Final Cut Pro X, and as you may have noticed, despite being a bit tricky, the process is extremely simple. However, as mentioned earlier, if you have a Windows PC, or even if you own a Mac but don’t want to invest in FCPX because of a limited budget or don’t find the program worth putting your money in, you can always rely on Wondershare UniConverter as an alternate tool that is as efficient as Final Cut Pro, but is comparatively cheaper, and is available for both Windows and Mac platforms.


 Convert Video on Mac >
 Compress Video on Mac >
 Record Video on Mac >


Christine Smith
chief Editor