Are you wondering which is better Avid Media Composer or Final Cut Pro? In this article, I will give you a complete comparison between the two of them. There will be the basic information, function, and performance comparison and I will also give a more affordable alternative tool for Avid and Final Cut Pro.
Part 1: Basic Information of Final Cut Pro and Avid
Final Cut Pro and Avid Media Composer are two of the most popular video editing software programs on the market. Both programs are good and have their unique strengths and weaknesses. So which one is the right choice for you?
There are a few factors that can help you decide, such as budget, device compatibility, level of expertise, learning curve, and more. In this part, I will inform you about their basic information to give you better ideas.
Avid Media Composer
Avid Media Pro is software that offers you to create, manage and edit your video. It is a 64-bit non-linear editing system that offers you to work with no transcoding with most file formats and resolutions.
Features of Avid Media Pro:
- Virtual reality editing features, including advanced color tools, HDR projects editing, Multicam processing, convenient timeline, and collaborative support
- Allows you to record many video clips at once
- Trim and split long clips
- Preview recorded footage in real-time
- Making complex transitions
- Several customizations and shortcuts for the editors
Final Cut Pro
On the other hand, Final Cut Pro is a multifunctional software for video editing and recording. Since Final Cut is created on state-of-the-art architecture for computing, there are powerful tools that let you create unique and impressive videos.
The software highly utilizes the power of the most recent graphics processors and CPUs running on Mac computers. As a result, video editing becomes smooth and quick.
Features of Final Cut Pro:
- Non-destructive editing process
- Color coding tools
- 2D and 3D titles
- Green-screen effects
- Creative transitions
For a detailed basic information comparison, you can see the table below:
| Software/Features | Final Cut Pro | Avid Media Composer |
| Released on | June 21, 2011 (initial release) August 9, 2022 (stable release) |
1989 (initial release) September 30, 2021 (stable release) |
| Available device | macOS 11.5.1 or later | Windows, macOS |
| Best for | Youtuber Film editor Professional video makers |
Youtuber Content maker |
| Price | $299.99 (One-time Purchase) | $34.99 per month (Monthly Subscription), $23.99 per month (1-Year Subscription), $239.00 (1-Year Subscription, Paid Upfront) |
| Grading | Advanced | Fast |
| Language supported | Spanish, French, German, and English | Spanish, French, German, and English |
| Ease of use | Advanced | Advanced |
Part 2: Function and Performance Comparison of Final Cut Pro and Avid
Besides the basic information, I am sure you will agree that what the users see in using any video editing software are its function and performance. Now, I will give you a detailed comparison related to function and performance between Final Cut Pro and Avid Media Composer.
You can see the detailed general function and performance in the table below:
| Features | Final Cut Pro | Avid Media Composer |
| Installed application size | 3.8 GB | 16 GB |
| Minimum RAM | 4 GB | 32 GB |
| Export to Mobile Devices, | Yes | Yes |
| Automatic Audio and Video Sync | Yes | No |
| Automatic Content Analyzer | Yes | No |
| Cloud Functionality | No | Yes |
As you can see, Final Cut Pro wins on most of the features like the size, minimum RAM, automatic audio and video sync, and automatic content analyzer. However, Final Cut Pro doesn't have a cloud functionality feature. The render files are stored in your local folder.
Besides the main performance above, I will also give you a more detailed function and performance comparison below:
1. Video Edit
There are new great features from Final Cut Pro which are "Object Tracker" and "Cinematic Mode. "Object Tracker allows you to drag effects, titles, or generators into the viewer to detect, track, and match the movement of faces or objects using machine learning. For the Cinematic Mode, you can edit videos recorded on iPhone 13 in Cinematic mode (requires macOS Monterey) and use Cinematic controls in the inspector to modify it.
Meanwhile, Avid Media Composer has some new features added including the Bin Map. When you have activated it, Bin Map will give you a bird's eye view of the entire content of your bin with a highlight of which part of the bin the panel is currently on.
2. Video Effects
Final Cut Pro provides users to adjust audio and add audio effects, but to be honest, Final Cut Pro still lacks key features of advanced audio editing tools if you need to edit audio up to a professional standard.
Avid Media Composer offers visual effects that you can use to polish your project to perfection. It features Multicam editing and audio ducking, where you can shop with many visual effects and transitions. Besides, it can ship with many speed controls, color correction, color templates, and title tools. The audio module also enables you to add, record, edit, and mix audio.
3. Color calibration
Final Cut Pro provides advanced color grading for you. For instance, it will help you to make the right decision analytically and rationally. If you access video scopes, a range of analytical data including waveforms, RGB Parade, and vectorscope can tell you where the safe line is.
Avid Media Composer has full-color grading options within its software with primary, secondary, and ColorMatch options. Furthermore, in the updated DNxUncompressed format, it is used for import, transcode, mixdown, and render. It also enables you to work with camera originals and apply and render color corrections and VFX while you are maintaining the full bit depth of the media.
4. Audio editing
Final Cut Pro provides you to make audio adjustments and edits to whole clips. At this rate, you can apply audio adjustments and effects to the entire clip, including any audio channels within the clip.
Avid Media Composer is best suitable for an editor who is working on VFX-heavy feature films and television shows. Now, video editors can make up to 99 audio tracks in a sequence that offers you additional room to work with sound and keyed elements.
5. User Interface customization
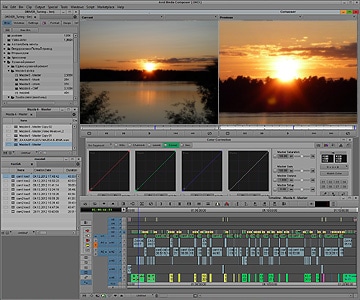
Final Cut Pro's interface is consistently in dark gray which will make the content you're editing the most prominent thing on the screen. Four preset window layouts in Final Cut include Default, Color & Effects, Organize, and Dual Displays. You can also create your custom workspace layouts.
For Avid Media Composer, there are also task-specific workspaces on the right-hand side. It makes editors not restrict themselves to just a single configuration. In other words, you can use the one that works best for the job at hand instead, whether it's editing, color correction, applying effects, or working with audio.
6. Subtitle
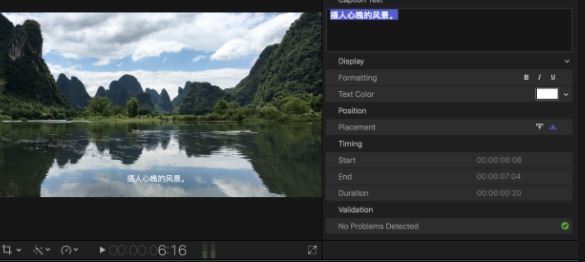
Final Cut Pro has two ways to create subtitles and captions for your footage. The first one is to make them from scratch and the other one is to import an SRT file.
For Avid, the available files on Avid are Spruce Subtitle File (.STL) and Avid DS Subtitle File (.TXT). You can add subtitles for multiple languages like you add regular captions.
7. Video and audio plugin support
You can easily import third-party plugins to Final Cut Pro's library. Some of them are Videohive, Motonvfx, Filmora, and Pixel Film Studios. However, you have to take note that sometimes built-in audio and video effects or third-party plugins may fail to bring the footage to a professional level.
For Avid, you can now apply hundreds of real-time audio effects with support for Real-Time AudioSuite audio plug-ins. Although Media Composer used to be a bit lacking in the audio-sweetening arena, the Real-Time AudioSuite (RTAS) plugins were developed for their Pro Tools program and provide your needs to create and record music at home.
Part 3: A cost-effective alternative tool for Final Cut Pro and Avid
After you know the detailed comparison between Final Cut Pro and Avid Media Composer, you may notice that there are various limitations when you use the two of them. For instance, they can be difficult to operate for those who are not familiar with video editing tools and they are expensive to begin with.
However, you don't have to worry. I will recommend you Wondershare UniConverter as an easy and affordable alternative. UniConverter works on both Windows and Mac systems, and it also supports 1000+ video and audio formats for conversion and editing.
Here are just a few of the features that make UniConverter stand out from the rest:
- Video Downloader
You can download videos from YouTube, Vimeo, Dailymotion, and other popular video sites in various formats.
- Screen Recorder
UniConverter Screen Recorder lets you record your screen activity in high quality. This tool can capture your screen in HD and save it as a video file.
- Toolbox
The UniConverter Toolbox includes an Image Converter, GIF Maker, File Transfer to iOS and Android, CD Converter, and Video to VR Converter that allows you to convert files between different formats.
- Watermark Editor
Watermarks in videos can be annoying and ruin the look of your video. However, UniConverter's Watermark Editor has a watermark remover tool that can easily remove any watermarks from your videos.
- AI Lab
UniConverter AI Lab is powerful to help you with all sorts of tasks. The AI Lab includes Voice Changer, Vocal Remover, Noise Remover, Remove Watermark 2.0, Background Remover, AI Portrait, etc.
How to use UniConverter Video Editor on Windows
Step 1
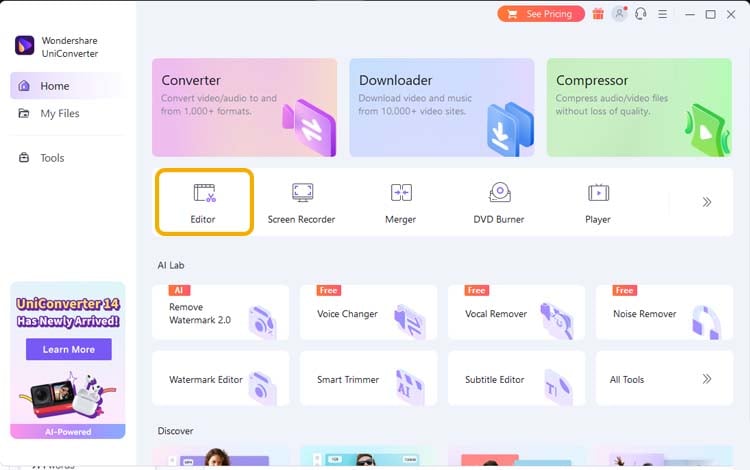
Launch UniConverter on your PC and click Editor in the Home menu.
Step 2
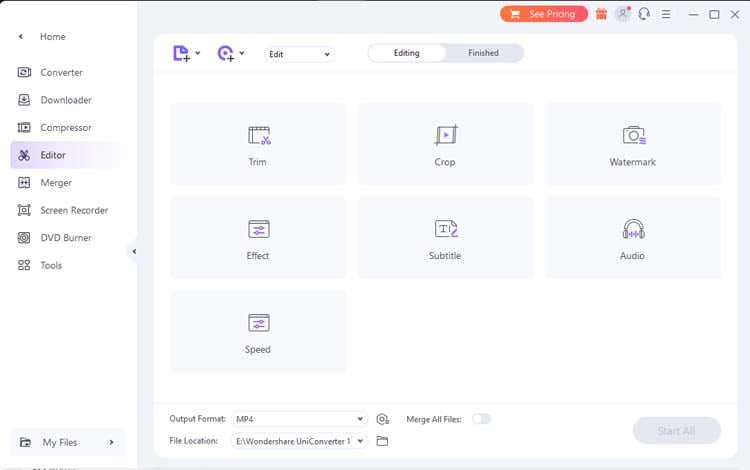
You will see different tools to edit your video, including Trim, Crop, Watermark, Effect, Subtitle, Audio, and Speed. Choose which tool you want to use to edit your video.
- Trim your video on UniConverter
Step 1
Click the Trim tool and import the video you want to edit.
Step 2
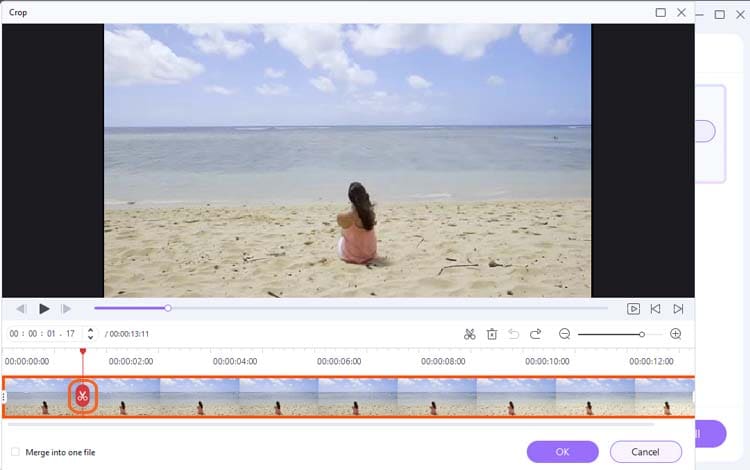
Move your mouse on the time slider and click the scissor button to divide the clip.
Step 3
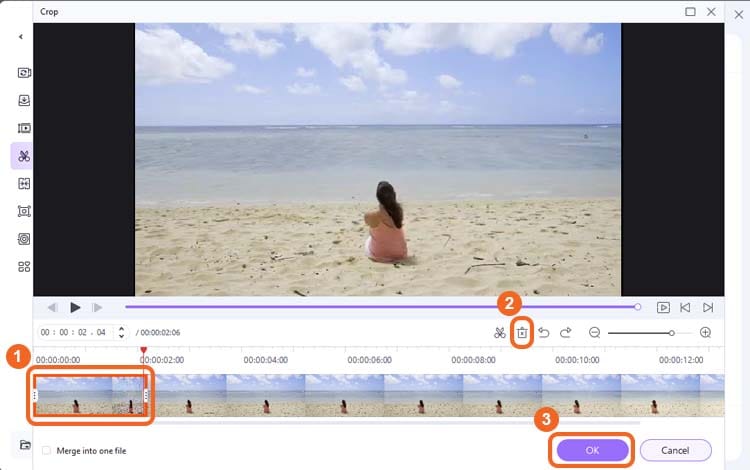
Select the part you want to delete, then click the delete button and OK once you are done.
Step 4
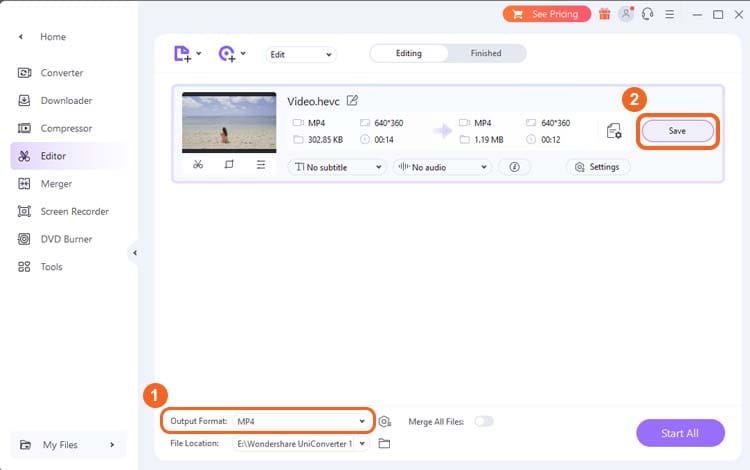
In the main interface, change the output format before saving. Now, click the Save button so you can save the trimmed video to your local computer.
- Crop your video on UniConverter
Step 1
Click the Crop tool and import the video file you want to edit.
Step 2
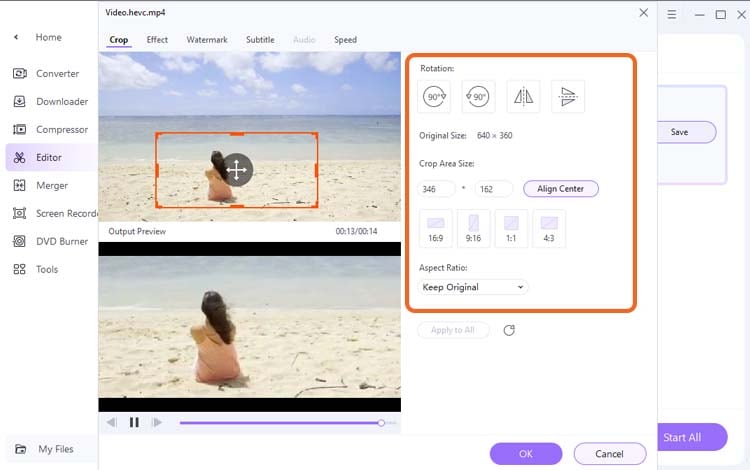
In the "Crop" window, you can drag the dashed line around the video preview to select the part of the video you want to keep. You can also adjust the "Left," "Right," "Top," and "Bottom" values to achieve the same goal.

Additionally, you can change the rotation and crop area size, as well as use different size presets. Once you're happy with the selection, click OK to confirm.
Step 3
The cropped video will now appear in the main interface. Change the output format, then click Save to save the video to your computer.
- Adding Watermark
Step 1
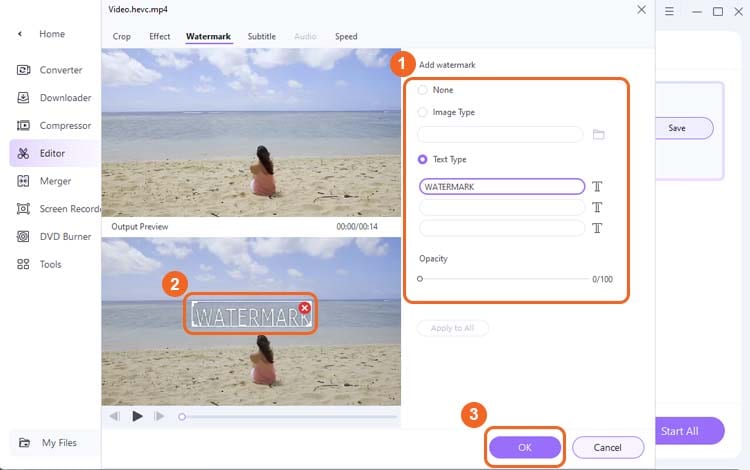
Click the Watermark tool and import the video you want to edit.
Step 2
Now, add a watermark to your videos. You can upload a watermark as an image or type text on it. Then, customize the size and opacity of the watermark. Move the watermark to your desired place and click OK.
Step 3
You will be directed to the main interface. Now, change the output format and click Save to save the video to your folder.
- Adding Effects
Step 1
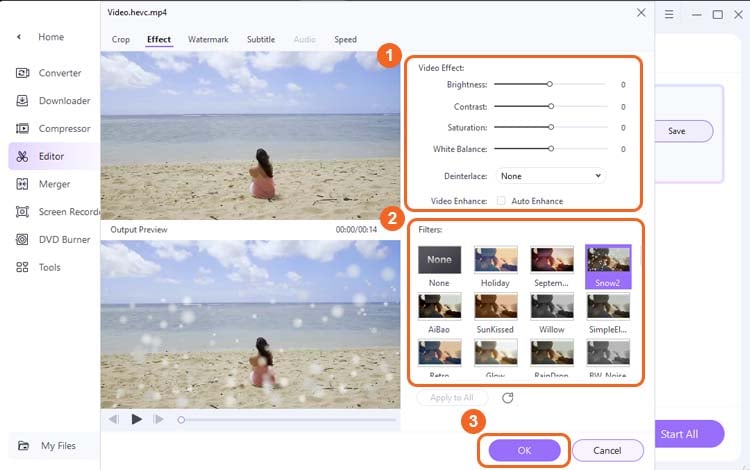
Click the Effect tool and import the video you want to edit.
Step 2
You can change the brightness, contrast, saturation, etc., or apply available filter options to your video. Once done, click OK.
Step 3
Save your edited video in your desired format.
- Adding Subtitles
Step 1
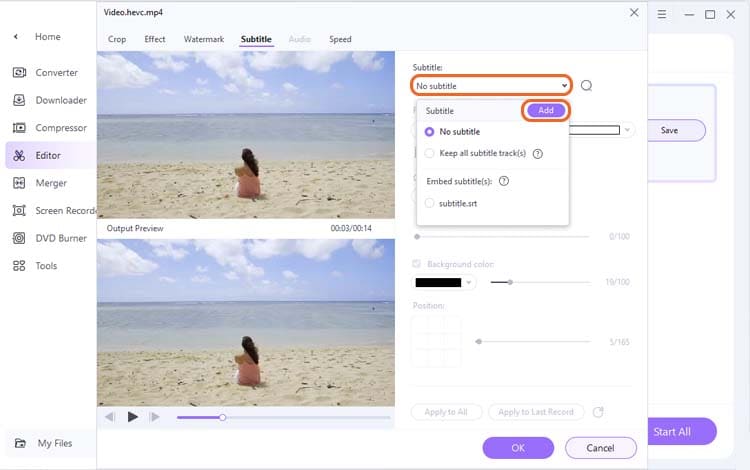
Open the Subtitles tool and import the video you want to edit.
Step 2
Click Add from the Subtitle drop-down list to add your subtitles file (.srt).
Step 3
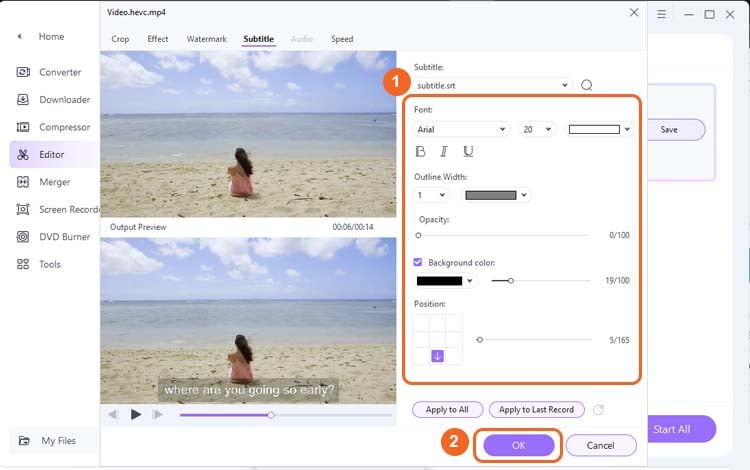
You can adjust the subtitle settings, such as font, opacity, background color, or position, then click OK.
Step 4
Save your edited video to the local folder after setting it to your desired output format.
Bottom line
Now you know the detailed basic information and function and performance comparison between Final Cut Pro and Avid. You may notice that there are some advantages and disadvantages to the two of them, and you can choose based on your needs. But if you need an alternative that is cheaper and offers more features, I recommend you to use UniConverter.


Christine Smith
chief Editor