FCP
- TRY IT FREE TRY IT FREE
- 1. Convert Videos to FCP+
- 2. Tips for FCP+
-
- 2.1 FCP iPad Alternatives
- 2.2 Export FCP Videos
- 2.3 FCP vs Sony Vegas
- 2.4 final cut pro alternative
- 2.5 final cut pro android
- 2.6 apple video editing
- 2.7 final cut pro free
- 2.8 final cut pro apk
- 2.9 final cut pro review
- 2.10 final cut pro rotate video
- 2.11 Adobe Premiere vs Final Cut Pro
- 2.12 how to split clip in final cut pro
- 2.13 imovie vs final cut pro
- 2.14 prores codec for windows
- 2.15 prores 4k
- 2.16 prores mp4
- 2.17 imovie prores
- 2.18 quicktime prores
- 2.19 premiere prores
- 2.20 prores
- 2.21 final cut express
Full Review on iMovie VS. Final Cut Pro in 2026
by Christine Smith • 2026-01-21 18:55:17 • Proven solutions
If you own a Mac PC or any of the iOS or iPadOS devices, this iMovie vs Final Cut Pro comparison would be of great help while deciding which video editor you should go for as per your requirements. After reading this, you will have clear understanding of the two editing tools. In addition to this, you will also learn about another equally efficient program that is worth giving a try if you are a beginner and want to understand the basics, and/or you don’t have access to any of the Apple devices and use a Windows computer instead.
- Part 1. Best Alternative to iMovie and Final Cut Pro for Beginners
- Part 2. Comparison Table Between iMovie VS. Final Cut Pro
- Part 3. What are the Key Differences Between iMovie VS. Final Cut Pro
Part 1. Best Alternative to iMovie and Final Cut Pro for Beginners
Although both iMovie and Final Cut Pro X are good video editing tools for Apple users where iMovie is even free to use, none of the two offers a simple UI, and neither is any of them available for a platform other than iOS, iPadOS, and macOS. Therefore, if you are new to post-production field and want to understand the basics, you need a program that not only has an easy-to-use interface, it is also cheap, and can do many relevant things without having you to invest in any other application. One such program that meets all the above conditions is UniConverter by Wondershare. Wondershare UniConverter (originally Wondershare Video Converter Ultimate) offers user-friendly UI, is inexpensive, has several built-in programs like video editor, video compressor, screen recorder, VR converter, etc., and is available for both Mac and Windows platforms.
 Wondershare UniConverter - Best Video Editor and Converter

- Edit video files with trimming, cutting, adding subtitles, applying effects, and more.
- Convert videos to Final Cut Pro compatible formats easily and quickly on Mac/Windows.
- Support 1000+ video formats including MP4, MOV, WMV, AVI, MKV, and customized output settings.
- 90X faster conversion speed than any conventional converters.
- Burn video to playable DVD with attractive free DVD template.
- Download or record videos from 10,000+ video sharing sites.
- Versatile toolbox combines fix video metadata, GIF maker, cast video to TV, video compressor, and screen recorder.
- Stream your videos from Windows or Mac to other devices, including Chromecast, Roku, Apple TV, Xbox 360 or PS3.
- Supported OS: macOS 11 Big Sur, 10.15 (Catalina), 10.14, 10.13, 10.12, 10.11, 10.10, 10.9, 10.8, 10.7, 10.6, Windows 10/8/7/XP/Vista.
Editing videos in Wondershare UniConverter is extremely easy as compared to iMovie or Final Cut. The instructions given below explain how things can be done using UniConverter on a Windows computer:
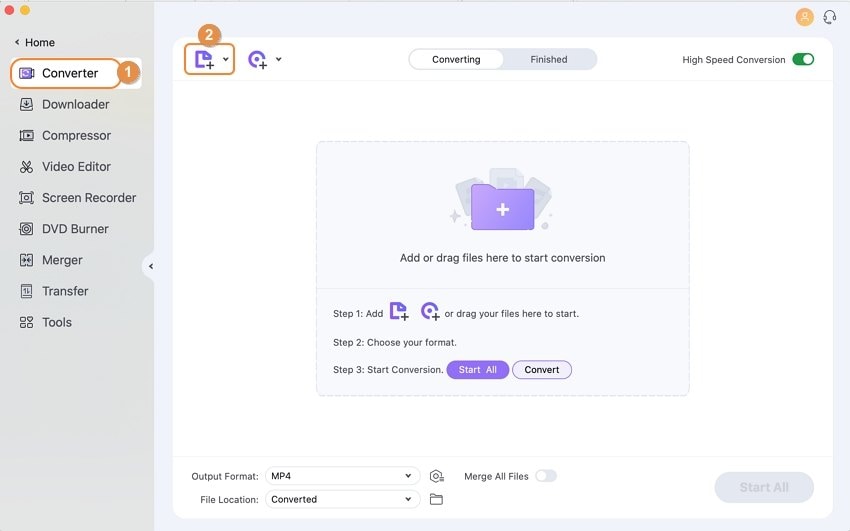
Step 1 Launch Wondershare UniConverter and Import a Footage.
Launch Wondershare UniConverter on your Mac or Windows computer, ensure that the Converter tile is selected from the top, and click the ![]() icon from the center of the window. Use the Open box that appears next to select a video you want to edit, and click Open to import the footage.
icon from the center of the window. Use the Open box that appears next to select a video you want to edit, and click Open to import the footage.

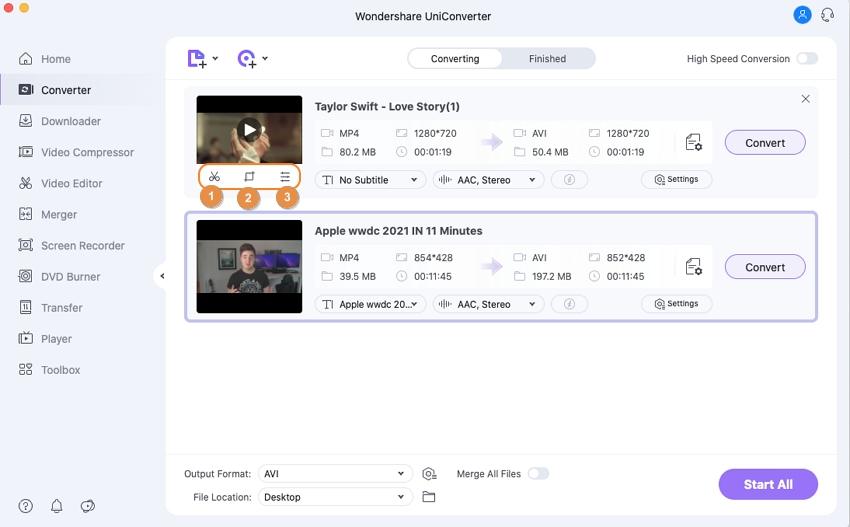
Step 2 Click Scissors and Edit the Video.
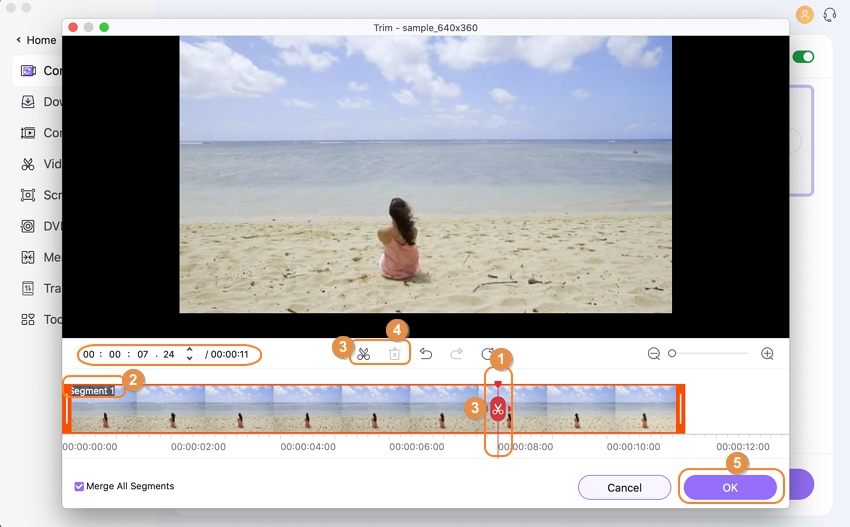
Click the Scissors (Trim) icon present under the thumbnail of the imported video. When the editor window opens up, place the Playhead (called ‘Skimmer’ in Final Cut Pro X) in the Timeline you want to trim the clip from, and click Cut. Next, select the unwanted section, and click Delete. If needed, repeat the process for the other side of the footage to get rid of the end section as well, and click OK to save the changes.


Step 3 Click Crop and Add More Effects.
Click the Crop icon present next to that of Trim to open the Crop/Effect box. Use the tabs given at the top to access their relevant options, and make the necessary modifications to crop or rotate the video, add watermarks, subtitles, and audio as required. Click OK from the bottom when you are done.

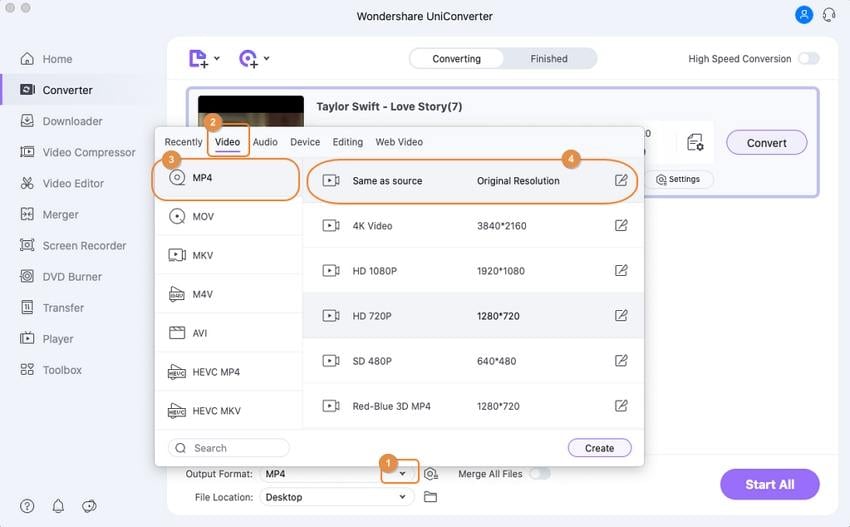
Step 4 Choose a Format and Export the Video.
Open the Output Format: menu from the top-right of the main window, use the tabs at the top of the menu to locate and select your preferred format and resolution (MP4 with the Same as source resolution for this tutorial), define a destination folder in the Output field at the bottom, and click the Start All to begin rendering and export the video.

Part 2. Comparison Table Between iMovie VS. Final Cut Pro
In case you are still interested in learning more about iMovie and Final Cut Pro and want to choose any one among the two, the iMovie vs Final Cut Pro table given in this section highlights the key differences between both the programs. This would help you decide which application should you go for depending on your level of expertise in video editing. Other factors that may influence your decision to pick one software over the other would be the target audience you wish to prepare the videos for, the amount of funds you want to invest in a tool, and the device(s) you intend to use the app on.
| Particulars | iMovie | Final Cut Pro X |
|---|---|---|
| Features | Multiple Projects Support, Built-in Backdrops and Themes, Clip Stabilization | Motion Graphic Templates, Virtual Reality (VR) Support, HDR Support for Videos |
| Price | Free | USD299.99 |
| Pricing Model | Not Applicable | Onetime Payment |
| Pros | Simple UI, Does Not Require Prior Training, Has Built-in Social Media Sharing Options | Smooth Working, Has Advanced Features, Gives Industry-Standard Output |
| Cons | Lack Advanced Features and Tools, Doesn’t Allow Professional Editing, Changes Permanently Saved on Original Files | Has Steep Learning Curve, Doesn’t Have Built-in Sharing Options, No Automatic Updates Available |
| Platforms | iOS, iPadOS, Mac | Mac |
Part 3. What are the Key Differences Between iMovie VS. Final Cut Pro
In addition to the table given above explaining iMovie vs Final Cut Pro, another difference between iMovie and Final Cut Pro, or say, other key differences between the two applications are discussed below:

iMovie vs Final Cut Pro: General Information
While iMovie is a free application designed for novice users or the beginners in post-production field, Final Cut Pro X is a full-fledged video editing program used by highly skilled professional editors in commercial projects.
iMovie vs Final Cut Pro: Learning and Using
Learning iMovie is easy because of its simple UI that is developed keeping the Home users or amateurs in mind. On the other hand, Final Cut Pro X requires moderate amount of knowledge in the field of video editing. The latter also recommends that the users should have good understanding of technical terms like framerate, pixels, resolution, etc. in order to work on Final Cut Pro X effectively.
iMovie vs Final Cut Pro: Rendering Efficiency
Since iMovie mostly uses built-in templates and presets to produce final outputs, rendering videos consume less amount of processing power and GPU. Whereas Final Cut Pro, unlike iMovie, allows users to add custom effects, filters, and other transitions, and therefore it uses the GPU to its full, thus increasing the render duration. Nevertheless, rendering in Final Cut Pro is significantly quicker when compared to other non-Apple professional video editing applications available in the market.
iMovie vs Final Cut Pro: Sharing
Because iMovie is good at editing and exporting videos for domestic uses, it has built-in options to share the outputs to social media websites. This is something that Final Cut Pro lacks in. Because of being a tool that is expected to produce commercial projects, sharing the Final Cut Pro X’s outputs to social networking sites for free isn’t ethically correct.
Conclusion
Although discussing about difference between iMovie and Final Cut Pro would be injustice to both the editing tools, you may want to choose iMovie or Final Cut Pro X if you intend to produce videos for your personal use or commercial gains respectively. However, if you don’t have access to iOS, iPadOS, or macOS device(s), you can always and by all means skip the iMovie vs Final Cut Pro part, and choose Wondershare UniConverter instead that is more equipped, simple, and can be installed on either a Windows or Mac PC.


Christine Smith
chief Editor