FCP
- TRY IT FREE TRY IT FREE
- 1. Convert Videos to FCP+
- 2. Tips for FCP+
-
- 2.1 FCP iPad Alternatives
- 2.2 Export FCP Videos
- 2.3 FCP vs Sony Vegas
- 2.4 final cut pro alternative
- 2.5 final cut pro android
- 2.6 apple video editing
- 2.7 final cut pro free
- 2.8 final cut pro apk
- 2.9 final cut pro review
- 2.10 final cut pro rotate video
- 2.11 Adobe Premiere vs Final Cut Pro
- 2.12 how to split clip in final cut pro
- 2.13 imovie vs final cut pro
- 2.14 prores codec for windows
- 2.15 prores 4k
- 2.16 prores mp4
- 2.17 imovie prores
- 2.18 quicktime prores
- 2.19 premiere prores
- 2.20 prores
- 2.21 final cut express
How to Split Clips in Final Cut Pro Easily
by Christine Smith • 2026-01-21 18:55:17 • Proven solutions
If you are new to video editing, or even to FCPX, you would surely want to learn how to split clip in Final Cut Pro in order to come up with a fine-tuned output to share with your friends or to send to your clients. That said, if you have raw footage captured with any of the recording devices, here you will learn a couple of processes of how to split in Final Cut Pro. In addition to this, you will also learn about one of the best alternatives to Final Cut Pro X if you don’t have a Mac computer, or don’t want to buy such an expensive program, especially during the initial phase of your career.
- Part 1. How to Split Clips in Final Cut Pro
- Part 2. How to Split Clips in Final Cut Pro Alternative Program
- Part 3. How to Split All Clips at One Time in Final Cut Pro
- Part 4. How to Split Selected Clips Together in Final Cut Pro
Part 1. How to Split Clips in Final Cut Pro
After you have imported a raw footage to FCP, the clip can be split into multiple parts, and each part can then be treated as an individual clip to make further modifications like adding effects, applying motion graphics, and even getting rid of the section(s) that you don’t need in the final output.
Talking about splitting, Final Cut Pro has a Blade tool that helps you cut the footages as needed. You can follow the step-by-step instructions given below to learn how to split clip in Final Cut Pro:
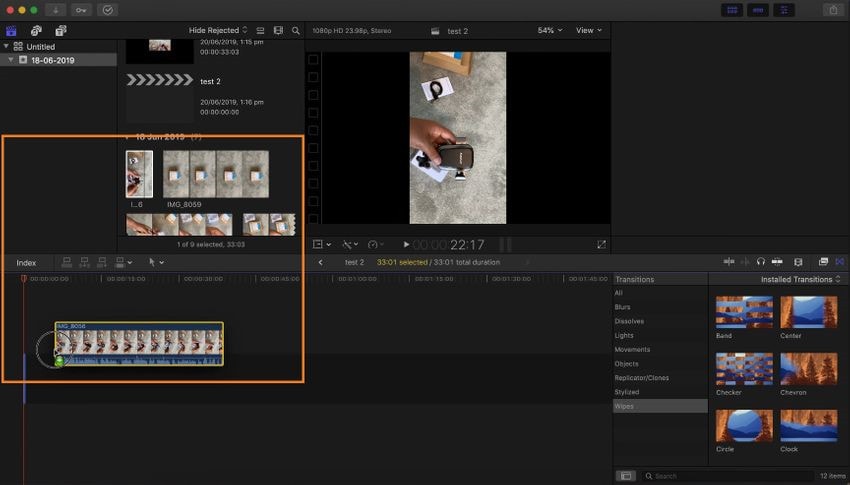
Step 1: Drag the Footage to Timeline.
Launch Final Cut Pro X, import the raw footage from your Mac to the Library, and drag it from the Library to the Timeline. Make the required changes in the Preferences box that appears next, and click OK.
Step 2: Select the Blade Tool.
Click to open the Selection menu from the Toolbar above the Timeline, and click Blade (or press B) to select the Blade tool.
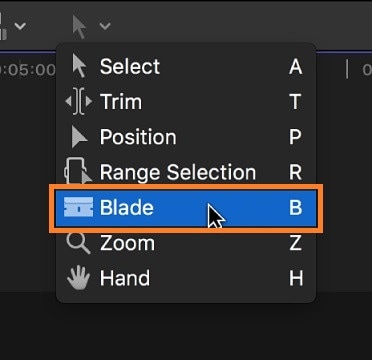
Step 3: Click to Split.
Click the clip in the Timeline from where you want to split the footage. Notice that you can now select the separated sections of the video individually. Note: You must press A on the keyboard to select the Selection tool.
More Info: Introduction to Frequently Used Terms, Effects, and Features
Split a Video: The terms ‘video’ and ‘clip’ are generally used interchangeably in context with Final Cut Pro X, or with any other video editing tool for that matter.
Split Screen: Split Screen is an effect in Final Cut Pro X that lets you place two or more clips or sections of a fragmented clip side-by-side or vertically so both of them can be viewed simultaneously (in one frame) post exporting. A good example of Split Screen could be a movie scene where two or more people are getting dressed up at their home to prepare for a fight, and both of them are visible next to each other in the frame.
Split Audio: Split Audio is a process in Final Cut Pro X that can be used when you want to separate audio from a video clip. This is usually done to remove a noisy sound from a footage, and add a clean one instead.
Part 2. How to Split Clips in Final Cut Pro Alternative Program
Splitting a clip is one of the basic functions that almost every video editor has. Therefore, Final Cut Pro doesn’t, and couldn’t enjoy the monopoly, at least in this area. One of the best and most recommended alternatives to FCPX to split footage is Wondershare UniConverter (originally Wondershare Video Converter Ultimate). Apart from being a media conversion tool, the program also has a built-in video editor that allows you to trim, crop, apply effects, place watermarks, and add subtitles to the videos before exporting them for distribution or broadcasting.
 Wondershare UniConverter - Best Video Toolbox

- Split clips with simple clicks easily on Windows and Mac.
- Edit video files with trimming, cutting, adding subtitles, applying effects, and more.
- Convert videos to Final Cut Pro compatible formats easily and quickly on Mac/Windows.
- Support 1000+ video formats including MP4, MOV, WMV, AVI, MKV, and customized output settings.
- 90X faster conversion speed than any conventional converters.
- Burn video to playable DVD with attractive free DVD template.
- Download or record videos from 10,000+ video sharing sites.
- Versatile toolbox combines fix video metadata, GIF maker, CD burner, video compressor, and screen recorder.
- Stream your videos from Windows or Mac to other devices, including Chromecast, Roku, Apple TV, Xbox 360 or PS3.
- Supported OS: macOS 11 Big Sur, 10.15 (Catalina), 10.14, 10.13, 10.12, 10.11, 10.10, 10.9, 10.8, 10.7, 10.6, Windows 10/8/7/XP/Vista.
The step-by-step instructions given below explain how you can use Wondershare UniConverter to split a video:
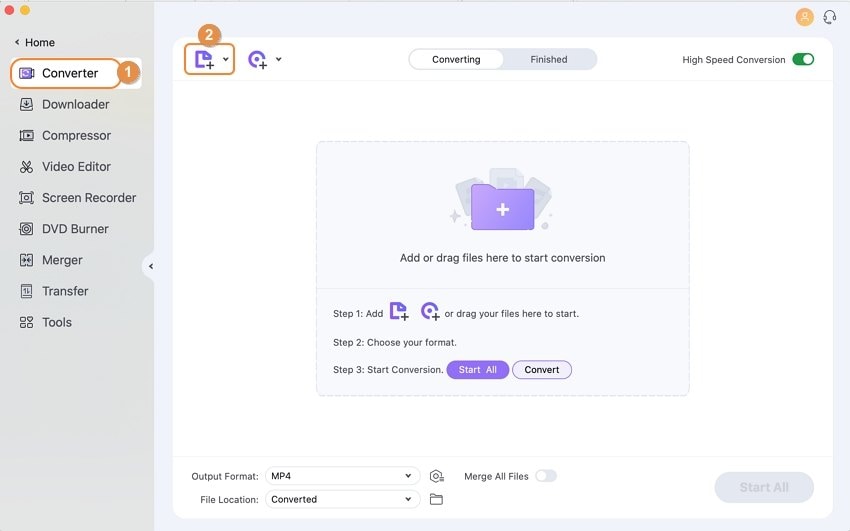
Step 1 Import a Clip by Clicking Add Files.
Click the ![]() icon available at the center of the Converter window of Wondershare UniConverter, using the Open box, select the footage you want to split, and click Open.
icon available at the center of the Converter window of Wondershare UniConverter, using the Open box, select the footage you want to split, and click Open.
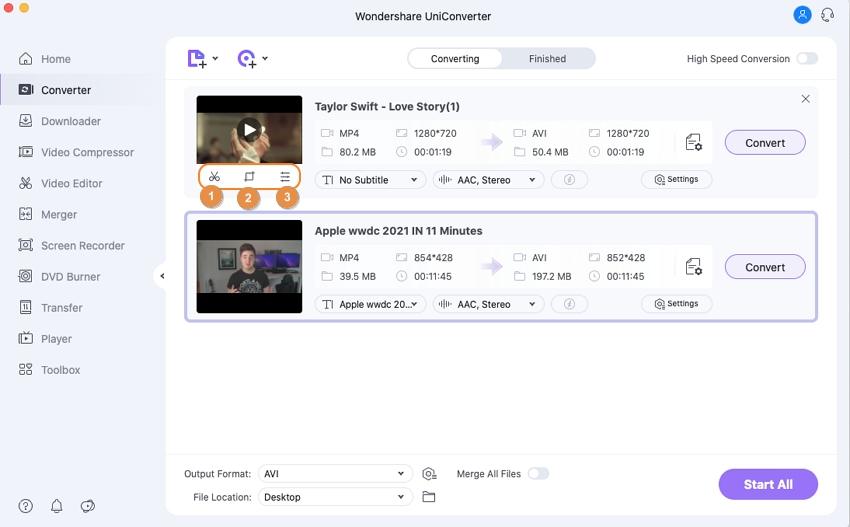
Step 2 Click Scissors and Split the Clip.
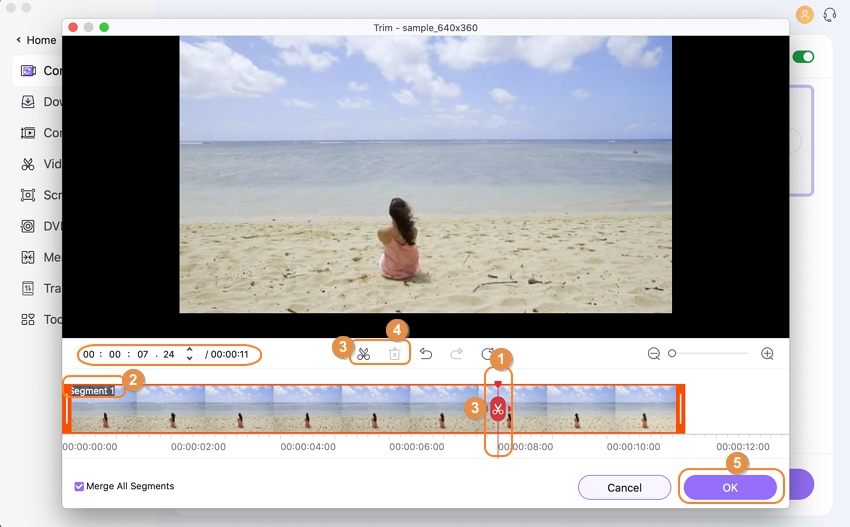
Click the Trim icon (Scissors symbol) from below the imported footage’s thumbnail. On the editing window that opens up, place the playhead bar on the Timeline from where you want to split the video, click Cut from the upper section of the Timeline. Next, select the unwanted clip you split from the footage, and click Delete from next to the Cut button. Click OK from the bottom of the box to save the modifications.
Step 3 Select an Output Format and Click Convert.
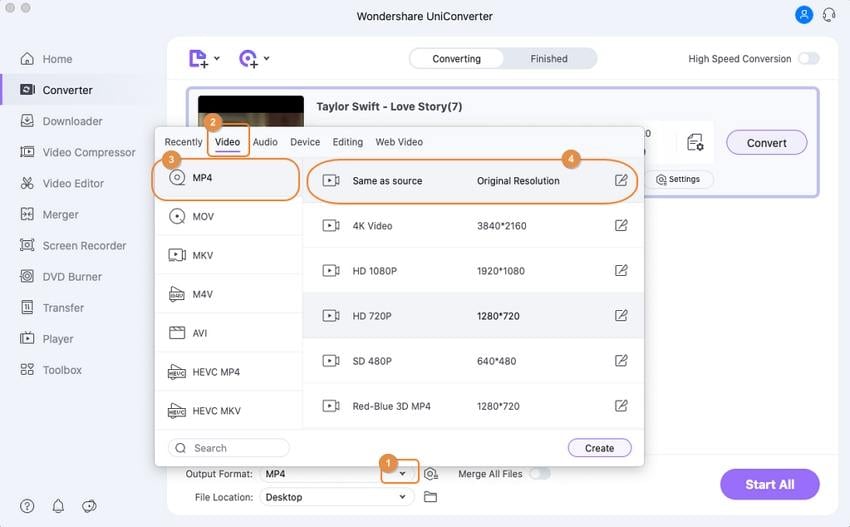
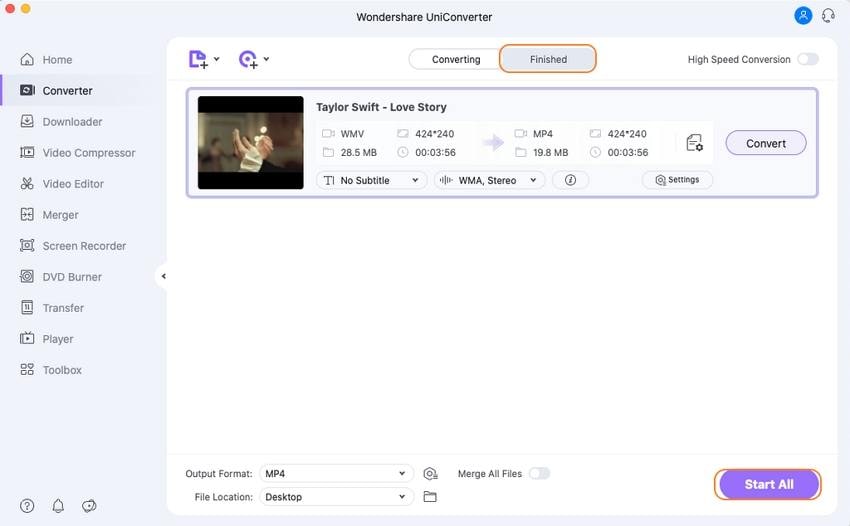
Once you are on the main window, click the Output Format: menu from the top-right, choose your preferred output format (MP4 and Same as source resolution for the example used here), in the Output field at the bottom, select a target folder, and click the Start All to render and export the video to the destination folder.
Part 3. How to Split All Clips at One Time in Final Cut Pro
If you have multiple videos and want to fragment them all in one go, you can follow the steps given below to learn how to split in Final Cut Pro X:
Step 1: Arrange the Clips.
Unlock all the clips if they’re locked, and position each footage layer in the Timeline in a way that the frame of all the layers you want to cut is placed at a single instance (one above the other).
Step 2: Position the Skimmer.
Place the Timeline Playhead (formally known as a ‘Skimmer’) on the position you want to split all the footages from.
Step 3: Split All Layers at Once.
Open the Trim menu from the top, and click Blade All to split all the video layers at once. Alternatively, you can press the shift + command + B keys together on the keyboard to get the task done.
Part 4. How to Split Selected Clips Together in Final Cut Pro
This process is slightly different from that explained in Part 4. You can follow the steps given below to learn how to split clip in Final Cut Pro if there are multiple footages in the Timeline that need to be fragmented instead of all:
Step 1: Arrange All the Participating Clips.
Make sure that none of the participating clips is locked; use the method discussed above, i.e., in Step 1 of Part 3, to arrange all the layers in the Timeline accordingly.
Step 2: Position the Skimmer Correctly.
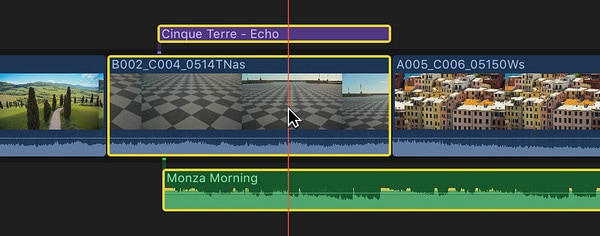
Place the Skimmer on the Timeline, where the frame of each of the participating clips is positioned one above the other.
Step 3: Select the Clips and Split.
Use command + left-click to select the clips you want to split at once, and press command + B on the keyboard to split all the selected layers at once.
Conclusion
As you might have noticed, learning how to split clip in Final Cut Pro is simple and straightforward. However, if you don’t have a Mac computer or are not willing to invest a huge amount in a video editing program, Wondershare UniConverter is an alternative tool you would definitely love to use.


Christine Smith
chief Editor