FCP
- TRY IT FREE TRY IT FREE
- 1. Convert Videos to FCP+
- 2. Tips for FCP+
-
- 2.1 FCP iPad Alternatives
- 2.2 Export FCP Videos
- 2.3 FCP vs Sony Vegas
- 2.4 final cut pro alternative
- 2.5 final cut pro android
- 2.6 apple video editing
- 2.7 final cut pro free
- 2.8 final cut pro apk
- 2.9 final cut pro review
- 2.10 final cut pro rotate video
- 2.11 Adobe Premiere vs Final Cut Pro
- 2.12 how to split clip in final cut pro
- 2.13 imovie vs final cut pro
- 2.14 prores codec for windows
- 2.15 prores 4k
- 2.16 prores mp4
- 2.17 imovie prores
- 2.18 quicktime prores
- 2.19 premiere prores
- 2.20 prores
- 2.21 final cut express
Export ProRes on iMovie in Easy Steps
by Christine Smith • 2026-01-21 18:55:19 • Proven solutions
The reason to export to iMovie ProRes can be easily explained with a quick question, “Ever experienced extreme lagging while editing a video in the Mac version of iMovie?” You most likely have, and there is a cause behind it.
In Absence of ProRes
Almost all recording devices these days capture the footages in a format that uses a compression-oriented codec (e.g., , , etc.) to reduce the file size and put less overhead on the GPU and processor during the playback. However, when it comes to editing such recordings, the GPU needs to de-compress them, thus demanding more processing power. Because of this, the videos lag, not only in iMovie but in any post-product application, unless you have a PC with enormous specifications.
Most professionals transcode the videos to Apple ProRes iMovie can import and use while editing to overcome this.
How do ProRes help?
The answer is simple. Since ProRes is a container that stores the visuals in uncompressed form, the additional amount of GPU that was otherwise consumed while processing the files of any other format is now utilized to edit the footage, thus preventing the videos from lagging during the process.
Keeping all the above info in mind and the challenges you may face while editing a clip, this tutorial explains how to transcode footage to ProRes iMovie can use for post-production tasks. The guide also suggests another better alternative to export videos to Apple ProRes iMovie to import fine and professional-level editing.
- Part 1. How to Export ProRes on iMovie
- Part 2. How to Convert Any Video to ProRes with iMovie Alternative
Part 1. How to Export ProRes on iMovie
This section explains how you can transcode a video to iMovie ProRes. It is assumed that you have already created an iMovie project on your Mac, imported footage to it, and you are all set to export the recording to ProRes. You can follow the step-by-step instructions given below to get the task done with ease:
Step 1: Open the Project.
Launch iMovie on your Mac computer, and from the Project Library section at the top-left area of the interface, double-click to open the project you want to export to iMovie ProRes.
Step 2: Click Share and Define File Name and Export Type.
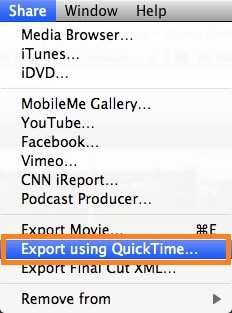
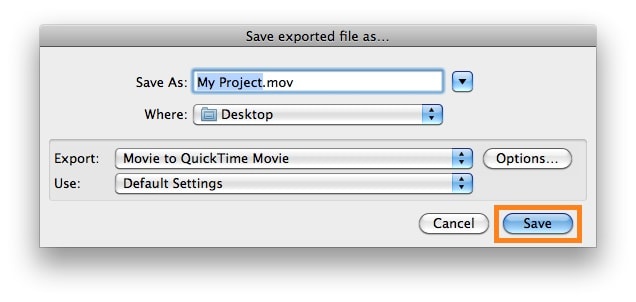
Click Share from the menu bar at the top, and click Export using QuickTime from the drop-down menu. In the Save exported file as box, type a new name for the file in the Save As a field, ensure that Movie to QuickTime Movie is selected in the Export drop-down list, and click Options.
Step 3: Configure Video and Audio Settings
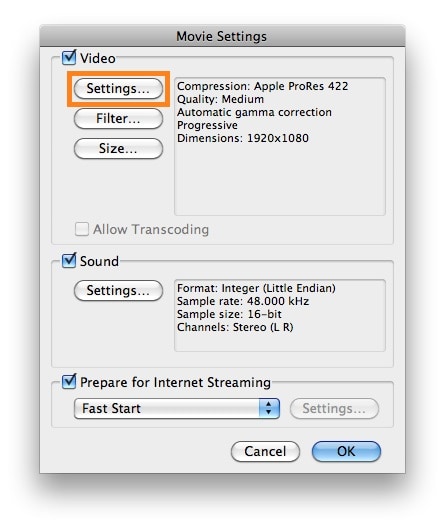
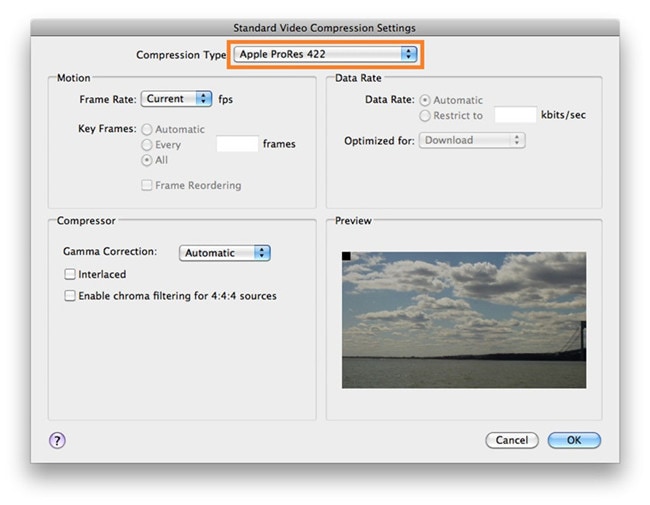
Click Settings from the Video section of the Export Settings box, choose Apple ProRes 422 from the Compression Type drop-down list if not already selected, and click OK. Back on the Export Settings box, click Size from the Video section, choose your preferred resolution from the Dimensions drop-down list (1920 x 1080 HD here) present on the Export Size Settings box opens, and click OK again. Next, click Settings from the Sound section of the Export Settings box, on the Sound Settings box, choose Best from the Quality drop-down list from the Render Settings section, and click OK.
Step 4: Click OK and Click Save to Export
Click OK on the Export Settings box, and back on the Save exported file as box, click Save to export to iMovie ProRes.
Part 2. How to Convert Any Video to ProRes with iMovie Alternative
Although iMovie is a free program for Mac users, it has certain limitations, such as the compatible version of macOS is required, hardware dependency, etc. Considering all those restrictions, you may feel the need for an alternate program that is not only equally efficient but is also capable of producing iMovie ProRes comparatively sooner, and with lesser options to configure.
An application covering all these aspects under one roof is Wondershare UniConverter (originally Wondershare Video Converter Ultimate). Also available for Windows computers, the Mac version of Wondershar UniConverter can convert any video to iMovie ProRes with ease. In addition to this, the app is also capable of detecting a connected external device. It can seamlessly import the videos for the post-production process or to export to Apple ProRes iMovie can recognize.
 Wondershare UniConverter - Best Video to ProRes Converter
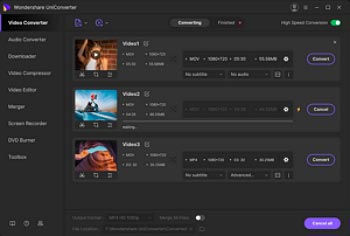
- Convert videos to ProRes codec and other 1000+ video formats like MP4, MOV, AVI, etc.
- Convert video files with optimized presets for Final Cut Pro, iMovie, iPhone, iPad, and more devices.
- 90X faster conversion speed than any conventional converters.
- Edit video files with trimming, cropping, cutting, merging, adding subtitles, etc.
- Burn videos to DVD with customized free DVD menu templates.
- Download or record videos from 10,000+ video sharing sites.
- Industry-leading APEXTRANS technology converts videos with zero quality loss or video compression.
- Versatile toolbox combines video metadata editor, GIF maker, video compressor, and screen recorder.
- Supported OS: Windows 10/8/7/XP/Vista, macOS 11 Big Sur, 10.15 (Catalina), 10.14, 10.13, 10.12, 10.11, 10.10, 10.9, 10.8, 10.7, 10.6.
You can follow the steps below to convert a video of any format to iMovie ProRes using Wondershare UniConverter:
Step 1 Click Add Files and Import any Video File.
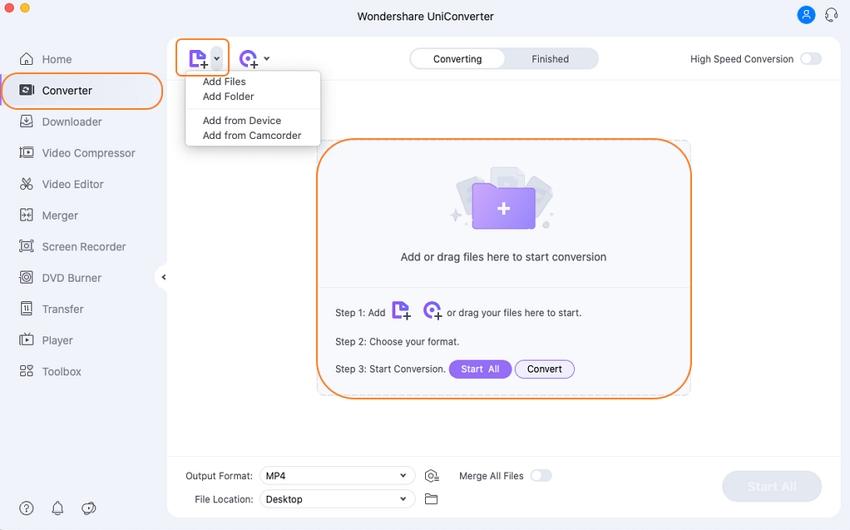
Start Wondershare UniConverter on your Mac computer, confirm that the Converter tile is selected from the top, click the Add Files icon from the middle of the window, use the box that appears to choose the footage you want to export to iMovie ProRes, and click Load.
Step 2 Choose ProRes and Select Resolution.
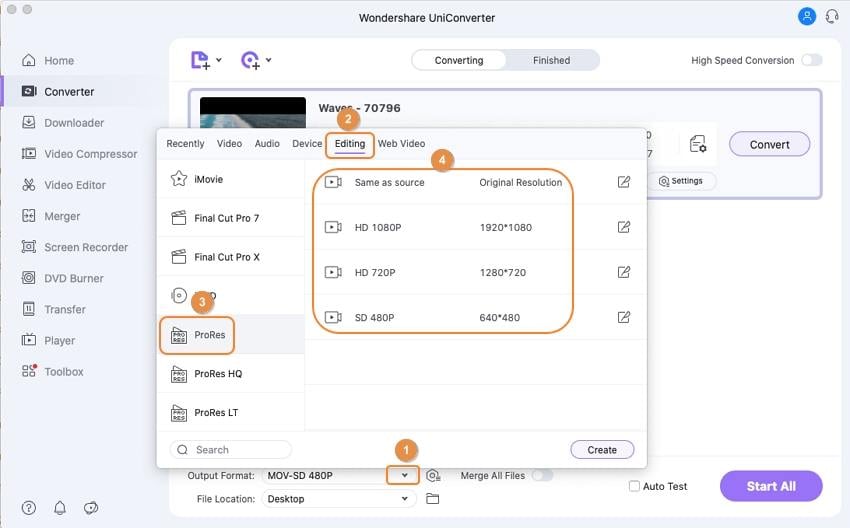
Click and open the Output Format menu from the top-right section, go to the Editing tab from the top, select ProRes from the left section of the menu, and select a suitable resolution from the right (Same as the source for this illustration).
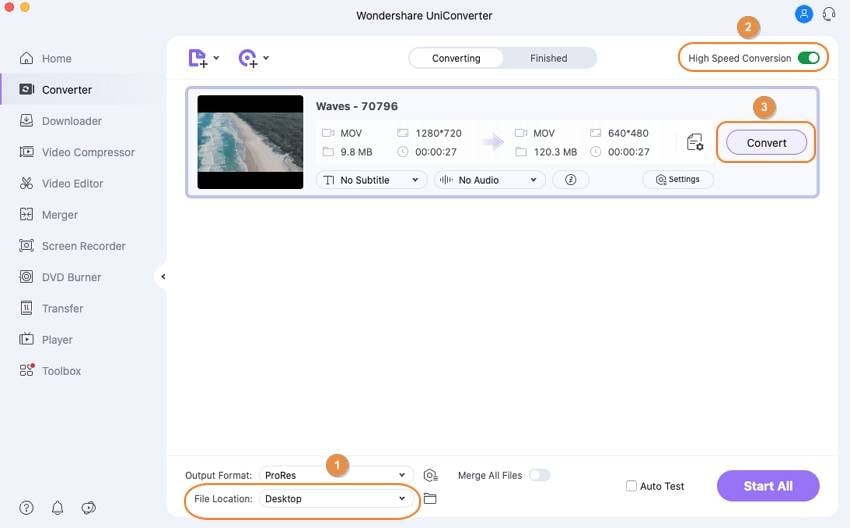
Step 3 Click Convert After Selecting an Output Location.
Once you have selected ProRes and an appropriate resolution, from the bottom of the main interface, choose a location you want to save the exported iMovie ProRes file to, and click Convert to begin the transcoding process.
More Info
Although ProRes is Apple’s proprietary, many application vendors have now adapted the format, including Adobe. With this collaboration, post transcoding a video using Wondershare UniConverter, not only with iMovie, ProRes can now be used with Adobe Premiere Pro, Adobe After Effects, and Adobe Media Encoder.
Conclusion
While working with iMovie, ProRes can be quite helpful in editing the footage, which is why the program has a built-in option to transcode the clips accordingly. However, because iMovie is a resource-demanding program, if your Mac doesn’t have sufficient hardware or updated macOS, it may refuse to run. This is where Wondershare UniConverter steps in as its Mac variant allows you to export the videos to Apple ProRes iMovie can work with. If iMovie fails to run on your macOS, an iMovie ProRes file can be moved to a highly equipped Windows PC and used with any Adobe applications for post-production tasks.
* Some of the above codec formats may need to be supported by system.

Christine Smith
chief Editor