
Do you want to eliminate background noises from your video? How many times have you encountered unwanted noises on your video?
Everyone has to deal with this problem, so there's no point in answering that question. Noise from a fan or the wind blowing through an open window can ruin your video quality. This is why, before posting a video to YouTube or any social media platform, you should work to eliminate or significantly minimize any distracting background noise.
In this tutorial, we'll look at different solutions for how to remove background noise in Premiere Pro.
How to remove background noise in Premier Pro with DeNoiser?
It is unnecessary to install any special software to decrease the amount of background noise in a video. You can do this task with the help of Adobe Premiere's DeNoiser Effect. If you have never played with audio effects before, you should know that they are very similar to video effects.
Simply pick the one you wish to use and apply it to your clips. Although the DeNoiser effect uses several complex audio parameters, you can easily modify them to your liking and achieve the desired background noise cancellation.
The following demonstrates how to use the DeNoiser effect to remove background noise from audio Premiere Pro.
Step 1
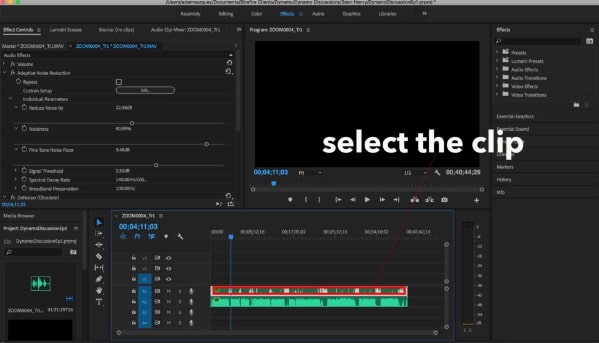
To get started, open Premiere and choose the video from which you want to eliminate the background noise. When you have finished importing the video, go to the Window menu and select the Effects option.
Step 2
Now, choose DeNoiser from the list of dated audio effects by clicking on the Obsolete option. Here, the app will inquire whether you want to use the most recent version of the function. Select "NO" to keep using the present DeNoiser version!
Step 3
Drag the DeNoiser effect onto the video to minimise noise in Premiere Pro. After importing DeNoiser, click DeNoiser in Effect Controls.
Step 4
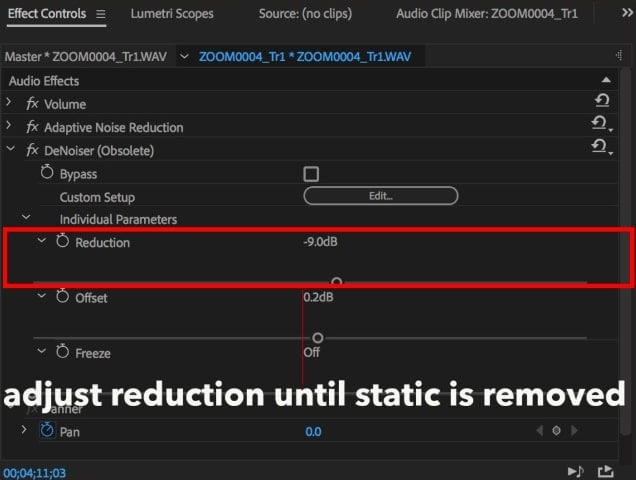
To lessen the background noise, select Reduce Noise By. The volume can be adjusted using the bar's sliders. This will help you reduce noise in Premiere Pro. We find -5 to -10 is usually the range to lower to an unnoticeable level.

How to reduce background noise in Premier Pro by using the Essential Sound Panel?
Now that we've established that the DeNoiser effect is a feature of Premiere Pro's past, we can examine some of the more cutting-edge techniques for reducing noise. This section will cover how the Essential Sound Panel can help you remove the background noise.
Step 1 Navigate to the Essential Sound Panel
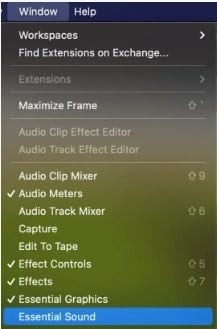
To begin, you will want to ensure that the Essential Sound Panel in Premiere Pro is turned on. To accomplish this, select Window > Essential Sound from the menu bar, and the Essential Sound Panel will immediately become active and available for use.

Step 2 Import the File
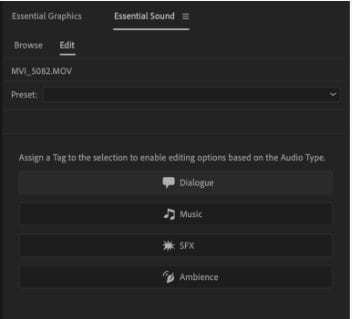
Select the audio or video clips you want to use within your created timeline. Then, in the Essential Sound Panel, select the Dialogue option.
Step 3 Open the Repair Tab
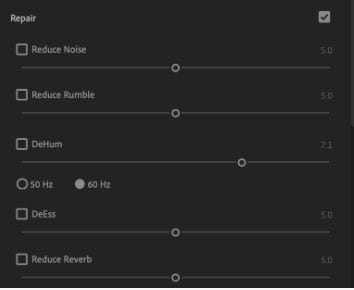
The panel above with recommendations will appear when you click and open the option labeled Repair or Edit in the Essential Sound Panel. Now, we will go through the several options that are available to assist you in cutting down on the background noise in Premiere Pro:
- DeHum
- Reduce noise
- Reduce reverb
- DeEss
- Reduce rumble
Step 4 Adjust the noise reduction
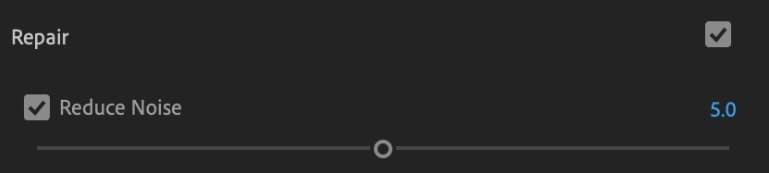
You can reduce the noise intensity by selecting the box marked "noise" and then adjusting the slider to the desired level of reduction. This assists in isolating low external noises and eliminates any background noise that may have been interfering with the primary sound. Avoid removing all ambient noise from your footage, as doing so can make it sound strange.
The more you use it, the less natural the person speaking will sound.
You should carefully adjust the slider and listen to it by playing back the audio and modifying it in small steps. This will ensure that you do not damage any crucial sounds and will allow you to properly remove background noise in Premiere Pro.
Step 5 Reduce rumble
The "Reduce rumble" option is used if there is a knock on the microphone or any scratching sound.
Check the box and adjust the slider to implement the change. Keep pushing it and replaying the audio until you hear it being taken away, as said above. The goal should be to reduce the background noise as much as possible without negatively impacting the quality of the primary audio.
Step 6 DeHum to eliminate low-frequency sounds
In Premiere Pro, you can adjust the DeHum slider to eliminate low-frequency hum by checking the box. Using Premiere Pro's DeHum tool will successfully get rid of low-humming noises.
Step 7 DeEss
You can use this to eliminate the annoying "S" sound from audio sensitivity. Get rid of them with the help of the DeEss.
Step 8 Reduce the reverb

Sound reverberation increases while recording without soundproof walls. Reverb will be an issue regardless of how good of a microphone you use. To reduce the amount of reverberation in your recording, select the "Reverse reverb" option. It's the best way to get rid of unwanted noise in Premiere Pro, and it also helps get rid of echo.
How to use a third-party tool to remove noise from Premier Pro video?
Pros frequently utilize Premiere Pro and its features to edit various media file types. This indicates that users need to comprehensively understand the technology to successfully remove background noise online. Users will find it difficult and time-consuming to use these two tools and get used to them, even with the details provided above.
If you're thinking similarly, it's time to use Noise Remover function of UniConverter to remove noise from audio online for free. Using this feature, you won't need any prior understanding of technology to edit audio or video.
Advantages of UniConverter
- The application utilizes AI to separate vocals from music. The platform's AI is developed to recognize voice and music from millions of audio recordings.
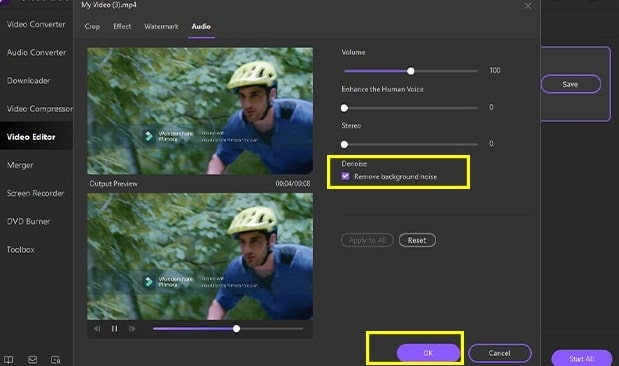
- It offers a speech enhancement function that removes rain, wind, automobile, and other noise. AI vocal augmentation is a must-have for filming TikTok videos, virtual meetings, and podcasts.
- It supports 4K/8K HDR HD video full and multi-file GPU acceleration, which means you may convert several files simultaneously without pauses.

Wondershare UniConverter — All-in-one Video Toolbox for Windows and Mac.
Edit videos on Mac by trimming, cropping, adding effects, and subtitles.
Converter videos to any format at 90X faster speed.
Compress your video or audio files without quality loss.
Excellent smart trimmer for cutting and splitting videos automatically.
Nice AI-enabled subtitle editor for adding subtitles to your tutorial videos automatically.
Download any online video for teaching from more than 10,000 platforms and sites.
You may easily remove background noise online from your movie by following the below steps.
Step 1 Download and Open UniConverter
To begin, you will need to go to the official website of Uniconverter to download the application. If you already have Uniconverter installed on your desktop, it is recommended that you upgrade it.
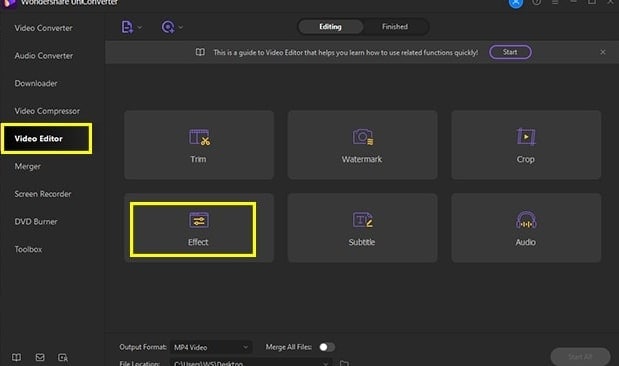
In the latest version of UniConverter, there is a Noise Remover feature available on the home page - Click on it to open!
Step 2 Upload the file
After selecting the Noise Remover feature, you will open to the below shown page. Now, you need to add or drag your desired audio/video file in the marked box.
Step 3 Select the File Location
Make sure to choose the location where you want you file to be stored after removal of the noise from it by clicking on the dropdown option provided in front of 'File Location' feature.
Step 4 Convert and Download
Next, click on 'Convert All' and the file will start getting exported to your system.
Conclusion
In summary, you have just explored various techniques that may be applied to understand how to minimize the amount of background noise present in your video or audio using Premiere Pro. We reviewed using the DeNoiser tool to mute the background noise. In addition to this, we also looked at various options provided by the Essential Sound Panel.
And last, if you're not a super-techie, you can always use one of the easiest and most user-friendly applications, the UniConverter, to remove background noise. Using this tool, you won't need any prior understanding of technology to edit audio, video, or image files, and you'll be able to do so easily. To amp up their video further, users can apply various transitions, filters, texts, and stickers available on this software.

