
Social Media
- TRY IT FREE TRY IT FREE
- 1. Adobe Premiere Tips+
-
- 1.1 export premiere pro
- 1.2 premiere editing
- 1.3 premiere pro export for instagram
- 1.4 premiere pro compress video
- 1.5 export avi premiere pro
- 1.6 4k video from adobe premiere
- 1.7 gopro video from adobe premiere
- 1.8 best format to export from premiere pro
- 1.9 adobe video maker
- 1.10 premiere to avid
- 1.11 adobe premiere export mov
- 1.12 import mkv to adobe premiere
- 1.13 premiere prores
- 1.14 Adobe Premiere vs Final Cut Pro
- 1.15 Best Premiere Pro
- 2. Youtube Tips+
-
- 2.1 youtube video editor
- 2.2 youtube video editor app
- 2.3 youtube video editor for android
- 2.4 best video editor for youtube
- 2.5 youtube video editor free
- 2.6 youtube video editor online
- 2.7 youtube music editor
- 2.8 avs video editor youtubers
- 2.9 easy video editor for youtube
- 2.101 y2mate mp4
- 2.11 youtube clip editor
- 2.12 youtube video format
- 2.13 youtube srt
- 2.14 mxf youtube
- 2.15 youtube video maker free
- 2.16 youtube video maker app
- 2.17 youtube converter dailymotion
- 3. Facebook Tips+
- 4. Instagram Tips+
- 5. Twitter Tips+
- 6. Whatsapp Tips+
How to Export a GIF from Premiere Pro in 2025
by Christine Smith • 2025-10-21 20:04:07 • Proven solutions
GIF or Graphic Integrated Format is one of the most popularly used media files on social media platforms. GIFs have multiple frames of a single image without any sound, which makes it look like a really short video. If you are also looking for a tool that can allow the creation and editing of GIFs, Adobe Premiere Pro GIF exporting feature will be great for your requirements. Adobe Premiere Pro is one of the most advanced and widely used video editing tools which can export GIF quality at fast speed. It is quite easy to use Adobe Premiere Pro to export GIFs on any device.
- Part 1. How to Export a GIF from Premiere Pro in Easy Steps
- Part 2. Easier Alternative: How to Export a GIF with UniConverter
- Part 3. Conclusion
- Part 4. FAQ
Part 1. How to Export a GIF from Premiere Pro in Easy Steps
Premiere Pro is comprehensive video editing software application and available for computers. It has high-level video editing options and can be used to create cinematic-quality videos with ease. You will be able to add effects, themes, texts, images, and transitions to your video along with allowing you to create videos in 4K quality. It can also be used to create GIFs out of large video clips so that it can be shared with friends and family. The following is a step-by-step guide that will help you export GIFs with Adobe Premiere Pro.
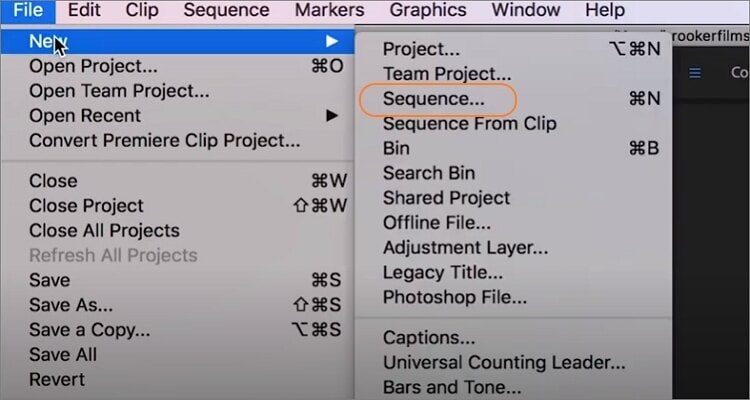
Step 1: Run Adobe Premiere Pro and Create a New Sequence.
Install and run Premiere Pro on your PC and then click the File, tap the New, then choose the Sequence. In the Sequence window, click the Settings and then change the frame size to suit your preference. For example, you can set the frame size to 1080 x 1080 if you want a square composition.
Step 2: Load the Image Files to Convert to GIF.
Now start importing your image files by clicking the File, then tap the Import to add image files from local storage. You can also drag-n-drop files from Finder or Windows File Explorer into the Project panel. Remember, you can also upload a video file and convert it to GIF.
Step 3: Set Your In/Out Points.
Now it’s time to customize your GIF file a little bit to make it look more professional. In that case, drag the trimming handles on the timeline to select a quick 2-3-second part that you want to encode to a GIF file.
Step 4: Customize and Export your Animated GIF.
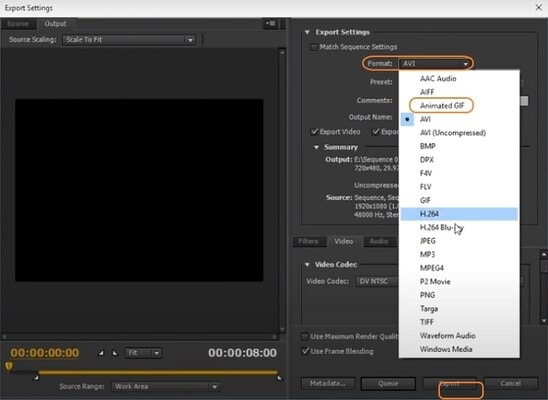
Once again, click the File tab, then choose the Export before clicking the Media option. An Export Settings window will launch automatically. Here, open the Format menu and change the file format to Animated GIF. Scroll down and click the Video tab before changing the GIF height, width, frame rate, and so on. Finally, click the Export, choose a folder path, and click the Save. You’ll have a new GIF file in seconds.
Part 2. Easier Alternative: How to Export a GIF with UniConverter
If you are looking for a tool to create GIFs and you don’t want to use Adobe Premiere Pro due to its expensive subscription or its long beginner's learning curve, Wondershare UniConverter (originally Wondershare Video Converter Ultimate) is one of the best tools that you can go for right now. You can get this tool at less cost and use it for a lifetime without spending anything later. This tool can easily create GIFs from YouTube Videos or convert files into GIFs and allow basic editing with ease. The followings are steps to use this tool to export GIFs.
 Wondershare UniConverter - Best GIFs Export Converter for Windows 10 / Mac (Catalina Included)

- Best alternative to export GIF with simple steps and no watermarks.
- Edit video files with trimming, cropping, cutting, merging, adding subtitle, etc.
- 30X faster conversion speed than any conventional converters.
- Make GIF from MP4, MOV, M4V and other format videos or JPG, PNG, JPEG, BMP pictures directly.
- Convert videos to any format in batch with less quality loss.
- Download or record videos from YouTube and other 10,000+ video sharing sites.
- Transfer converted DVD videos to devices and external hard drives directly.
- Supported OS: Windows 10/8/7/XP/Vista, macOS 11 Big Sur, 10.15 (Catalina), 10.14, 10.13, 10.12, 10.11, 10.10, 10.9, 10.8, 10.7, 10.6.
Step 1 Add the Video Files
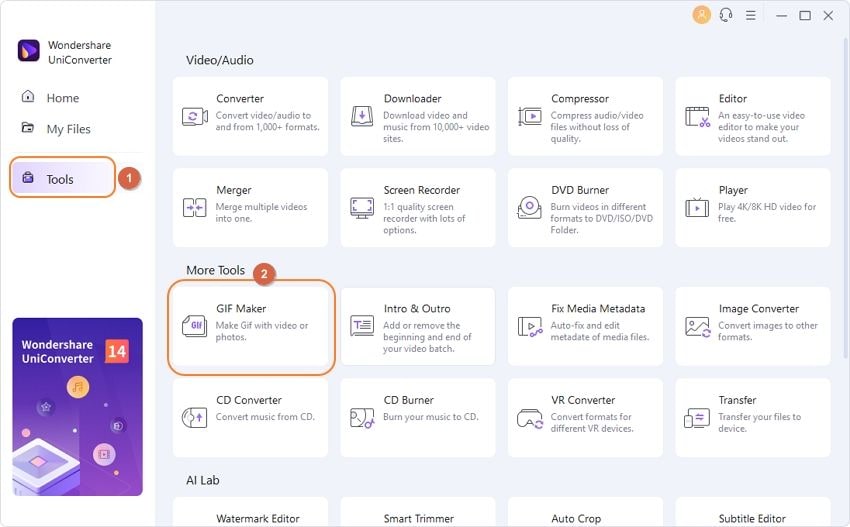
Launch Wondershare UniConverter on your device. Choose Toolbox and select the GIF Maker option.
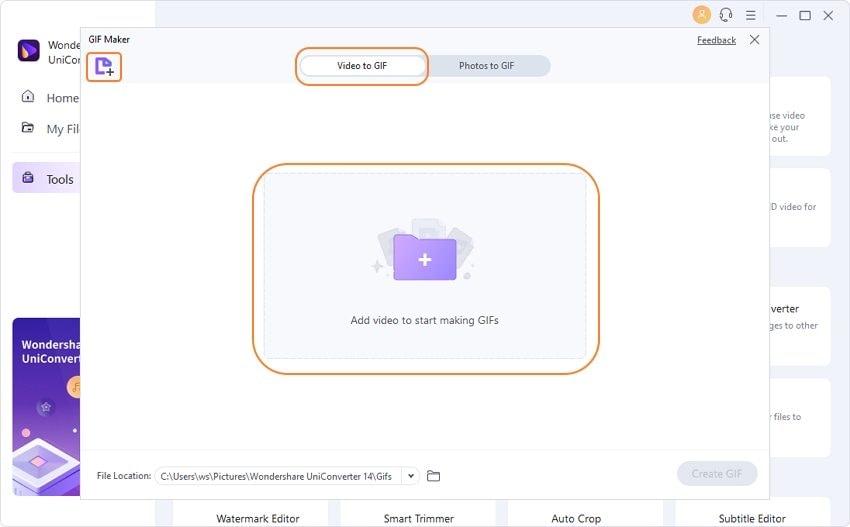
Select the Video to GIF option. You will now be able to see the Add Files option. Click on it and select the videos that you wish to convert to GIF.
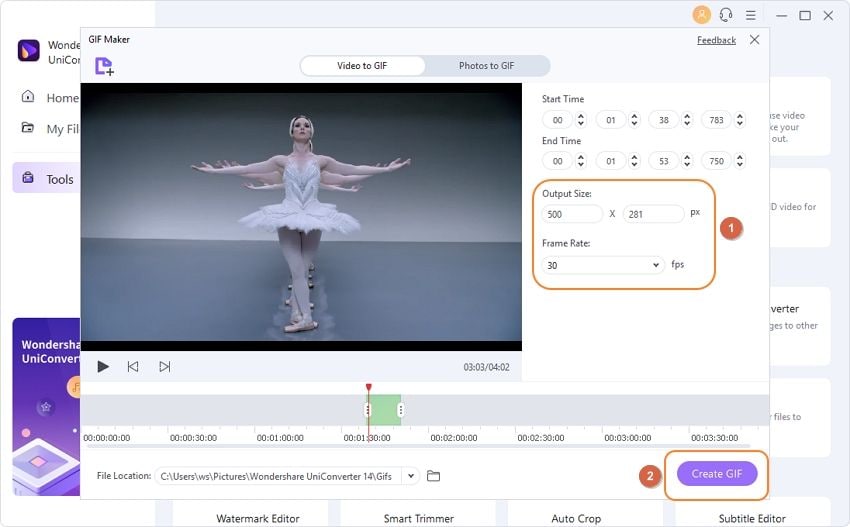
Step 2 Set Preferences
The next step is to select the duration of the GIF, width, height, and resolution of the GIF. You can set the parameters as you like.

Step 3 Export the GIFs
Now select the frame rates, output size and file location of the GIF. Click on Create GIF, and everything is done.
Conclusion
Creating GIF is something that you might need to do quite often. In order to create a GIF, you can make use of Adobe Premiere Pro for that. But if you want to use a tool that is easy to operate and you don’t want to spend lots of money, make sure that you use Wondershare UniConverter to create GIF with ease. It is not just a simple GIF creator even you can use it to edit, convert, download or transfer the videos without any limitation of devices.
FAQ
1. Why a black frame or glitch when exporting GIF from Premiere Pro?
This is a known bug. Premiere can append a blank (often black) frame at the end of animated GIFs. Many users recommend exporting your clip as video first and then importing into Photoshop for final output to avoid this issue.
2. Why does the GIF exported from Premiere Pro look glitchy, speckled, or have odd pixel artifacts?
GIFs are limited to 256 colors, which can cause dithering or palette glitches. Premiere’s built-in GIF exporter often mishandles color reduction, leading to artifacts.
3. What if I need specific file size targets (e.g. ≤ 150 KB)?
Premiere doesn’t provide real-time size estimations for GIF export settings.
The workaround: Import into Photoshop: File → Import → Video Frames to Layers. Use File → Save for Web (Legacy) to fine-tune colour palette, dithering, frame rate, and resolution—with real-time size preview.
4. Why is my GIF file size huge—even if the clip is short?
Premiere’s GIF exporter generates large files, especially compared to well-optimized video formats.
5. Are there any other options for GIF making?
For Adobe series, you can also consider using Adobe Photoshop to create GIFs from image sequences. Online tools for GIF making are also worth considering.


Christine Smith
chief Editor