

GIFs have become a popular way to share short, looping clips online, and turning videos into GIFs has never been easier. Whether you’re creating a GIF for social media, emails, or simply for fun, this guide will show you how to turn video into GIF using the best tools and techniques available. From desktop software like UniConverter to online options and mobile apps, you’ll learn how to make video into GIF with ease, wherever you are.
In this article
Part 1: What You Need to Know Before Turning Video into GIF
Turning a video into a GIF is a fun and easy way to share memorable moments, whether it’s a funny scene, a reaction, or a creative snippet. Before you dive into the process, there are a few important things to consider to ensure that your GIF turns out perfectly:
- Video Length Matters: GIFs are most effective when they are short and concise. Aim for clips between 2-5 seconds long. Longer videos tend to result in large file sizes, which can affect loading times and sharing capability.
- Resolution and Quality: While GIFs are typically low resolution to keep file sizes small, it’s important to preserve the video quality during the conversion process. Ensure the video you convert retains its clarity to create a crisp and sharp GIF, especially if it's going to be shared on high-definition screens.
- File Size Considerations: A key challenge with GIFs is managing file size. Larger videos can produce bulky GIFs, which may not be easy to share. Compressing your GIFs after conversion can help keep them optimized for social media platforms and quick loading.
- Video Format: Ensure your video is in a format that can be easily converted to GIF. Common video formats like MP4, MOV, and AVI are usually supported by most GIF-making tools, so it's essential to check compatibility before starting the conversion.
- Editing Options: After converting a video into a GIF, you might want to edit it to fit your needs. You can crop, trim, and even add text or effects to enhance the GIF. Editing tools allow for creative control, helping you customize your GIF to fit the message or moment you want to share.
- Frame Rate: Frame rate affects how smooth your GIF looks. A higher frame rate results in smoother animation but larger file sizes. A frame rate of 15-20 fps is ideal, as lower rates can cause choppy movement, while higher rates can unnecessarily increase file size.
Part 2: How to Turn Videos into GIFs: Best Techniques
UniConverter
Turning videos into GIFs has become easier than ever, thanks to a variety of online and desktop tools that simplify the process. One of the most reliable and efficient methods toturn video into GIF is using UniConverter. This powerful tool ensures high-quality conversion, allowing you to make video into GIF with ease. Let’s explore how UniConverter can help you create stunning GIFs, offering multiple features and simple steps to get the job done.

Best Gif Converter
Features
- High-Quality Conversion: Converts videos to GIFs without compromising on quality, ensuring a crisp and clear result.
- Batch Conversion: Allows you to convert multiple videos into GIFs simultaneously, saving time and effort.
- Fast Processing: Delivers quick video-to-GIF conversions, ideal for users who need fast results.
- Customizable Frame Rate: Adjust the frame rate to create smoother or more dynamic GIFs according to your needs.
- Advanced Compression: Reduces the file size of your GIFs without sacrificing quality, making it ideal for online sharing.
User Reviews
- "UniConverter is my go-to for converting videos to GIFs! It’s so easy to use and the quality is always great."
- "I love the batch conversion feature, it saves me so much time when I need to create multiple GIFs."
- "The editing options are perfect for customizing my GIFs. I can crop, resize, and add text in just a few clicks!"
Steps to Turn Video into GIF using UniConverter
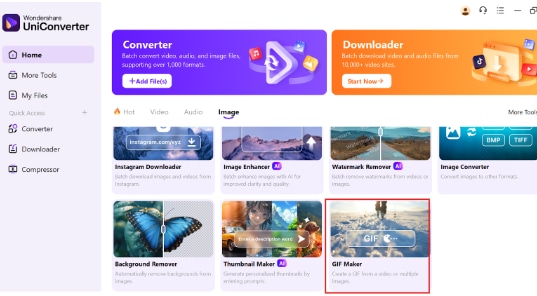
Step 1: Open UniConverter and Access GIF Maker
Launch UniConverter and go to the GIF Maker option under the Image section on the Home tab. Click the GIF Maker button to begin creating GIFs from your video.
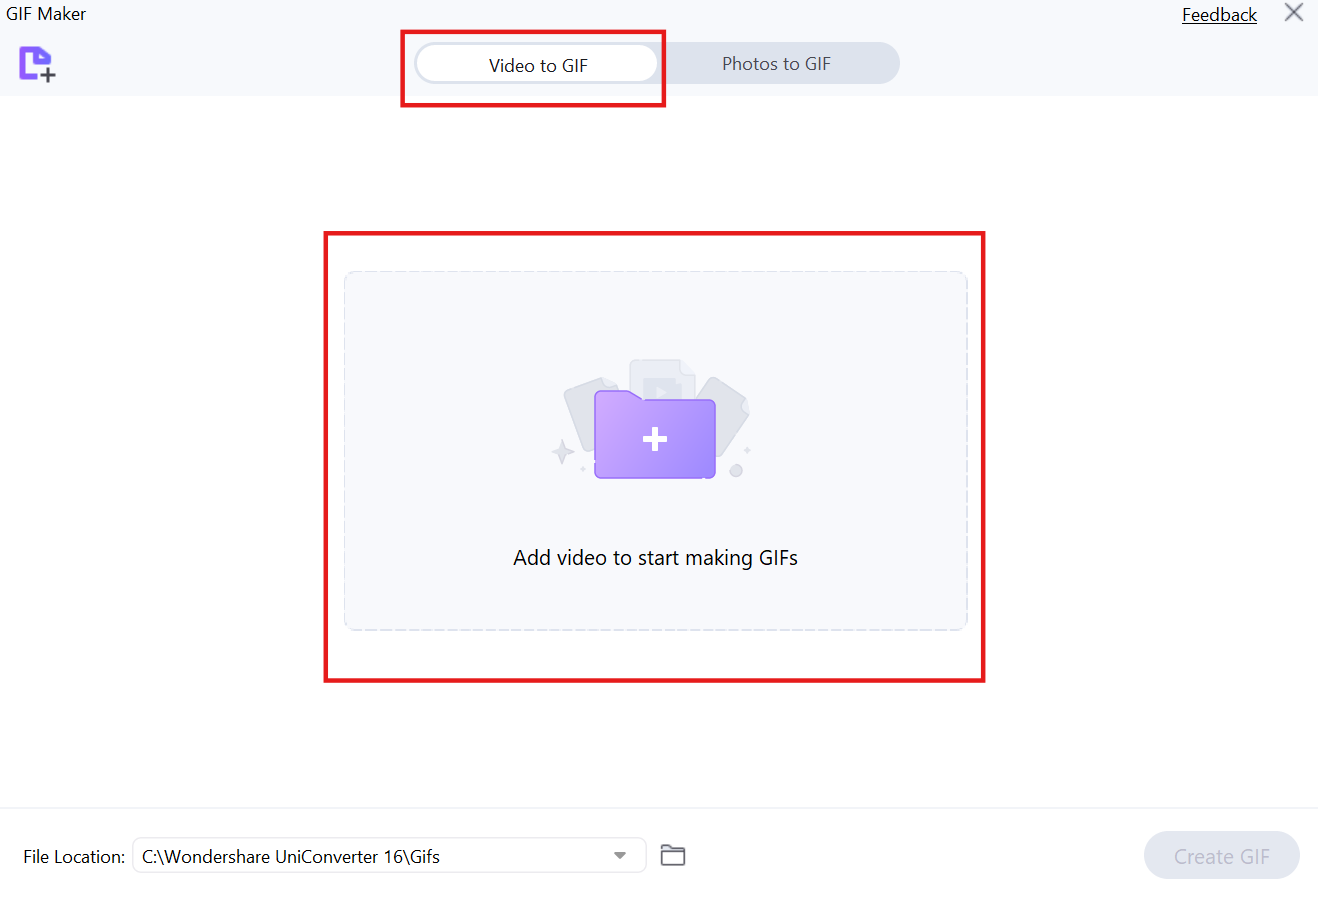
Step 2: Add Your Video to GIF Maker
In the GIF Maker window, ensure you’re on the Video to GIF tab. Click the + button to upload your video by either dragging and dropping the file or selecting it from your device. Once uploaded, you can start editing your video to create the perfect GIF.
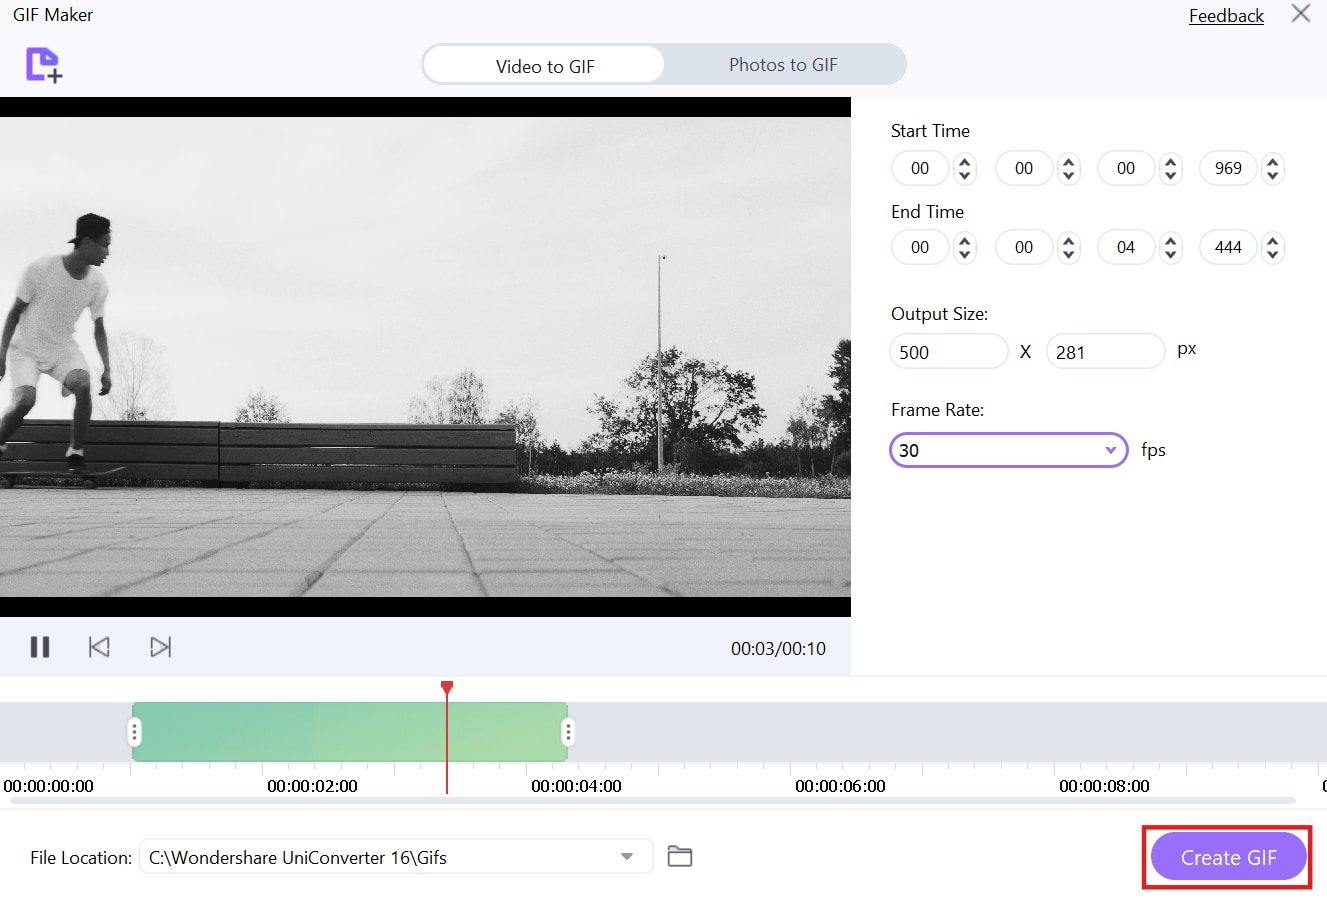
Step 3: Set the Start and End Times for Your GIF
Use the timeline to select the part of the video you want to convert into a GIF by adjusting the Start Time and End Time. You can also customize the Output Size and Frame Rate. Once you're happy with your selection, click Create GIF to generate your GIF.
Part 3: How to Convert Videos to GIFs on iPhone or iPad?
If you're looking for a quick and easy way to turn video into GIF on your iPhone, using the Shortcuts app is a convenient solution. By adding the GIF shortcut to your device, you can convert videos into GIFs in just a few taps. This section will guide you through adding the shortcut to your iPhone and getting started with GIF creation.
Section 1: Add GIF Shortcut on iPhone
Step 1: Launch the Shortcuts Application
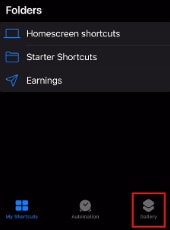
Open the Shortcuts app on your iPhone. Navigate to the Gallery section located at the right-bottom corner of the screen. This is where you can find and add useful shortcuts.
Step 2: Search for GIF
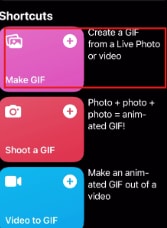
In the Search Bar, type “GIF” and look for the Make GIF tile. Tap on the tile to open it, allowing you to add this shortcut to your iPhone for easy GIF creation.
Step 3: Add the Shortcut
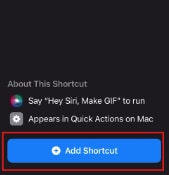
Once you’ve found the Make GIF shortcut, click Add Shortcut. This will add the shortcut to your library, making it available for future use.
Section 2: Convert Videos to GIFs on iPhone
Step 1: Open the Shortcuts App Again
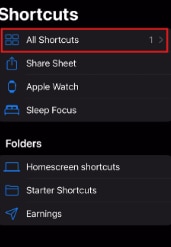
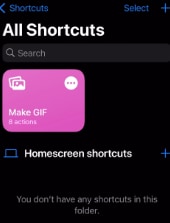
Re-launch the Shortcuts app on your iPhone and go to the All Shortcuts section. This is where you’ll find the shortcut you added in the previous section, ready to use.
Step 2: Select the Make GIF Option
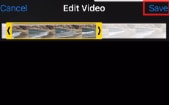
Tap on the Make GIF shortcut from the list. You will then be prompted to select the video from your gallery that you want to convert.
Step 3: Save Your GIF
After selecting the video, the app will automatically convert it into a GIF. Once completed, click Save to store your newly created GIF on your device.
Part 4: How to Turn YouTube Clips into GIFs Online?
Converting YouTube clips into GIFs online is a quick and easy way to share your favorite moments. One of the best tools for this is Kapwing, which allows you to turn YouTube videos into GIFs with just a few simple steps. It’s a user-friendly platform that makes the entire process seamless and fast, with no need for downloads or complicated software.
Steps to Turn YouTube Clips into GIFs Using Kapwing
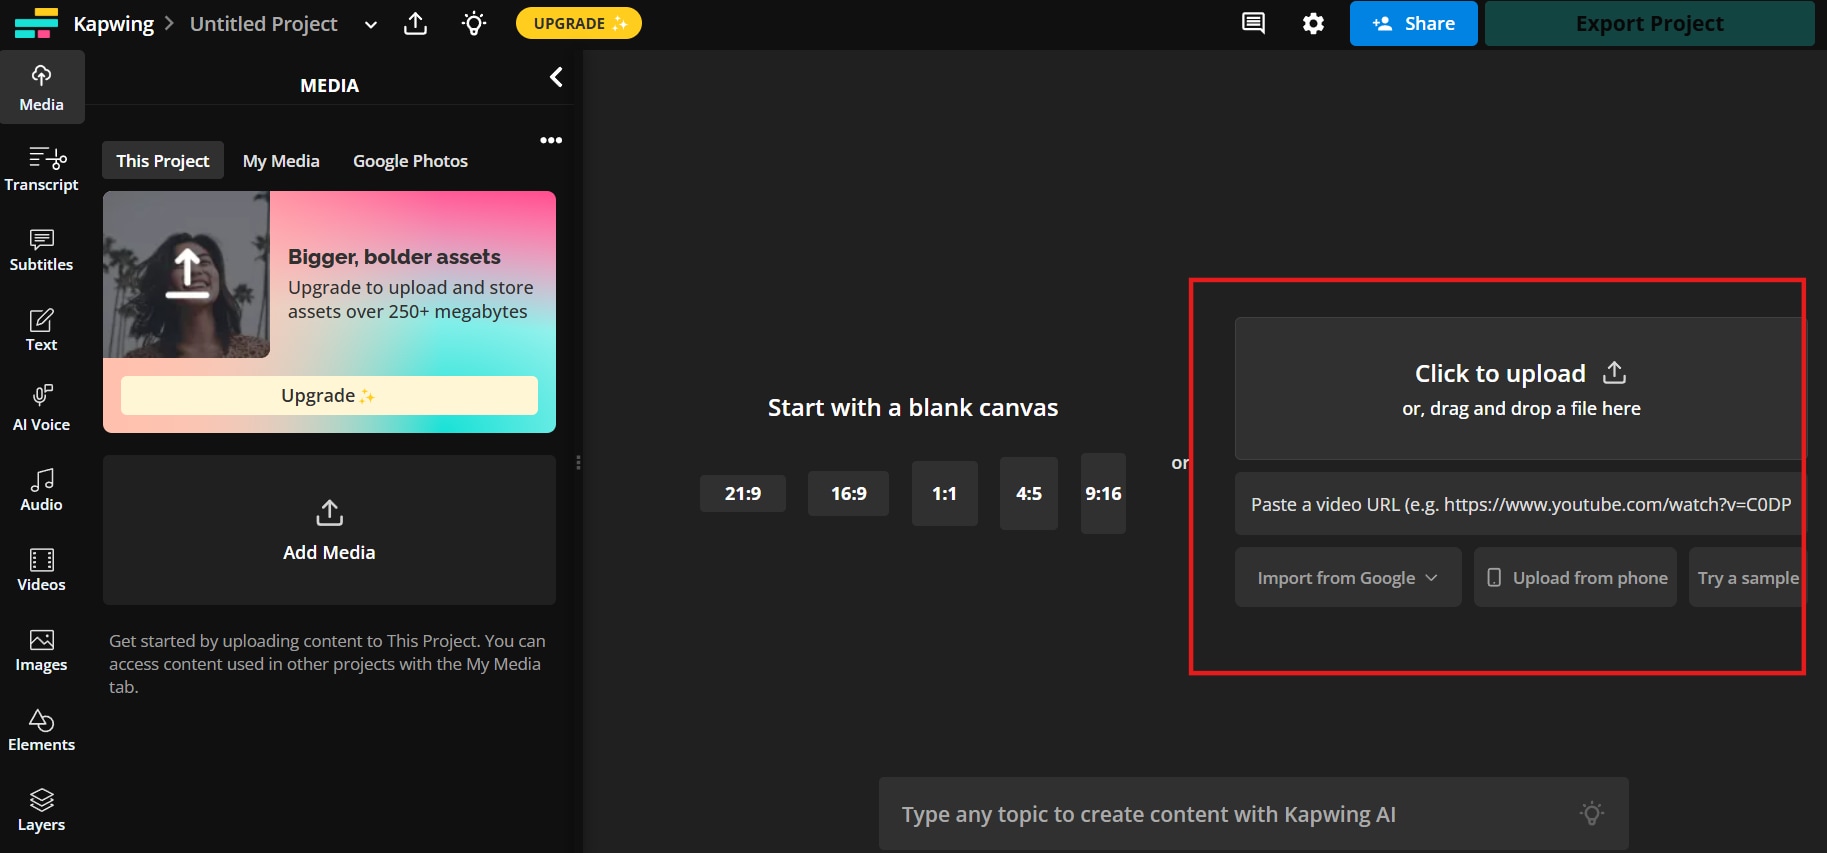
Step 1: Visit the Kapwing Website
Go to Kapwing's GIF maker and paste the YouTube video URL into the input box. The video will automatically load, and you can start the conversion process right away without any downloads.
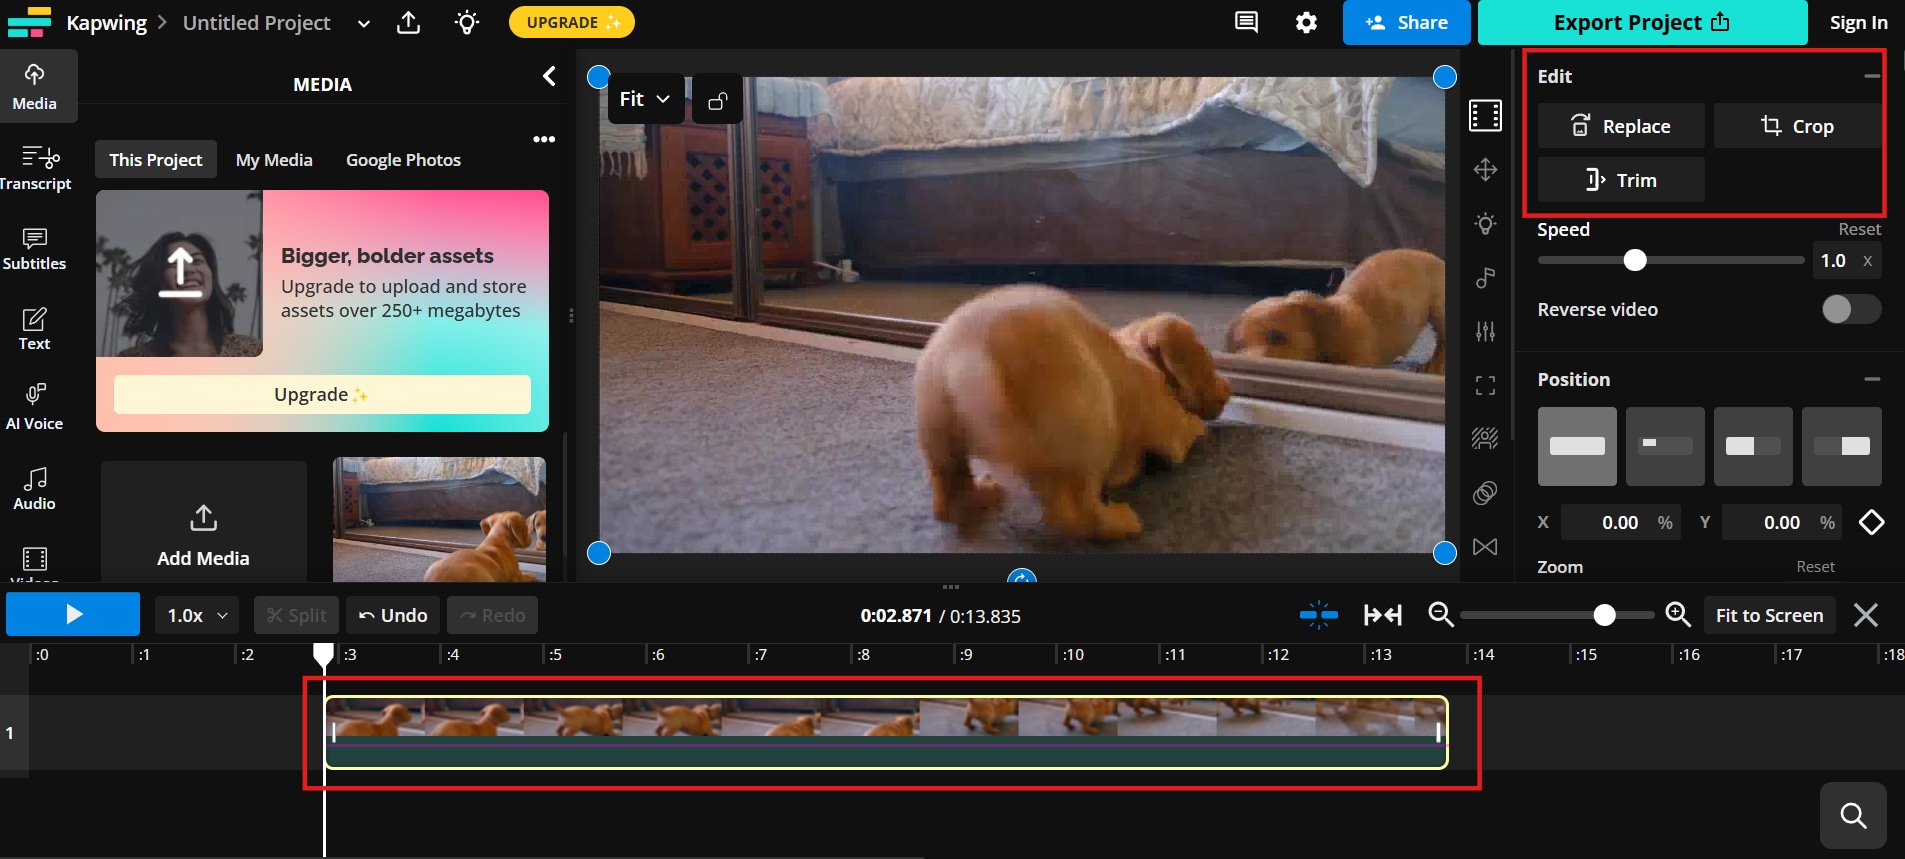
Step 2: Select the Clip
Once the video is loaded, use the timeline at the bottom to select the exact portion you want to turn into a GIF. You can adjust the start and end points, as well as resize or crop the video to focus on the key moment you want.
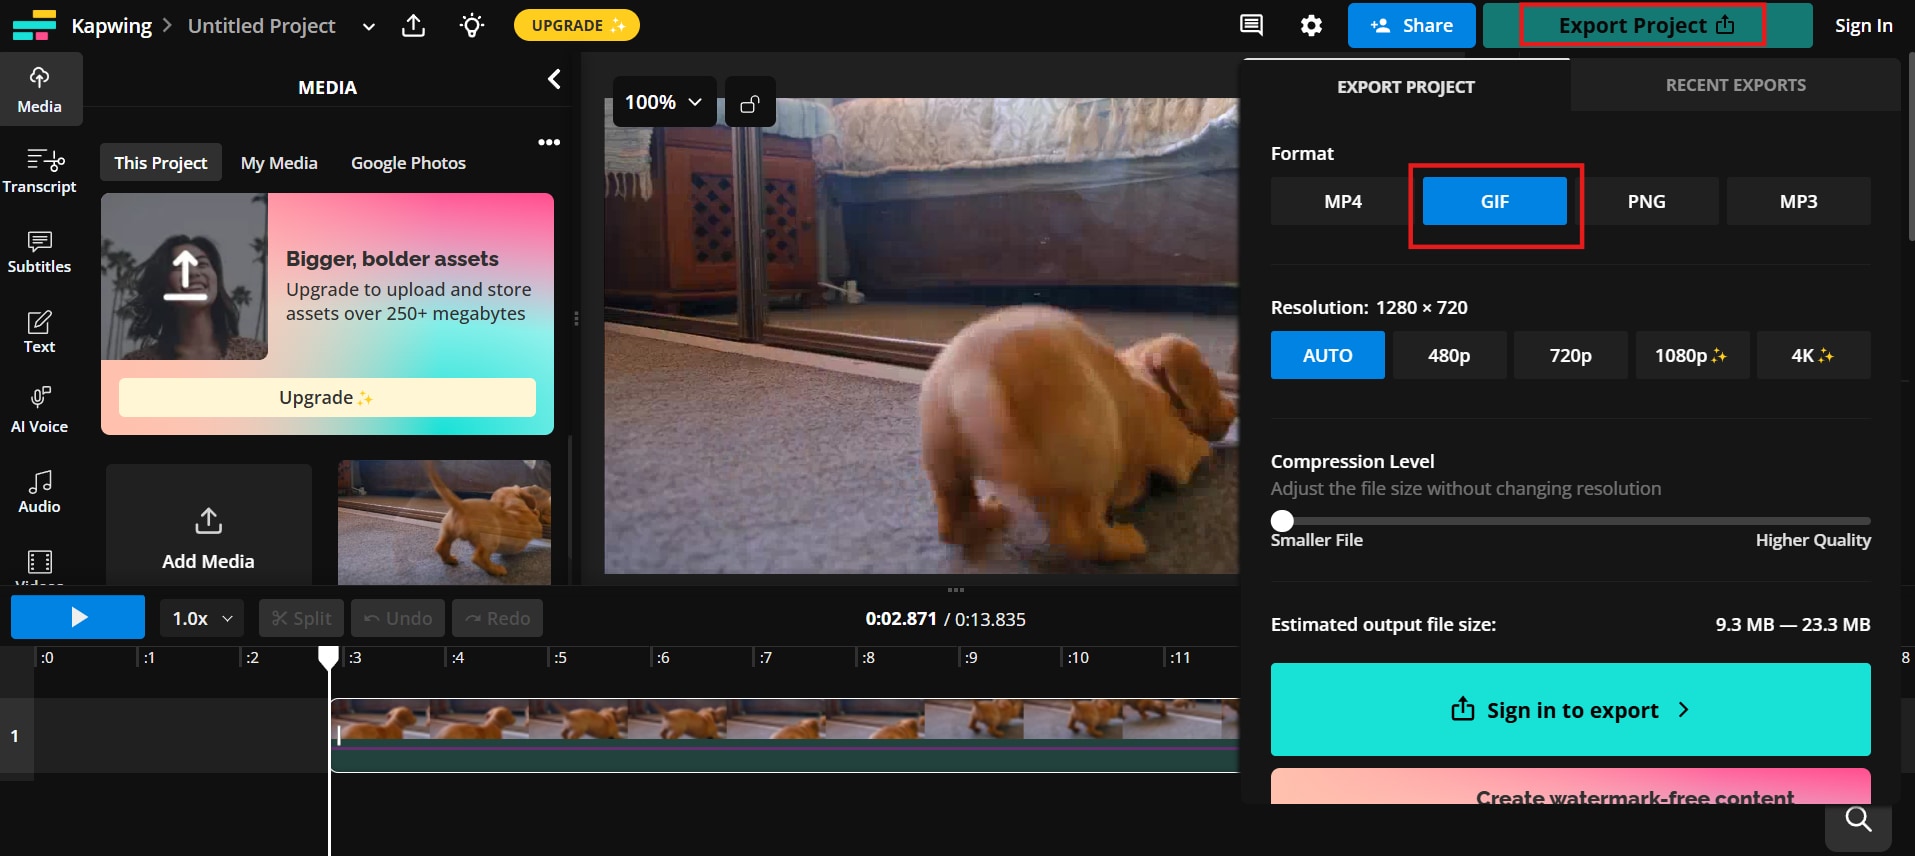
Step 3: Export and Download the GIF
After editing the clip, click on the Export button and select GIF as your preferred output format. Once the GIF is processed, you can download it directly to your device and share it as needed.
Part 5: How to turn video into GIF in Google Photos?
Google Photos offers an easy way to convert videos into GIFs using the Live Photos feature. This simple process allows you to create fun and shareable GIFs directly from your existing videos. Follow the steps below to quickly convert your video into a GIF.
Steps to Turn Video into GIF in Google Photos
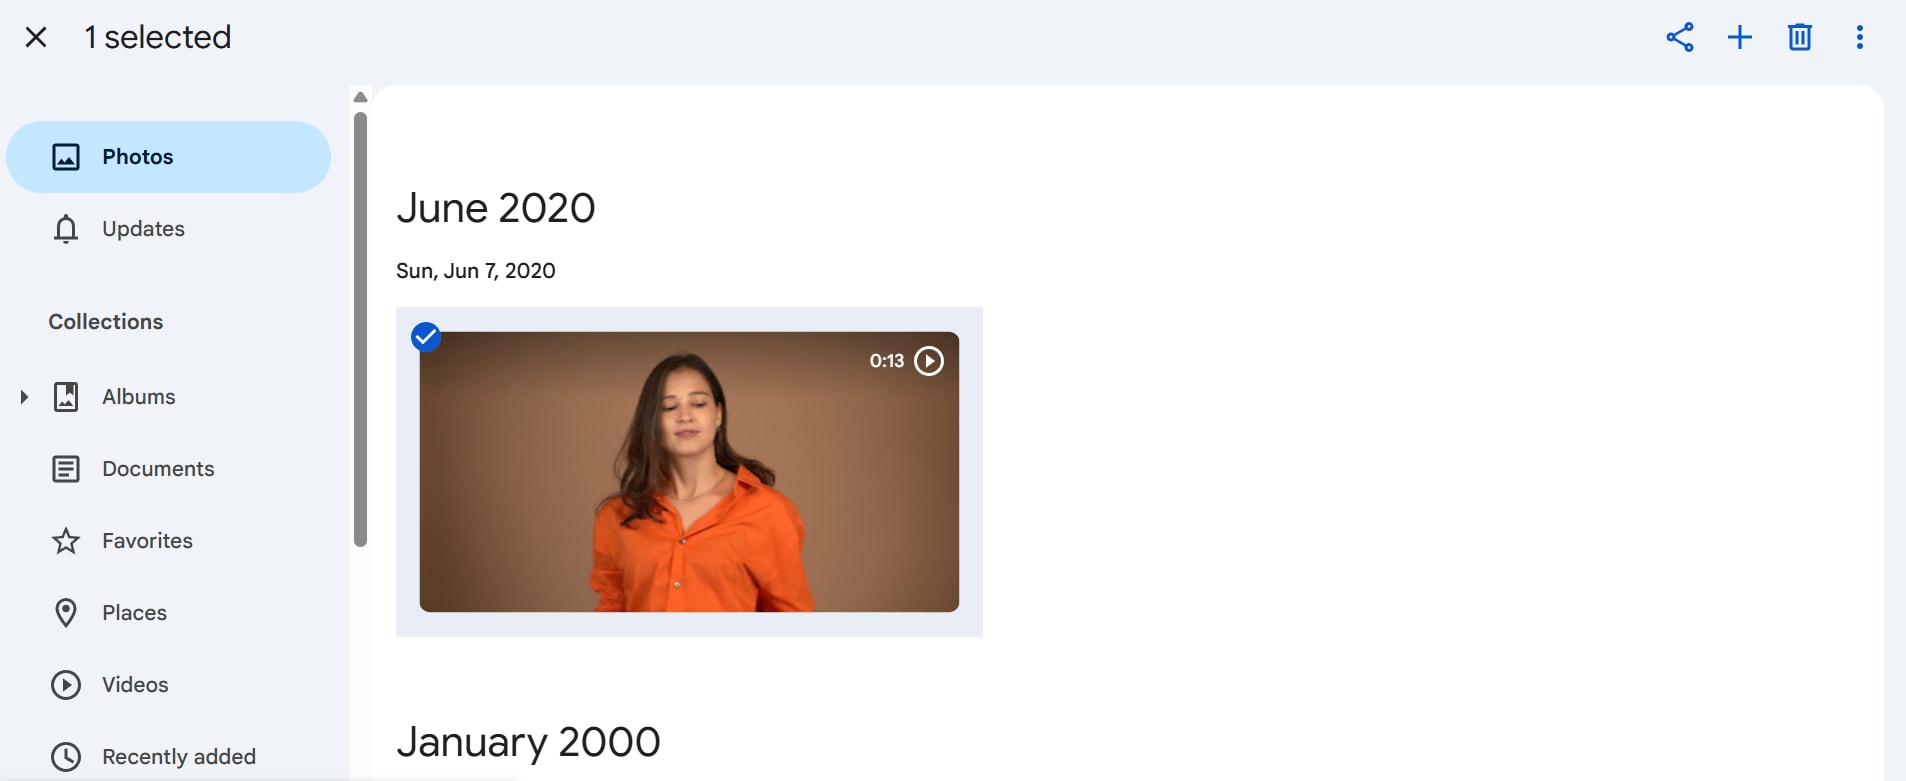
Step 1: Open Google Photos
Launch the Google Photos app on your device and navigate to the video you want to convert. Tap on the video to open it in full view, ensuring it’s ready for the next step.
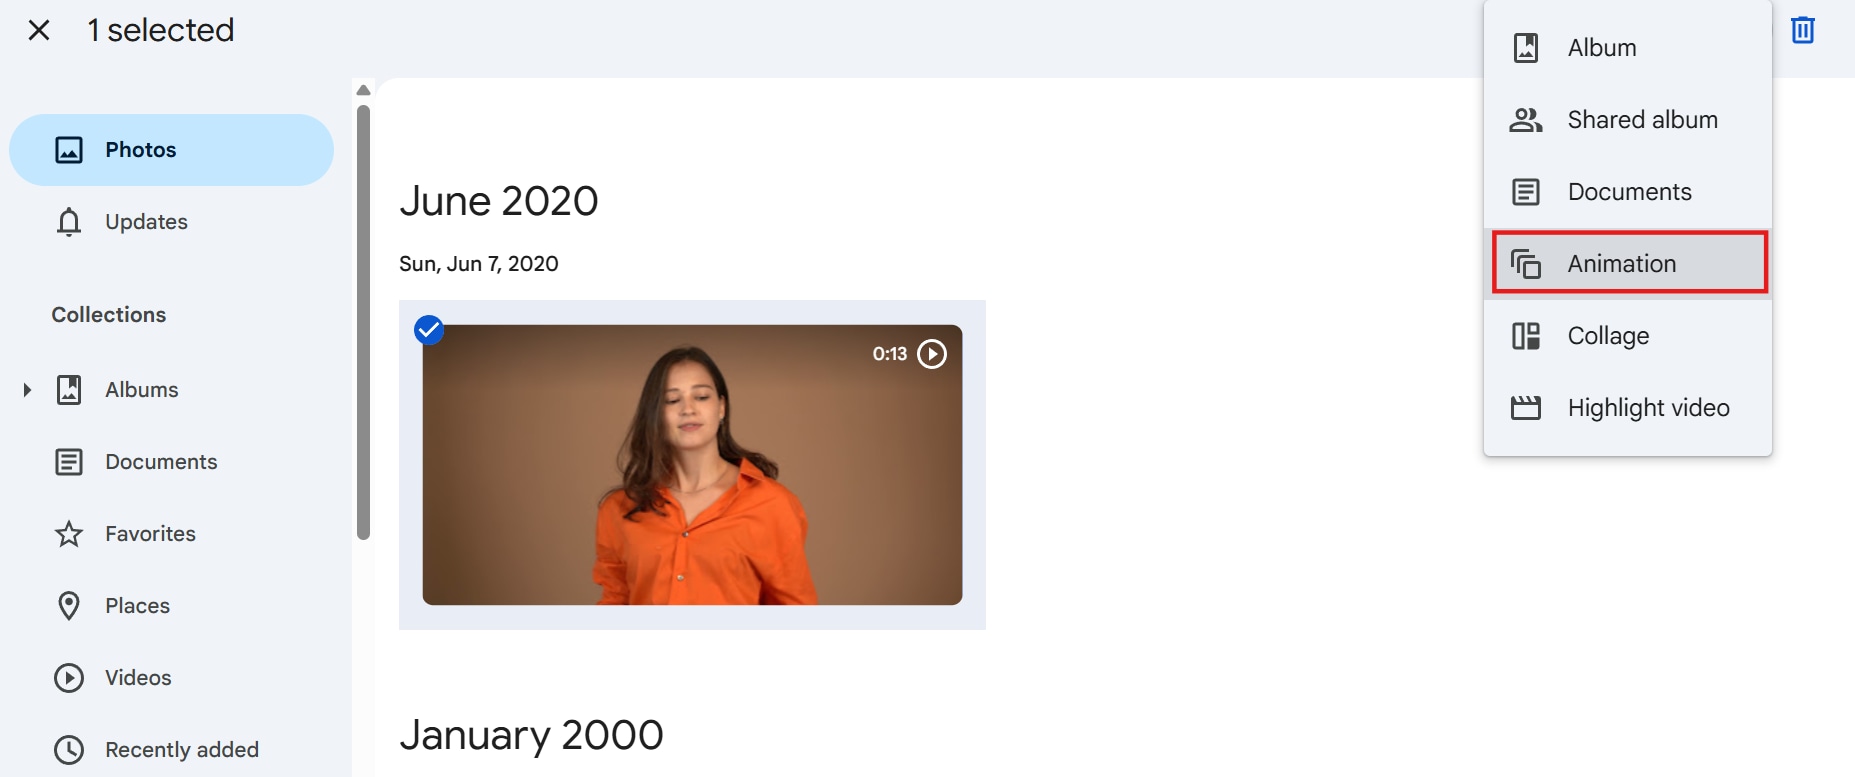
Step 2: Create Animation
Tap on the Create button (usually represented by a plus sign in the top-right corner) and select the Animation option, which is accessible when selecting short videos or a series of photos. This feature allows for the automatic creation of looping GIF animations directly within the app.
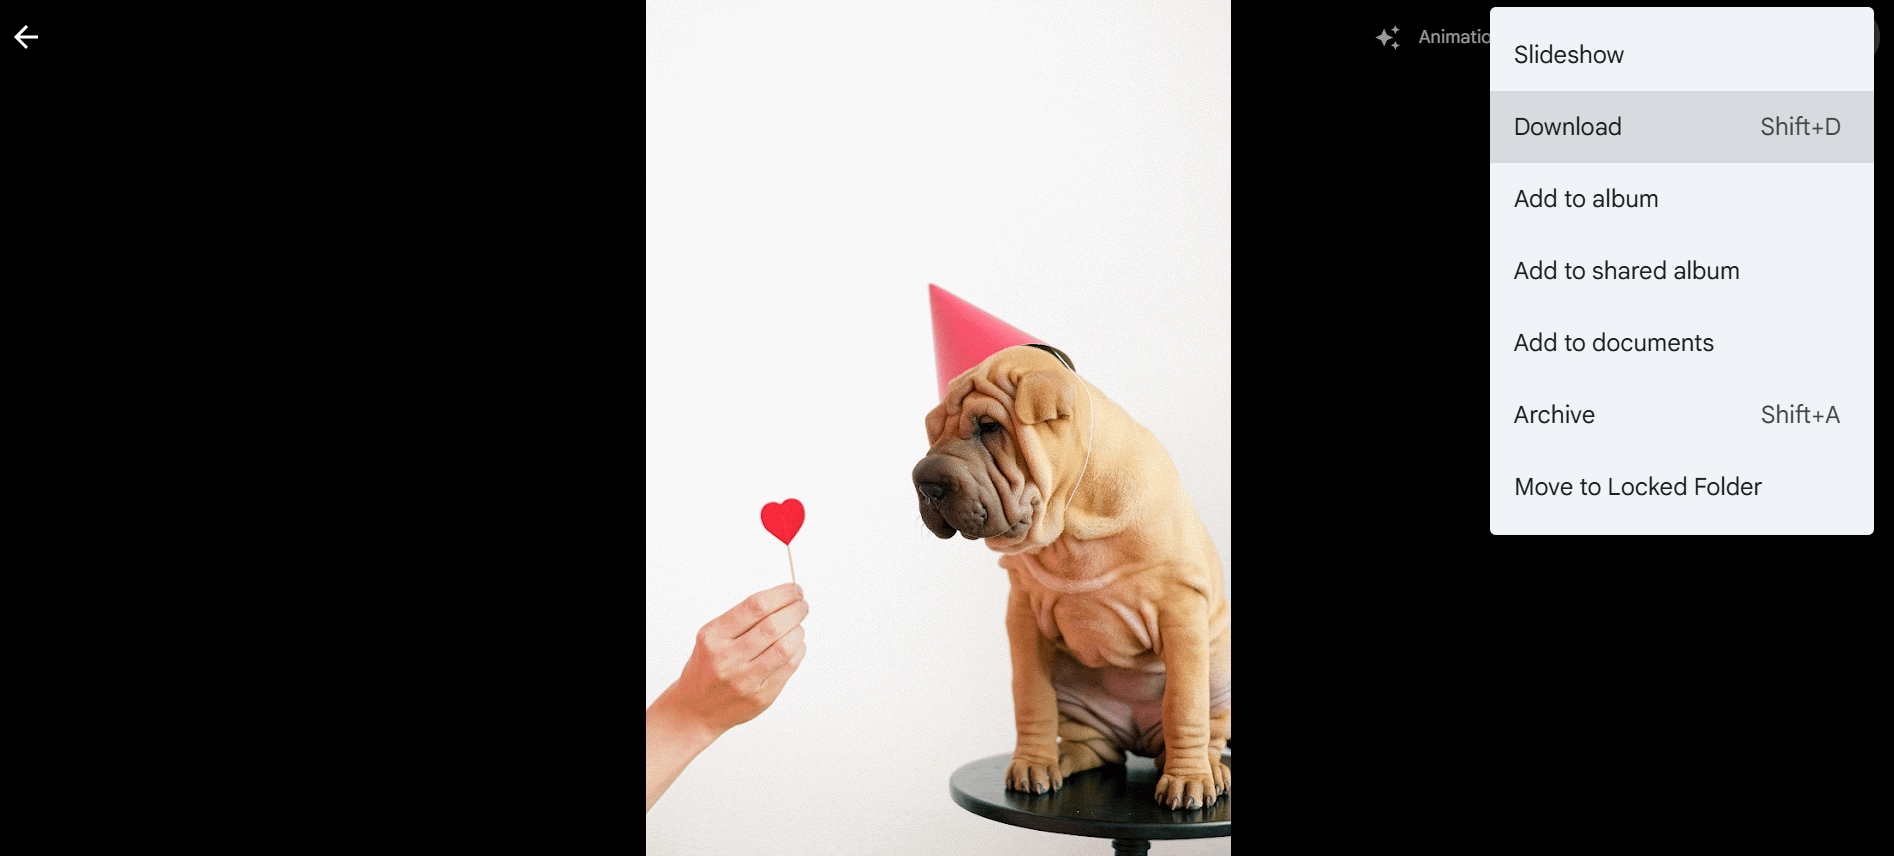
Step 3: Save and Share
Once the GIF is generated, tap Save to store it in your photo library. Afterward, you can easily share your newly created GIF on social media platforms or through messaging apps directly from Google Photos.
Conclusion
In this guide, we’ve explored various ways to turn video into GIF using both online tools and mobile apps. Whether you’re using shortcuts on your iPhone, converting YouTube clips online, or using Google Photos, creating GIFs from videos has never been easier. For those who need high-quality, customizable conversions, UniConverter offers an all-in-one solution. It allows you to create GIFs effortlessly, with added features like a Voice Changer to modify audio and a Video Editor to further enhance your videos. These extra tools make UniConverter a versatile choice for all your multimedia needs.
FAQs
1. What is the best video format to use when making a GIF?
MP4 is generally the most compatible format for GIF conversion. It maintains good quality and is widely supported by most GIF-making tools. Using a higher quality source video will generally lead to a better quality GIF.
2. How can I reduce the file size of my GIFs?
Reduce the GIF's resolution, limit the number of frames, or decrease the color palette. Many tools offer compression options. Additionally, keeping the GIF short in duration will help reduce file size.
3. Can I create GIFs from YouTube videos?
Yes, many online tools like Kapwing allow you to paste a YouTube URL and select a portion of the video to convert into a GIF. Ensure you are using content that you have the right to use.
4. Is it possible to add text or effects to a GIF?
Yes, many GIF-making tools, including UniConverter and online editors, offer options to add text, stickers, and effects. These features allow you to personalize your GIFs and make them more engaging.
5. What is the ideal frame rate for a GIF?
A frame rate of 15-20 frames per second (fps) is generally ideal. It provides a smooth animation without creating an excessively large file size. Lower frame rates can result in choppy GIFs.

