

Have you ever snapped the perfect shot—only to discover it’s too dark, too bright, or just… off? That sinking feeling when your photo doesn’t reflect the magic you saw with your eyes is something every creator knows too well. Shadows that swallow details, highlights that burn faces, and uneven lighting that steals the soul of your picture — these are the silent enemies of great photography.
But here’s the good news: you don’t need perfect lighting conditions to create stunning images anymore. With the right photo lighting editing techniques and tools, you can rewrite the story of light in your photos.
This guide is your creative companion through the art of fixing exposure, taming harsh highlights, balancing backlit portraits, and achieving the perfect glow — all with the best editing tools of 2025 by your side. It’s time to make your photos shine the way they were meant to.
In this article
Part 1: Core Lighting Adjustments Every Photographer Should Know
Lighting adjustments form the backbone of every great photo. Getting exposure, contrast, and tones right can instantly elevate your image from ordinary to professional. Let’s explore the essential adjustments that every photographer should master:
Exposure: The Overall Brightness
Exposure controls how light or dark your photo appears. Too bright, and details fade; too dark, and clarity disappears. Adjust it carefully to achieve a balanced, natural brightness.
Contrast: Making Your Image Pop
Contrast defines the difference between light and dark areas. Increasing it adds depth and drama, while reducing it creates a softer, more muted mood.
Highlights & Shadows: Recovering Detail
Fine-tuning highlights restores lost details in bright areas, while lifting shadows uncovers hidden textures in darker regions — adding balance and realism.
Whites & Blacks: Defining the Tonal Range
Setting proper white and black points sharpens tonal range. Whites bring brilliance, while blacks add richness and grounding to your photo.
Part 2: How to Fix Dark & Underexposed Photos with Photo Lighting Editor
If you need a fast, user-friendly way to rescue dark or underexposed photos, Wondershare UniConverter (which includes an AI Image Enhancer) is a surprisingly capable all-in-one option. Its AI-powered image tools can brighten underexposed shots, reduce noise, restore detail in low-light areas, and upscale resolution with one click — useful when you want quick, consistent results without a steep learning curve. UniConverter offers both an online enhancer and desktop modules (batch processing, face enhancement, color correction and noise reduction), so you can fix single images or dozens at once. It’s a practical choice for photographers who need reliable exposure repair alongside a broader media toolkit. Learn more or try the AI Image Enhancer on UniConverter’s site.

Functions of AI photo enhancer
- Portrait Enhancer: This feature refines facial details by smoothing skin, enhancing eyes, and balancing tones for a natural yet polished look. It ensures portraits appear professional without over-editing or losing authenticity.
- Super Enlargement: AI-driven enlargement technology lets you upscale images up to several times their original size without losing quality. It maintains sharpness and detail, making small photos suitable for prints or high-resolution use.
- Image Sharpener: This tool enhances edge definition and brings clarity to slightly blurred images. It helps restore focus, making textures, text, and fine elements appear crisp and detailed.
- Image Denoiser: Designed to clean up grain and digital noise, especially in low-light or high-ISO photos. It smooths unwanted speckles while keeping image texture natural and true-to-life.
- Texture Optimization: Improves the surface details of materials like fabric, skin, or landscapes. It enhances depth and realism, ensuring your images have a balanced, tactile look without harsh contrast.
- Photo Restoration: Revives old, damaged, or faded photographs using advanced AI repair tools. It removes scratches, corrects discoloration, and restores lost clarity, bringing vintage memories back to life.
Step-by-step guide to improve lighting of photos
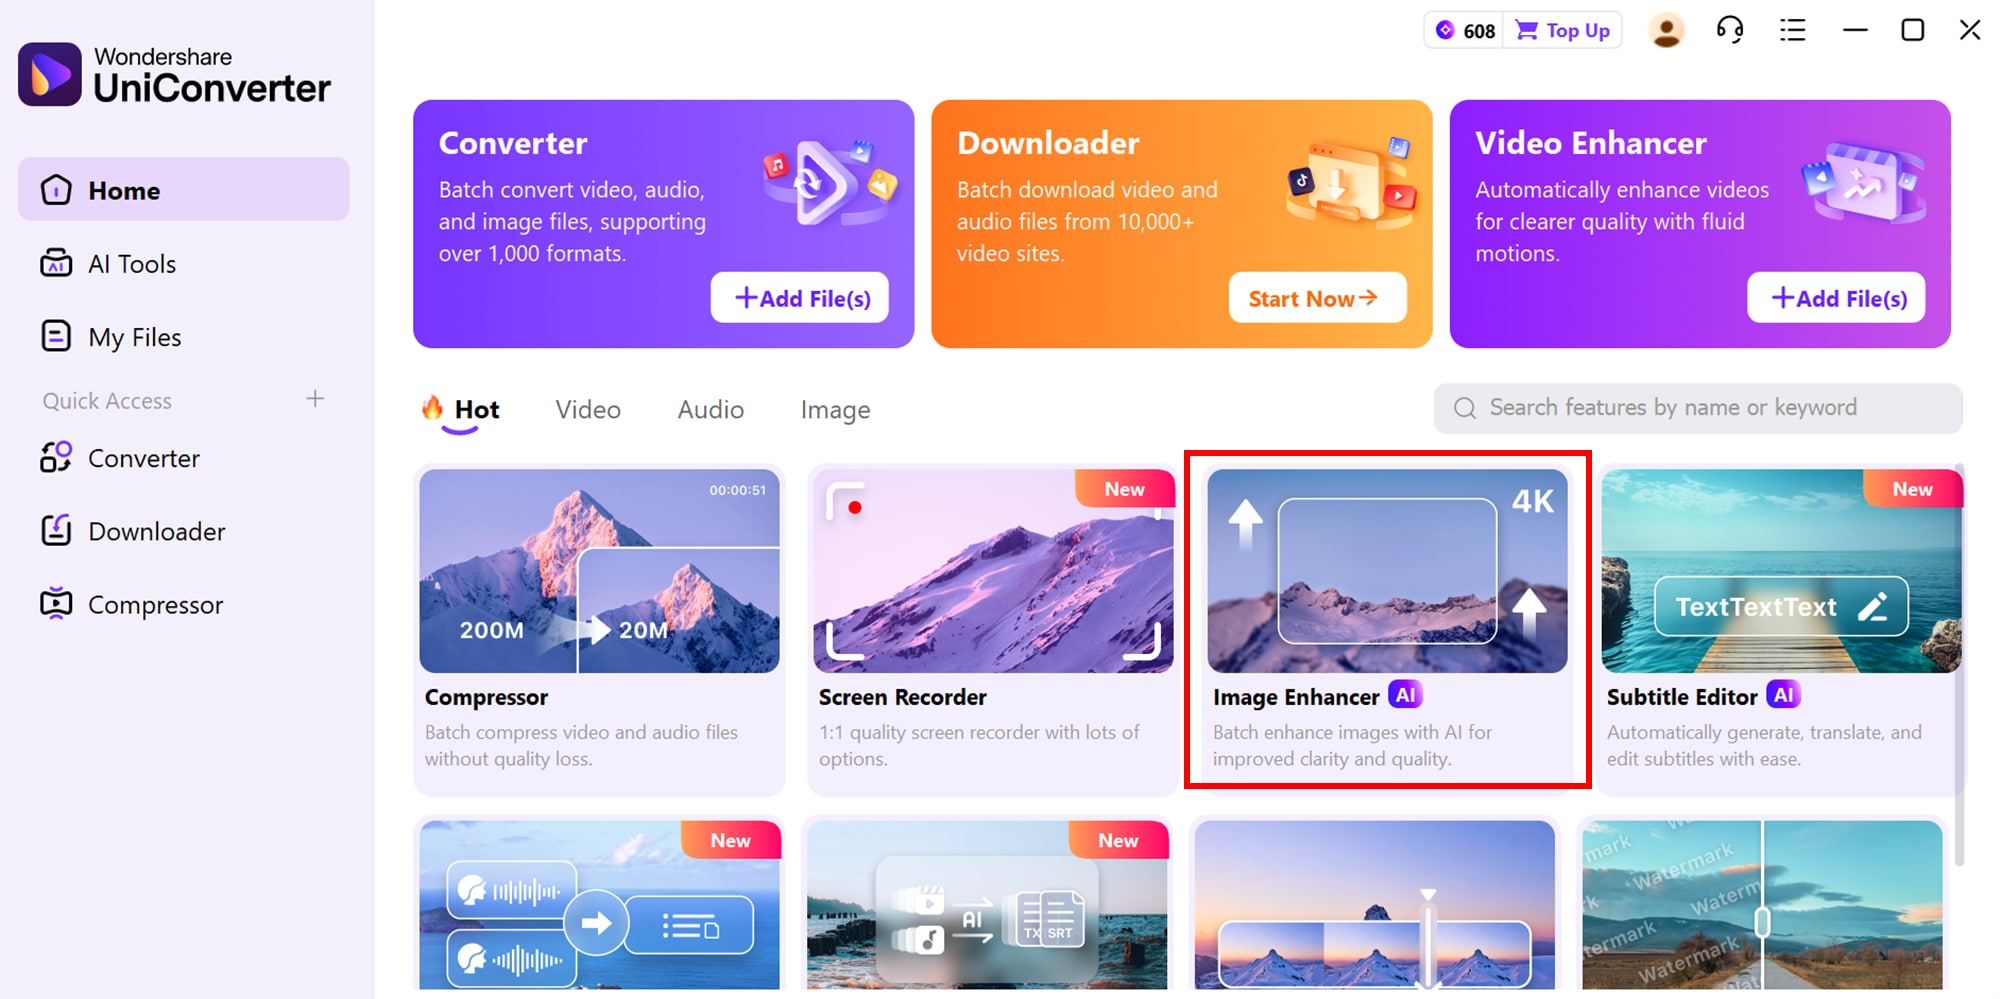
Step 1: Enter AI Image Enhancer
Start by navigating to the UniConverter homepage and locating the AI Image Enhancer tool. Once selected, you’ll enter a clean, intuitive interface designed for effortless photo enhancement, making it easy to begin editing right away.
Step 2: Upload Images
Click the upload button to add the photos you want to enhance. UniConverter’s AI will automatically detect the image quality and suggest smart adjustments, including exposure correction, noise reduction, and detail enhancement, while still allowing you to tweak settings manually if desired.

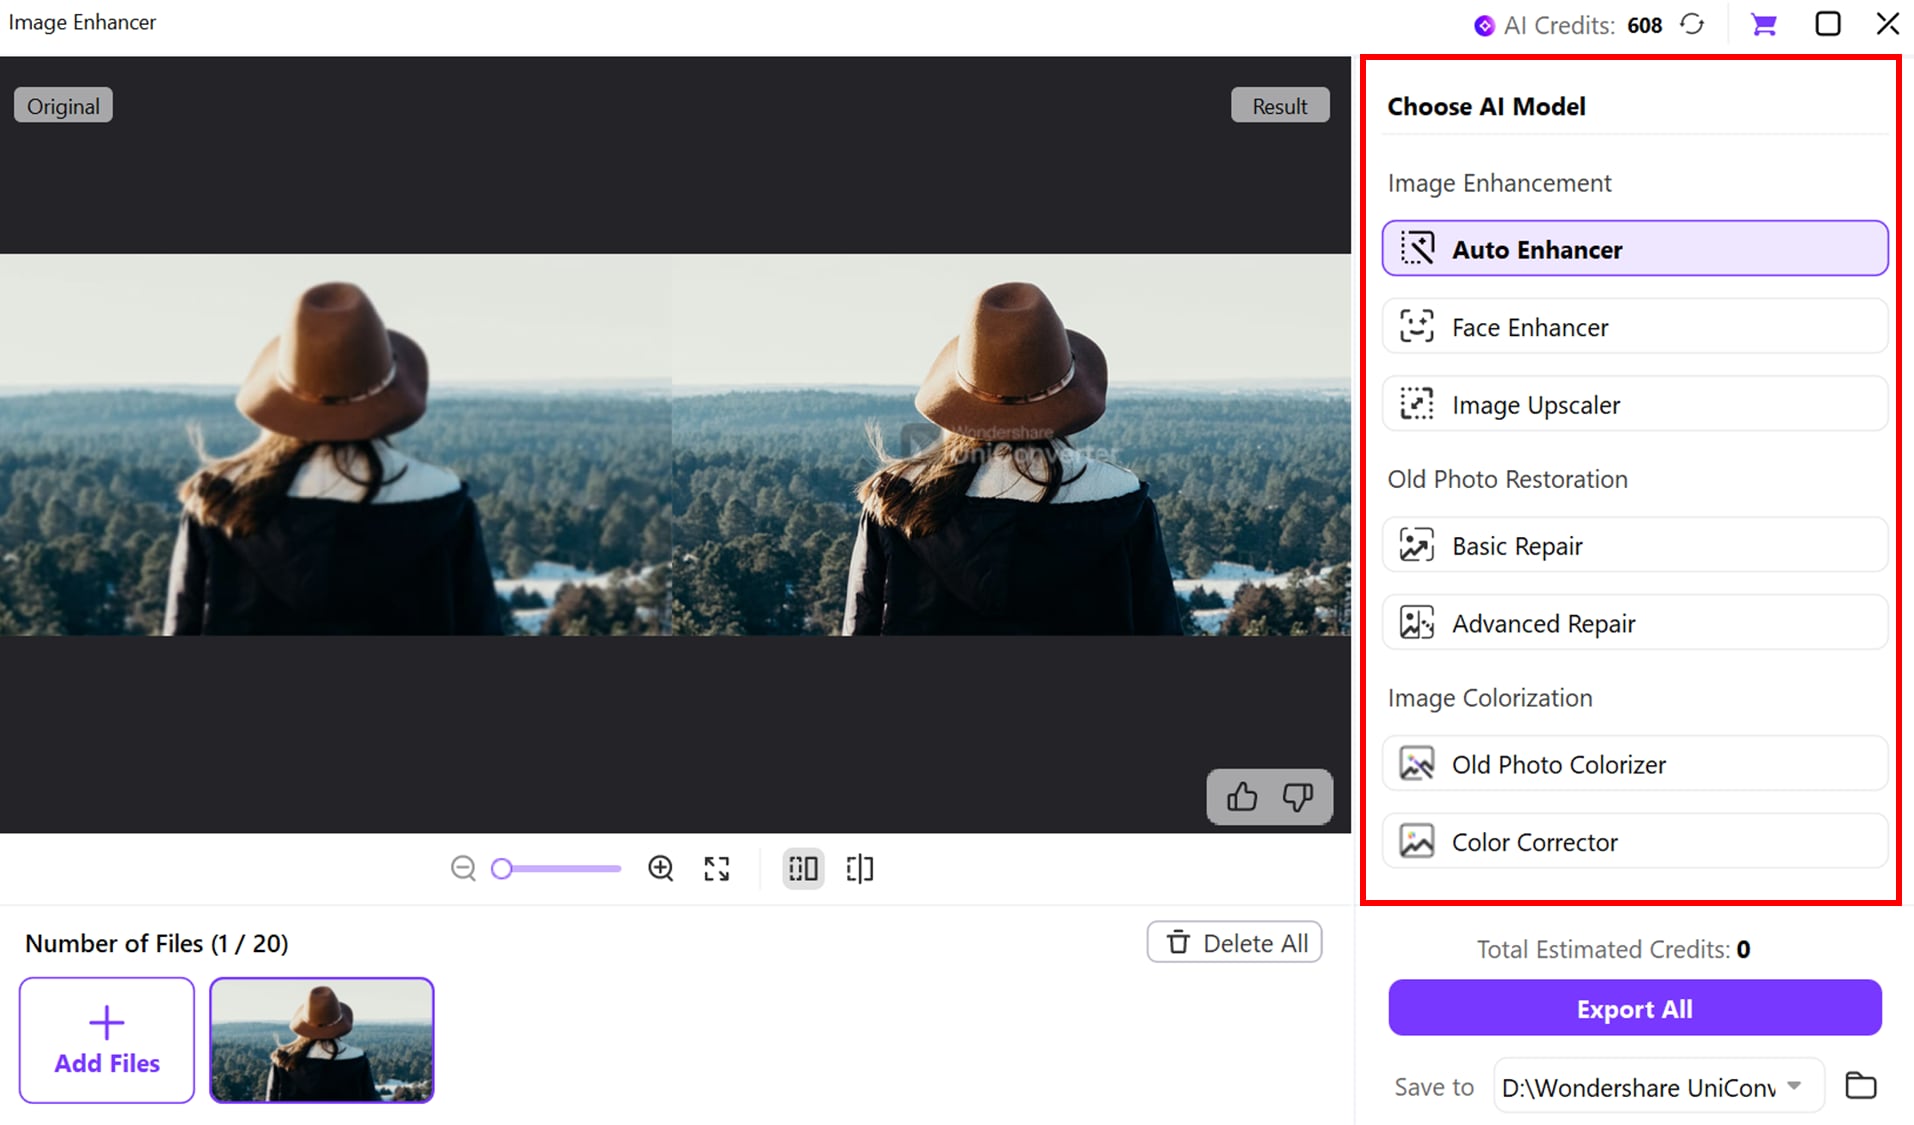
Step 3: Fine-tune manually
Choose the AI model and adjust exposure, shadows, highlights, and noise reduction sliders to taste (reduce noise first, then lift shadows).
Step 4: Export Results
After the enhancement process is complete, review the improved image for brightness, sharpness, and overall quality. If you’re satisfied with the results, export the image in your preferred format and resolution; you can also make further adjustments and re-export multiple versions to compare outcomes.
Use cases of AI photo enhancer
- Restoring old family photos that are too dark.
- Brightening smartphone shots taken in low light or indoor events.
- Salvaging underexposed portrait sessions for client delivery.
- Preparing product images shot in imperfect studio lighting.
- Upscaling and resizing social media images for higher visual quality.
- Batch-processing event photos to quickly fix dozens of underexposed frames.

Easy to Use Batch Photo Lighting Editor
Part 3: How to Fix Taming Overexposure and Harsh Light
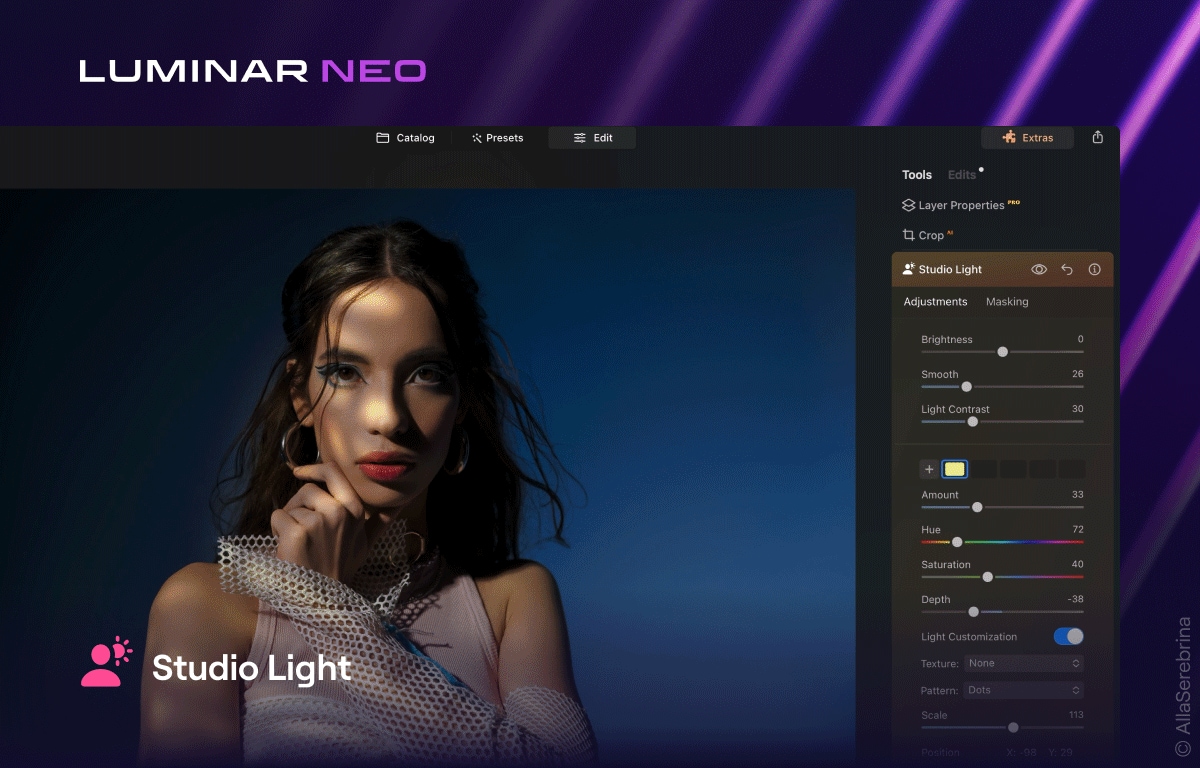
For photos suffering from overexposure or harsh lighting, Luminar Neo is a powerful solution. This AI-driven photo editor helps you balance bright areas, recover lost details, and soften harsh sunlight or reflections with intuitive tools. Its smart algorithms automatically detect blown-out highlights and allow precise adjustments without affecting the rest of the image. Perfect for photographers and content creators, Luminar Neo combines ease-of-use with professional-grade editing to turn harsh, glaring shots into visually balanced masterpieces. Additionally, it offers batch processing for multiple images, saving time for large projects. Its creative filters and AI-powered enhancements also allow you to add artistic flair while maintaining natural lighting.
Features of Luminar Neo
- Highlight Recovery: This feature restores details in overly bright or blown-out areas of your image. It ensures that highlights retain texture and don’t appear flat or washed out.
- AI Accent & Light Enhancer: Automatically balances exposure, color, and contrast across the entire photo. It intelligently adjusts lighting to make the image look natural without manual tweaking.
- Tone Mapping: Allows local adjustments of brightness and contrast for specific parts of your image. This gives you precise control to recover details in both highlights and shadows.
- Sky & Light Control: Reduces harsh sunlight, reflections, or glare in outdoor and indoor photos. It softens overly bright areas while keeping other regions intact.
- One-click Presets: Offers quick solutions for common overexposure problems. These smart presets save time while providing professional-looking corrections instantly.
Step by Step Guide How to Fix Taming Overexposure and Harsh Light
Step 1: Upload Your Photo
Open Luminar Neo and upload the image you want to correct. The intuitive workspace immediately displays your photo and offers AI-powered enhancement options for lighting issues.
Step 2: Apply Highlight Recovery
Use the Highlight Recovery tool to restore blown-out areas. Adjust the slider gradually to bring back texture in bright sections without affecting the midtones and shadows.
Step 3: Use AI Accent & Light Enhancer
Activate the AI Accent & Light Enhancer to automatically balance exposure, color, and contrast across your photo. This step quickly improves overall lighting, making the image look natural and evenly lit.
Step 4: Fine-tune with Tone Mapping & Light Controls
For more precise adjustments, use Tone Mapping to control brightness and contrast locally, and Sky & Light Control to soften harsh sunlight or reflections. These tools help achieve a perfectly balanced photo.
Step 5: Export Your Image
Once satisfied with the results, export your photo in the desired format and resolution. You can also save different versions to compare adjustments or share directly to social media.
Use Cases of Luminar Neo
- Correcting outdoor photos taken in harsh midday sunlight.
- Fixing overexposed wedding or event shots.
- Reducing glare in indoor photography with strong window light.
- Balancing high-contrast landscape photography for natural detail.
- Quickly enhancing social media images that appear washed out.
Part 4: Tool to Solve the Backlit Portrait Dilemma
For photographers struggling with backlit portraits,Adobe Lightroom Classic is an industry-standard solution. This powerful editing software allows you to recover details lost in shadows, balance bright backgrounds, and enhance subject clarity with precision. Its intuitive sliders and AI-powered features make correcting tricky lighting situations straightforward. Lightroom Classic is perfect for portrait photographers who want natural, professional results while preserving mood and depth in every shot. Whether shooting outdoors at sunset or indoors with strong window light, Lightroom gives you full control over every tonal adjustment. Its advanced tools ensure your subjects always stand out sharply against challenging backgrounds.

Features of Adobe Lightroom Classic
- Shadow & Highlight Recovery: Restore details in both dark and bright areas without affecting the rest of the photo. It helps bring your subject out of harsh backlight naturally.
- Exposure & Contrast Adjustment: Fine-tune overall brightness and contrast to balance subject and background lighting. This ensures the portrait looks evenly lit and vibrant.
- Selective Editing Tools: Use brushes, gradients, and masks to adjust specific areas like the subject’s face or background. Perfect for fine-tuning lighting on tricky parts.
- AI-Powered Auto Enhance: Automatically analyzes the image and applies intelligent adjustments for exposure, shadows, highlights, and color balance. Saves time while delivering professional-quality results.
- Color & Tone Correction: Adjust color temperature, saturation, and tonal curves to harmonize foreground and background lighting. This creates a more natural and visually appealing portrait.
Step by Step Guide to Solve the Backlit Portrait Dilemma
Step 1: Import Your Backlit Photo
Open Lightroom Classic and import the portrait you want to edit. Make sure the image is in a high-resolution format to preserve details during adjustments, and preview it in the Develop module for easier access to all editing tools.
Step 2: Adjust Shadows and Highlights
Use the Shadows slider to bring out details in the subject’s face or other dark areas. At the same time, reduce Highlights to tone down overly bright backgrounds, balancing the light between foreground and background.
Step 3: Fine-tune Exposure & Contrast
Adjust the Exposure slider to correct the overall brightness of the image. Then, tweak Contrast to enhance depth and make the subject stand out naturally against the background without overdoing the effect.
Step 4: Apply Selective Edits if Needed
Use Adjustment Brushes, Radial Filters, or Graduated Filters to target specific areas, like bright windows or shadows on the subject. This ensures the lighting is perfectly balanced where it matters most, without affecting the rest of the image.
Step 5: Export Your Enhanced Portrait
Once satisfied with the edits, export your portrait in your preferred format and resolution. You can also save a copy with different settings for social media, print, or portfolio use.
Use Cases of Lightroom Classic AI Enhancer
- Correcting portraits shot against strong backlighting.
- Recovering details in shadowed faces during sunset or indoor lighting.
- Balancing subjects with bright windows or natural light behind them.
- Enhancing professional headshots for consistent studio-quality results.
- Quickly preparing social media images with natural lighting and vibrant subjects.
Part 5: Tool for Creating Perfect, Even Lighting
For photographers aiming to achieve perfectly even lighting in their images, Capture One Pro is a professional-grade solution. This advanced photo editing software provides precise control over exposure, shadows, highlights, and tonal range to ensure balanced and natural-looking lighting across all types of images. Its intuitive interface and powerful tools make it easy to correct uneven illumination, recover lost details, and enhance clarity. Capture One Pro is ideal for portrait, product, and landscape photographers who want consistent, polished results. With features like HDR recovery, Luma curves, and Clarity adjustments, it allows you to achieve professional-quality lighting in every shot.
Features of Capture One Pro
- High Dynamic Range (HDR) Tool: Recovers highlight and shadow details to balance exposure across the image. This ensures even lighting without losing texture or depth.
- Levels Tool: Adjusts black and white points to define the tonal range of your photo. It helps create a natural balance between dark and bright areas.
- Clarity and Structure Sliders: Enhance midtone contrast and fine details without introducing noise. This improves texture and gives your image a polished look.
- Luma Curve: Modifies brightness levels across the image for precise tonal adjustments. It allows subtle control over highlights, shadows, and midtones.
- Lens Correction (LCC): Corrects lens-induced lighting inconsistencies to ensure uniform illumination. Ideal for wide-angle or studio photography where lighting can vary across the frame.
Step-by-Step Guide to Create Perfect, Even Lighting
Step 1: Import Your Image
Open Capture One Pro and import the image you wish to edit. Ensure the photo is high-resolution to preserve details during adjustments, and navigate to the editing workspace.
Step 2: Adjust Exposure with HDR Tool
Use the HDR tool to recover details in bright and dark areas. This balances overall exposure and ensures even lighting throughout the image.
Step 3: Refine Tonal Range with Levels and Luma Curve
Set the black and white points using the Levels tool, then fine-tune brightness across the photo with the Luma Curve. This ensures a natural tonal balance and prevents areas from appearing too dark or blown out.
Step 4: Enhance Details with Clarity and Structure
Apply the Clarity and Structure sliders to improve midtone contrast and sharpen textures. This step ensures the image looks crisp and professionally lit.
Step 5: Correct Lens Effects with LCC (Optional)
If your lens introduces lighting inconsistencies, use the LCC tool to fix uneven illumination.
Step 6: Export Your Final Image
Once satisfied, export your photo in your desired format and resolution. You can also save multiple versions for print, social media, or portfolio use.
Use Cases of Capture One Pro
- Correcting portraits taken under inconsistent or uneven lighting.
- Balancing product photography shots in studio setups for uniform illumination.
- Enhancing landscape photos with high-contrast lighting conditions.
- Refining professional headshots for consistent studio-quality results.
- Preparing images for social media with natural, even lighting and vibrant colors.
Conclusion
Mastering photo lighting is essential for creating professional, visually striking images, whether you’re dealing with dark shadows, harsh sunlight, backlit portraits, or uneven studio lighting. Tools like UniConverter, Luminar Neo, Adobe Lightroom Classic, and Capture One Pro provide powerful, AI-driven solutions to correct exposure, balance highlights and shadows, enhance colors, and achieve consistent lighting across your photos.
Among them, Wondershare UniConverter stands out as a versatile option for quickly brightening underexposed images, reducing noise, and enhancing overall quality with minimal effort.
Easy to Use Batch Photo Lighting Editor
FAQs
-
1. Can AI photo enhancers maintain the natural look of my images?
Yes, most AI photo enhancers are designed to intelligently adjust lighting, shadows, and highlights while preserving the original texture and details of your photo. They enhance the image without making it look over-processed or artificial. -
2. Are these lighting editing tools suitable for beginners?
Absolutely. Many tools offer one-click presets and AI-powered adjustments, making them beginner-friendly. Even without technical expertise, you can achieve professional-looking results. -
3. How do I quickly fix multiple underexposed images at once?
Some tools, like Wondershare UniConverter, support batch processing, allowing you to enhance lighting and exposure across multiple photos simultaneously. This is especially useful for event shoots or large photo collections. -
4. Can these software solutions help with indoor and low-light photography?
Yes. AI-powered editors can brighten dark areas, reduce noise, and recover hidden details in indoor or low-light shots. This makes them ideal for portraits, product photos, and indoor events. -
5. Do I need a high-end computer to run these photo lighting editors?
Not necessarily. Most modern tools are optimized to run smoothly on standard PCs and laptops. Cloud-based or online options further reduce hardware dependency, making them accessible to a wider audience.

