Social Media
- TRY IT FREE TRY IT FREE
- 1. Adobe Premiere Tips+
-
- 1.1 export premiere pro
- 1.2 premiere editing
- 1.3 premiere pro export for instagram
- 1.4 premiere pro compress video
- 1.5 export avi premiere pro
- 1.6 4k video from adobe premiere
- 1.7 gopro video from adobe premiere
- 1.8 best format to export from premiere pro
- 1.9 adobe video maker
- 1.10 premiere to avid
- 1.11 adobe premiere export mov
- 1.12 import mkv to adobe premiere
- 1.13 premiere prores
- 1.14 Adobe Premiere vs Final Cut Pro
- 1.15 Best Premiere Pro
- 2. Youtube Tips+
-
- 2.1 youtube video editor
- 2.2 youtube video editor app
- 2.3 youtube video editor free
- 2.4 youtube video editor online
- 2.5 youtube music editor
- 2.6 avs video editor youtubers
- 2.7 easy video editor for youtube
- 2.8 y2mate mp4
- 2.9 youtube clip editor
- 2.10 youtube video format
- 2.11 youtube srt
- 2.12 mxf youtube
- 2.13 youtube video maker free
- 2.14 youtube video maker app
- 2.15 youtube converter dailymotion
- 3. Facebook Tips+
- 4. Instagram Tips+
- 5. Twitter Tips+
- 6. Whatsapp Tips+
All Topic
- YouTube Tips
-
- AI Tools Tips
-
- AI Photo Enhancer Tips
- Voice Changer Tips
- AI Thumbnail Maker Tips
- AI Script Generator Tips
- Smart Summarizer
- AI Subtitle Generator Tips
- Watermark Remover
- Vocal Remover Tips
- Speech to Text Tips
- AI Video Tips
- AI Image Tips
- AI Subtitle Translator Tips
- Video Extractor Tips
- Text to Speech Tips
- AI Video Enhancer Tips
- DVD Users
- Social Media Users
- Camera Users
- Photography
- Creative Design
- Movie Users
- Travelling Fans
- Educational Users
- More Solutions
- Holidays and Commemoration
- Game Lovers
- Other Tips
How Adobe Premiere Pro Export Videos to MP4
by Christine Smith • 2026-01-21 18:58:54 • Proven solutions
You may wish to upload a video on Vimeo, YouTube, or any other platform after editing it. You could also want to play it on your tablet, computer, or smartphone, but the format is not supported. You got your troubles solved! This article will show you how to use Adobe Premiere Pro export MP4, a format compatible with the mentioned platforms. Something you need to pay attention to when carrying out the task is to save your project file before you start. The steps you take to save the file will help you find it fast. To save premiere pro as mp4, read on the steps below.
- Part 1. How Adobe Premiere Pro Export Video to MP4
- Part 2. How to Export Video to MP4 in Adobe Premiere Pro Alternative
Part 1. How Adobe Premiere Pro Export Video to MP4
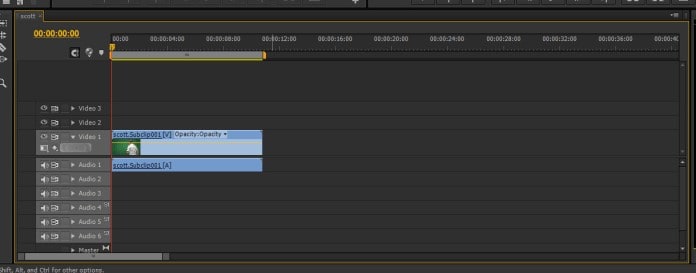
Step 1: Sequence Selection.
After the first important step of saving your project file in premiere pro, you need to select the desired sequence to export. To do this, you will have to click on the Timeline panel and choose a range specification if it is not the entire project on adobe premiere pro you are exporting.
Step 2: Exporting.
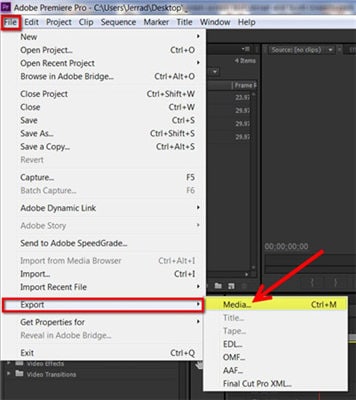
For the Export settings window to initialize, you will click on “File” and choose “Export,” then go to “Media.” To save your time, to export premiere pro to mp4, use a shortcut if you use Windows, which is CTRL+M. If using the Mac, your shortcut for the Export function is CMD+M.
Step 3: Format Selection.
To select the format and export mp4 in the premiere, you will select the value on the Export Settings window. The value offers you an option to save premiere pro as an mp4 media file that will be compatible with your devices and play on various platforms you upload it.

Step 4: Selecting Presets.
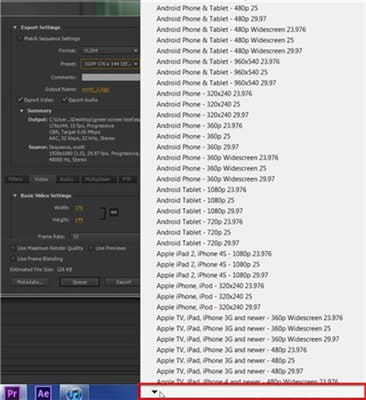
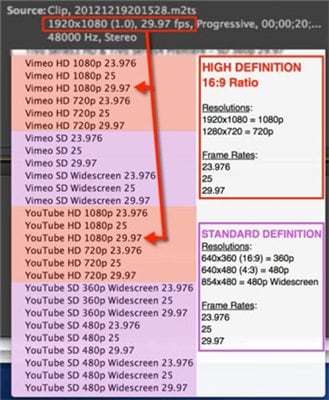
The adobe premiere can choose a preset for you, but you can do it yourself. Certain input files have various attributes, and you may have to select presets for them instead of the program. You may also need to limit your video’s final resolution. Clicking on the Preset menu will open you to a long list with options, go at the bottom to Vimeo and YouTube options. You can choose between standard or premiere pro export mp4 1080p high definition resolutions.
Step 5: Naming Your File.
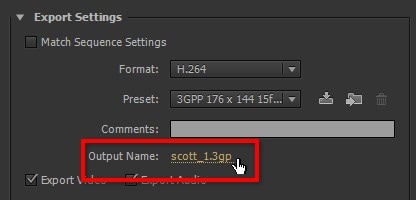
Your project file in adobe premiere pro needs a name to make it easier for you when searching for it. You can offer a custom name to your file by clicking on Output Name, and to a location on the hard drive.
Step 6: Exporting Or Queuing Your Video.
Exporting your video to premiere mp4 is well done when you have finished all your computer tasks. You need to close all running programs before starting the video export process as it needs most of the computer memory. To start exporting, click at the bottom on the “Export.” You may wish to continue working on your tasks as you export your file later on. Click on Queue and send the file to the Adobe Media Encoder program in premiere pro. The program can allow you to export several videos later.

Step 7: Verify Before Upload.
To ensure the video you want to upload after exporting to mp4 in premiere pro is the best version, you need to play it first. The final step helps you make any changes you may have missed and been sure of what you are uploading. The final video from export adobe premiere to mp4 needs to be appealing to your target audience, and thus its quality matters.
Part 2. How to Export Video to MP4 in Adobe Premiere Pro Alternative
Wondershare UniConverter (originally Wondershare Video Converter Ultimate) is a powerful alternative to adobe premiere pro. It has features that enable you to convert your videos to MP4 with no hassles. Below are the simple steps you need to know to start the process.
Wondershare UniConverter
-
Directly convert videos to MP4, AVI, MKV, and other 1,000 formats or vice versa
-
120X faster conversion speed than any conventional converters
-
Edit the video files with trimming, cropping, cutting, merging, adding subtitles, etc.
-
Burn videos to DVD with customized free DVD menu templates
-
Download or record videos from 10,000+ video sharing sites
-
Industry-leading APEXTRANS technology converts videos with zero quality loss or video compression
-
Versatile toolbox combines video metadata editor, GIF maker, video compressor, and screen recorder
Step 1 Add Your Videos.
To add any video on Wondershare Uniconverter, click on the Converter section, then on the Converting tab, and the “Add Files.” On the program, choose the files you need to convert and add them after clicking the “Open” button.

Step 2 Choosing The Video Format.
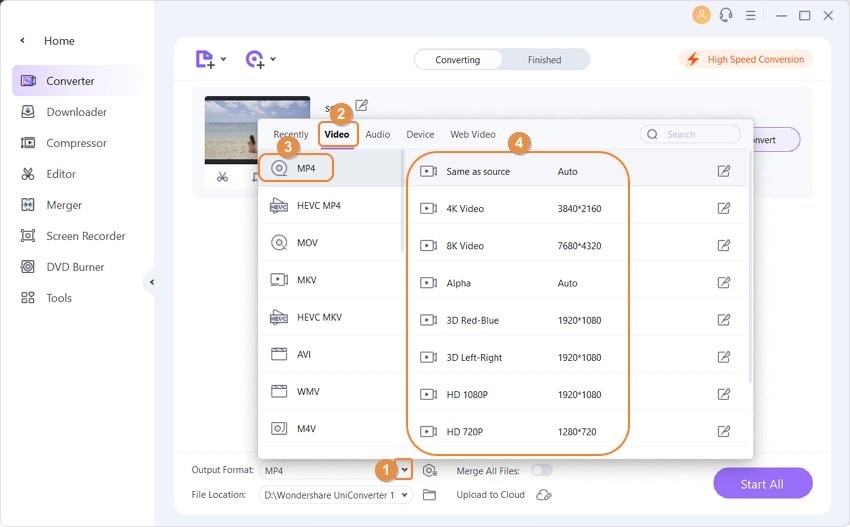
After adding the video, you can convert it to MP4. On the Video tab, there are output formats to choose from. On the output format, you can select your desired format, and in this case, you will choose the MP4.
Step 3 Converting the Video.
You can now convert the videos by clicking on the “Start All” button. You can also click on the “Convert” button if you wish to convert one video after the other.

Conclusion
Converting your videos into MP4 is an easy task with the right program. For instance, you can export premiere pro to mp4 easily, as outlined above. If you want to convert and edit your videos cheaply and professionally, Wondershare UniConverter is definitely the best tool for you.
Your complete video toolbox
 Convert audios/videos to 1,000+ formats, including AVI, MKV, MOV, MP4, etc.


Christine Smith
chief Editor