

Looking for an honest FLUX.1 Kontext review before diving into AI-driven design? Well! You are not alone here. Creators, marketers, and digital artists are actively searching for tools that offer more control, smarter prompts, and faster visual outputs.
Whether you're comparing it to other AI image editors or simply want to know how it fits into your creative workflow, this guide is designed for you. We’ll break down its features, show how it handles prompt-based design. If you're curious about AI image generation that feels structured yet flexible, this review will answer exactly that.
In this article
Part 1: Why FLUX.1 Kontext Image Editor A Game Changer
FLUX.1 Kontext is a cutting-edge AI image editor from Black Forest Labs that combines in-context image generation with precision editing. It seamlessly merges text-to-image workflows with interactive adjustments, which enables users to move from broad creative concepts to pixel-level refinements. It supports three versions: Pro, Max, and a free Dev version, which suits both professionals and hobbyists. Its streamlined interface, fast processing, and visual consistency make it a go-to for designers seeking efficiency without compromise.
Performance & Key Features:
- Context-aware image editing
- Localized editing via masks and prompts
- High style and character fidelity
- Rapid iterative workflows
- Smooth multi-turn editing
Pros & Cons
Part 2: Who FLUX.1 Kontext is For
FLUX.1 Kontext is not just another AI image tool, it’s a high-precision creative assistant tailored to meet the diverse needs of modern visual workflows. It is built with advanced in-context generation and prompt-based editing, which empowers users across industries to create faster, smarter, and with greater visual fidelity. If you are a professional designer or an experimental creator, Kontext adapts to your goals without compromising quality.
Mentioned below are the key user groups that benefit most from its capabilities:
Digital artists & illustrators
For artists working on character concepts, fantasy scenes, or narrative illustrations, FLUX.1 Kontext brings a fluid, iterative workflow. This tool preserves stylistic tone and character features which means artists can experiment without disrupting core identity. Its In-context editing feature allows creative updates without restarting compositions. Whether refining linework, adjusting color palettes, or changing scenes, it's built for seamless control.
E-commerce product editors
Kontext enables e-commerce editors to make rapid visual changes that scale—like updating product backgrounds, packaging designs, or lighting effects. Its prompt or text-based editing feature reduces dependency on manual tools which helps in speeding up content refreshes for seasonal or trend-based campaigns. This tool is ideal for catalogs, thumbnails and PDP visuals as it offers minimal hallucination and strong visual clarity. The output visuals delivered by FLU.1 Kontext stays consistent and brand-safe.
Graphic designers needing quick object swaps or text edits
Designers often face tight turnarounds—Kontext makes their workflow faster and smarter. Whether swapping out elements in a campaign banner, altering colors in a mockup, or updating embedded text, the tool handles it efficiently. It supports natural language input, so designers can describe edits instead of manually masking or layering. It's especially useful for layout revisions, digital ads, and cross-platform content.
AI hobbyists and prompt engineers
For those experimenting with AI-driven creativity, FLUX.1 Kontext is a flexible sandbox. Its support for regional prompting, multi-turn editing, and fidelity preservation makes it ideal for testing out prompt logic, edge cases, or fine-tuned visual results. Hobbyists and engineers can explore how image-to-text interactions evolve, assess model behavior, and tweak workflows for storytelling, research, or aesthetic play.
Social media managers
We know that Speed and relevance are everything on social media—and Kontext delivers both. It is ideal for social media managers to quickly generate, localize, and customize visuals for platform-specific campaigns without relying on full-scale design teams. FLU.1 Kontext's iterative output options allow easy A/B testing, while the in-context controls help maintain branding.
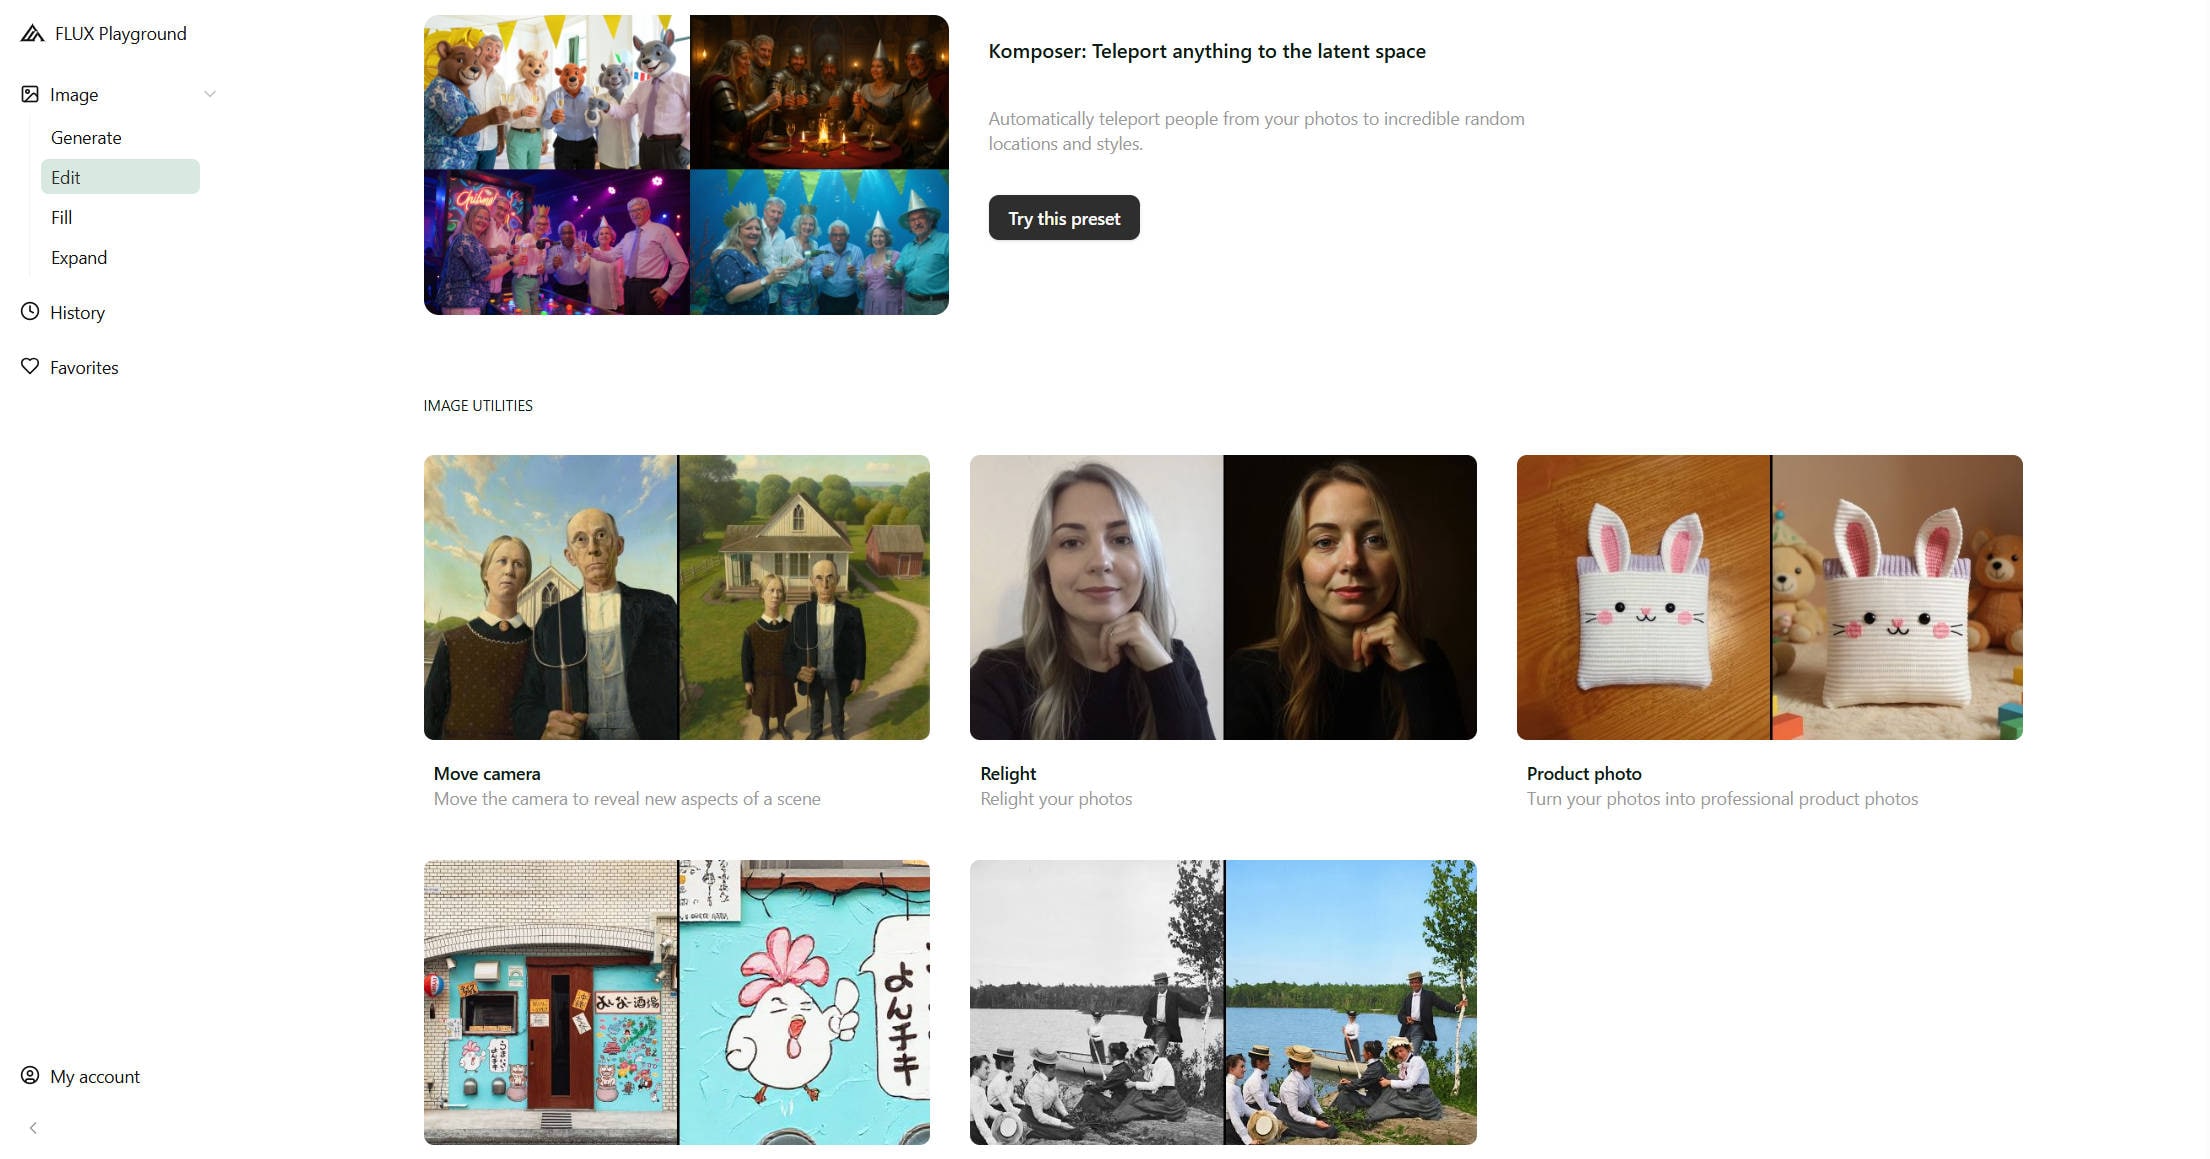
Part 3: Tools Offering Access to FLUX.1 Kontext Model
FLUX.1 Kontext is not just locked into one app or interface—it’s available across a bunch of platforms that fit different styles of working. Whether you’re someone who prefers no-code, drag-and-drop interfaces or you’re building with APIs, there’s an option that works for you. The model comes in different tiers (Dev, Pro, Max), and these tools make it easy to explore whichever version suits your needs. Below, you’ll find a list of platforms where you can use FLUX.1 Kontext, plus a quick comparison table to help you decide which one’s right for you..
Platforms Supporting FLUX.1 Kontext:
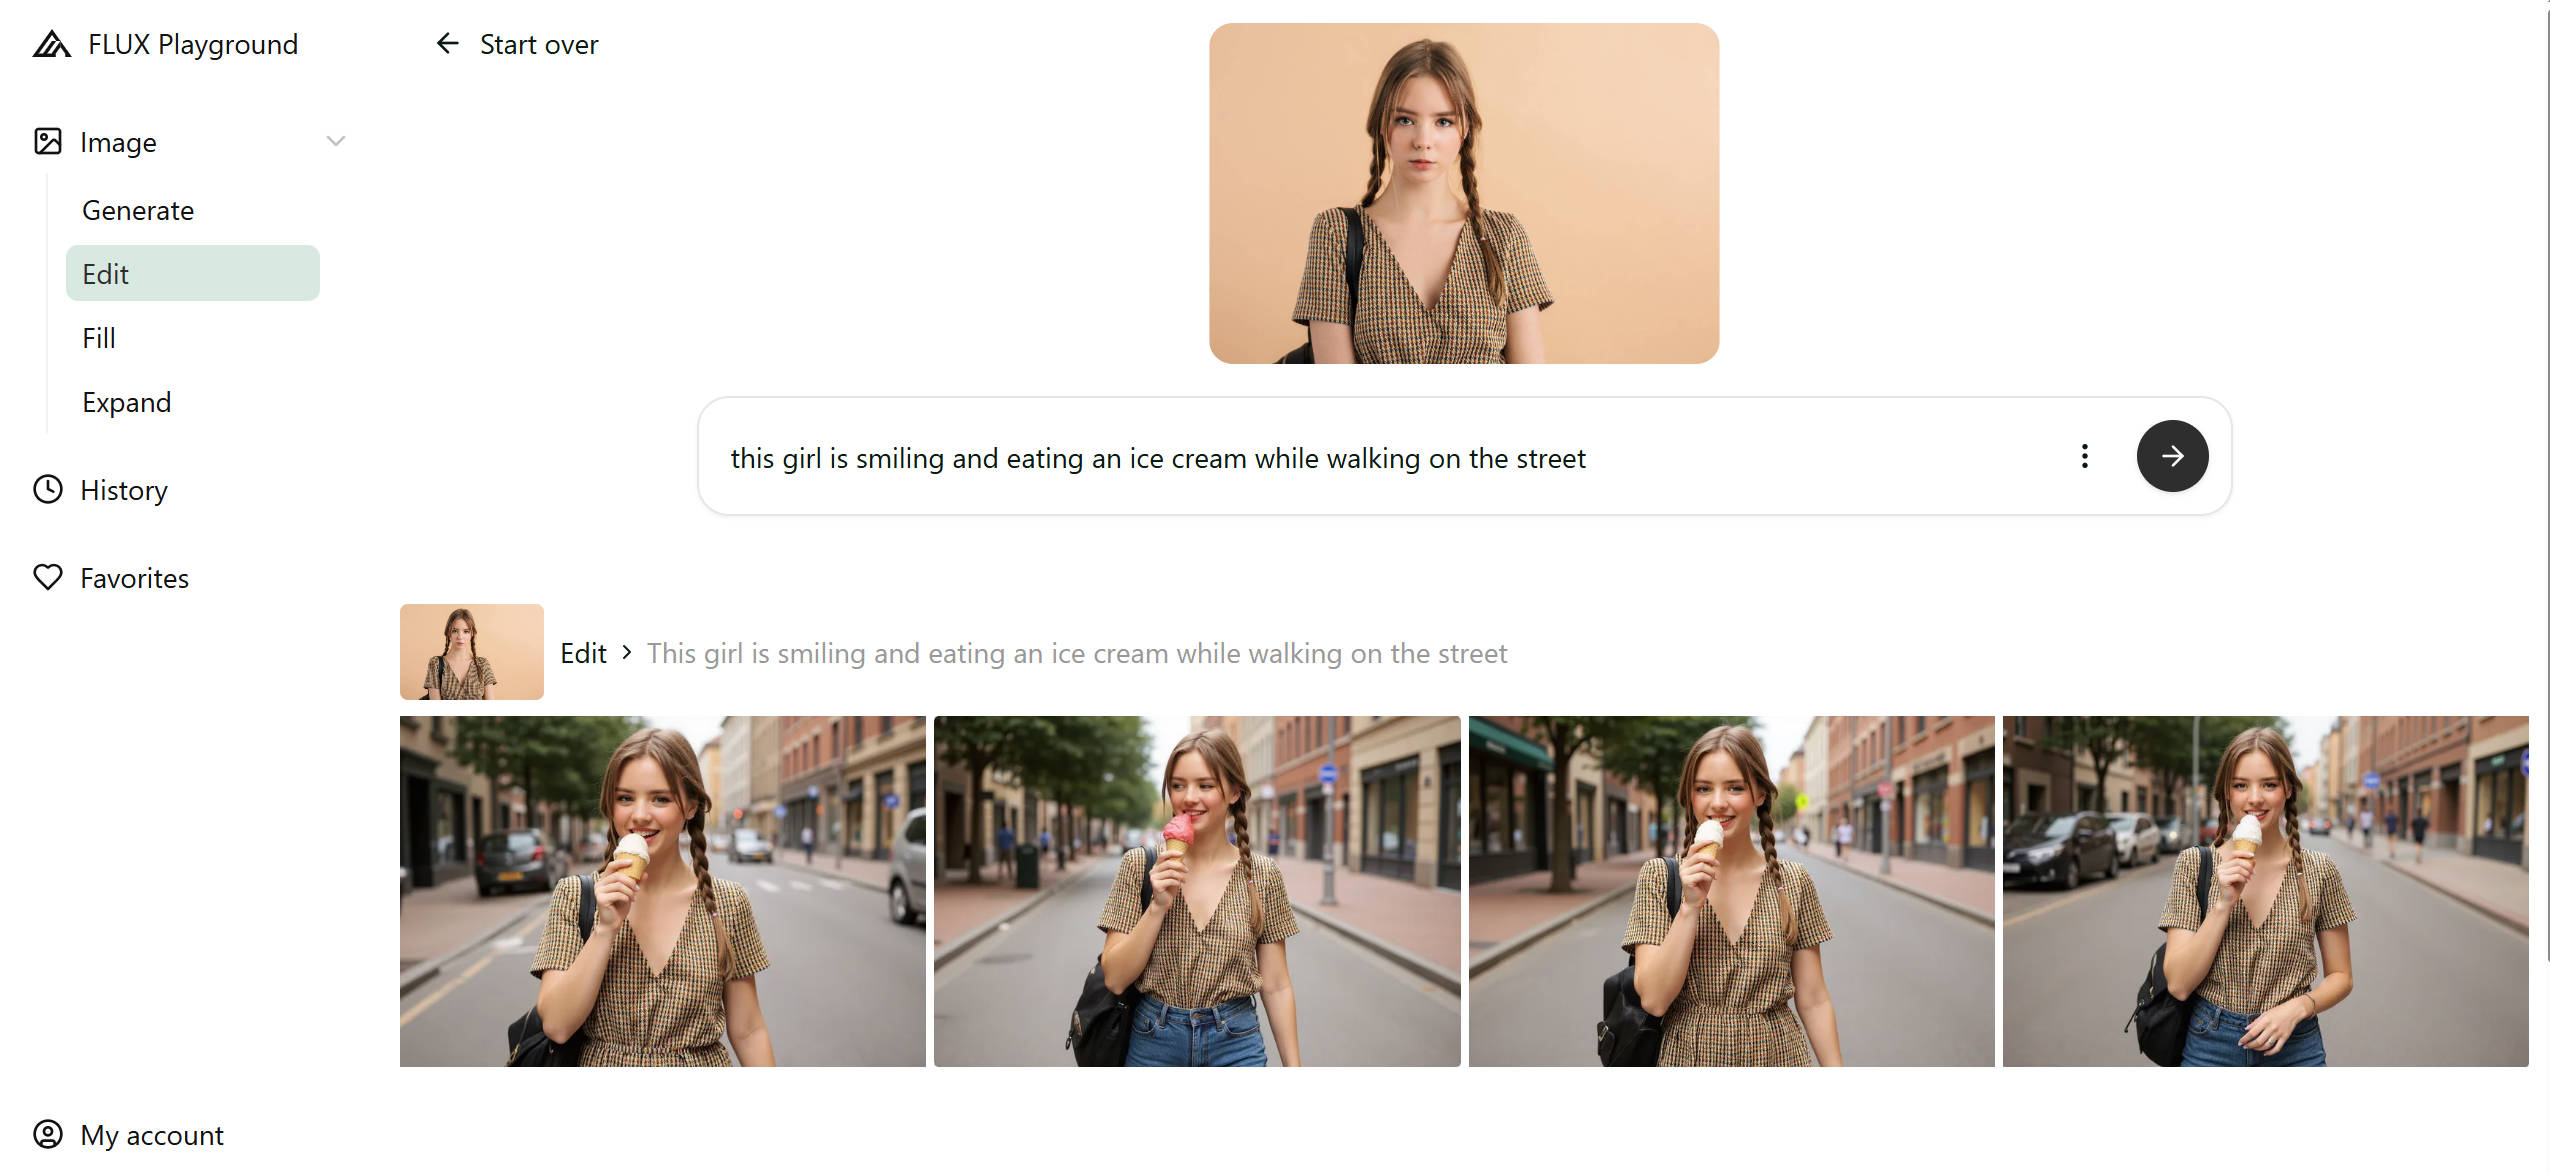
Flux Playground - Official playground offered by Black Forest Labs
ComfyUI – For visual tinkerers using node workflows (Dev tier)
Together.ai – Full access via API for all model versions
Hugging Face – Download or test the Dev model locally
Flux.1 AI – The official GUI that supports every tier
Fal.ai – A cloud-based option with both GUI and API features
Comparison Table: FLUX.1 Kontext Access Across Platforms
| Platform | Free vs Paid Access | Ease of Use | Supported Versions |
| ComfyUI | Free (Dev only) | Moderate (requires node setup | Dev |
| Together.ai | Paid (API credits), Free (Dev limited | Advanced (API skills needed) | Dev, Pro, Max |
| Hugging Face | Free (with account, Dev only) | Developer-friendly | Dev |
| Flux.1 AI | Free (limited), Paid (full tiers) | Easy (no-code GUI) | Dev, Pro, Max |
| Fal.ai | Free (Dev limited), Paid for Pro/Max | Very Easy (web-based GUI) | Dev, Pro, Max |
Part 4: Tutorial: How to Keep Character Consistency with Prompts
Have you ever wondered why your AI character looks perfect in one image—but totally different in the next? Consistent character design is not luck, it’s about how you design a perfect prompt. By using a few smart tweaks, you can guide the model to keep the same look, feel, and identity across multiple images.
Avoid Common Vague prompts Pitfall
The #1 mistake? Vague prompts. If you let the AI guess too much—like saying “a woman in a garden” without any cues about her hair, outfit, or expression—it will almost always alter key features. Be direct about what stays unchanged and only allow creativity where needed.
Breakdown of Image Regions to Control
Rather than prompting the model to regenerate the entire composition, isolate key visual zones—such as facial features, garments, and backgrounds. Utilize regional prompts or masking workflows to define editable vs. locked elements. This granular control drastically improves character and style consistency across outputs.
Define Relationships Between Regions
In an AI image generation positional logic matters. Specify interactions between character and environment—e.g., “three-quarter pose with sunlight from left” or “child standing near bookshelf.” This reduces scene variability and improves reproducibility across prompts.
Use Explicit Style or Theme Instructions
Style parameters must be included with each generation request. Use consistent descriptors like “flat cel shading,” “oil on canvas,” or “CGI-style” to lock the aesthetic framework. Even subtle deviations can result in visual drift.
Add Quality & Fidelity Directives
To avoid blurry or inconsistent results, add precision terms. Use phrases like “sharp detail,” “photographic clarity,” or “8K render” to guide the model toward polished, high-quality output—especially for key areas like eyes, skin, and texture.
Part 5: How to Upscale Image with FLUX.1 Kontext Image Upscaler for More Impressions
In the world of visual communication, image clarity definitely reflects brand quality. Whether you're a creative freelancer or a business, high-resolution imagery boosts credibility, professionalism, and engagement across every channel. Upscaling is the bridge between raw visuals and polished content.
Social media impressions rely on clarity
Platforms like Instagram, LinkedIn, and Pinterest compress uploads. If your image starts off sharp, it stays sharp—even after compression. A high-res image earns more attention, performs better in algorithmic feeds, and drives longer engagement.
Print demands pixel precision
As we know that print-ready assets require at least 300 DPI for quality output. Without visual upscaling, your images may appear blurry or stretched. The upscaling process ensures your visual assets meet resolution standards for flyers, posters, packaging, and merchandise.
Portfolios showcase visual mastery
Aren' t we all are aware of the fact that your portfolio is often the first impression a client or employer sees. Clean, upscaled images communicate that you value quality and detail. It reinforces your visual identity and makes your work stand out across print and digital formats.
Better visuals equal better perception
In a saturated market, your visuals speak before you do. A well-upscaled image can instantly improve perception, giving the viewer confidence in your skills or product quality—without needing words.
Upscaling improves asset reusability
A single high-res image can be repurposed across thumbnails, large-format prints, and social reels. Upscaling gives you more flexibility, ensuring consistency and sharpness across formats without redoing the original design.
Now, for those seeking a seamless workflow, UniConverter offers a perfect balance of simplicity and power. With FLUX.1 Kontext built in, it delivers intelligent, high-fidelity upscaling directly through its intuitive interface
Use UniConverter with FLUX.1 Kontext Integration
Wondershare UniConverter has emerged as one of the most practical tools for AI-based image upscaling—and it now includes FLUX.1 Kontext under its enhancement engine. This means you can upscale with improved character consistency, sharp edges, and stylistic preservation—all without diving into technical tools or code.
Steps to Upscale an Image Using UniConverter:
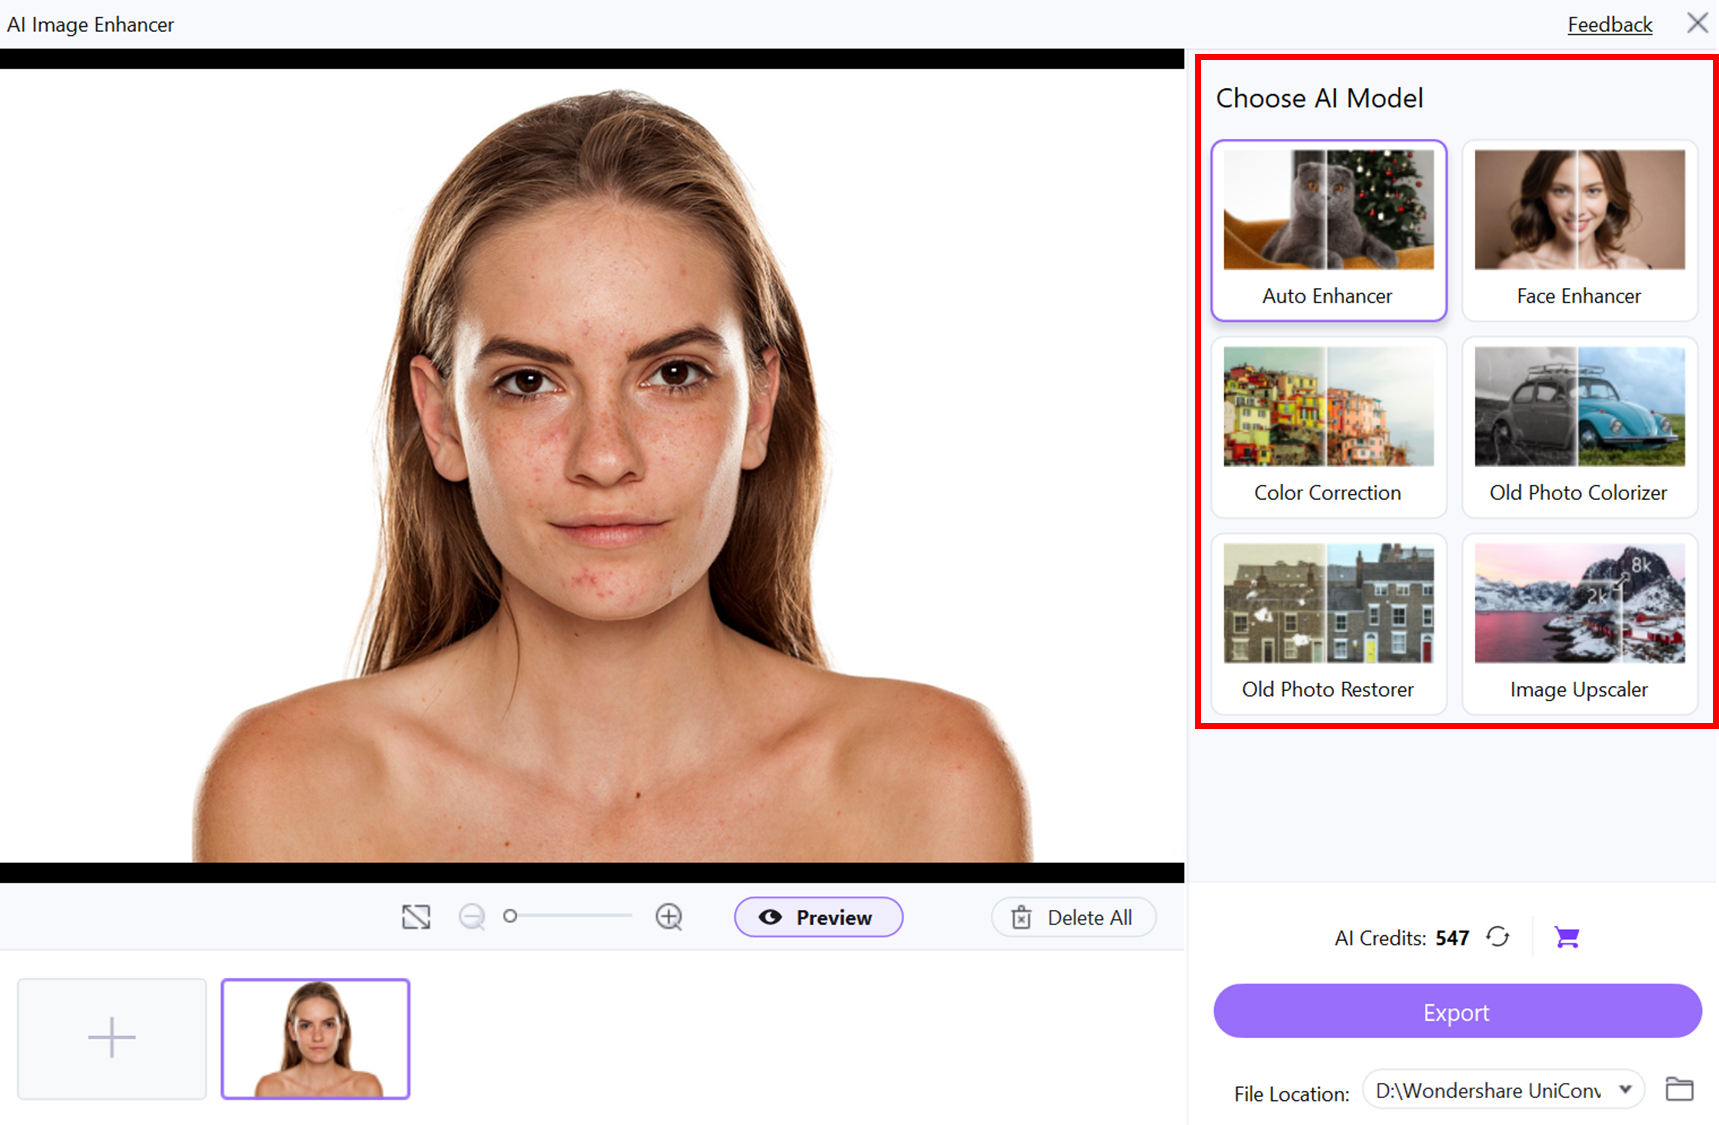
Step 1: Open the AI Image Enhancer
Go to the Toolbox tab and click on AI Image Enhancer to launch the editor. This tool uses smart AI to improve image quality, fix colors, and upscale resolution. You can use it for both single photos and batch edits with ease.
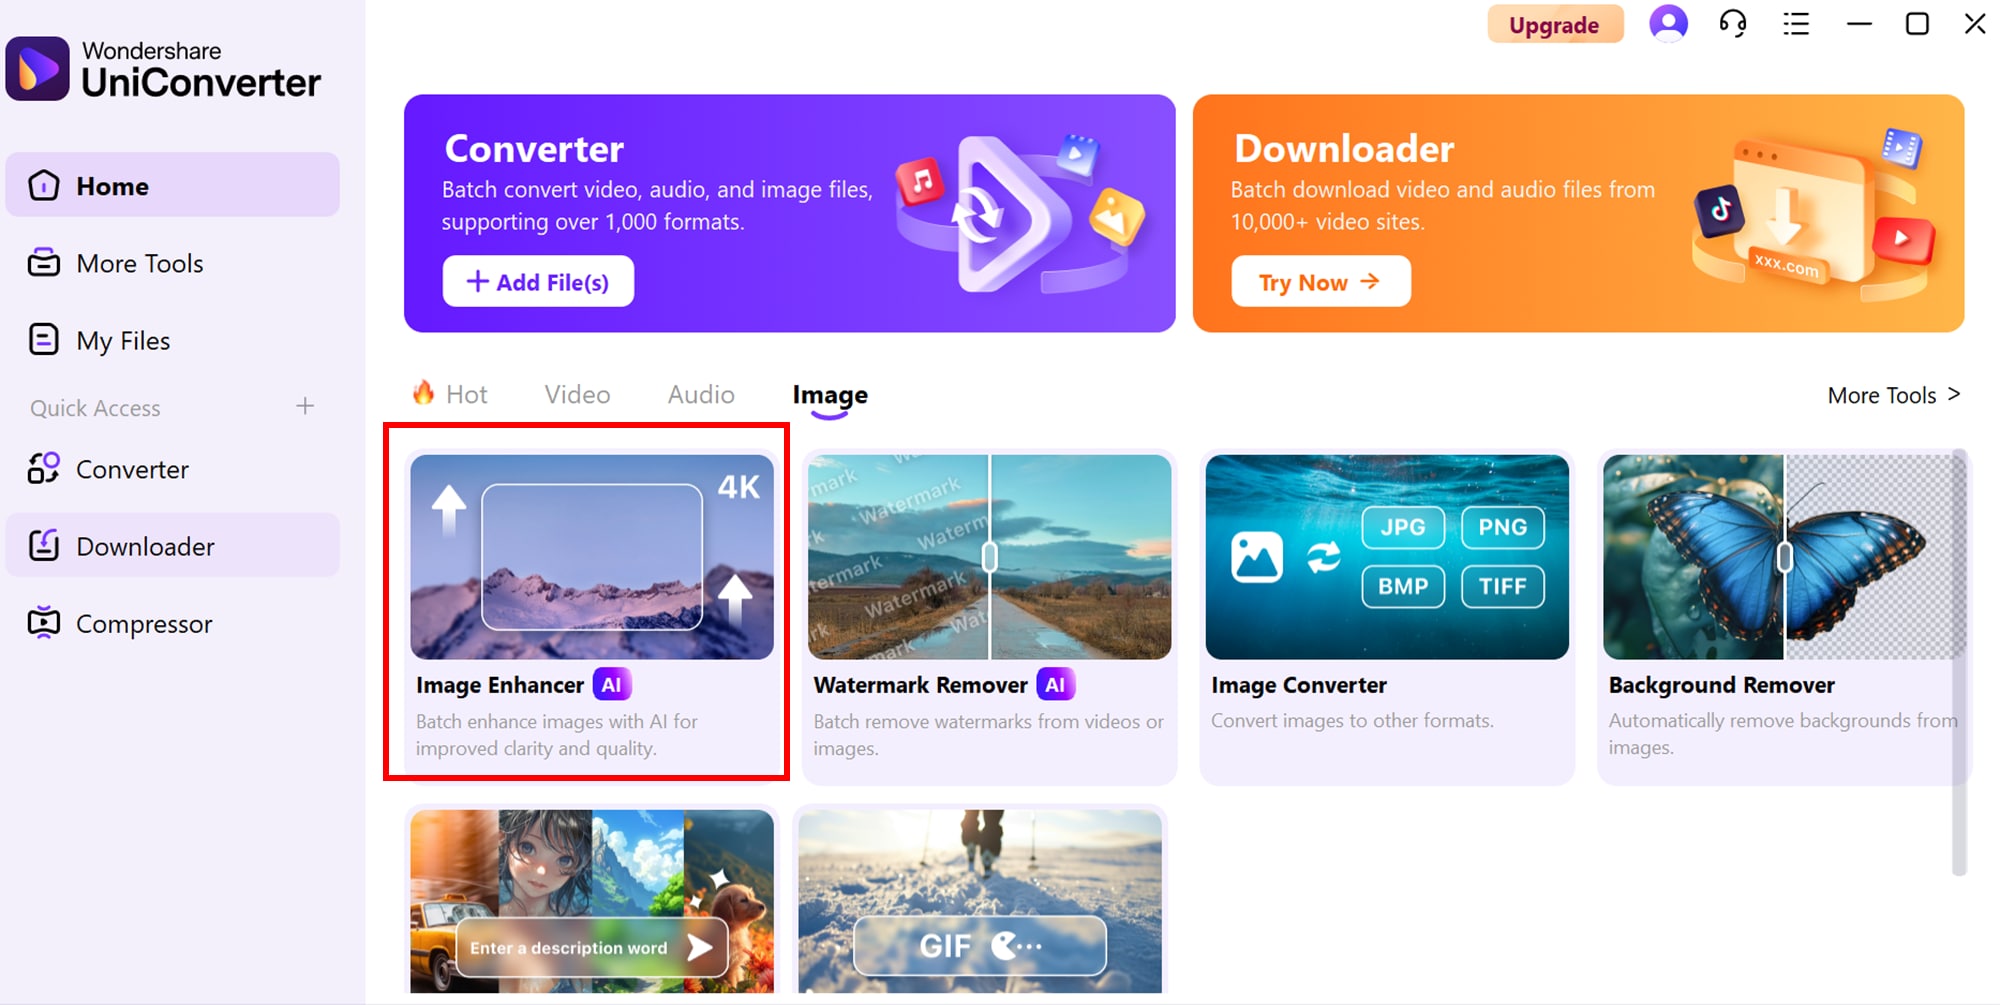
Step 2: Add your photos
Click Add Images and choose the photos you’d like to enhance. From the list of enhancement options, select the AI model to automatically smooth out skin, even out tone, and clear up blemishes. You’ll also find modes like:
Auto Enhancer – A quick fix for overall photo improvements
Color Correction – Ideal for reviving dull or washed-out shots
Old Photo Restore – Repairs creases and damage in aged images
Image Upscaler – Increases resolution without distortion
Once you select your preferred mode, UniConverter begins applying smart adjustments. You can check the preview for each photo to see how the enhancements affect skin clarity, color, and detail.
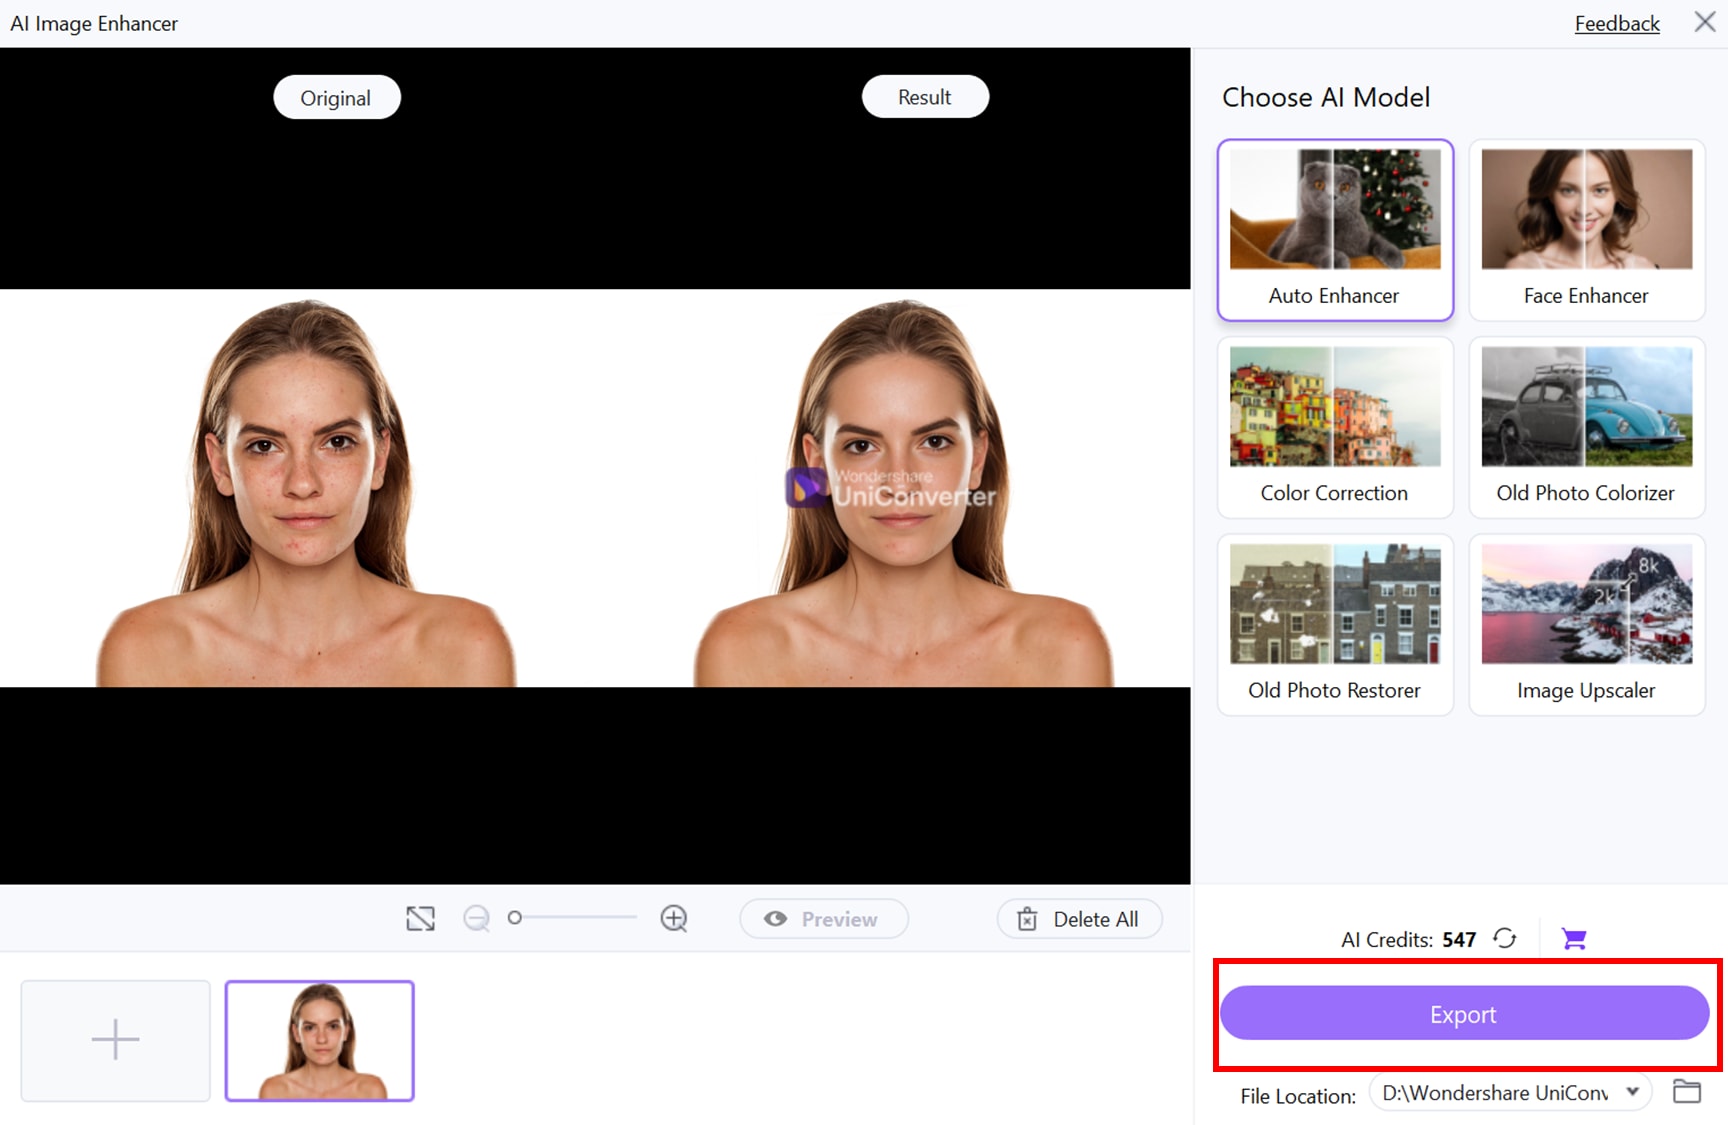
Step 3: Save your enhanced portraits
After the enhancements are done, use the Preview button to compare the updated version with the original. If you're happy with the outcome, click Export to save the edited photos. The tool also supports batch export, which means you can process and save multiple portraits at once—all while preserving their original resolution and quality. The results are clean, consistent, and ready for use.
Tips for Maintaining Image Quality While Upscaling
Just because you're using AI doesn’t mean everything is automatic. Upscaling image is game changing, but only when you handle your visuals with care. The below mentioned beginner-friendly tips will help you get professional-looking results every time.
Always upscale first, compress later
If you are planning to post on Instagram, WhatsApp, or any platform that compresses images, upscale your visuals first. That way, your final upload still looks clear even after automatic quality reduction.
Crop to highlight what's important
First think about what matters in the image. Is it the face? The texture? The product? Crop out extra space so that the AI enhances only the parts you want to stand out.
Stick to original size ratios
Don’t stretch your image manually—it’ll look weird. Let the AI handle the upscale while keeping your image shape the same. This keeps everything looking natural and balanced.
Skip the filters (for now)
Tempted to slap on a filter? Wait. The image is already enhanced by AI—adding too much editing afterward might actually ruin how clean and professional it looks.
Save in the best format possible
Use PNG if you're saving for high-res use, and TIFF for print. Only use JPEG if you need to keep the file small. Always keep a “master” copy just in case you need to resize or re-export later.
Conclusion
Your art deserves better than blurry exports or compression losses. With FLUX.1 Kontext and Wondershare UniConverter, upscaling becomes an easy, empowering step in your creative workflow. You get stunning detail, preserved style, and platform-ready visuals in just a few clicks. Whether you're building a portfolio or posting to social media, this is your go-to Flux Kontext beginner guide—and the best upscaler for AI-generated art you can trust.
FAQs
-
1. Can I use FLUX.1 Kontext to enhance AI art made in other tools like Midjourney or DALL·E?
Absolutely. You can import images generated in tools like Midjourney, DALL·E, or Stable Diffusion and then use FLUX.1 Kontext via UniConverter or Fal.ai to upscale and refine those visuals—especially to sharpen faces, textures, or backgrounds. -
2. Is FLUX.1 Kontext safe for use in commercial projects?
The Pro and Max tiers of FLUX.1 Kontext are licensed for commercial use. However, the Dev model is non-commercial only, so always check which version you're using before applying it in client work or public campaigns. -
3. Does FLUX.1 Kontext work on animated frames or only still images?
FLUX.1 Kontext currently supports still image enhancement. If you're working with animations, you can process each frame individually using tools like ComfyUI—but this requires a frame-by-frame workflow and higher VRAM. -
4. Can I integrate FLUX.1 Kontext into a Photoshop workflow?
No, you cannot. While FLUX.1 Kontext doesn't natively run inside Photoshop, you can upscale and enhance your image externally (via Together.ai or ), then re-import the result into Photoshop for further design or compositing. -
5. Can I upscale only selected regions of an image?
Yes. FLUX.1 Kontext allows region-based upscaling using prompt segmentation or mask-guided tools. This helps you target specific areas (like faces or backgrounds) without affecting the entire image.

