CD Burner
- TRY IT FREE TRY IT FREE
- 1. Burn Different Formats to CD+
- 2. Other CD Burners +
-
- 2.1 Burn Audio CD Mac
- 2.2 Best Audio CD Burning Software
- 2.3 Music Burning Software
- 2.4 Burn CD to MP3
- 2.5 How to Burn a CD on a Macbook Pro
- 2.6 Burn CD Online
- 2.7 CD Burner
- 2.8 CD Burner Download
- 2.9 CD Burner App
- 2.10 CD Burner for Mac
- 2.11 Audio CD Burner
- 2.12 Linux CD Burner
- 2.13 Free CD Burner
- 2.14 XP Burner
- 2.15 Easy CD Burner
- 2.16 Free MP3 to CD Converter & Burner
- 2.17 CD Burner Windows 7
- 2.18 Windows XP CD Burner
- 2.19 CD DVD Burner
- 2.20 Free CD DVD Burner
- 2.21 Disc Burner
- 3. Other Tips& Tricks+
5 Excellent Methods to Burn Video to a CD
by Christine Smith • 2026-01-21 18:53:41 • Proven solutions
There are several ways of burning video on a CD. CDs (Compact Discs) are quite good storage devices and make great backup storage for your video files. However, you will not be able to play the video CD on a CD player. Hence, in this article, we will look at five of the most efficient methods to burn video to a CD using different programs. Read on to find out what programs these are.
- Part 1. Best software to burn video to a CD
- Part 2. How to burn video to a CD with gBurner
- Part 3. How to burn video to a CD with iTunes
- Part 4. How to burn video to a CD with Windows Media Player
- Part 5. How to burn video to a CD with VLC
Part 1. Best software to burn video to a CD.
In this section, we are going to school you how to best burn video to a CD using Wondershare UniConverter. Being top of the list, this is the sleekest method to burn video to a CD because of its built.
Originally called Wondershare Video Converter Ultimate, Wondershare UniConverter provides you with pretty much everything you could need to burn video to a CD. It is the best software to convert all kinds of videos to almost 1000 times of format, and that too, at 30 times faster speed. All this, with zero quality loss. You can download, compress, edit, burn, transfer, do everything with the top-class video converter software.
 Wondershare UniConverter (originally Wondershare Video Converter Ultimate)
Your Complete Audio and Video Toolbox

- Convert video to over 1000 formats like AVI, MKV, MOV, MP4, Youtube, etc.
- Burn Audio files to CD easily on Windows/Mac.
- Work as an metadata management tool to edit video metada files.
- Convert video to optimized preset for almost all of the devices.
- 30X faster conversion speed than other common converters.
- Edit, enhance & personalize your videos by trimming, croping videos, add subtitles and watermark etc.
- Burn video to playable DVD with attractive free DVD template.
- Download or record videos from 10,000+ video sharing sites.
- Versatile toolbox includes GIF maker, VR converter and screen recorder.
- Supported OS: Windows 10/8/7/XP/Vista, Mac OS 10.15 (Catalina), 10.14, 10.13, 10.12, 10.11, 10.10, 10.9, 10.8, 10.7, 10.6
Now, let us burn video to a CD by using the steps below:
Step 1 Start Wondershare UniConverter.
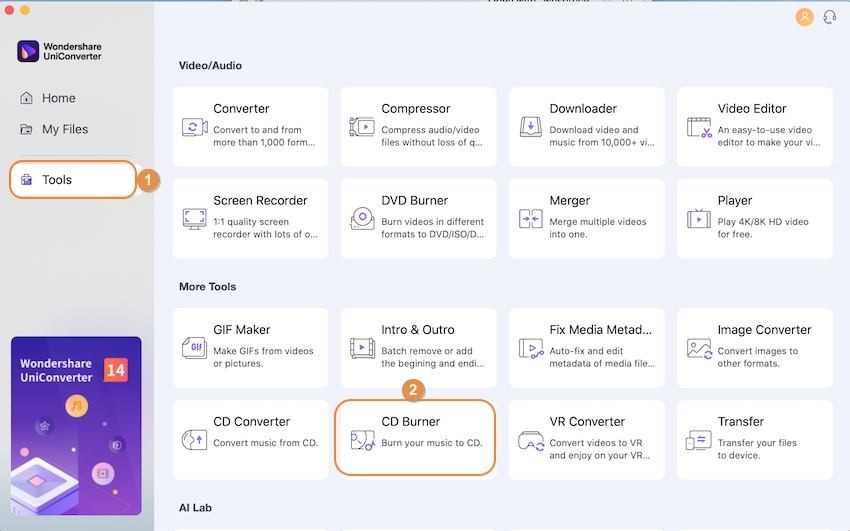
After downloading and completing the successful installation, launch Wondershare UniConverter on your machine then tap on the Toolbox tab from the main window. Choose the CD Burner option.
Step 2 Adding media files to the CD burner.
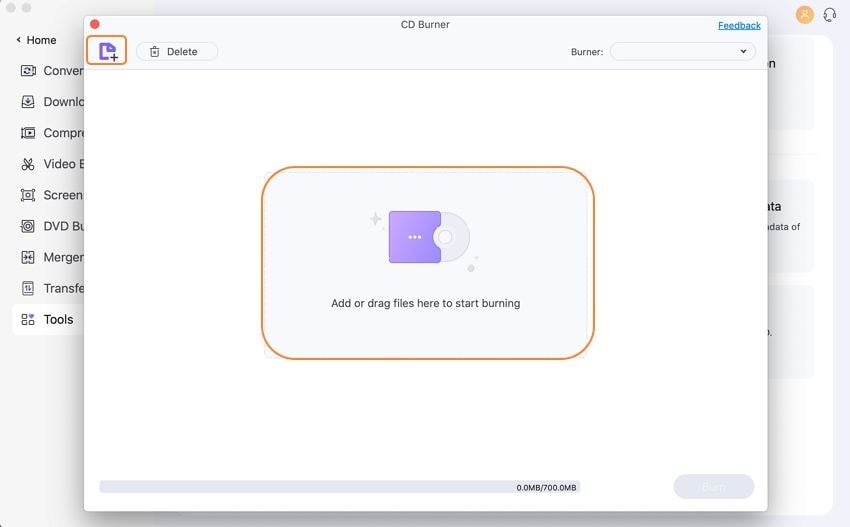
In the next interface, tap on the + (Add) icon to select the desired files to burn or drag the files directly to the center of the interface. You can add one or more files as needed.
Step 3 Checking music files and selecting burner.
Uploaded files will get displayed with Name, Length, Size, and Output Size. To play it, double-click. You can also delete (Trash) or add (+) files using the icons on the top left corner of the screen.
Once you are satisfied with the selection, insert a blank CD into your PC and select the burner from the top right corner of the interface.

Step 4 Start burning.
Once all settings are over, tap on the Burn button to initiate the copying process. You can track the storage space of your disc from the bottom bar to know the precise size of files you can add to it.
Part 2. How to burn video to a CD with gBurner.
This Video to CD Burner software is a powerful and user-friendly CD/DVD/BD burning program that allows you to create data, audio and Video CDs, DVDs, and Blu-ray discs. The software also helps you make bootable data discs and create multisession CDs. Plus, with gBurner, you can open, create, edit, extract, convert, and burn image files.
Below are the easy steps to follow to burn video to a CD using gBurner.
Step 1: Launch the program, and in the Video CD project, click on Video > Video CD. Or instead, click on the File > New > Video CD menu.
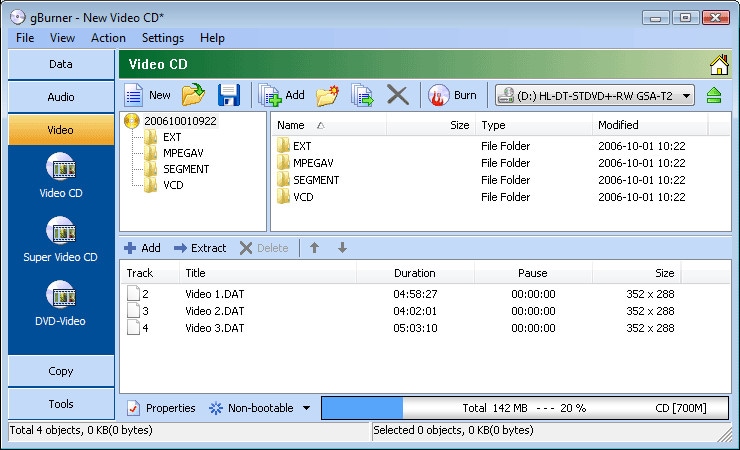
Step 2: From the project window, to open an existing Video project or image file, tap on the ‘Folder’ icon then navigate to the Video CD project/ image file you want to open.
Step 3: Next, select a recorder from the drop-down menu and insert a blank CD into your recorder.
Step 4: Finally, you can edit the Video CD: to add, use + (add) icon, to delete, use the X (delete) icon, and to change the Video orientation, use the up and down arrows.
From Step 2 above, to save the current Video project, click on the 3rd icon, next to the Folder icon.
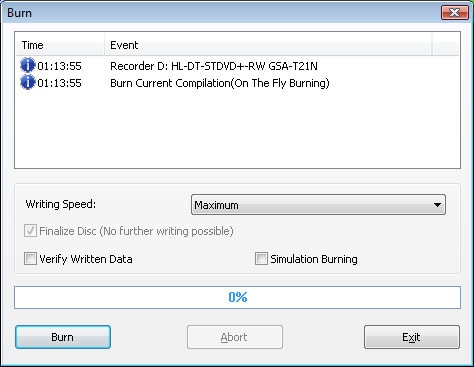
Step 5: Next, click on the ‘Burn’ icon, and a dialog box will popup. Now select or check the appropriate burn options then click on the ‘Burn’ button to commence the burning process.
What are the features of gBurner program?
- With gBurner you can create data, audio, and video discs. The software supports more than 15 file formats
- It allows you to develop multisession and bootable data discs
- You can erase rewriteable discs
- It helps Unicode file names
- It optimizes file layout to save on disc space
- It has an impressive user interface
Reviews
A gBurner user said, it is wise to stick to free Video to CD burning program alternatives. Also, he advised that one should put a lot of time into finding the ISO version of a particular disk image one desires.
Part 3. How to burn video to a CD with iTunes.
Did you know that you can make your CDs and DVDs with Audio and Video from your iTunes library? Yes, you can! However, you cannot burn to CDs or DVDs movies and TV shows bought from the iTunes store or songs and music Videos purchased from Apple Music.
To Burn Video to a CD with iTunes, follow the guideline below:
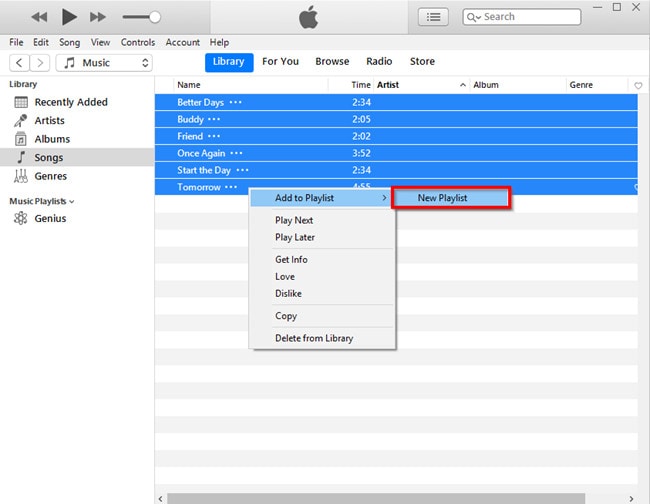
Step 1: Create a Playlist
Although you cannot use iTunes to burn Videos to a CD, you can use it to burn audio files. You first need to create a playlist of the media you need to burn.
Step 2: Burning
Once the playlist is ready, select the ‘Burn Playlist to Disc’ option in the File tab. A popup window will appear from which you will be able to Burn media to a CD.

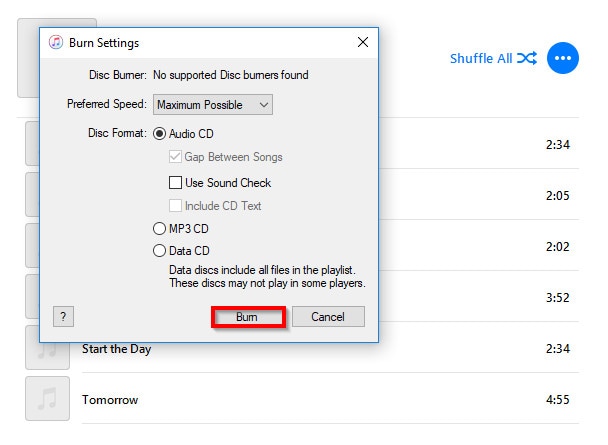
Step 3: Burn Settings
Lastly, we will look at how to handle the Burn Settings window:
- Speed – choose the rate you would like your CD to burn. Tip: slower speeds help produce discs of higher quality.
- Disc Format – for uncompressed audio select Audio CD, for compressed audio choose MP3 CD, and for a playlist with a mixture of different types of audio files, select Data Discs.
When the selection is over, click on Burn to start the burning process.
Why burn to CD using iTunes? Below are some iTunes features:
- It has Ping that enables you to follow your favorite artists and browse their music history
- It has auto-syncing that automatically downloads all content you added to iTunes from the last sync besides detecting an iPod, iPhone or iPad
- It creates smart playlists from the songs in your library
- The Home Sharing feature enables you to share music across multiple comps on your home network
- The iTunes store is integrated and allows you to buy content online or browse music information in the Music Store
Part 4. How to burn video to a CD with Windows Media Player.
Windows Media Player is great for playing Videos and music files as well as viewing pictures on computers running Microsoft Windows. This program can also be used to burn Videos to CD in Windows 10. Below is how to go about the burning process:
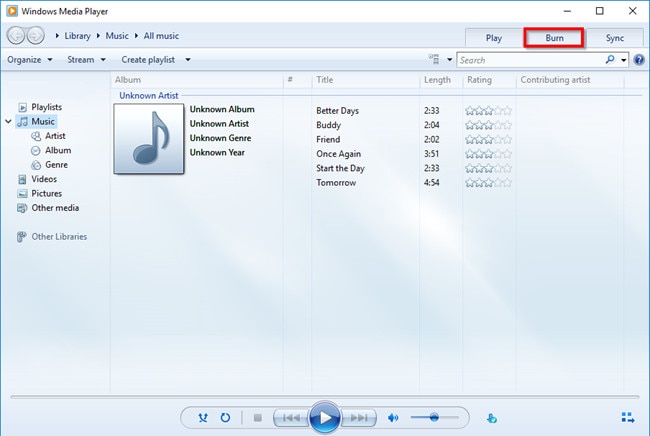
Step 1: Importing Media
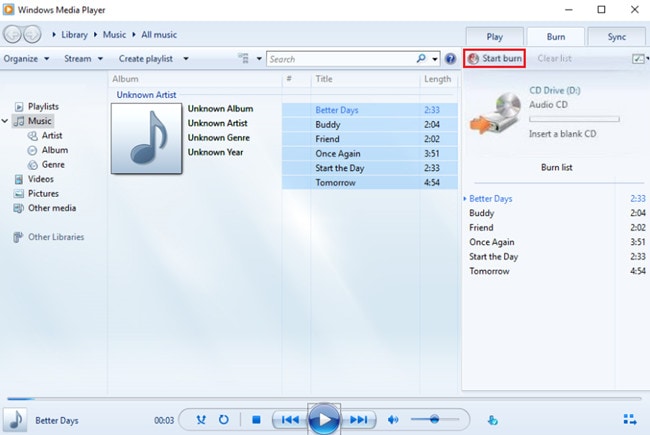
Windows media player enables you to burn Videos and music to CD, unlike the case with iTunes. First, import the particular file you want to burn and click on the Burn tab to get started.
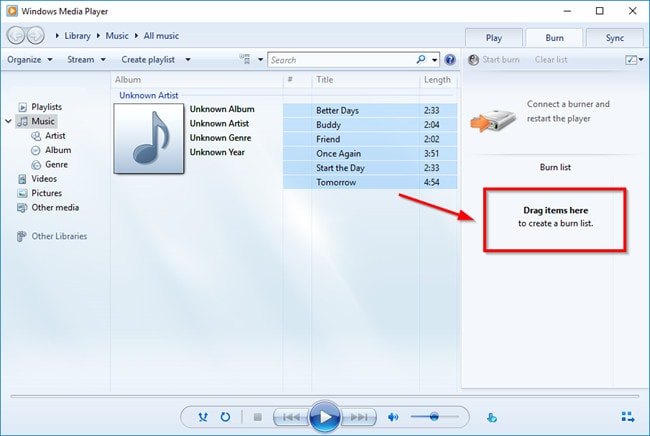
Step 2: Dragging and Dropping
Now, to create a Burn List, drag the audio/Video files and drop them into the appropriate area, as shown in the screenshot below.
Step 3: Burning
Once the Burn list is complete, initiate the copy process by clicking on the Start Burn button. It will get the job done in good time.
Features of Windows Media Player:
- It is an in-built program in Windows OS computers thus doesn’t need downloading
- It is simple and straight forward to navigate
- It is practical and an efficient in burning Video and music to CD in Windows 10
- It requires minimum updating for effective functioning
- It can be used to play Video and audio files
Part 5. How to burn video to a CD with VLC.
If you are a Video enthusiast, then you can testify that VLC is an excellent tool to use. It is famous for its host of options and features and the ability to support most file formats. This free Video to CD burner can only burn a Video if it is correctly formatted as the program doesn’t do this for the user. Once the formatting is successfully done using third-party apps like Nero, Adobe Encore, or Sony’s Media Center Suite, follow the steps below to finish the burning:
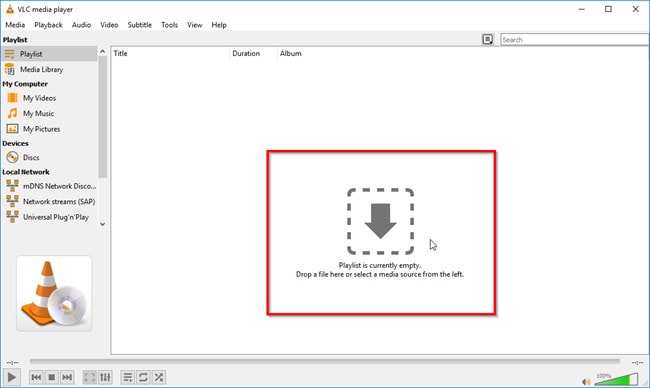
Step 1: Playlist Creation
Drag and drop media onto the screen to create a playlist.
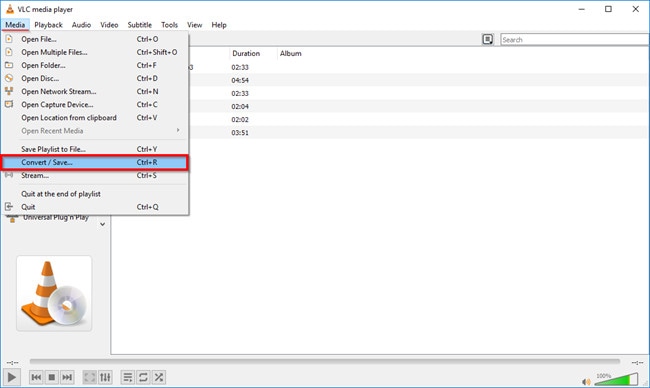
Step 2: Convert/Save option
When you are done creating the playlist, find and choose the Convert/Save option from the drop-down menu under Media, on the top left corner of the screen.
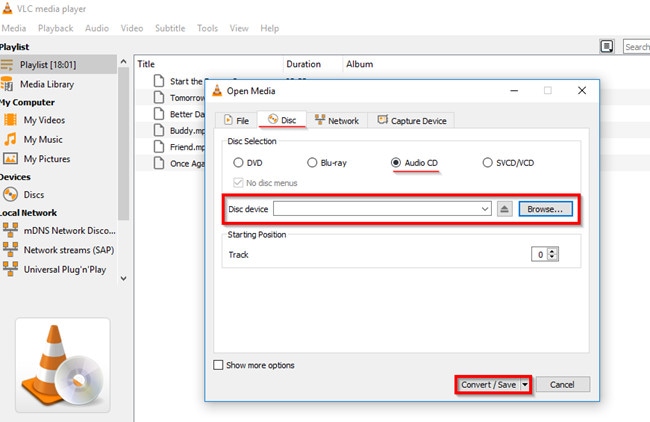
Step 3: Burning
Lastly, activate the Disc tab. Here, choose Audio CD in case you are burning audio to CD. Otherwise, select SVCD/VCD if you are burning formatted Video to a CD. Next, browse your comp for the burner with a blank disc in it then click on Convert/Save to complete the process.
Key Features:
- This software supports MPEG and DivX streaming and can play Videos while downloading
- It allows you to play ZIP files without having to unzip them first
- It enables you to manually increase media volume up to 200% on complete downloading
- It has an excellent user interface
Review:
Its standard interface is not as fancy as other media players and doesn’t make tagging easy. However, VLC is excellent and effortlessly makes the perfect media player for both audio and Video files.
Conclusion
Thus, Wondershare UniConverter saves the day better than any other Video to a CD burner program discussed above. Why?
- Well, for instance, it is not limited to a particular operating system or device.
- It has all Video editing features you’d want to use on your Video.
- It has a customize to DVD menu with parameters like background image, music, text, etc.
- The program has additional functions such as ISO to DVD, Data Disc, Video Editor, Slideshow Maker, etc.


Christine Smith
chief Editor