CD Burner
- TRY IT FREE TRY IT FREE
- 1. Burn Different Formats to CD+
- 2. Other CD Burners +
-
- 2.1 Burn Audio CD Mac
- 2.2 Best Audio CD Burning Software
- 2.3 Music Burning Software
- 2.4 Burn CD to MP3
- 2.5 How to Burn a CD on a Macbook Pro
- 2.6 Burn CD Online
- 2.7 CD Burner
- 2.8 CD Burner Download
- 2.9 CD Burner App
- 2.10 CD Burner for Mac
- 2.11 MP3 Burner
- 2.12 Audio CD Burner
- 2.13 Linux CD Burner
- 2.14 Free CD Burner
- 2.15 XP Burner
- 2.16 Easy CD Burner
- 2.17 Free MP3 to CD Converter & Burner
- 2.18 CD Burner for Laptop
- 2.19 CD Burner Windows 10
- 2.20 CD Burner Windows 7
- 2.21 Windows XP CD Burner
- 2.22 CD DVD Burner
- 2.23 Free CD DVD Burner
- 2.24 Free Easy CD DVD Burner
- 2.25 Disc Burner
- 3. Other Tips& Tricks+
-
- 3.1 Burn CDs Windows 10
- 3.2 Burn Audio CD Windows 7
- 3.3 Best Rrogram to Burn Cds
- 3.4 CD Burning Software
- 3.5 CD Burning Software Mac
- 3.6 Best Free CD Burning Software
- 3.7 Burn CD Program
- 3.8 CD DVD Burning Software
- 3.9 Best CD DVD Burning Software
- 3.10 Burn MP3 Download
- 3.11 Windows Media Player Burn CD
4 Excellent Methods to Burn Data to CD Recommended
by Christine Smith • 2026-01-21 18:45:42 • Proven solutions
You would be forgiven to conclude that storage devices like CD no longer exist today. With cloud storage devices and USB drives that are being widely used today, no one would consider CDs. However, CDs and DVDs still exist. Windows has incorporated features that support users to burn data to CD
Plenty of programs have also been availed. Such programs are powerful and possess even more robust features. This guide is going to take you through a step-by-step guide to help you know how to burn data cd on windows 7, and the later versions.
- Part 1. How to Burn Data to CD with Windows File Explorer
- Part 2. How to Burn Data to CD with Windows Media Center
- Part 3. How to Burn Data to CD with Express Burn
- Part 4. How to Burn Data to CD with K3b
 Wondershare UniConverter (originally Wondershare Video Converter Ultimate)
Your Complete Audio Toolbox

- Convert video to over 1000 formats like AVI, MKV, MOV, MP4, etc.
- Burn Audio files to CD easily on Windows/Mac.
- Work as a metadata management tool to edit video metadata files.
- Convert video to optimized preset for almost all of the devices.
- 90X faster conversion speed than other common converters.
- Edit, enhance & personalize your videos by trimming, croping videos, add subtitles and watermark, etc.
- Burn video to playable DVD with attractive free DVD template.
- Download or record videos from 10,000+ video sharing sites.
- Versatile toolbox includes GIF maker, VR converter and screen recorder.
- Supported OS: Windows 10/8/7/XP/Vista, Mac OS 10.15 (Catalina), 10.14, 10.13, 10.12, 10.11, 10.10, 10.9, 10.8, 10.7, 10.6
Part 1. How to Burn Data to CD with Windows File Explorer?
It is difficult for many people to realize that Windows File Explorer can be used to burn data to cd. In fact, it has actually been there for years, but people generally tend to forget it. In the steps shown below, you’ll get to know how to burn data in Windows 10 using simple steps. But firstly, let’s take a look at its features.
Key features:
- The tool supports the opening of ISO files in Windows 8 and later versions.
- The tool supports the drag and drops feature.
- It lets you add comments and tags inside files.
Step 1. The first step is to place the CD into the DVD drive of your device.
There’s a notification that will pop up. Ensure you’ve selected on that notification,
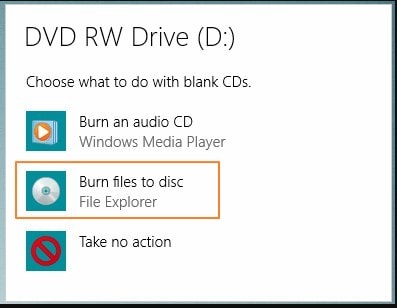
Step 2. Choose Burn Files to Disc
A new window will pop up. Go to Burn Files to Disc and click on it.
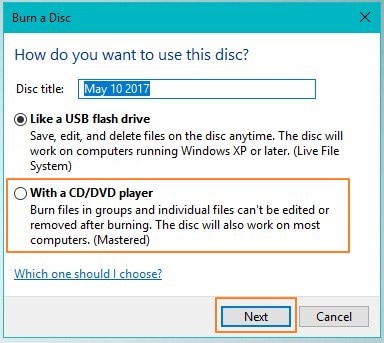
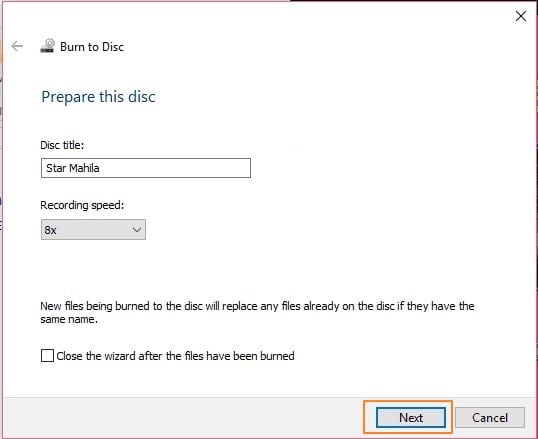
Step 3. There will be a display that will enable you
- 1. Change the title of the disc.
- 2. Choose how you would want to burn the CD.
Click on With a CD/DVD player and click on the Next button.
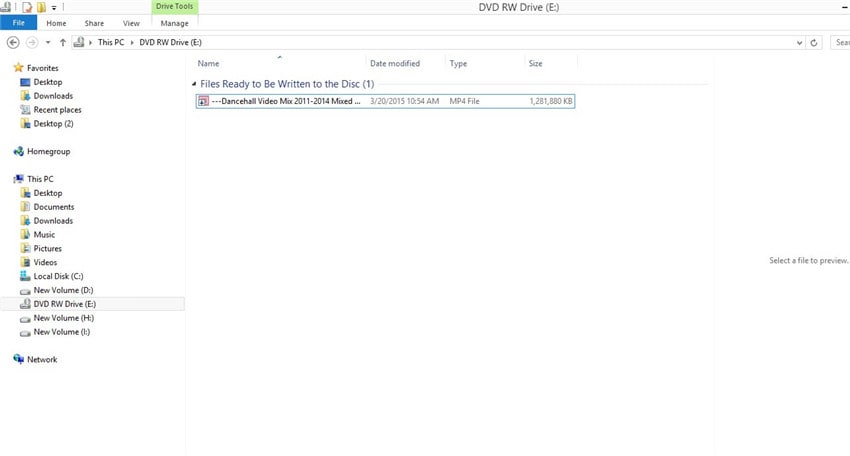
Step 4. Add Files/Data to be Burned
A new window will pop up. You will then be required to press on the Windows + E buttons, and there will be a new file explorer window. Drag and drop the files that need to be burned into this window. This program also supports the users to copy and paste files into this window.
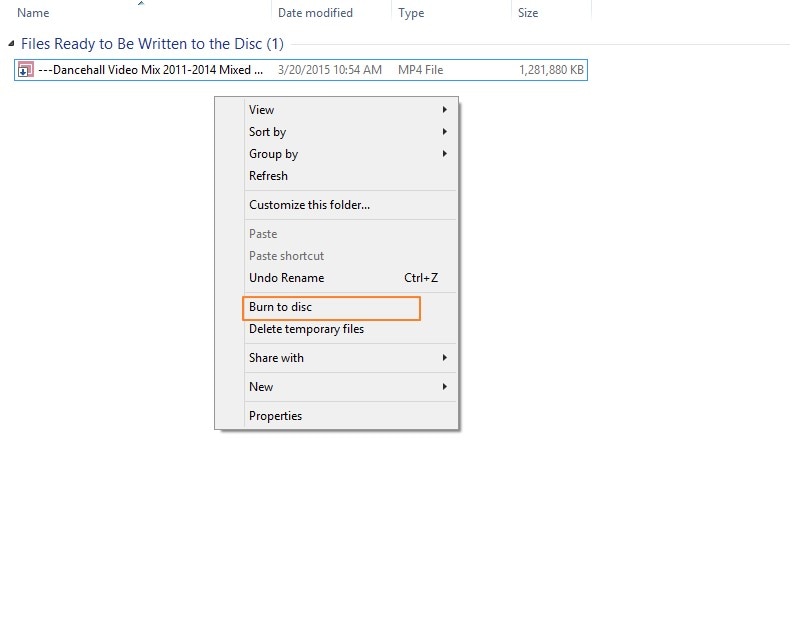
Step 5. Burn the Files to Disc
Right-click on this new window and a new one will be shown. After that, click on the Burn to Disc option.
Step 6. Complete the process
From the window displayed, you can rename or customize the files in your CD. Then click on the Next button. This will prompt the burning process. You can check on its progress from the screen, and when you have finished burning data to a CD, the CD will be ejected.
Pros
- You can either copy and paste or drag and drop programs to other applications.
- It saves your search history.
Cons
- The program is quite unreliable and can, for example, show unreliable dates.
Part 2. How to Burn Data to CD with Windows Media Center
Otherwise known as Wmplayer or simply as WMP, Windows Media Player is a tool developed by Windows to play media files. The tool lets users view pictures, view audios and watch videos. More so, the program can be used to burn and rip files.
Windows Media Player features:
- It supports almost all of the file types that are in existence.
- Ability to organize files based on their genres, rating, year,
- The latest versions of Windows Media Player have made it possible for users to obtain and encode files from other devices such as the camera.
- The program can stream radio broadcasts live with the help of the internet.
Steps of burning data with WMP:
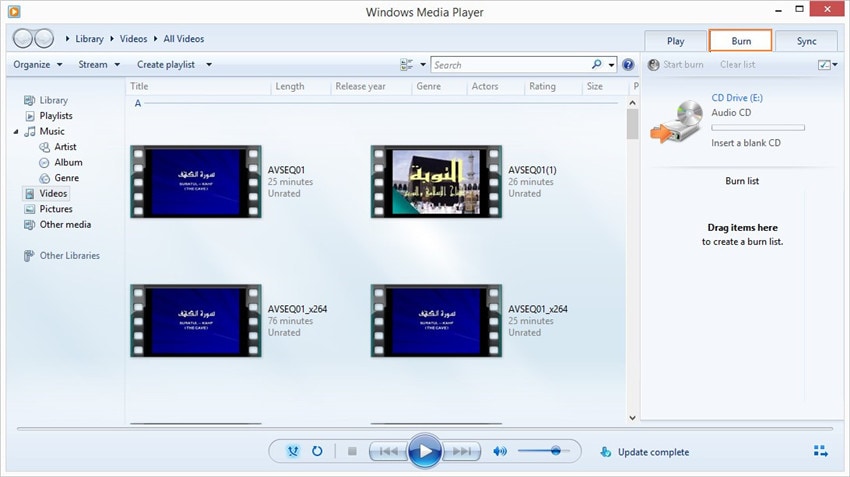
Step 1. Open the Windows Media Player program in your device.
And to be able to burn data to CD, activate the feature by clicking on the Burn tab.
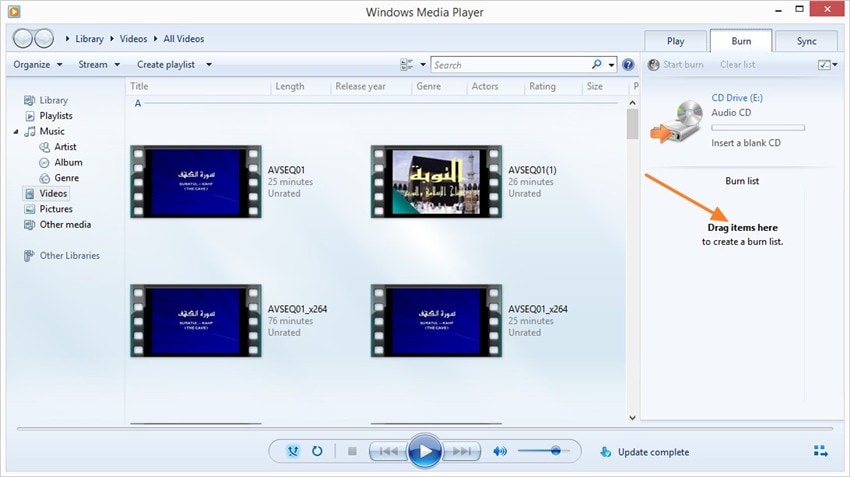
Step 2. Drag and drop the data/files
You will be needed to drop the data to be burned on the display that comes up after the first step.
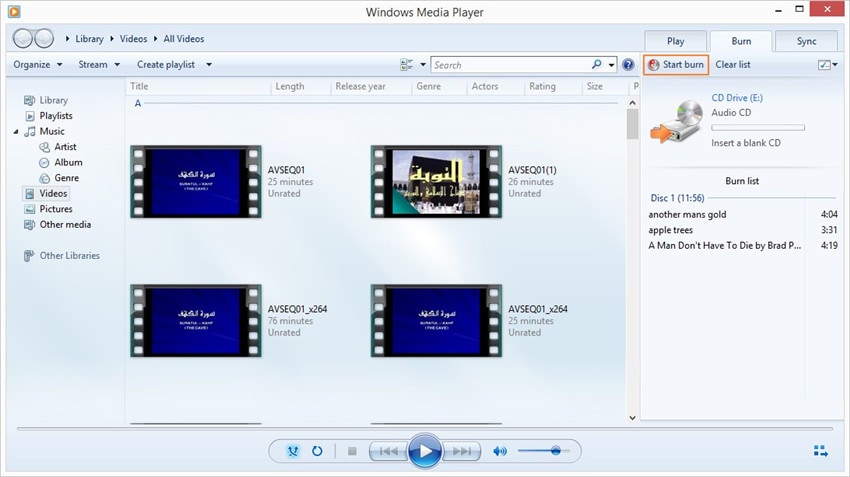
Step 3. Finally, burn the files
Click on the Start Burn button that is present at the top right side of the display.
Pros
- The software is available for free.
- It’s very simple to use
Cons
- It cannot play on DVDs due to copyright restrictions.
- The program does stream videos well.
Part 3. How to Burn Data to CD with Express Burn
Express Burn is a dependable premium optimal disc tool that is equipped to burn, write or copy files like audios, documents, and videos to optical discs such as CD. It is indeed a quality software used to burn data to cd on Windows 10. Its display is simple to use and Is also supported by other utilities.
Key features:
- The program is easy to use and also powerful.
- It performs tasks fast
- Users can use command-line instructions
- Ideal for burning data to CD
Steps on Burning Data to CD with Express Burn:
Step 1. Download and install the Express Burn application program to your device.
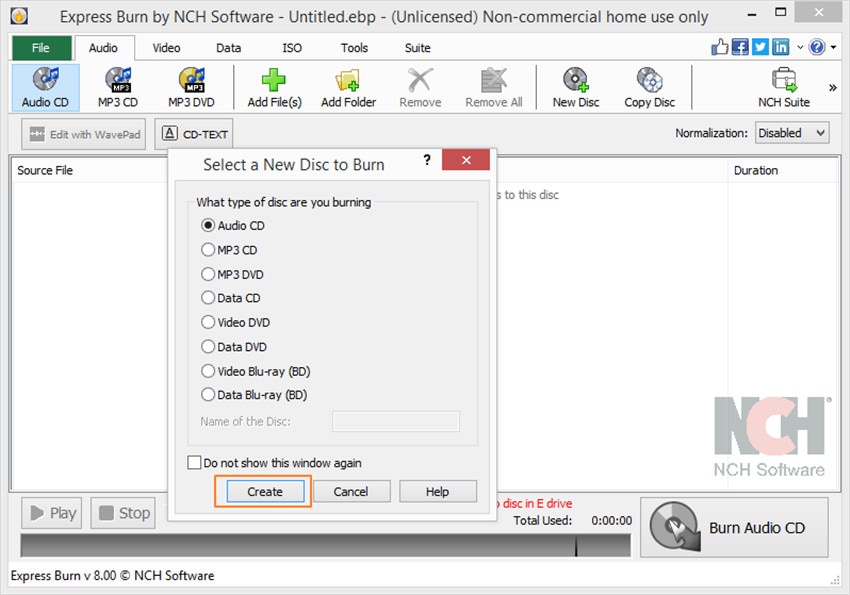
The application is installed by clicking at the setup with the exe extension. Ensure that you have inserted an empty CD. Then, launch the program. On the main window, choose the type of disc you’re burning. Click Create to proceed.
Step 2. Add/Upload Data or Files
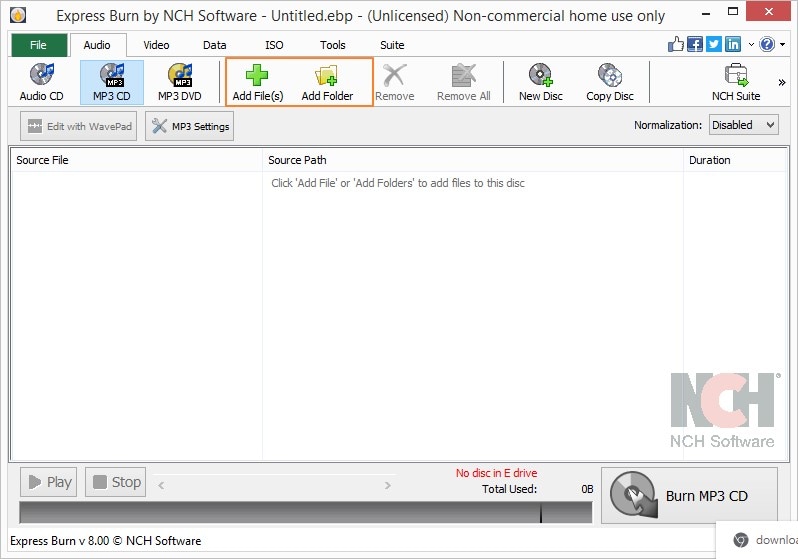
The next step will be uploading files into the program. Use the Add File (s) or Add Folder if you are looking to upload one complete file. Alternatively, go to File>Add File(s) or >Add Folder of Files. If by any chance, you have uploaded a file you do not wish to burn, click on it and choose the Remove.
Step 3. Burn the files
The next step will be to select Burn MP3 CD, from where you will be given a platform to customize the properties. When you are satisfied with the choices, click on the Burn button.

Pros
- It can create ISO images.
- Its quick-start wizard quickens the burning process.
Cons
- It has not really distinguished itself from other tools.
Part 4. How to Burn Data to CD with K3b
This program was designed to be a simple yet rich CD burning tool. K3b lets the users to easily create projects by going to the File menu. You can burn data to cd in this program, and perform other tasks like copying CDs and formatting the DVDs.
Key features:
- Can convert files to different file formats such as AVI, WAV, and MP3.
- It can burn data easily. Also, it accommodates the making of ISO images.
- It has a powerful ripping program that extracts data from CDs.
- K3b has been equipped to rename ripped tracks.
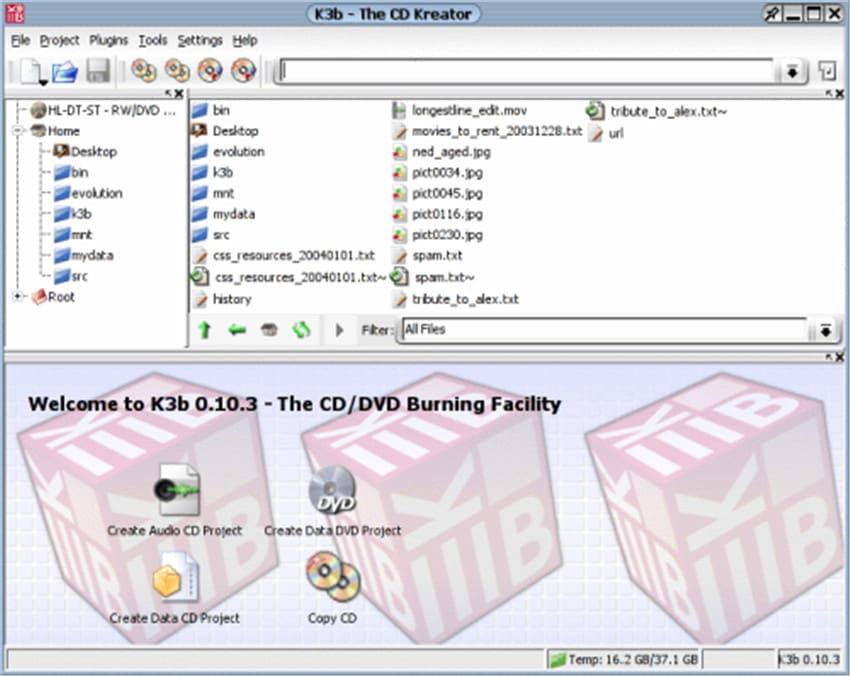
Step 1: Download the K3b application and install it on your device. Launch the program.
Step 2: Add data or files. Go to Project> New Project to upload the files. Alternatively, go to File>Add File(s)
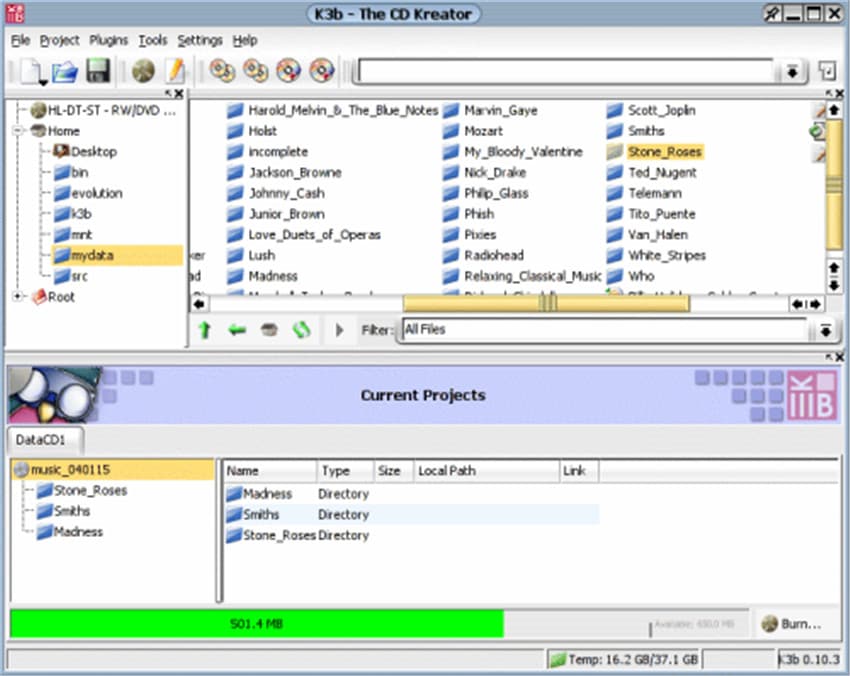
Step 3: When all is good, click at Burn that is available at the bottom right end of the program.
Pros
- The program is available for free.
Cons
- Only available for Linux
Conclusion
Now that you have learned about the four tools in detail, and how to perform your tasks with it, you should be able to burn data cd in Windows 10 on your own. As you may have noticed, the steps are also quite clear, and the guarantee of achieving the desired output, there are also other powerful tools that can be supplemented with these. The programs are the best available ones as of now and will play a major role in getting your tasks handled.


Christine Smith
chief Editor