CD Burner
- TRY IT FREE TRY IT FREE
- 1. Burn Different Formats to CD+
- 2. Other CD Burners +
-
- 2.1 Burn Audio CD Mac
- 2.2 Best Audio CD Burning Software
- 2.3 Music Burning Software
- 2.4 Burn CD to MP3
- 2.5 How to Burn a CD on a Macbook Pro
- 2.6 Burn CD Online
- 2.7 CD Burner
- 2.8 CD Burner Download
- 2.9 CD Burner App
- 2.10 CD Burner for Mac
- 2.11 Audio CD Burner
- 2.12 Linux CD Burner
- 2.13 Free CD Burner
- 2.14 XP Burner
- 2.15 Easy CD Burner
- 2.16 Free MP3 to CD Converter & Burner
- 2.17 CD Burner Windows 7
- 2.18 Windows XP CD Burner
- 2.19 CD DVD Burner
- 2.20 Free CD DVD Burner
- 2.21 Disc Burner
- 3. Other Tips& Tricks+
How to Burn CD to MP3 in Simple Methods
by Christine Smith • 2026-01-21 18:53:43 • Proven solutions
Are you wondering why you would want to burn CD to MP3? Well, so that you can listen to your favorite tunes in CD players if you don’t have digital media players and MP3. Also, for back up purposes in case you want to hold on to the playlist. You know, it is not easy to accidentally delete media files stored on CDs, unlike other external drives. CDs, therefore, make quite safe and secure storage for media files.
You can burn MP3 files to CD through frequently used music applications such as iTunes, Windows Media Player, RealPlayer, and Winamp. In this article, however, we will address how to burn CD to MP3 on Windows 10 in Windows Media Player and also on a third-party app called Wondershare UniConverter.
- Part 1. How to Burn/Rip CD to MP3 in Windows Media Player
- Part 2. How to Burn MP3 to CD with Wondershare UniConverter
Part 1. How to Burn/Rip CD to MP3 in Windows Media Player
In the first part of the article, we are going to show you the step by step process of how to burn CD to MP3 in Windows 10. The procedure is the same for all Windows versions with a built-in Windows Media Player, i.e., Windows 7, 8, and 10. Before we proceed, let me inform you a little about what burning and ripping a CD means. The act of copying music, photos, and video files to a blank CD or DVD refers to burning. Ripping is the converse of burning, i.e., when media files get copied from a CD/DVD to your computer. Windows Media Player got designed to rip and burn files to or from CDs seamlessly.
Now, here is how to go about burning CD to MP3 for car stereo to listen to on a long random drive:
Bonus tip: You should prefer to use a CD-R instead of a CD-RW, since not all CD players can play rewritable CDs (CD-RW) smoothly.
Step 1: CD Insertion
First of all, insert a blank CD into the CD compartment of your PC and launch Windows Media Player.
Step 2: Selecting Burn Option
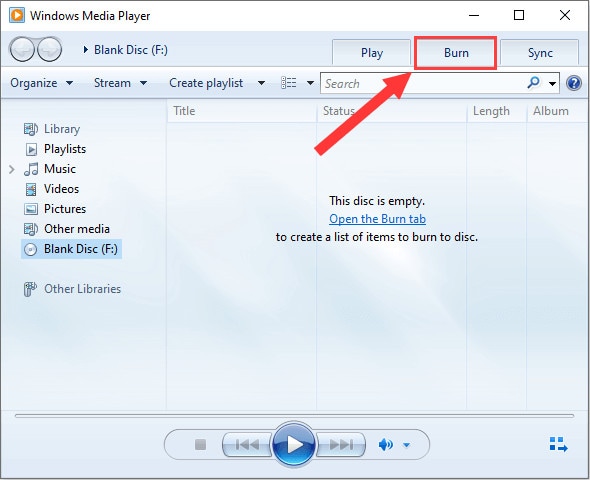
Secondly, click on the Burn icon, which is in between the Play and Sync tabs on the top right corner of the screen.
Step 3: Choosing Disc Type
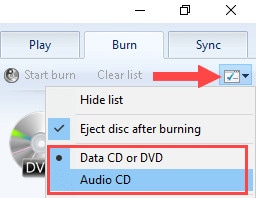
Next step is to click on the Burn Options icon to select either
- Data CD or DVD: if you want to burn MP3 files to a data disc. The output will be a CD that plays only on your PC and players that support the audio file format.
- Audio CD: in case you want to burn the MP3 files to an Audio CD. The output will be a CD that plays on practically any CD player. It won’t be limited to a particular CD player.
Step 4: Creating the Burn List
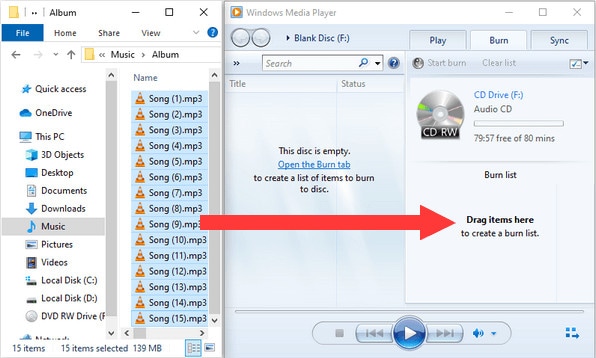
Now, open Windows Explorer and find the storage place of the songs you want to burn on your PC. With Windows Media Player and Windows Explorer interfaces well displayed, drag and drop the files from Windows Explorer to the burn list in WMP.
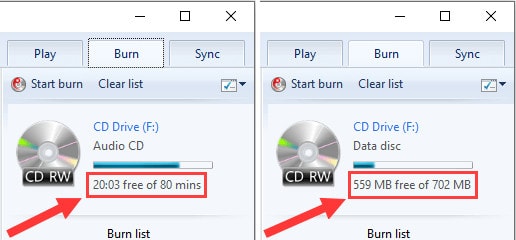
Bonus tip: You can monitor the time in minutes or file size in MB remaining on your CD at _:_free of _mins or _MB free of _MB above the Burn list.
Step 5: Customizing the Burn List
This step is optional. If you want, you can reorder the uploaded music files by just dragging and dropping the songs into the desired position.
Step 6: Burning
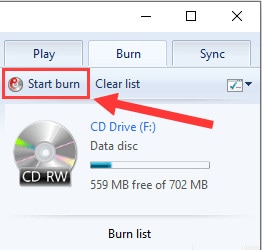
Once you are okay with the details of your music files in the Burn list, click on the Start burn option to initiate the burning process.
Lastly, wait and let Windows Media Player burn your MP3 to CD on Windows 10. Do not eject the CD until the burning process is over.
Part 2. How to Burn MP3 to CD with Wondershare UniConverter
Wondershare UniConverter is an upgrade version of Wondershare Video Converter Ultimate. This program can sufficiently work as a CD burner so that it can burn MP3 to CD besides maintaining the quality of the audio file. The UniConverter from Wondershare accommodates the most popular audio file formats like MP3, WAV, M4A, M4B, FLAC, etc. The software also allows you to download, compress, edit, transfer video files, add video metadata, and is 30 times faster than existing CD burners. When you use Wondershare Uniconverter to burn MP3 to CD, you can be sure of getting a different output, thanks to its simple editing tools. You get to have excellent burned CDs in a short while, and with no hustle whatsoever.
 Wondershare UniConverter (originally Wondershare Video Converter Ultimate)
Your Complete Audio and Video Toolbox

- Convert video to over 1000 formats like AVI, MKV, MOV, MP4, etc.
- Burn Audio files to CD easily on Windows/Mac.
- Work as a metadata management tool to edit video metadata files.
- Convert video to optimized preset for almost all of the devices.
- 90X faster conversion speed than other common converters.
- Edit, enhance & personalize your videos by trimming, croping videos, add subtitles and watermark, etc.
- Burn video to playable DVD with attractive free DVD template.
- Download or record videos from 10,000+ video sharing sites.
- Versatile toolbox includes GIF maker, VR converter and screen recorder.
- Supported OS: Windows 10/8/7/XP/Vista, Mac OS 10.15 (Catalina), 10.14, 10.13, 10.12, 10.11, 10.10, 10.9, 10.8, 10.7, 10.6
Now, let us go around the steps to follow to burn MP3 to CD on Windows or Mac, fast and easy:
Step 1 Launching the Program
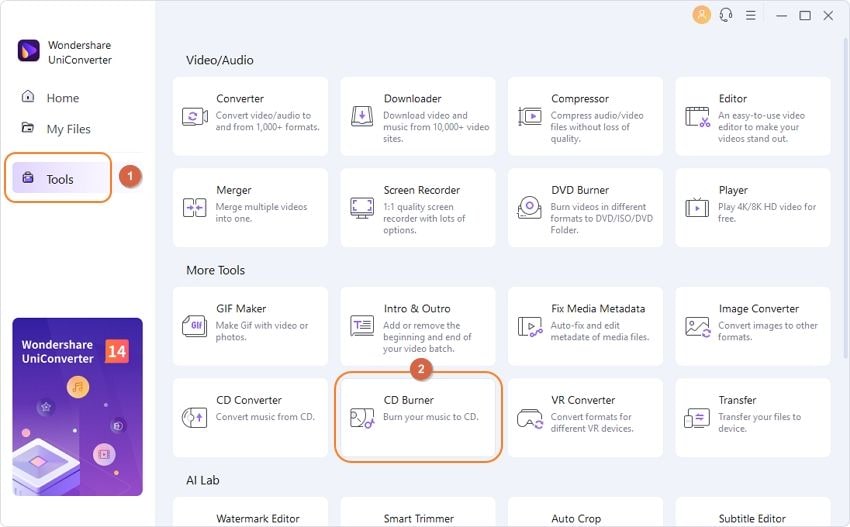
First, you need to download, install, and launch the software on your PC. From the main window, click on the Toolbox tab and opt for the CD Burner option.
Step 2 Selecting Audio Files
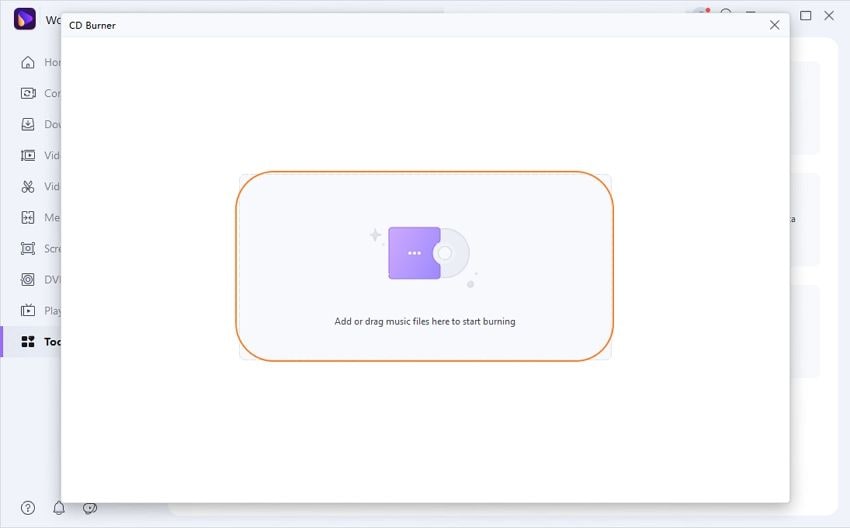
In the window popup, tap on the + (Add) icon, which will allow you to choose the audio files from your computer. You can select a bunch of files and add them here.
Step 3 Personalizing Selected Audio List
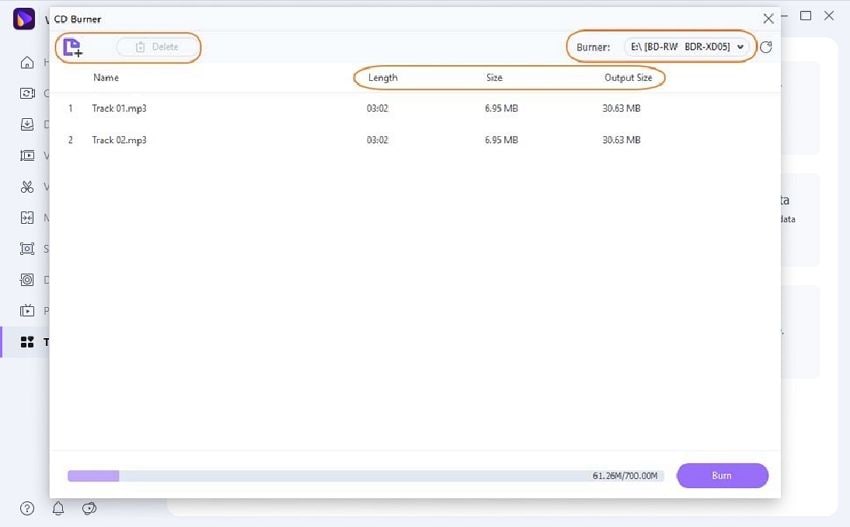
The files you add will be visible on the screen with their Name, Length, Size, and Output Size. To play it, double-click. If you need to add or remove files from the list, then use the add and delete icons located at the top-left corner of the screen. After that, insert a blank CD into your computer and select the burner from the top-right corner of that window.
Step 4 Burning Process
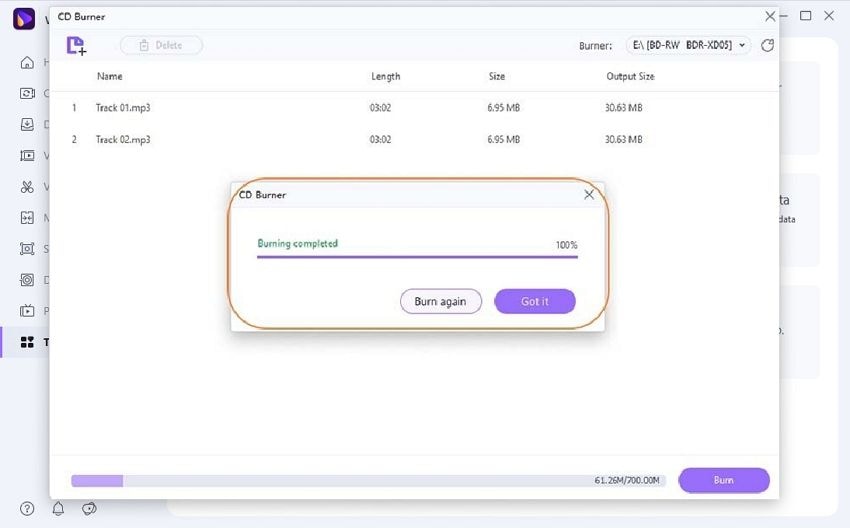
Finally, click on the Burn button to begin burning MP3 to CD. The CD’s storage capacity will show on the bottom bar so that you are aware of the total file size you can add.

When the burning process is complete, you will receive a notification (see image below).
Conclusion
Whether you are looking to burn MP3 to CD for car stereo or safekeeping, you can utilize either of the two music burning software above. They both have simple and straightforward steps for the burning process. It doesn’t matter if you are inexperienced or not tech-savvy, you can quickly burn MP3 to CD on Windows 10 as long as you follow instructions. With the upgraded Wondershare UniConverter, I’d recommend it for a more customized and personal output on the burned CD. It is simply the best for burning MP3 to CD downloads.


Christine Smith
chief Editor