CD Burner
- TRY IT FREE TRY IT FREE
- 1. Burn Different Formats to CD+
- 2. Other CD Burners +
-
- 2.1 Burn Audio CD Mac
- 2.2 Best Audio CD Burning Software
- 2.3 Music Burning Software
- 2.4 Burn CD to MP3
- 2.5 How to Burn a CD on a Macbook Pro
- 2.6 Burn CD Online
- 2.7 CD Burner
- 2.8 CD Burner Download
- 2.9 CD Burner App
- 2.10 CD Burner for Mac
- 2.11 Audio CD Burner
- 2.12 Linux CD Burner
- 2.13 Free CD Burner
- 2.14 XP Burner
- 2.15 Easy CD Burner
- 2.16 Free MP3 to CD Converter & Burner
- 2.17 CD Burner Windows 7
- 2.18 Windows XP CD Burner
- 2.19 CD DVD Burner
- 2.20 Free CD DVD Burner
- 2.21 Disc Burner
- 3. Other Tips& Tricks+
Top 6 ways to Burn Files to CD in Windows 7/ 8/ 10/ Mac
by Christine Smith • 2026-06-23 14:37:50 • Proven solutions
Burning files into your CD or Compact Disk is not a big deal. However, if you don’t know how to do it, you may start to dislike the thing altogether. Not to worry, that is the precise reason why you are here, reading this article. Keep on reading till the end, and you will have not one, not two, but six fresh and absurdly simple ways to burn files to CD in windows 7,8,10 or your Mac.
- Part 1. Burn Your Files to CD in Windows or Mac with Wondershare UniConverter
- Part 2. Another 5 Simple Methods to Burn Files to CD
Part 1. Burn Your Files to CD in Windows or Mac with Wondershare UniConverter
Wondershare UniConverter is an excellent tool if you want to burn files to CD. It is compatible with both Windows and Mac. You can burn your files and retain their qualities and is relatively easy to use, as well. Also, the tool supports almost every type of file format in the category, namely MP3, M4A, FLAC, M4B, WAV, etc.
 Wondershare UniConverter
Your Complete Video and Audio Toolbox

- Burn audio files to CD easily on Windows/Mac.
- Work as a metadata management tool to edit video metadata files.
- Convert video to over 1000 formats like AVI, MKV, MOV, MP4, etc.
- Convert video to optimized preset for almost all of the devices.
- It has a 90X faster conversion speed than other common converters.
- Edit, enhance & personalize your videos by trimming, croping videos, add subtitles and watermark, etc.
- Burn video to playable DVD with an attractive free DVD template.
- Versatile toolbox includes GIF maker, VR converter, and screen recorder.
- Supported OS: Windows 10/8/7/XP/Vista, Mac OS 10.15 (Catalina), 10.14, 10.13, 10.12, 10.11, 10.10, 10.9, 10.8, 10.7, 10.6
Follow the Steps Below to Burn All Your Files to CD in Windows or Mac in a Few Minutes:
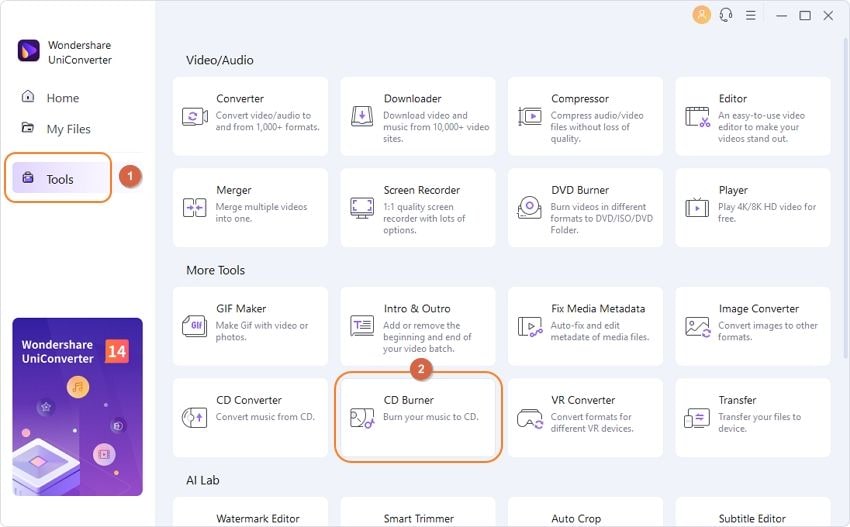
Step 1 Launch Wondershare UniConverter to Start the Process.
To begin with, download Wondershare UniConverter, install it on your PC and launch the program. Once started, go to the Toolbox tab and click on the CD Burner option.
Step 2 Add Files to CD Burner from the Interface.
Once you click on the CD Burner option from the Toolbox tab, a new window opens up in the interface. You can see a + icon at the center of the window. Click on that to add files of your choice, the ones you want to burn. You can add multiple files here.

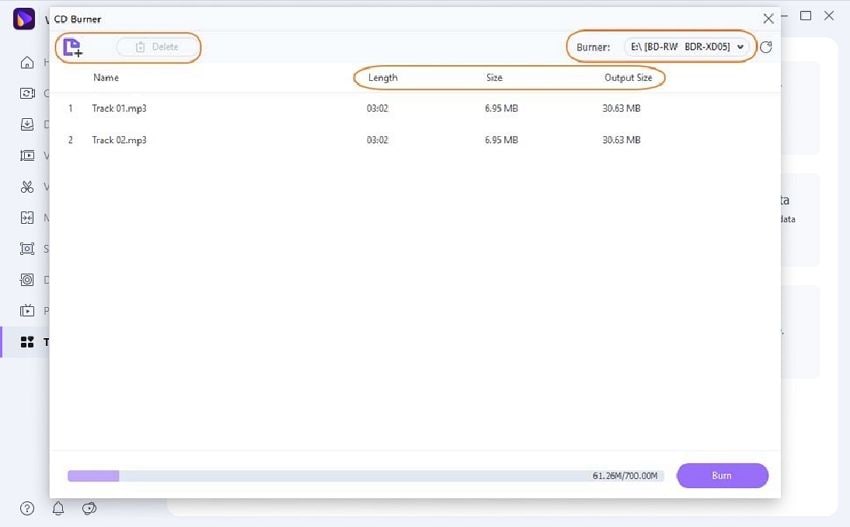
Step 3 Check Your Files and Choose Burner.
The added files will get displayed along with the information regarding those files such as File Name, Size, Length, and Output Size in the form of a list. You can double-click on them if you want to open the said file(s). You can also add more data or delete the unwanted ones just by clicking on the icons at the top-left corner of the interface or window.
Now, insert a blank CD into your computer’s CD Drive and chose the burner. You will find the Burner icon at the top-right of the window.
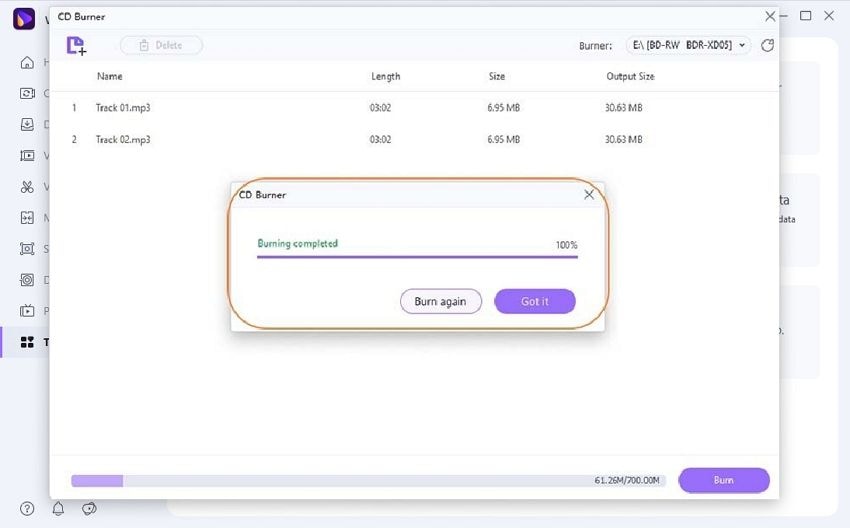
Step 4 Burn All Files to CD Burner.
Click on the Burn button at the bottom-right corner and sit back while Wondershare Uniconverter does all your hard work. There is a bar gauge at the bottom-center of the screen that will keep you updated on the storage space and total file size that you are burning to your CD.

Once the task is complete, a notification message will appear on the screen, as below.
Part 2. Another 5 Simple Methods to Burn Files to CD
Here is five more software to burn files to CD in Windows/Mac.
1. CDBurnerXP
It is one of the best tools out there, along with Wondershare UniConverter for burning files to CD in Windows or Mac platforms. It supports a wide range of data, including MP3, AAC, FLAC, ALAC, WAV, and many more. One of the cool features of this software is that it can add your files directly to your playlists or compilations without having to rip the data beforehand.
How to Use CDBurnerXP to Burn Files to CD?
Step 1: Download, install, and launch the program.
Step 2: Choose the first option, called Data Disk. Here you can not only burn files to CD on Windows/Mac, but you can also create ISO images. Click on the OK button once you select the option.

Step 3: A new window opens as you click on the OK button. Navigate to the left side of the interface and browse the files that you want to burn from your library. You can see the contents of the folder chosen on the right side. Below is a window with the words Drag & Drop here. It is where you need to add the files you want to burn.

Step 4: Once all your files get selected, dragged, and dropped at the window, click on the Burn Disc option. The software will start the process. However, be sure to insert a blank CD into your CD drive before you click on the Burn Disc option.

Step 5: After the burning is complete, and a popup window opens, click on the OK button.

Step 6: Finally, another window will open up. There is no logical reason behind it, but I speculate that it is for future references to the settings of your process. Click Close.

Pros:
- Focus on the basics of the process.
- Once you burn a disk, the data inside is always verified.
- You can create a bootable disk.
- The interface is very user-friendly.
Cons:
- Not have many extra features, only a few.
- It has a system requirement for the Microsoft .NET framework.
- It is not at all useful for media editing.
2. ImgBurn
It is free software and is good to burn files to CD in Windows 7 and above. Just like CDBurnerXP, ImgBurn also supports almost every type of disks and file formats. One amazing feature of this software is that it enables you to match the burned data on your CD with the original data.
How to Use ImgBurn to Burn Files to CD?
Step 1: Download, install, and open ImgBurn. Go to the Mode menu in the initial screen or interface. From there, select the Write option.

Step 2: A new window will open for you to define what type of CD you want to create, i.e., the type of files you want to burn. Let us say you want to create an audio CD. Hence, you need to click on the CD icon with a musical note, as highlighted here.

Step 3: On clicking the Audio CD option, a new window will appear to select the files you want to burn. You can browse your hard drive for the desired data by clicking on the icon at the top-right corner of the window and add them to the CUE file.

Step 4: Once you have all the files you want to burn, click on the OK button. A new window will appear showing the details of the CUE file you created just now to burn to the CD. It will also start the burning process automatically, so make sure to insert a blank CD into your PC drive beforehand.

Lastly, a notification message will arrive, showing that the burning process was a success.

Pros:
- You can burn almost all disk and file types.
- It is free.
- No limitations.
Cons:
- During the installation, some other program may get installed along with it.
- Lack of some features.
- You will lose the original quality of data after burning.
It is yet another free CD Burner tool available online. It can burn different types of disks as well as files. It is compatible with Windows 7 and higher versions. You can also make bootable disks with BurnAware Free.
How to Use BurnAware Free to Burn Files to CD?
Step 1: Download and install on your computer. Open the software, and a window will pop up, as shown below. Select the Data option, and it will show you various tasks you can perform under that option. From there, select the Data Disk task to import or add your files to the software.

Step 2: From the ADD option in the toolbar at the upper central area of the interface, you can browse and add the files you want to burn.

Step 3: Once you have added all the desired files, click on the red Burn button from the same toolbar as the Add option.
Now, sit back, relax, as BurnAware will do the rest.
Pros:
- You can find almost all the options needed to burn a CD or a DVD;
- Compatible with all the Windows OS versions;
- You can make a bootable CD as well.
Cons:
- Stability is shallow, and so it might crash while burning;
- Uses up lots of CPU space;
- It cannot retain the original data quality.
4. iSkysoft DVD Creator for Mac
It is one of the best CD Burner software to burn files to CD in Mac. You can find many inbuilt options catering to all your burning needs. You can also make beautiful slideshows with this tool.
How to Use iSkysoft DVD Creator to Burn Files to CD?
Step 1: Download, install, and open the iSkysoft DVD creator on your Mac, and an interface as shown below will popup.

Step 2: You can add files by either the drag & drop feature or by clicking the + button.

Step 3: Once you add all the required files, click on the Burn button to start the burning process. Be sure to insert a blank CD before you start burning.

Pros:
- You can personalize your CD or DVD with templates built into the software.
- User-friendly interface for easy burning.
- Video editing is also possible.
Cons
- It is not free and can be a bit costly.
- Not support many formats in case of videos.
- The windows version has more features than its Mac counterpart.
5. iTunes
Most of you may not know, but you can also use iTunes to burn files to CD in Mac platforms. However, you can burn only audio files with iTunes.
How to Use iTunes to Burn Files to CD?
Step 1: Since the software comes installed, open it, and create a playlist containing the data, you want to burn to CD. Select the files from your iTunes library and then select the Add to Playlist tab and click on the New Playlist option to create the playlist.

Step 2: Select the File tab, and you will find the Burn Playlist to Disc option, click on it.

Step 3: You need to configure the burn settings, like the burn speed and disk format.
Higher speed would cost you data quality, so be sure about your burning speed. After configuring these settings, click on the Burn button. One more thing, do not forget to insert a blank disk in the CD drive before you select the Burn option.

Pros:
- There is no need to download and free of cost.
- Excellent stability, as you probably have experienced while using the software to listen to music.
- You can manage songs on your iOS devices.
Cons:
- You have to create a playlist to burn your audio files.
- It is a bit hard to use for first-timers.
Conclusion
Thus, you can easily download this software, some of which are free. The primary steps for all, as you have seen, are the same. Lastly, we hope the article helped you understand how to burn files to CD in Windows and Mac devices.
- Effortless DVD to MP4 Conversion: VLC Tutorial for Mac/Windows 10
- [Solved] How to Play DVDs on Wii Easily
- 5 Best DVD to Digital Converters You Should Try [2026 New Updated]
- NTSC to PAL Converter: How to Convert NTSC to PAL (Windows 10 Included)
- CDBurnerXP: Software Reviews and How to Use
- Top 4 Methods to Burn MP3 Files to CD Burner
- How to Burn ISO to CD Easily with 5 Best Methods
- 13 Most Useful CD Burners for Windows 7 in 2026
- 15 Excellent MP3 CD Burners Recommended


Christine Smith
chief Editor