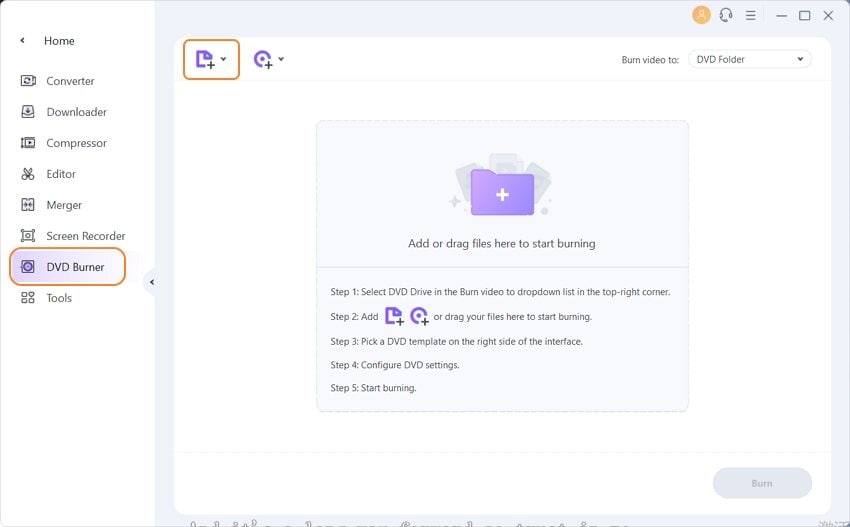
- Select Burn Section
-
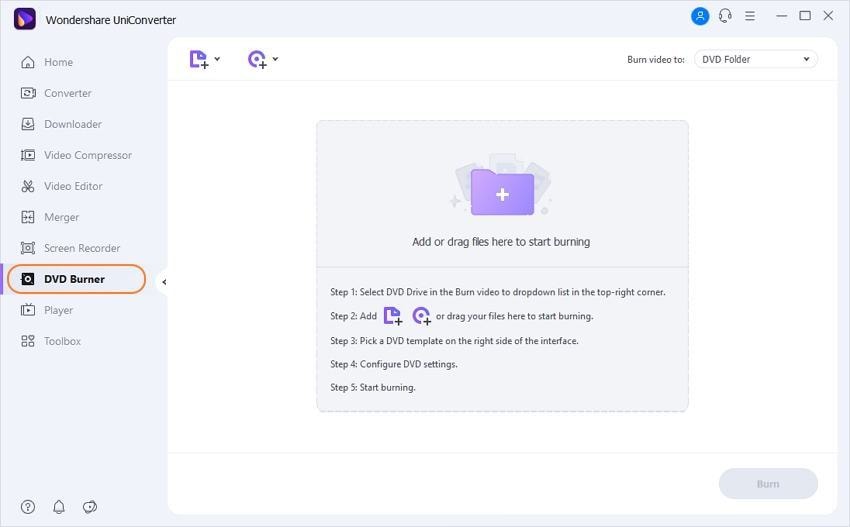
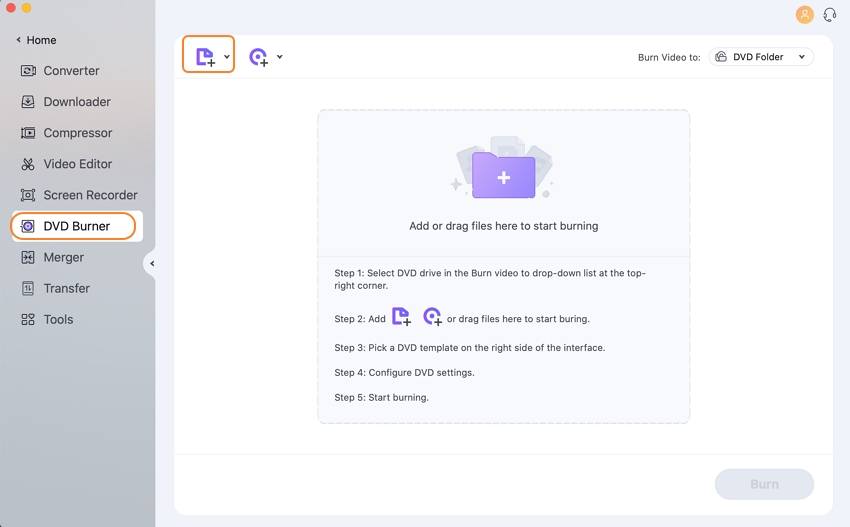
Download and start Wondershare UniConverter, and choose the Burn tab at the top middle of the main interface.
Part 1. Most Helpful DVD Burners
- 1.1 Best DVD Burner for Windows 10 & Windows 8
- 1.2 Top 3 DVD Burning Software for Windows 7 & Windows XP
- 1.3 Top 3 DVD Burning Software for Mac
- 1.4 Best 3 Video to DVD Converters
- 1.5 Tips & Tricks about DVD Burning
Burning DVDs is always a hot topic among people today. It’s very easy for us to shoot a video today, but there’s not an efficient way to save the videos permanently. Burning these videos to DVDs is a good way to keep the videos safe. In the following part, we’re going to introduce you a bunch of DVD burners that can help you to burn DVDs with easy steps.
1.1 Best DVD Burner for Windows 10 & Windows 8
1. Wondershare UniConverter
Wondershare UniConverter (originally Wondershare Video Converter Ultimate) is a powerful DVD burning program for Windows 10 and Windows 8 computers, and it’s also compatible with Windows 7 and Windows XP computers. This DVD burner enables you to burn HD and FHD videos to DVDs, burn ISO files to DVDs, and burn local videos on your computer to DVDs easily.
1.2 Top 3 DVD Burning Software for Windows 7 & Windows XP
MyDVD
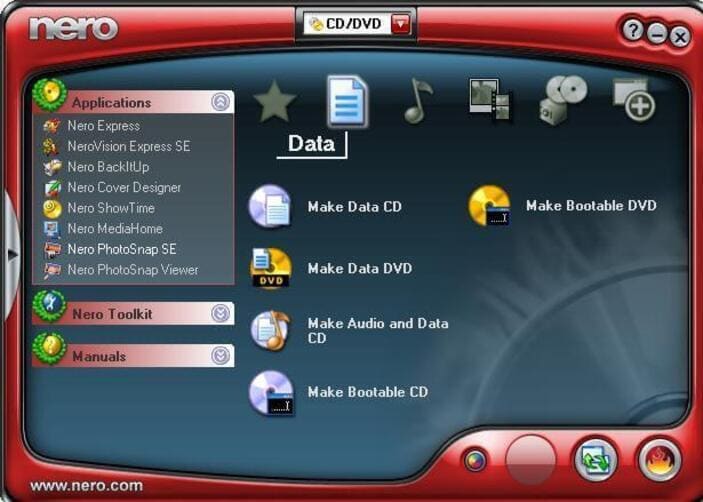
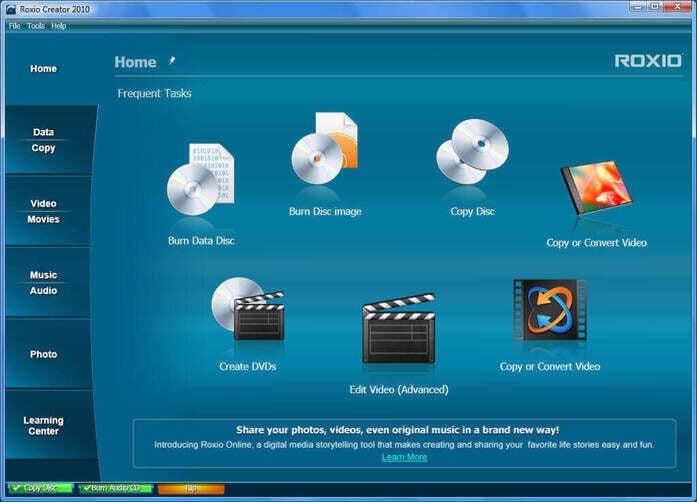
DVD burner is another commonly used DVD burner for Windows that allows turning your videos into a number of disc types including DVD, AVCHD, and Blu-ray. The software has 10 themed menu templates from which you can make a choice depending on your needs. Infinite menu layouts can also be created using the program by adding a photo background. If needed an intro video can also be added. The DVD burning process using is quick and simple and also supports combining multiple videos on disc. Additional features include customizing menu, music and text, project preview, erasing a disc, adding chapter points to videos, and others. MyDVD comes in 2 mode- Magic Mode and Advanced Mode and is compatible working with Windows 10/8/8.1/7 OS versions. The price for this DVD burner is USD 49.99 instead of DVD burner free. Meanwhile, this site also includes Toast DVD as the Toast dvd burner for Mac.
1.3 Top 3 DVD Burning Software for Mac
Burn
Burn is well-known DVD burning software that comes with advanced features and is simple to use. The program is capable of burning all types of files added to the interface and has 4 modes- Data, Audio, Video, and Copy. For videos, the software allows creating a range of discs like CD, DVD, and DivX. Interactive menus can also be created for video disc personalization. You can organize and store all your music files at one place using Burn as it allows creating MP3 discs. Advanced features like MP3 tagging and CD-Text are also supported. Audio and video files are can be converted to the right format and the software also facilities copying disc or using disk images for recreating the discs. Burn is an open source program that is free to use.
1.4 Best 3 Video to DVD Converters
Ashampoo Burning Studio Free
This program is a very helpful video to DVD converter program which can help you to convert and burn videos to DVD disc with ease. This program offers a very easy-to-use interface for you to handle the video to DVD converting process, and it adds new functions that are offered by its loyal users.
1.5 Tips & Tricks about DVD Burning
- 1. What’s a DVD Writer and How to Get It?
- Many a time, people will refer to the DVD burner as a DVD writer. In fact, a DVD writer doesn’t only burn files to DVDs, but also store computer data in a blank DVD disc. If you are in need of a DVD writer, you can get it easily on Amazon. DVD writers provide internal and external DVD writers, and you can select the one that meets your requirements.
- 2. Is There Any DVD Image Burner Available?
- Generally speaking, a DVD image burner refers to ISO Image to DVD burner software. You’ll be able to burn ISO image files to DVD with the help of an ISO burner. If you want to burn ISO image files to DVD, you can find solutions in Part 4.
- 3. How to Get a DVD Maker or DVD Creator on Computer?
- A DVD maker allows you to make a DVD from your local videos or music files, and it’s also known as DVD creator. If you are looking for a helpful DVD maker program, this article All Knowledge about DVD Maker will help you out.
- 4. Is There a Multi DVD Burner Available?
- When it comes to multi DVD burners, people can find different answers on Google, but most of them are related to hardware. In fact, there’s a multi DVD burner program available for Windows users, which is called GEAR PRO Professional Edition 8.10. This program enables you to burn CDs and DVDs to multiple drives simultaneously.
- 5. Is There Any DVD Player that Has a Burning Feature?
- Of course. If you want to find a DVD player that can burn videos to DVD, take a look at RealPlayer. This world-famous multimedia player giant offers you RealPlayer 18 Plus that allows you to burn videos to DVD as well.
- 6. Is There Any Phone Video to DVD App Available?
- We doubt if there’s an app for burning phone videos to DVD at first, but after searching on Google, we found an app named QuickFlics that claims the video to DVD burning feature. The app enables you to upload your phone videos to their service, and then the company will send you the disc after burning your phone videos to DVD.
Part 2. How to Burn DVDs with All Ways
Burn DVDs with Wondershare UniConverter
Solution 1. Burn DVDs with Wondershare UniConverter
Wondershare UniConverter (originally Wondershare Video Converter Ultimate) is a powerful DVD burning program that enables you to burn videos to DVD with easy steps. In this part, we’re going to introduce how to burn DVDs with Wondershare UniConverter in detail.
2.1 How to Burn DVD on Windows
Burning DVDs on Windows computers is easy to be done with Wondershare UniConverter. The program enables you to burn DVDs on Windows 10 or earlier Windows version.
- Add Files from Computer
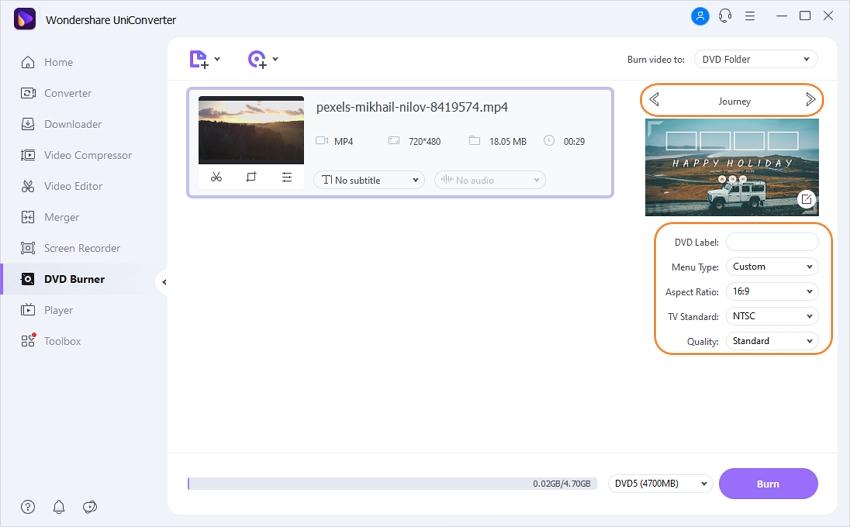
- Click the Add Files button at the upper left corner of the program window to add video into the program.
- Make Up DVD Settings
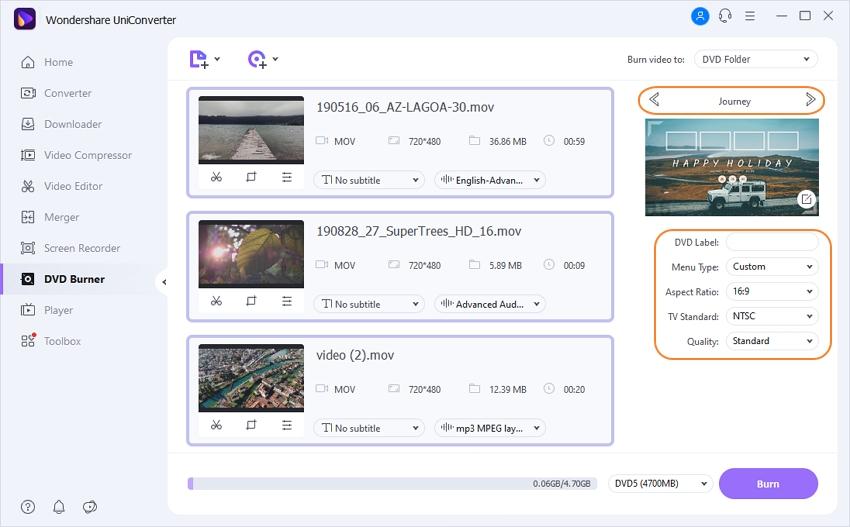
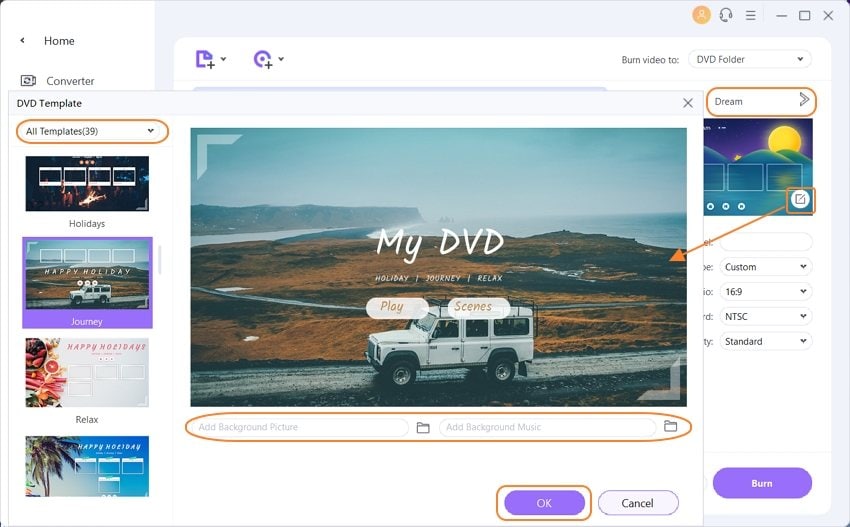
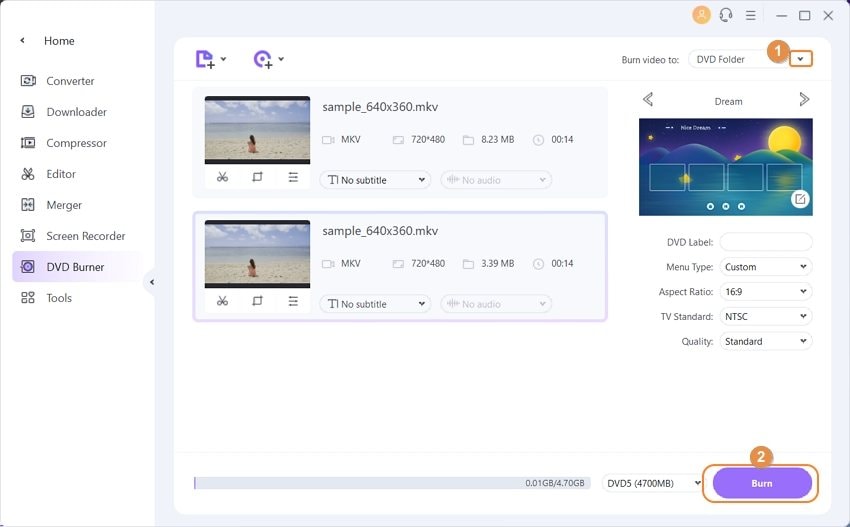
- Now the program will let you choose the DVD template. You can also customize the settings after choosing a template. When finished, click Burn to start burning DVDs on your Windows computer.
2.2 How to Burn DVD on Mac
With Wondershare UniConverter for Mac (originally Wondershare Video Converter Ultimate for Mac), you're able to burn DVD on Mac with easy steps.
Step 1: Download and install Wondershare UniConverter for Mac on your computer, then start it. After that, choose the Burn section in the middle of the top.
Other steps are just the same as mentioned about burning videos to DVD with Wondershare UniConverter.
2.3 How to Burn iTunes Movie to DVD
* If you want to burn iTunes movie to DVD, you’ll need to make the movie DRM-free at first.
Step 1: Download, install, and launch Wondershare iTunes to DVD converter on your PC, and go to the Burn tab from the primary interface. To add iTunes videos, hit the Add Files icon to select. You can also use the drag-and-drop method.
Now you can burn videos to DVD easily with the same steps as mentioned above.
2.4 Burn iMovie to DVD on Mac
Hit the Burn button to start the process. At Burn Video to: option, select the destination folder where you want to burn the files to.
2.5 Burn YouTube Videos to DVD
* Please note that you can only burn copyright-free YouTube videos to DVD for personal use.
Step 1: Start Wondershare UniConverter and select the Download section at the top of the main interface, then download YouTube videos to your computer first.
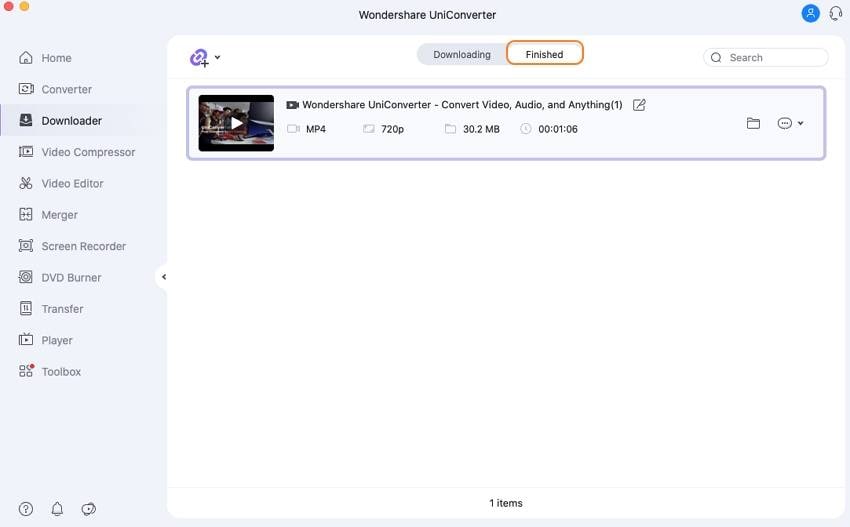
Step 2: After downloading the video, you can locate the video in Finished tab and right-click the video, then select Open File Location.
2.6 How to Convert Phone Video to DVD
You’re enabled to convert videos to DVD-compatible video files with the help Wondershare UniConverter, and it’ll only take you few steps to do that.
If you're going to convert phone videos to DVD, you can choose the Burn section in Wondershare UniConverter, and click the inverted triangle icon beside Add Files button, then select Add from Device in the drop-down menu.
Solution 2. Free Ways to Burn DVDs on Your Computer
2.7 How to Convert Videos to DVD
- Add Videos from Computer
-
Enter Media.io (originally Media.io) in your browser, and click the Add your files section to add your local video.
- Select DVD Video Output
- After adding the video into the program, you can select the DVD format as an output. Generally speaking, VOB is comprehensively used on DVD.
2.8 Burn Videos to DVD on Ubuntu
* To burn videos to DVD on Ubuntu, you’ll need a piece of third-party burning software.
Step 1: Enter Ubuntu Software Center and find a program named DeVeDe NG. Then install and start the program on your computer. After that, choose Video DVD option.
Step 2: Open your video with OpenShot Video Editor, and create an ISO file with this program.
Step 3: Now Click Add button in DeVeDe NG and add the ISO file to the program window. The program will load the ISO file. Then you can make up the settings for your ISO file.
Step 4: When the settings are finished, click OK to start burning videos to DVD on Ubuntu.
2.9 How to Burn Videos to DVD on Linux
Step 1: Download and install K3b on your Linux computer, and then start it.
Step 2: You’ll need to convert your video to an ISO file at first. You’ll be able to create an ISO file with ffmpeg easily.
Step 3: Now return to K3b and add the ISO file into the program window. Click The Further Actions > New Video DVD Project, then drag and drop the Video_TS and Audio_TS directories into the program.
Step 4: Click Burn to start burning videos to DVD on Linux.
2.10 How to Burn Videos to DVD with VLC
Step 1: Start VLC, and select Media > Stream.
Step 2: Click the Add button to add the files into VLC.
Step 3: Make up the settings before you start burning videos to DVD.
Step 4: Click Burn to start burning videos to DVD with VLC.
2.11 Burn Music to DVD
Step 1: Insert a blank DVD to your computer drive, and open the Windows Media Player program.
Step 2: Select all the music files you want to burn at the right side of the program window.
Step 3: Click the Burn button to start burning music to DVD.
Part 3. How to Burn Blu-ray on Windows
Step 1: Insert a blank DVD to your computer drive, and open the Windows Media Player program.
Step 2: Select all the music files you want to burn at the right side of the program window.
Step 3: Click the Burn button to start burning music to DVD.
Blu-ray discs contain much higher storage space than DVD discs, therefore the Blu-ray discs can save the HD videos with its original quality. In this part, we’ll introduce the helpful solutions to burn Blu-ray on your computer.
3.1 Best Blu-ray Burning Software for Windows
Wondershare UniConverter
Wondershare UniConverter (originally Wondershare Video Converter Ultimate) is a helpful and easy-to-use Blu-ray burning program that can help you to burn Blu-ray on Windows computer with simple steps. Wondershare UniConverter is also a helpful video to Blu-ray converter that can help you to convert videos to Blu-ray compatible video files.
3.2 Most Helpful Blu-ray Burning Software for Mac
DVDFab Blu-ray Creator for Mac
DVDFab Blu-ray Creator for Mac is also a good Blu-ray burning program, and it allows you burn Blu-ray on a Mac computer with simple steps. This Blu-ray burner software for Mac also enables you to get the work done in easy steps. DVDFab Blu-ray creator for Mac gives users other options, for example, you can burn music to Blu-ray with the program easily.
3.3 How to Burn Blu-ray on Mac with DVDFab Blu-ray Creator
DVDFab Blu-ray Creator for Mac
As mentioned, DVDFab Blu-ray Creator can help you to burn Blu-ray on Mac easily. In the following tutorial, we'll introduce how to do that in detail.
Step 1. Install and start DVDFab Blu-ray Creator on your computer, and then load the video you’d like to burn.
Step 2. Now select Blu-ray mode in the Creator Mode.
Step 3. Click the Start button at the lower-right bottom to start burning Blu-ray on Mac.
Part 4. Burn ISO to DVD
- 4.1 Best ISO to DVD Burner Software
- 4.2 How to Burn ISO to DVD on Windows
- 4.3 How to Burn ISO to DVD on Mac
4.1 Best ISO to DVD Burner Software
1. Wondershare UniConverter
Wondershare UniConverter (originally Wondershare Video Converter Ultimate) is a powerful DVD/Blu-ray burner program for Windows and Mac users. It helps you to burn ISO files to DVD or Blu-ray discs with easy steps. This program also offers different kinds of templates to make your DVD more interesting and organized.
4.2 How to Burn ISO to DVD on Windows
How to Burn ISO to DVD on Windows
Step 1: Start Wondershare UniConverter (originally Wondershare Video Converter Ultimate) on your computer after the installation. After that, select Burn section at the top of the main interface.
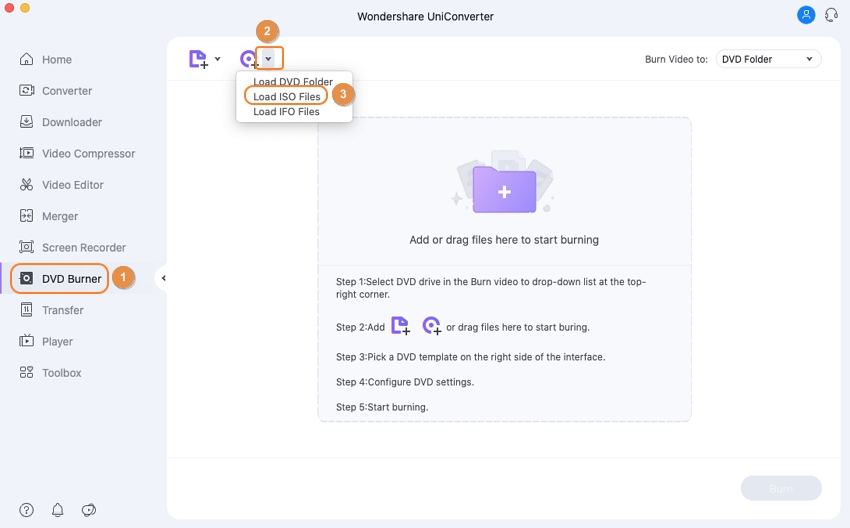
Step 2: Click the triangle icon at the right side of the Load DVD button, and then choose Load ISO Files in the drop-down menu.
Step 3: Now you can select a template for your DVD, or makeup settings before burning the ISO files to DVD.
Step 4: Click Burn at the lower-right bottom to start burning ISO to DVD on Windows computer. When the burning process finishes, you can click Open File Location to view the DVD file.
4.3 How to Burn ISO to DVD on Mac
How to Burn ISO to DVD on Mac
Step 1: Download and install Toast on your Mac computer.
Step 2: Select the Copy section at the top middle of the main interface, and select Image File in the drop-down menu at the upper left corner of the main interface.
Step 3: Click Select in the program window and browse the ISO folder on your Mac.
Step 4: After selecting the ISO file, you should insert the blank disc into your Mac computer.
Step 5: Click the Copy button a the lower-right bottom to start burning ISO to DVD on a Mac computer.
Part 5. CD Burning Software
- 5.1 Best CD Burning Software
- 5.2 Best CD Burning Software for Windows 10 and How to Burn Music to CD on Windows 10
- 5.3 Best CD Burning Software for Windows 7 and How to Burn Music to CD on Windows 7
- 5.4 Best CD Burning Software for Mac and How to Burn Music to CD on Mac
- 5.5 Tips & Tricks about CD Burning
If you’re a music enthusiast and want to save your music files to CD or DVD for any purpose, this part will be helpful for you. The following part will introduce the best CD burning software and how to burn music to CD with the help of these programs.
5.1 Best CD Burning Software
5.2 Best CD Burning Software for Windows 10 and How to Burn Music to CD on Windows 10
Windows Media Player, the built-in multimedia player for Windows users, can help you to burn music files to CD.
Key Features of Windows Media Player
- Built-in media player program for Windows, no risk of malware.
- Provide easy-to-use burning features for burning music to CD.
- Please note that Windows Media Player and Media Center are two different things. Therefore, you may have problem playing DVD videos.
How to Burn Music to CD on Windows 10
Step 1: Insert a blank CD into your Windows 10 computer.
Step 2: Start Windows Media Player and click Burn on the right side of the main interface. Then select Audio CD in the drop-down menu by clicking the checklist icon at the upper right corner.
Step 3: Now enter your File Explorer and locate the songs you would like to burn to a CD.
Step 4: Drag and drop the music files to the burn list in Windows Media Player. You can arrange the order of the songs before burning them.
Step 5: Click the Start Burn button at the top of the main interface to start burning music to CD on Windows 10 computer.
5.3 Best CD Burning Software for Windows 7 and How to Burn Music to CD on Windows 7
Undoubtedly, the built-in solution, Windows Media Player, makes burning music to CD easy to be done. But in this part, we’ll introduce another method to music to CD on Windows 7, by using RealPlayer. RealPlayer is a popular multimedia player all over the world, and most people only use it as a video player. In fact, this program can help you to burn music to CD in simple steps. The following tutorial will show you how to do that.
Key Features of RealPlayer
- Play all kinds of video files with no hassle.
- Burn video and audio files to DVD or audio CD with ease.
- Play music library and create playlists.
How to Burn Music to CD on Windows 7
Step 1: Download and install RealPlayer on your computer, and start it. Then select Burn section at the top middle of the main interface. Then select Audio CD Burner.
Step 2: Hit the Add Tracks from My Library at the left side of the program window. Then add the music files from your computer to RealPlayer.
Step 3: Set up the burning speed and click OK.
Step 4: Click the Burn Your CD button to start burning music to CD on Windows 7.
5.4 Best CD Burning Software for Mac and How to Burn Music to CD on Mac
If you’re going to burn music to CD on Mac, iTunes can be your best option. iTunes is more than a music player, it also helps you to store multimedia files, discovers music or videos, and more. If you're still using iTunes on your Mac computer, you’ll be able to burn music files to CD with few steps.
Key Features of iTunes
- Burn music files to CD in order.
- Help you to fix the metadata of your music files.
- Create a playlist with a very easy step.
How to Burn Music to CD on Mac Using iTunes
Step 1: Open iTunes on your Mac computer, and then create a new playlist for burning music.
Step 2: Drag and drop the music files to the new playlist, and arrange them in order.
Step 3: Insert a blank CD into your computer.
Step 4: Click the Burn button to start burning music to CD on Mac. Or you can go to File > Burn playlist to disc in menu bar.
Step 5: Make up the settings for your burning process, and click Burn to start burning music to CD on Mac.
5.5 Tips & Tricks about CD Burning
When burning CD or selecting a CD burner, you may come up with all kinds of problems. In fact, there’re several helpful tips and tricks about CD burning. In this part, we’ll introduce 5 helpful tips for you.
- What’s Windows DVD Maker and How to Get It
-
Window DVD Maker is an inbuilt windows app with the feature of making DVD. There is no need for any third-party software installation if you want to use Windows DVD maker for burning your DVD’s because this is by default installed in your windows 7 OS. It allows you to burn homemade videos and digital photos to the DVD for free of charge. If you need to customize the DVD menu bar before burning then this is also possible using this program.
How to Get It: First click on the windows icon from the bottom right side and look at the search bar. Type “Windows DVD Maker” in the search bar now. After typing the windows DVD maker it will be available in the search results like the screenshot below.
- 1. Is There Any Good CD Player for Windows 10?
- If you don’t want to use Windows Media Player, you can select another CD player for Windows 10. Among all the CD player programs, VLC Player can be regarded as the most popular one. It is a very helpful multimedia player program, and it allows you to play video DVDs and audio CDs easily.
- 2. Is It Possible to Burn Pictures to CD in Windows 10
- The answer is positive. With the help of a CD burning program, you’ll be able to burn pictures to CD on Windows 10 in simple steps. Ashampoo Burning Studio, for example, can help you to burn photos and videos to CD or DVD.
- 3. Can I Burn Google Play Music to CD?
- It depends. If you’ve actually purchased the songs from Google Play, you can download the songs to your local computer, and then burn them to CD. But if you only subscribe to the streaming music service, then the songs you saved are copyright-protected, and you won’t be able to burn these songs to CD.
- 4. How Can I Make an MP3 CD?
- If you want to make an MP3 CD, you can either use the built-in software on your computers, like Windows Media Player or iTunes; or use a third-party program like UniConverter (originally Wondershare Video Converter Ultimate) or VLC.
- 5. How to Burn Flac to CD
- FLAC files are not CD audio files, and most CD players don't support to play FLAC files. Therefore, you’ll have to convert FLAC files to another file type. For example, you can convert FLAC to WAV files to avoid the loss of audio quality, and then burn the WAV files to CD for playback.
Part 6. Photo Burning Software
- 6.1 How to Burn Photos to DVD with Wondershare DVD Slideshow Builder Deluxe
- 6.2 How to Burn Photos to DVD with Wondershare DVD Creator
Most of us have tons of photos full of memories. On certain occasions, for example, birthday, wedding, anniversary and so on, you would like to share these pictures with friends and families. At this moment, you’ll need the help of a photo slideshow maker, which can help you to burn photos to DVD for playback. In this part, we’re going to introduce you two solutions to burn photos to DVD easily.
6.1 How to Burn Photos to DVD with Wondershare DVD Slideshow Builder Deluxe
Wondershare DVD Slideshow Builder Deluxe is a piece of the photo to DVD burning software that can help you to burn photos to DVD discs in easy steps. This program is very easy to use, and it has all kinds of templates for you to choose from.
Key Features of Wondershare DVD Slideshow Builder Deluxe
- Easy to use, and burn photos to DVD in seconds.
- Personalize your DVD with different kinds of templates.
- Share the created slideshow to others with one click.
Step 1: Download and install Wondershare DVD Slideshow Builder Deluxe, then start it on your computer. After that, click Add Files button or drag and drop the images from your computer to the program window.
Step 2: After adding the photos into the program, you can select the templates for your DVD.
Step 3: Click the Create button at the upper left corner, and then select Burn to DVD to start burning photos to DVD.
6.2 How to Burn Photos to DVD with Wondershare DVD Creator
Wondershare DVD Creator is another helpful program that can help you to burn photos to DVD. This program enables you to convert any video to DVD, make a smart photo slideshow with background music, and more. The following tutorial will show you how to burn photos to DVD with Wondershare DVD Creator.
Key Features of Wondershare DVD Creator
- Burn any video to DVD easily.
- Create a smart slideshow in seconds.
- Burn to DVD with very high speed and quality.
Step 1: Download and install DVD Creator on your computer, then start it. After that, select the Create DVD Video Disc tab in the main interface.
Step 2: Click the + button in the middle of the main interface to add the pictures from your computer into the program.
Step 3: Select a menu before burning the pictures to DVD.
Step 3: Select the Burn tab in the main interface, and make up the final settings. After that, click Burn to start burning photos to DVD.
Part 7. DVD Burning Video Format
DVDs have no specific requirements for video formats, therefore people can burn all kinds of video files to DVD discs. In this part, we’re going to list the DVD-compatible video formats out, so you can burn these videos to DVD without any hesitation next time.

How Do You Select a DVD Burner Program
A short survey about how you select a DVD burning program


