iPhone Tips
- TRY IT FREE TRY IT FREE
- 1. Transfer Tips+
-
- 1.1 How to Import Videos From iPhone to Mac
- 1.2 How to Transfer Videos From Mac to iPhone
- 1.3 Mail Drop iPhone
- 1.4 Convert iPhone to Android
- 1.5 How to Send Video From iPhone to Android
- 1.6 How to Send Video From iPhone Without Losing Quality
- 1.7 Import Video to iPhone
- 1.8 How to Upload Video to iPhone
- 1.9 How to Add Videos to iPhone
- 1.10 Transfer MP4 to iPhone
- 1.11 How to Transfer GoPro Videos to iPhone
- 2. Edit Photos on iPhone+
- 3. Edit Videos on iPhone+
-
- 3.1 iPhone Video Format
- 3.2 iPhone Supported Video Formats
- 3.3 Reduce Video Size iPhone
- 3.4 Resize video iphone
- 3.5 How to Trim a Video on iPhone
- 3.6 How to Clip a Video on iPhone
- 3.7 iPhone Video Upside Down
- 3.8 Change Video Orientation iPhone
- 3.9 Zoom Video iPhone
- 3.10 How to Merge Videos on iPhone
- 3.11 How to Brighten a Video on iPhone
- 3.12 Play MKV on iPhone
- 3.13 Remove Audio from Video iPhone
- 3.14 How to Remove Sound from iPhone Video
- 4. Convert Video to iPhone+
- 5. Other Tips+
How to Shrink a Photo on iPhone Easily
by Christine Smith • 2026-01-21 18:54:18 • Proven solutions
You may not often come across such need to shrink photo size on iPhone as the latest versions already support a format that uses less storage space as compared to standard JPEG format. However, in some cases, you need to resize or save space if the iPhone is set to default at Most Compatible. Thus, we have decided to frame an article on how to shrink photo file size on iPhone in three to four necessary steps and several different ways.
- Part 1. How to Shrink a Photo on iPhone by Changing Format
- Part 2. How to Shrink Photos on iPhone with Desqueeze
- Part 3. How to Shrink iPhone Photos on Windows and Mac
Part 1. How to Shrink a Photo on iPhone by Changing Format
Shrink photo size iPhone offers two options to save storage space. You can either resize an image or change format. However, here, we are going to introduce the concept of changing the format in simple steps. Apple devices starting from iOS 11 and later supports high-efficiency image format at default. It means HEIC format for images and format for videos. Thus, the standard JPEG format is not at default, which is most compatible for sharing though it uses extra storage space as compared to HEIC format.
So, what you need to do is to change JPEG to HEIC format to consume less space. In case the default is not at high-efficiency, you need to follow the steps given below to shrink an iPhone photo and make more space to store other files.
Note: It is compatible with iOS devices running on iOS 11 or later versions.
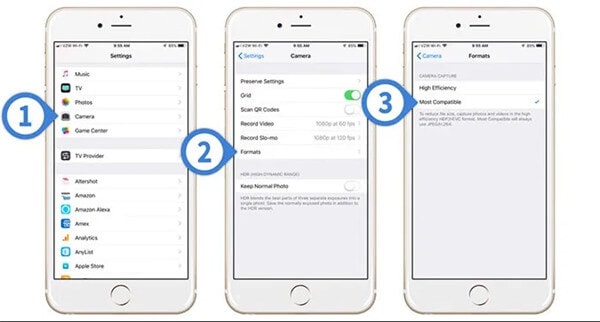
Step 1: Launch Settings.
If you are having an iOS 11 or later version, go to Settings and select the option Camera.
Step 2: Check Formats.
When you select the Camera, it will preview two camera capture options, i.e., High Efficiency and Most Compatible.
Step 3: Select High Efficiency.
To change JPEG to HEIC, select the option, High Efficiency, and the process will be over. It will automatically save videos in and images in HEIC format.
Part 2. How to Shrink Photos on iPhone with Desqueeze
Desqueeze-Batch Resizer is a bulk resize app for videos and pictures on the iPhone. The app uses beautiful templates, and an informative user interface, and flexible settings to resize. It can resize photos up to 8192 pixels and videos up to 4k resolution. Three different resize ways, namely the Ratio Clip, Stretch, and Ratio Fit with features such as anamorphic de-squeeze, orientation detection, and batch resize, get used. For reformatting images, you can set photo DPI, JPEG compression quality. Use JPEG, PNG, and TIFF formats, and format auto-detection.
URL: https://apps.apple.com/us/app/desqueeze-batch-resizer/id1046809993
The steps given below will let you know how to shrink photos on iPhone with Desqueeze-Batch Resizer.
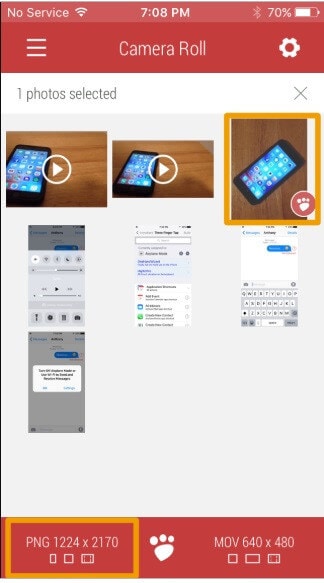
Step 1: Download Desqueeze.
Download and install the free application, i.e., Desqueeze-Batch Resizer, on your iPhone device. After you launch the app, tap photos in your camera roll, which you want to select and resize. Then, select the scaling ratio by tapping on the selected photo.
Step 2: Edit photo.
Once Step 1 is complete, select the editing button at the bottom left of the Desqueeze app. To get custom dimensions for the image, tap the dimensions box, and input your dimension data for scaling.
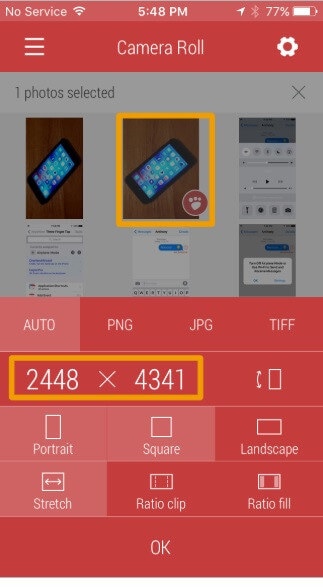
Step 3: Tap OK.
Enter the custom dimensions and hit the OK button to confirm. A new interface will appear for which you have to tap the OK button again.
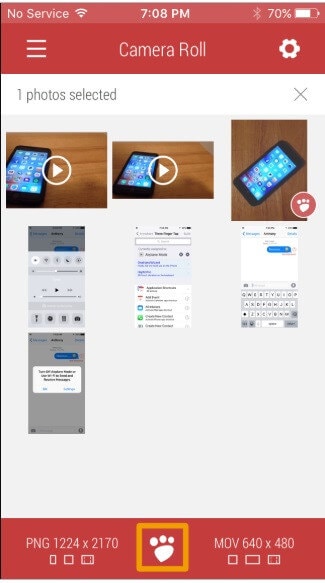
Step 4: Save changes.
After confirming the dimensional settings, select the paw button at the bottom interface, and initiate further changes. Then, a new window will appear where all your resized photos added to the camera roll are visible.

Part 3. How to Shrink iPhone Photos on Windows and Mac
Here is another precise tool called Wondershare UniConverter (originally Wondershare Video Converter Ultimate) if you want to shrink a photo on iPhone quickly. It is also known as all-in-one media converter software while supporting thousands of formats, including JPG, MP4, MKV, FLAC, MP3, and PNG. You can also extract media from DVDs, CDs, and various online sources. It also features other tools that usually are not in one software. Furthermore, media conversion is 30 times faster than those of its competitors.
Wondershare UniConverter - Your Complete iPhone Video and Photo Toolbox
- Shrink iPhone video and photo with easy steps.
- Edit iPhone videos with advanced video editing function like trimming, cropping, adding watermarks, subtitles, rotating, etc.
- Convert iPhone video to VOB (DVD-Video ), AVI, MKV, MOV, and 1000+ other formats.
- Burn iPhone video to DVD disk to play with your DVD player at 90X fastest speed.
- Optimized conversion presets for iDVD, iMovie, Final.
- Download videos from YouTube and other 1000+ video sharing sites.
- Supported OS: Windows 10/8/7/XP/Vista, macOS 11 Big Sur, 10.15 (Catalina), 10.14, 10.13, 10.12, 10.11, 10.10, 10.9, 10.8, 10.7, 10.6
Check the steps given below to shrink the photo size iPhone.
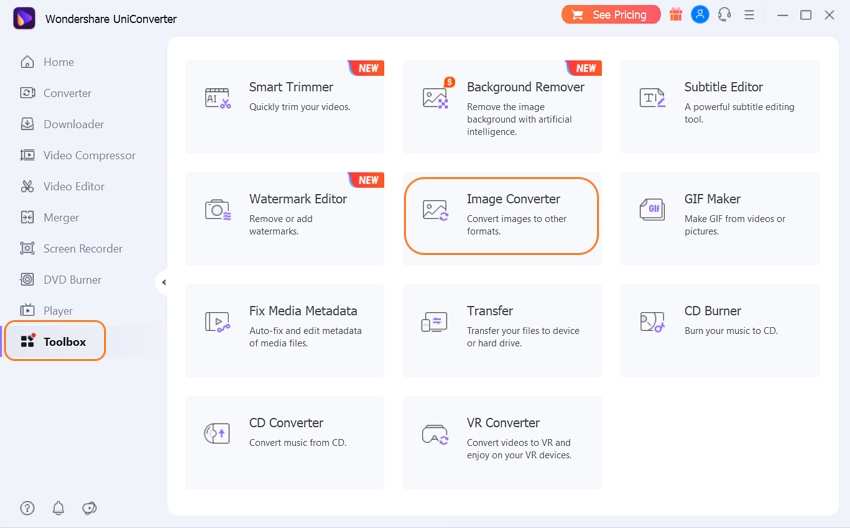
Step 1 Launch Wondershare UniConverter and Click Toolbox.
Download and install Wondershare UniConverter. After that, open the program and click Toolbox in the main interface. From a set of different tools, select the Image Converter option.
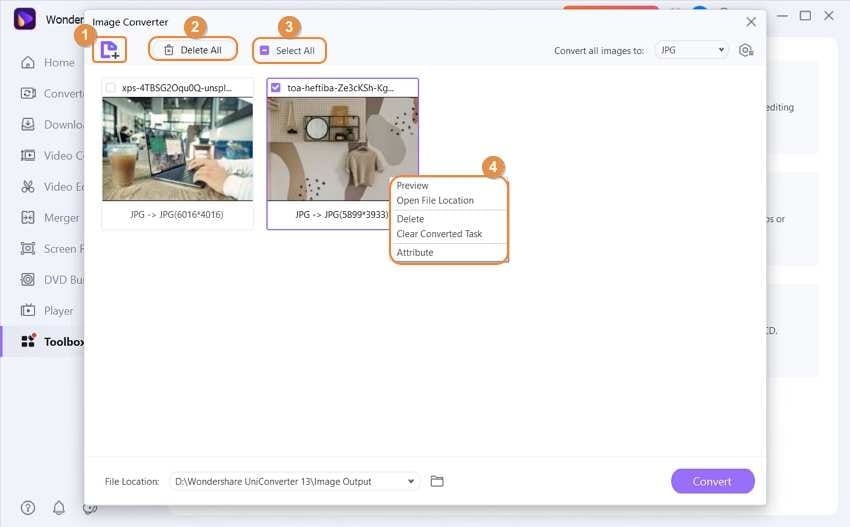
Step 2 Upload Image Files.
In this step, add image files by clicking the + icon or using the drag and drop feature. You can tap + Add Images and add multiples of images you want to shrink for the iPhone. As you have uploaded all images files, it will direct you to the interface where you can do a lot of things such as Delete All, Select All, and +Add Images. By right-clicking the selected image, you can preview, open file location, delete, clear converted task, and attribute.
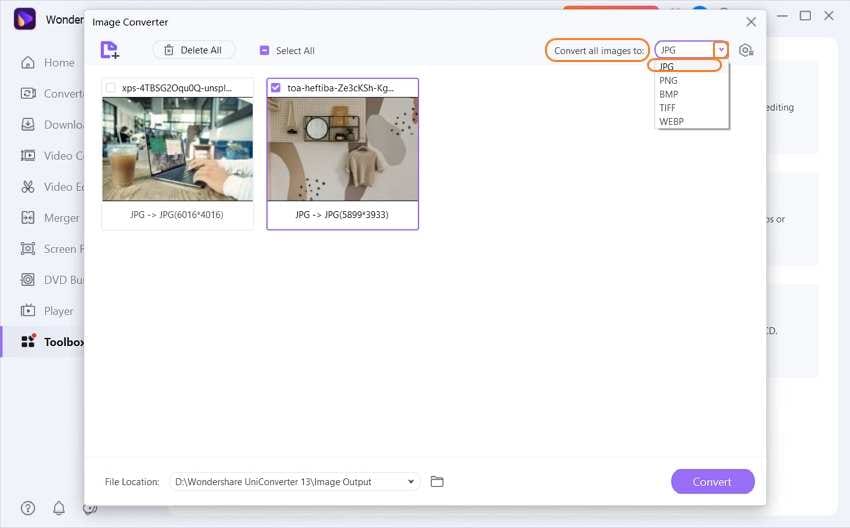
Step 3 Choose a Format.
Click the tab Convert all images to and select your target format in which you want to save the photo. It supports five image output formats, namely the JPG, BMP, PNG, WEBPand TIFF.
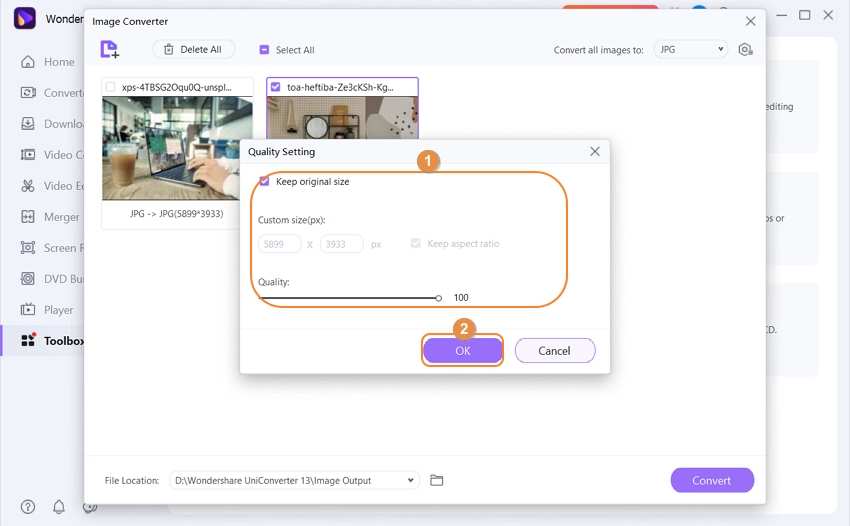
Step 4 Edit and Resize Image Files.
To resize and edit the image, move the cursor on the image, and see three options given below. They are Crop, Apply Effects, and Settings. Click the first option, Crop, and adjust the resize dimensions in Crop Area Size.
Then, click the last Settings option. A Quality Setting will open where you can set the height and width of the image. You can also adjust the quality preview here. Hit OK when all the modifications are complete.
Conclusion
So, these are some fundamental and natural aspects by which you can shrink photos on the iPhone. We would advise you to review all the methods and select the one that is the easiest, fastest, and best suits you.


Christine Smith
chief Editor