iPhone Tips
- TRY IT FREE TRY IT FREE
- 1. Transfer Tips+
-
- 1.1 How to Import Videos From iPhone to Mac
- 1.2 How to Transfer Videos From Mac to iPhone
- 1.3 Mail Drop iPhone
- 1.4 Convert iPhone to Android
- 1.5 How to Send Video From iPhone to Android
- 1.6 How to Send Video From iPhone Without Losing Quality
- 1.7 Import Video to iPhone
- 1.8 How to Upload Video to iPhone
- 1.9 How to Add Videos to iPhone
- 1.10 Transfer MP4 to iPhone
- 1.11 How to Transfer GoPro Videos to iPhone
- 2. Edit Photos on iPhone+
- 3. Edit Videos on iPhone+
-
- 3.1 iPhone Video Format
- 3.2 iPhone Supported Video Formats
- 3.3 Reduce Video Size iPhone
- 3.4 Resize video iphone
- 3.5 How to Trim a Video on iPhone
- 3.6 How to Clip a Video on iPhone
- 3.7 iPhone Video Upside Down
- 3.8 Change Video Orientation iPhone
- 3.9 Zoom Video iPhone
- 3.10 How to Merge Videos on iPhone
- 3.11 How to Brighten a Video on iPhone
- 3.12 Play MKV on iPhone
- 3.13 Remove Audio from Video iPhone
- 3.14 How to Remove Sound from iPhone Video
- 4. Convert Video to iPhone+
- 5. Other Tips+
How to Play MP4 Videos on iPad Easily
by Christine Smith • 2026-01-21 18:54:48 • Proven solutions
iOS doesn’t allow you to transfer audio and video files to your iOS Devices as simply as Android does. You need a particular program, iTunes, to be precise, to load MP4 onto iPad or iPhone. Although iTunes is a proprietary application by Apple and is free, it has certain limitations such as the absence of data recovery features, basic backup and restoration options, etc. However, Apple’s monopoly is almost over now as there are many third-party apps available in the market that are efficient, and do a lot more than iTunes does. The following are some of the best ways to transfer and play MP4 on iPad.
- Part 1. Best Method to Play MP4 Videos on iPad with Wondershare UniConverter
- Part 2. How to Play MP4 Videos on iPad with iTunes
- Part 3. How to Transfer and Play MP4 Videos on iPad with dr.fone – Transfer (iOS)
Part 1. Best Method to Play MP4 Videos on iPad with Wondershare UniConverter
Wondershare UniConverter is a universal tool for all types of media conversions. It is capable of accepting and converting 4K files, converting the videos to device-specific resolution, burning the final outputs to an optical media without using any third-party burning program, and much more.
 Wondershare UniConverter - Your Best Video Toolbox

- Best iPad video converter to convert videos and audios in any format among 1,000+ popular file formats.
- Convert videos to iPad/iPhone and other iOS devices with editing features and super fast converting speed.
- Transfer media files from Mac to iPhone/iPad/Android devices easily without quality loss.
- Paste URL to download videos from 10,000+ websites like YouTube.
- Burn videos to DVD/ISO/IFO files with free DVD menu templates.
- There is a toolbox with functions of Fix Media Metadata, video compressor, GIF Maker, Screen Recorder, and DVD Copy.
- Supported OS: macOS 11 Big Sur, 10.15 (Catalina), 10.14, 10.13, 10.12, 10.11, 10.10, 10.9, 10.8, 10.7, 10.6, Windows 10/8/7/XP/Vista.
When talking about playing mp4 videos on iPad, the major role of Wondershare UniConverter is to convert MP4 to iPad format to make them compatible with the device. It can be done easily by following the steps given below:
Step 1 Click Add Files and import an MP4 video.
After launching Wondershare UniConverter, click the + icon from the center of the Converter window that is selected by default. Locate and select the MP4 file you want to play on your iPad, and click Open. You can also drag the videos to the program.

Step 2 Select devices and modify the video for your iPad.
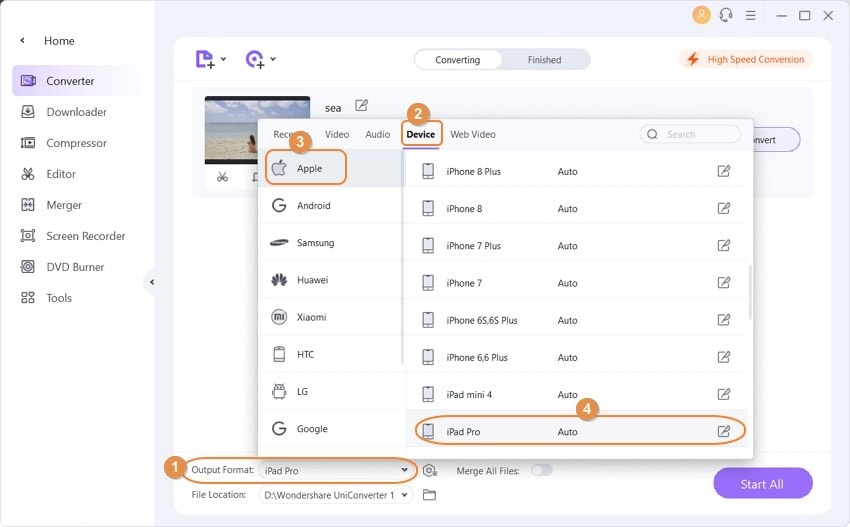
Open the Output Format: menu from the top-right corner, go to the Device section, ensure that Apple is selected in the left pane and select iPad Pro (or the model of the iPad you own) from the right.

Step 3 Select the output folder and click Convert.
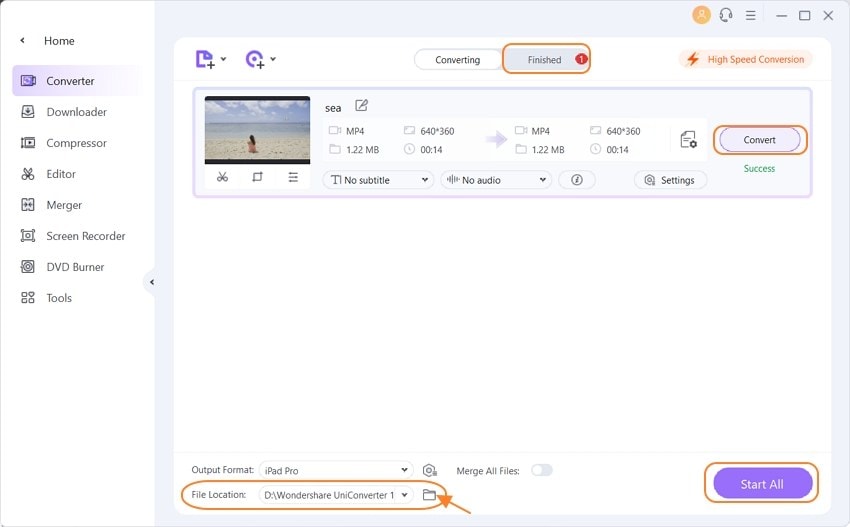
Once you are back on the main window, select a destination folder from the File Location field at the bottom, and click Start All or Convert to convert MP4 to iPad format.

Part 2. How to Play MP4 Videos on iPad with iTunes
Once you have successfully converted an MP4 to comply with the acceptable resolution and format of your iPad, it’s now time to add the video to your device. Although the entire process is a bit tricky due to the restrictions and limitations, iOS and iTunes have, you will get comfortable with it once you understand the procedure.
The steps are given below explain how you can transfer and view MP4 on iPad via iTunes:
Step 1: Click File and add MP4 to iTunes library.
Launch iTunes on your PC (a Windows 10 computer is used here for demonstration), go to the File menu from the top, and click Add File to Library. Use the Add To Library box to locate and select the MP4 file you want to play on the iPad, and click Open.

Step 2: Connect your iPad and transfer the video.
Use the USB cable to connect your iPad to the computer, select Movies from the category drop-down list at the top, select Home Videos from the Library category in the left pane, ensure that the imported MP4 video is present in the right window, and drag the video to your device under the Devices category to load MP4 onto iPad.

Step 3: Sync the MP4 Video and Play on iPad
Click your iDevice’s icon from the top, select the Movies container from under the Settings tree in the left pane, check the Sync Movies box from the top of the right pane, and check the box for the MP4 you just added. Click Apply from the bottom-right corner of the right pane, and click Sync and Replace if/when prompted to synchronize the video to your iPad library. Use your iPad’s default or the best MP4 player for iPad to play the file you transferred.


Part 3. How to Transfer and Play MP4 Videos on iPad with dr.fone – Transfer (iOS)
As discussed above, since iTunes has certain restrictions and limitations, it is sometimes challenging to transfer media files to your iPad or iPhone using the program. These hurdles can be bypassed easily with one of the most efficient third-party applications, dr.fone – Transfer (iOS) that automatically detects your connected iOS device, lets you select the videos from your PC, and import and synchronize them with your iDevice’s library.
You can follow the easy steps to transfer MP4 videos to your iPad with dr.fone – Transfer (iOS):
Step 1: Go to the dr.fone – Transfer Window
Connect your iPad to the computer, exit iTunes if it starts automatically, launches dr.fone Toolkit for iOS (used here for demonstration), and click the Transfer tile from the main window to go to the dr.fone – Transfer window.

Step 2: Go to the Video Section and Import the MP4 File
Click the Video tile from the top of the dr.fone – Transfer window, select a container you want to put the MP4 video to from the left pane, click the Add icon from the top of the right pane, and click Add File. Use the Open box that appears next to locate and select the MP4 file you want to play on iPad, and click Open.

Step 3: Play the Video on iPad
Disconnect your iPad from the computer, and use your favorite video/media player to play the MP4 file on your iPad.
Conclusion
Although the best way to have an MP4 file on your iPad (or any of your iOS Devices) is by recording the footage from the camera itself, this is not always possible as you can’t be present everywhere all the time. This condition cannot be fulfilled in case of movies or TV series either.
Therefore, keeping a few tricks on using your iPad and iTunes under your sleeve would be a wise idea. It is also equally important to be aware of some third-party apps like Wondershare UniConverter and Wondershare dr.fone – Transfer (iOS) and learn how they can be used to give you the best possible ‘smart-phoning’ experience.

Christine Smith
chief Editor