Wondershare Uniconverter
-
 Set and adjust the color temperature of white objects in one click.
 - Correct color brightness, contrast, saturation to enhance your footage.
- Fast convert video/audio to MOV, MP4, AVI, and other 1000 formats.

Camera Videos
- TRY IT FREE TRY IT FREE
- 1. Import Camera Videos to Apps+
- 2. Convert Camera Videos to Other formats +
-
- 2.1 Play MTS on iPad
- 2.2 Play M2TS with Plex Media Server
- 2.3 Convert Panasonic MTS/M2TS to Any Format
- 3.4 Convert M2TS/MTS with Handbrake
- 2.5 Convert MTS to MPEG
- 2.6 Convert MTS to MOV on Mac
- 2.7 Best MTS to MOV Converter
- 2.8 Convert M2TS to MOV
- 2.9 Convert AVCHD to MP4
- 2.10 Convert M2TS to MP4
- 2.11 Convert MXF to MOV
- 2.12 Convert VRO to MP4
- 2.13 Convert MOD to MOV
- 2.14 Convert MOD to MP4
- 2.15 Convert MTS to Prores
- 2.16 Convert VHS to Digital
- 2.17 Convert 8mm Film to Digital
- 2.18 Convert JVC Camcorder Videos on Mac
- 3. Camera Video Converters +
- 4. Other Tips & Tricks +
 Complete solutions for videos/pictures from any cameras>>
All Topic
- AI Tools Tips
- DVD Users
- Social Media Users
- Camera Users
- Photography
- Creative Design
- Movie Users
- Travelling Fans
- Educational Users
- More Solutions
- Holidays
- Game Lovers
- Other Tips
Final Cut Pro Color Correction Tricks | Auto Custom White Balance for Your Footage
by Christine Smith • 2025-01-13 09:24:30 • Proven solutions
If you have been editing media files on your Mac, Final Cut Pro is not a new name. Designed by Apple, this is a non-linear editing tool available for the Mac OS that comes packed with tons of features that support editing, processing, and exporting your files in multiple formats. If you have been struggling to correct the color-cast over your footage, may as well use a good tool Final Cut Pro to fix the white balance.
- Part 1. Is auto white balance good?
- Part 2. How to auto white balance in Final Cut Pro?
- Part 3. How to custom white balance in Final Cut Pro?
- Part 4. Alternative: the easiest tool to fix white balance with Wondershare UniConverter
Part 1: Is auto white balance good?
The cameras come with an auto adjustment feature that facilitates selecting several file parameters like focus, white balance, and others automatically. The auto settings work quite handy, especially for the ones who are not technically sound. Though the auto settings work quite decent in most situations, they are not fail-proof. Several times, you may experience that your footage has a color-cast over it, which happens due to inappropriate white balance.
When the lighting conditions outside are different and keep changing, the footage will not have the right colors, and here the need for adjusting the white balance manually arises.
While working with the artificial source of lights, the auto white balance of your camera will work quite well, but when you try to capture a subject that is majorly in one color or when the color-cast is desirable, the auto white balance will not function well. For instance, while recording sunset footage when the outside light is red or orange, the auto white balance setting will consider this red color as some issue. Thus, the actual footage which was supposed to be captured in this red and orange hue will be corrected to a bluish feel with the auto white balance functions. The same happens when an object in one single color is captured using an auto white balance.
Part 2: How to auto white balance in Final Cut Pro?
Above, we have mentioned the issues that arise while using the auto white balance function. The best solution to overcome the same is to correct and adjust the white balance using an editing tool like Final Cut Pro. On your Mac systems, you can adjust various footage parameters, including the white balance. The Integrated Analyzation tool of the software can be used for automatically adjusting the white balance of your footage. Though the automatic adjustment option might not always give you the colors you expected, it works quite decently and, above all is very fast and easy.

Steps to fix white balance in Final Cut Pro:
Step 1. Open the Final Cut Pro software on your system and add the footage to be edited to your timelines.
Step 2. Launch the Inspector feature of the software
Step 3. You will see a blue button on the left side of the Balance, clicking on which the software will automatically adjust the white balance of your footage.
Part 3: How to custom white balance in Final Cut Pro?
When you want your footage colors to be customized according to the lighting conditions, object, and other factors, manually adjust the white balance using Final Cut Pro. Manual adjustment gives you more freedom to control and adjust the colors as needed.
Steps to adjust the custom white balance manually using Final Cut Pro:
Step 1. Open the software and choose the desired footage in timeline or browser
Step 2. Move the play head over the footage, and it will be viewer will display it

Step 3. For turning on the Balance Color correction feature, the following options can be used
- Select Modify > Balance Color
- Under the viewer, tap on the Enhancements pop-up menu and then select the Balance Color option.
Step 4. Next, see if the Video Inspector is shown. If it is not, then you can enable it by selecting Window > Show in WorkSpace > Inspector. Alternatively, you can also choose the Inspector option from the right side of the toolbar.

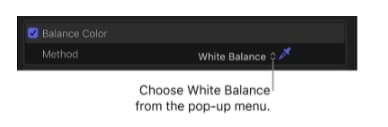
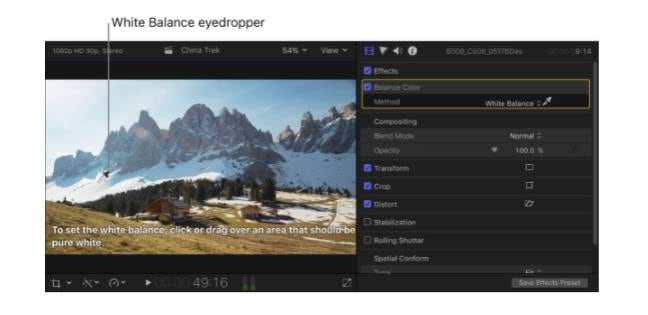
Step 5. At the Video Inspector, there is a Balance Color section from where click on the pop-up menu and select White Balance. You will notice that your pointer will now change to an eyedropper.
Step 6. Next, in your viewer, you need to click or drag over the footage area that has to be pure white, and with this, the entire footage color will be adjusted.
Part 4: Alternative: the easiest tool to fix white balance with Wondershare UniConverter
Final Cut Pro is a good tool for fixing white balance, but the complicated interface and the steep learning curve of the software make the entire process challenging. So, if you are a beginner in video editing or do not have prior experience working with Final Cut Pro, we suggest using an alternative tool called Wondershare UniConverter. Wondershare comes with a wide range of functions, including white balance adjustment, simple to use, and fast in processing. The built-in editor of the software facilitates fixing white balance in a few simple steps.
Key features of the software:

Wondershare UniConverter - Best Video Converter for Mac/Windows
-
Adjust the white balance of videos in almost all formats
-
Simple and quick processing of the videos
-
The footage to be processed can be added from the local system as well as directly from the camera
-
Other parameters like brightness, saturation, and more can also be fixed
-
Additional functions include video conversion, download, recording, DVD burning, and more.
-
Works on all latest Windows and Mac systems
Steps to fix white balance using Wondershare UniConverter
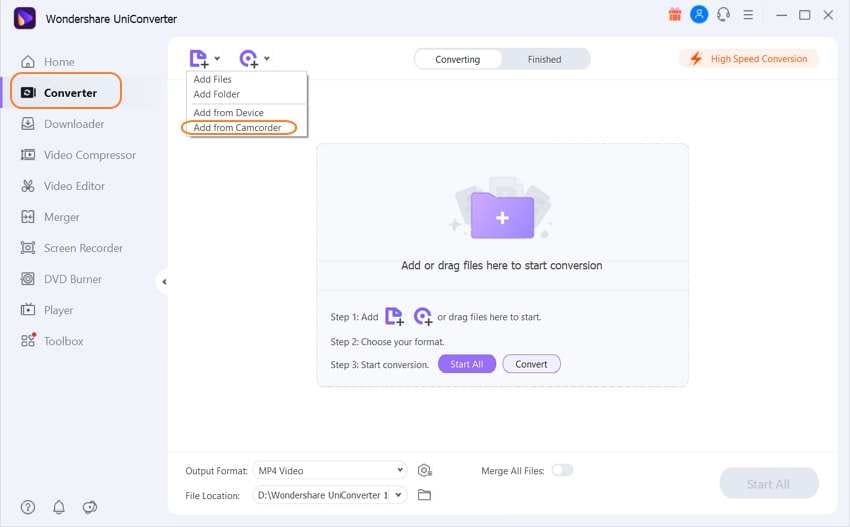
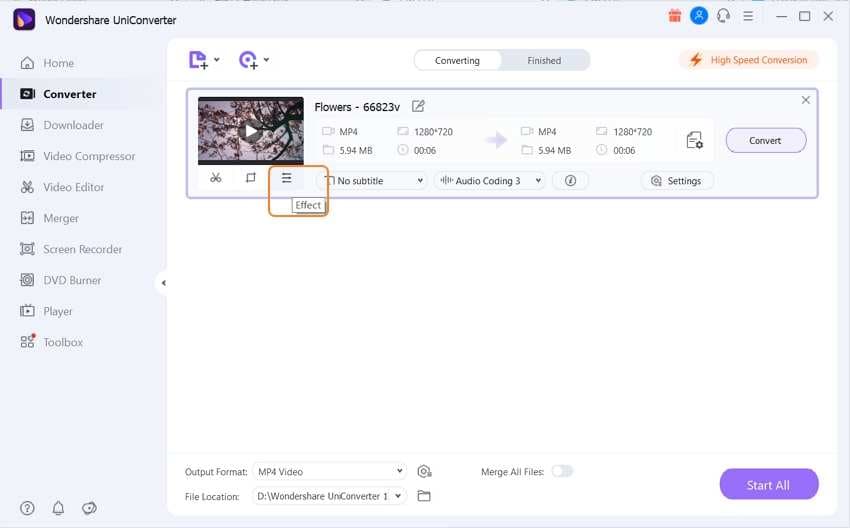
Step 1Add videos to Wondershare UniConverter
Open the software on your system, and from the Converter tab, click on the + Add Files to browse and import the local videos. To add the videos from your camera, expand the drop-down menu at the Add Files tab and choose Add from Camcorder or Add from Device option.
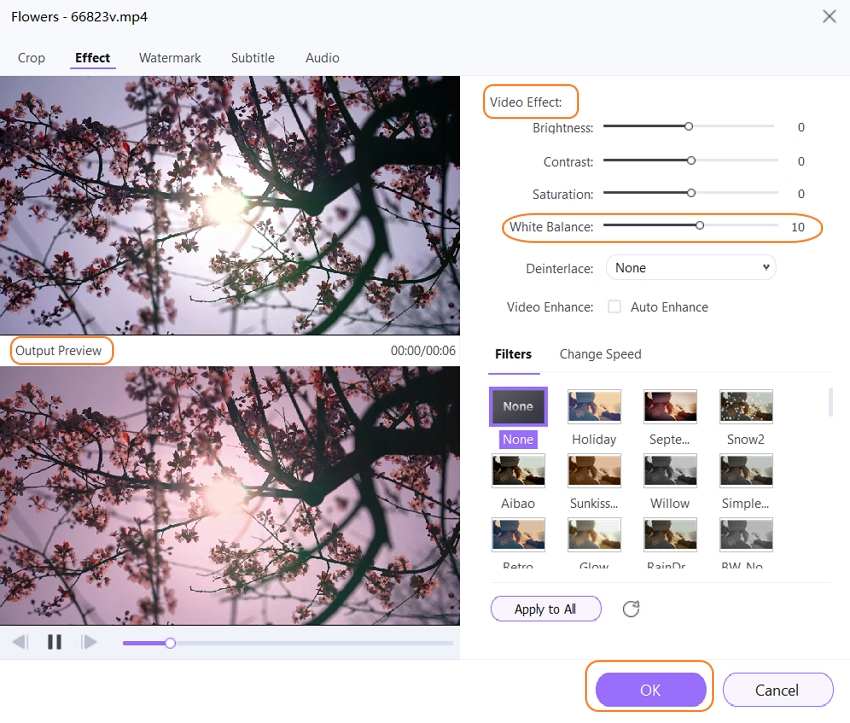
Step 2Fix White Balance
Under the added file thumbnail image, click on the Effect icon. On the pop-up window, under the Video Effect section fix the White Balance by moving the slider next to it. The preview of the changes can be checked from the Output Preview section on the left-hand side. When desired settings are done, click on the OK to confirm.
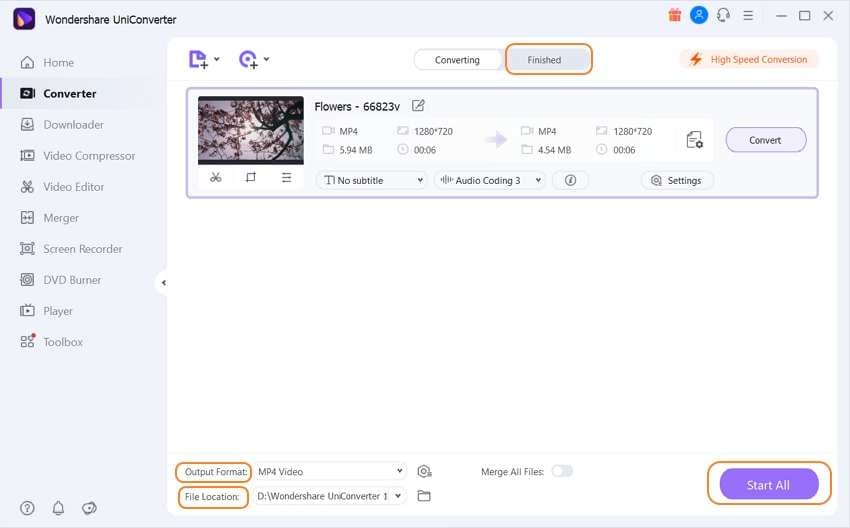
Step 3Process files
Choose the desired target format from the Output Format. Click on the Start All button to process the files. On the interface, the edited files can be checked from the Finished tab, while on the system, they can be checked from the folder selected at the File Location tab.
Conclusion:
So, if you forgot to enable the white balance settings on your camera or are not satisfied with the colors on the footage, post-processing can be done to fix the white balance. Final Cut Pro is a professional tool, but to get the desired results, you need to have good experience of working with the software. Wondershare UniConverter, on the other hand, is a simple yet effective program that can let you adjust the white balance as well as other parameters quickly and easily.

Christine Smith
chief Editor