Camera Videos
- TRY IT FREE TRY IT FREE
- 1. Import Camera Videos to Apps+
- 2. Convert Camera Videos to Other formats +
-
- 2.1 Play MTS on iPad
- 2.2 Play M2TS with Plex Media Server
- 2.3 Convert Panasonic MTS/M2TS to Any Format
- 3.4 Convert M2TS/MTS with Handbrake
- 2.5 Convert MTS to MPEG
- 2.6 Convert MTS to MOV on Mac
- 2.7 Best MTS to MOV Converter
- 2.8 Convert M2TS to MOV
- 2.9 Convert AVCHD to MP4
- 2.10 Convert M2TS to MP4
- 2.11 Convert MXF to MOV
- 2.12 Convert VRO to MP4
- 2.13 Convert MOD to MOV
- 2.14 Convert MOD to MP4
- 2.15 Convert VHS to Digital
- 2.16 Convert 8mm Film to Digital
- 2.17 Convert JVC Camcorder Videos on Mac
- 3. Camera Video Converters +
- 4. Other Tips & Tricks +
 Complete solutions for videos/pictures from any cameras>>
How to Import Camcorder Videos to Live Movie Maker Within 3 Steps
by Christine Smith • 2026-02-04 18:02:02 • Proven solutions
Windows Live Movie Maker is famous for its simplicity and convenience to sharing videos on YouTube and Facebook, and of course, because it's a Microsoft product. But as you may know, it's not the upgraded version of the Windows Movie Maker in Vista or XP. On the contrary, Windows Live Movie Maker lacks some important features on the previous version of Windows Movie Maker. However, significant improvements are also achieved, at least that's what the announcements said. Frankly, if you are a video editing beginner, you will find Windows Live Movie Maker definitely easier to import camcorder videos for movie making and to share with others, with a minimal number of editing features.
However, some video formats, such as camcorder videos in AVCHD/MTS/M2TS formats, are not supported by Windows Movie Maker, so you can't import camcorder videos to Windows Movie Maker due to formats or codec. Don't worry; you can learn 2 methods in this article to convert and import videos to Windows Movie Maker easily.
- Part 1. Steps to import camcorder videos to Windows Live Maker
- Part 2. [Recommended] How to convert camcorder videos to Windows Maker
- Part 3. General knowledge about Windows Movie Maker
Part 1. Steps to import camcorder videos to Windows Live Maker.
Step 1 Install Windows Live Essentials.
For some reason, importing camcorders video to Windows Live Movie Maker requires Windows Live Photo Gallery. You can download it here: https://ssl-download.live.com/moviemaker. When installing, only select the software you want.
Step 2 Import Camcorder Videos to Live Photo Gallery.
The followings are the detailed steps to import camcorder video to Windows Live Movie Maker. A wide range of camcorders is supported.
1. Run Windows Live Movie Maker - Click Start and type Movie Maker in the search box, select Windows Live Movie Maker in the search results to open it.
2. Depending on your camcorder device, do one of the followings:
- Connect your digital camera to your computer using its USB cable, and then turn on the camera, and if necessary, switch to VCR mode.
- Connect a video camera that records to an internal hard drive or flash memory card to your computer using a USB connection.
- Insert the flash memory card into a card reader (if you have one).
- Insert the DVD (already finalized in your DVD camcorder) into the disc drive on your computer.
3. In the program, click Import from the device. If the 'Photos and videos are imported into Windows Live Photo Gallery ' message appears, click OK.
4. In the Import Photos and Videos window, click the device that you want to import photos and videos from, and then click Import.
5. On the New photos and videos were found page, click Import all new items now, type a name for all the photos and videos, and then click Next.
6. Camcorder items are imported to Photo Gallery from where you can create movies or edit media using Windows Live Movie Maker.
Step 3 Add Camcorder Videos to Live Movie Maker
In Photo Gallery, select the checkbox in the upper-left corner for each photo or video you want to use in your movie. On the Create tab, in the Share group, click Movie. The selected photos and videos are added to the storyboard in Movie Maker. Now camcorders are imported to Windows Live Movie Maker finally.
Long steps, right? And sometimes, you will be frustrated with ridiculous problems, such as incomplete video clips, desired video not appearing, or other unpredictable codec errors. Especially for the DVD disc created with a DVD camcorder, you will have to convert your DVD/Video with a professional video converter before importing to Windows Live Movie Maker, rather than importing from the disc by the DVD drive.
Part 2. [Recommended] How to convert camcorder videos to Windows Maker.
Wondershare UniConverter is such a tool which helps you convert camcorder videos to Windows Movie Maker compatible formats, like WMV, within 3 steps. It supports 1000+ video formats for input and output, and you can add or import videos directly from camcorder devices. Editing features like trimming, cutting, merging, adding subtitles, and more others can also be done easily. Learn more about Wondershare UniConverter and follow the steps below to convert and import camcorder videos to Windows Movie Maker.
 Wondershare UniConverter - Best Camcorder Video Converter

- Convert AVCHD/MTS/M2TS camcorder videos to Windows Movie Maker compatible formats easily and quickly.
- Support 1000+ video formats including MP4, MOV, WMV, AVI, MKV, 3GP, etc.
- Edit videos easily by trimming, cropping, merging, adding subtitles, and more others with real-time preview.
- 90X faster conversion speed than common converters with unique APEXTRANS technology.
- Burn and customize videos to your DVD or Blu-ray disc with free DVD menu templates.
- Download or record videos from YouTube and other 10,000+ video sharing sites.
- Transfer videos from computer to iPhone, iPad, and other devices directly and vice versa.
- Versatile toolbox: Add video metadata, GIF maker, cast video to TV, video compressor, and screen recorder.
- Supported OS: Windows 10/8/7/XP/Vista, macOS 11 Big Sur, 10.15 (Catalina), 10.14, 10.13, 10.12, 10.11, 10.10, 10.9, 10.8, 10.7, 10.6.
Simple Steps to Convert Camcorder Videos to Windows Movie Maker
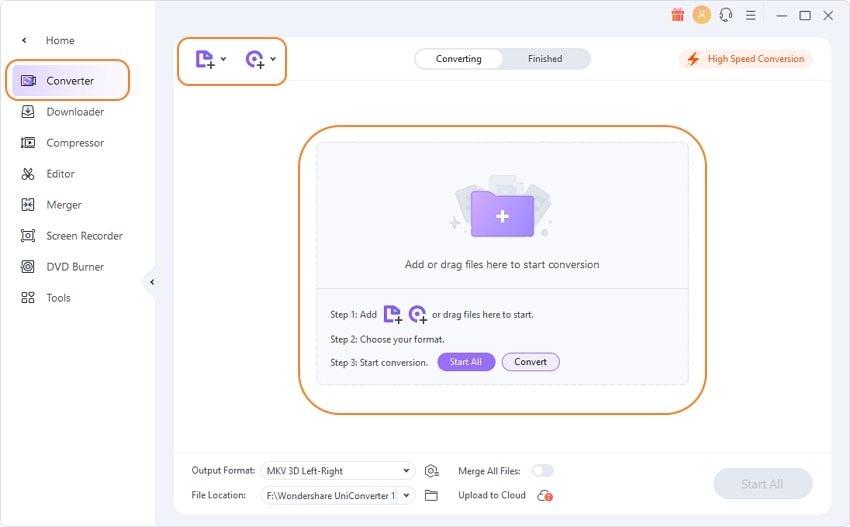
Step 1 Add camcorder videos to Windows Movie Maker converter.
Open Wondershare UniConverter after download and installation, and then click on the ![]() button to select your camcorder videos that need to import to Windows Movie Maker. Drag and drop can also add target videos directly.
button to select your camcorder videos that need to import to Windows Movie Maker. Drag and drop can also add target videos directly.

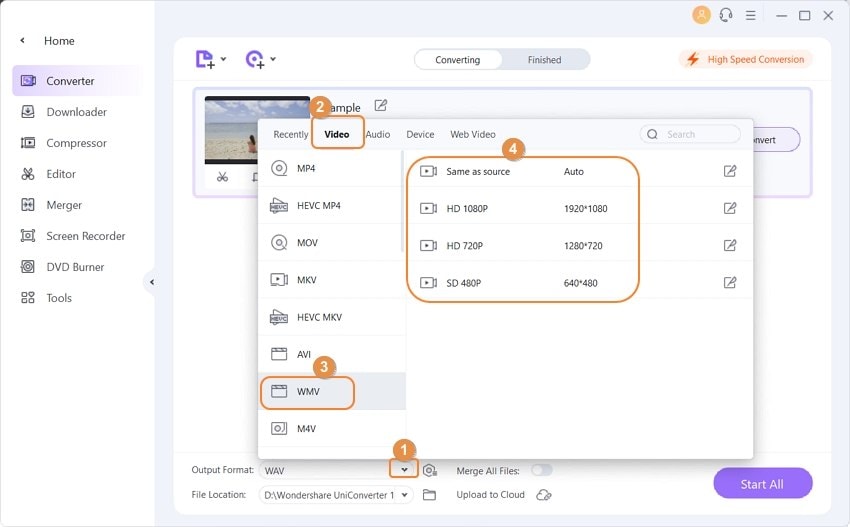
Step 2 Choose Windows Movie Maker as an output format.
You can choose MP4 or WMV as your output format from the Output Format: output list. And then go to the Video tab and choose Windows Movie Maker from the Video option.


Tips
Wondershare UniConverter also provides a video editing function. You can use it as the alternative to Windows Movie Maker and Edit Camcorder Videos with Trim/Crop/Merge/Subtitle/Effect >>.
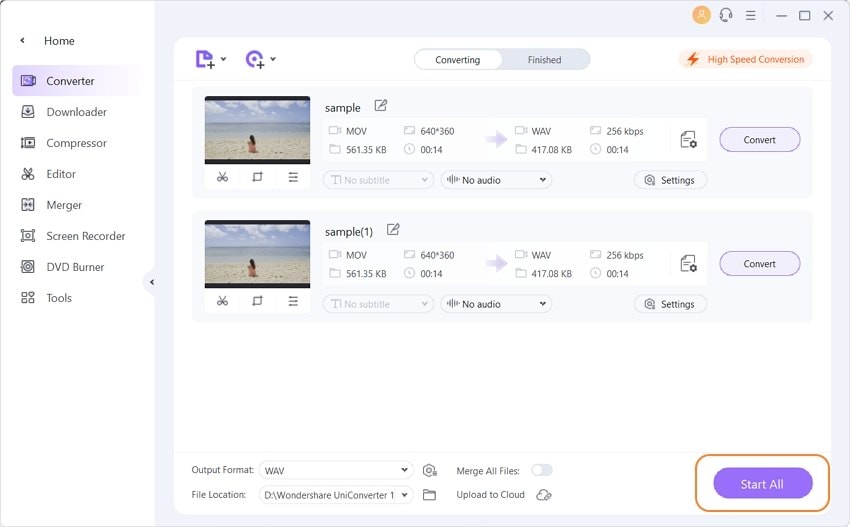
Step 3 Convert camcorder videos to Windows Movie Maker.
Finally, hit the Start All button to start converting your added camcorder videos to Windows Movie Maker. You can find the converted files under the Finished tab after the process.

Now, you can import the converted camcorder videos to Windows Movie Maker easily without trouble. Free download and follow the steps to have a try.
Part 3. General knowledge about Windows Movie Maker.
The below photo/audio/video formats are supported to import to Window Live Movie Maker. Check it out if your camcorder video is supported by this version of Windows Movie Maker. And if it is necessary, use Wondershare UniConverter to get Windows Movie Maker supported videos first.

Note: Sometimes you need software to view what's the real codec for the video to import to Windows Live Movie Maker. To do so, use the GSpot to find what video codec is used and install the corresponding codec to import to Vegas.


Christine Smith
chief Editor