Camera Videos
- TRY IT FREE TRY IT FREE
- 1. Import Camera Videos to Apps+
- 2. Convert Camera Videos to Other formats +
-
- 2.1 Play MTS on iPad
- 2.2 Play M2TS with Plex Media Server
- 2.3 Convert Panasonic MTS/M2TS to Any Format
- 3.4 Convert M2TS/MTS with Handbrake
- 2.5 Convert MTS to MPEG
- 2.6 Convert MTS to MOV on Mac
- 2.7 Best MTS to MOV Converter
- 2.8 Convert M2TS to MOV
- 2.9 Convert AVCHD to MP4
- 2.10 Convert M2TS to MP4
- 2.11 Convert MXF to MOV
- 2.12 Convert VRO to MP4
- 2.13 Convert MOD to MOV
- 2.14 Convert MOD to MP4
- 2.15 Convert VHS to Digital
- 2.16 Convert 8mm Film to Digital
- 2.17 Convert JVC Camcorder Videos on Mac
- 3. Camera Video Converters +
- 4. Other Tips & Tricks +
 Complete solutions for videos/pictures from any cameras>>
How to Convert 8mm Film to PC for Further Editing
by Christine Smith • 2026-01-21 18:53:50 • Proven solutions
"How much does it cost to convert 8mm to digital? How do I transfer 8mm film to my computer by myself?"
8mm and Super 8 films were among the main ways that many home videos were shot in the past. While many people who have these films still have 8mm players in their homes, they are becoming less common. Also, each time you play the film, more scratches are applied to the film. It can lead to the loss of parts or the whole movie. If you can convert 8mm to digital, the film will be preserved in its current state. By doing the conversion at home, you can save a lot of money and still get a great result. Read the following parts to learn how to convert 8mm film to digital by yourself.
- Part 1. Record 8mm Film to Digital Through Your Camera
- Part 2. Steps to Import and Convert the Recorded 8mm Film to Digital by Yourself
Part 1. Record 8mm Film to Digital Through Your Camera
The easiest and most cost-effective method of converting 8mm film video to digital data at home is recording the film using a digital camera. To do this, you will need a smooth white wall, a table, an 8mm projector, a digital camera, a tripod that fits the camera, and an area that has low light. When you are looking to start the converting process, you will need to set up the projector and the camera in the area that has low light. The camera should be next to the projector and about 4 to 6 feet from the wall. It will depend on the 8mm projector that you are using.
Once both of the items are set up, turn on the projector, and ensure that your digital camera has the full projection in the frame. It may mean that you need to move the camera forward or backward to fit the entire image in the frame without a border. A zoom is an option; however, it can lead to blurring of the images. Once everything is in a frame, you should start the recording and the video.
Part 2. Steps to Import and Convert the Recorded 8mm Film to Digital by Yourself
Once the film is recorded onto the digital camera, it is time to import it to the PC. When you are looking to convert 8mm to digital, it is necessary to make the process easier. The easiest software is Wondershare UniConverter (originally Wondershare Video Converter Ultimate), as it is the best option. It supports 1,000+ video and audio formats, including MP4, MOV, WMV, AVI, and more others, and it also supports video editing features.
 Wondershare UniConverter - 8mm Film to Digital Converter

- Convert recorded 8mm films to digital videos like MP4, MOV, WMV, AVI, FLV, and 1000+ formats.
- Customized conversion presets for any devices like iPhone, iPad, Android phones, etc.
- Edit videos easily with trimming, cropping, cutting, merging, adding subtitles, and more others.
- Compress 8mm videos on Windows/Mac without losing any quality.
- Burn 8mm videos to playable DVD with attractive free DVD templates.
- Support download or record videos from 10,000+ video sharing sites.
- Versatile toolbox includes fixing video metadata, GIF maker, casting video to TV, and screen recorder.
- Supported OS: Windows 10/8/7/XP/Vista, macOS 11 Big Sur, 10.15 (Catalina), 10.14, 10.13, 10.12, 10.11, 10.10, 10.9, 10.8, 10.7, 10.6.
Video Tutorial on How to Convert Recorded 8mm Film to Any Format Easily
Step 1 Import the recorded 8mm film to edit if you want.
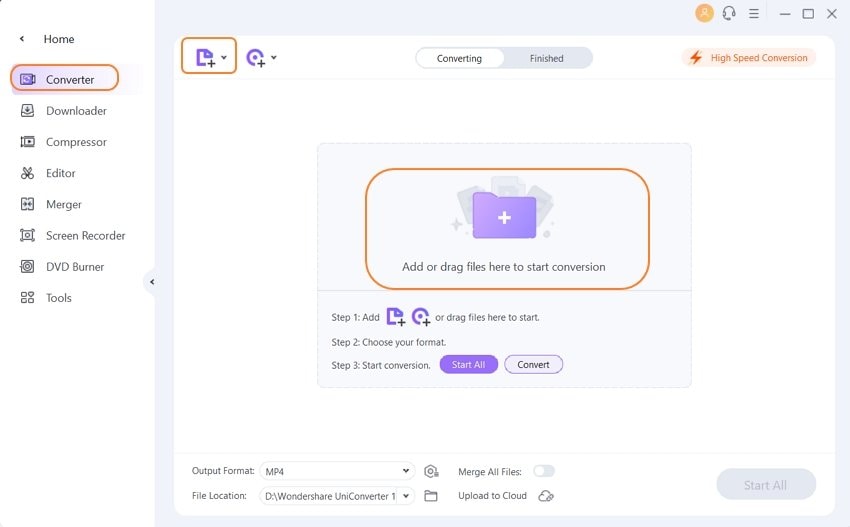
When the recording is finished, connect your digital camera to your computer, or insert the memory card used to record the movie. Once connected, find the storage device, and save the video files to the computer. After that, launch Wondershare UniConverter and click the Add Files button to add recorded 8mm films. You can also drag the files into the program window directly.

If you need to edit the video, just click one of the editing buttons under the video thumbnail to enter the window. Now you can edit videos with trimming, cutting, adding subtitles, applying effects, and more. You can skip this step if you don't need it.
Step 2 Select digital output format for 8mm film.
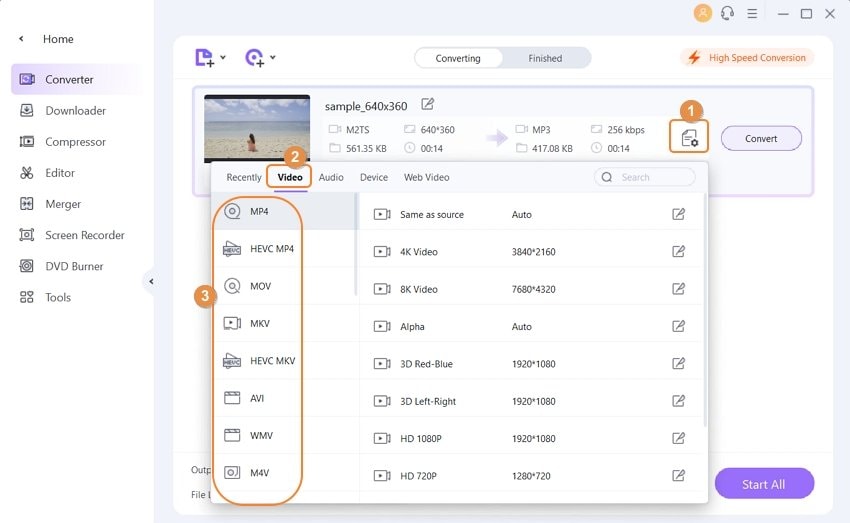
After importing and editing the video, the next step is to pick the target format. Click the Output Format drop-down button to open the format list, choose the format and resolution you need under the Video tab.

Step 3 Convert 8mm film video to digital by yourself.
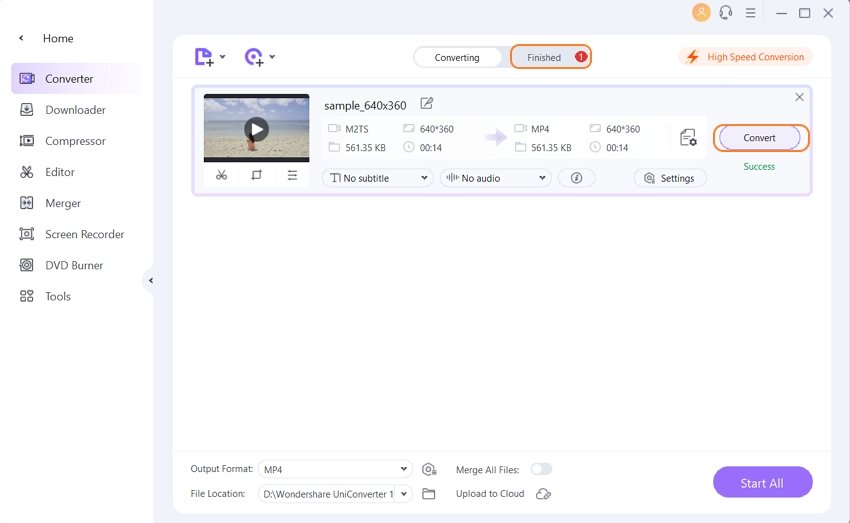
After all of the changes have been done, click on the Start All button to convert recorded 8mm camcorder videos to digital formats like MP4 by yourself. You can soon find the converted digital videos under the Finished tab and play or edit them.


Tips
You can also burn an 8mm film to DVD for playing on the DVD player; go to Convert 8mm Film to DVD by Yourself >> to learn more details.


Christine Smith
chief Editor