Your Complete Video Toolbox
Wondershare UniConverter
- Convert MTS to Adobe Premiere compatible formats for easily importing.
- Edit MTS videos easily with cutting, trimming, apply effects, adding watermarks, etc.
- Change MTS videos encoder, resolution, bitrate, and more other parameters.
- Versatile toolbox combines DVD Burner, Screen Recorder, GIF Maker, Fix Video Metadata, etc.

Camera Videos
- TRY IT FREE TRY IT FREE
- 1. Import Camera Videos to Apps+
- 2. Convert Camera Videos to Other formats +
-
- 2.1 Play MTS on iPad
- 2.2 Play M2TS with Plex Media Server
- 2.3 Convert Panasonic MTS/M2TS to Any Format
- 2.4 Convert MTS to MPEG
- 2.5 Convert MTS to MOV on Mac
- 2.6 Best MTS to MOV Converter
- 2.7 Convert M2TS to MOV
- 2.8 Convert AVCHD to MP4
- 2.9 Convert M2TS to MP4
- 2.10 Convert MXF to MOV
- 2.11 Convert VRO to MP4
- 2.12 Convert MOD to MOV
- 2.13 Convert MOD to MP4
- 2.14 Convert VHS to Digital
- 2.15 Convert 8mm Film to Digital
- 2.16 Convert JVC Camcorder Videos on Mac
- 3. Camera Video Converters +
- 4. Other Tips & Tricks +
 Complete solutions for videos/pictures from any cameras>>
How to Import MTS to Adobe Premiere (CS3/CS4/CS5/CS6 Included)
by Christine Smith • 2026-06-23 14:37:59 • Proven solutions
"Can Adobe Premiere Pro import MTS/M2TS files?"
Many modern video cameras output in the AVCHD format, which creates MTS/M2TS files and you may need to import into Adobe Premiere to edit together and work on as you desire. Although the file format is standard, you may sometimes can't import MTS to Adobe Premiere due to some unknown problems. This article will help you solve how to convert MTS to Adobe Premiere compatible formats with the best MTS to Adobe Premiere Converter and import smoothly.
- Part 1. How to Convert MTS to Adobe Premiere Without Any Trouble
- Part 2. How to Import MTS Files to Adobe Premiere
- Part 3. Steps to Export Files as MTS from Adobe Premiere
Part 1. How to Convert MTS to Adobe Premiere Without Any Trouble
Wondershare UniConverter is an all-in-one video converter that can convert MTS/M2TS files to 1000+ formats including MP4, MOV, WMV, and more others. When you have trouble to import MTS files, it may be caused by the wrong codec. So, Wondershare UniConverter can help you change the video format and encoder compatible with Adobe Premiere, and you can import MTS/M2TS files smoothly. It also supports basic video editing features like Trim, Cut, Crop, Merge, Add Subtitle, etc.
 Wondershare UniConverter - Your Complete Video Toolbox

- Convert MTS/M2TS videos to Adobe Premiere compatible formats including MP4, MOV, AVI, etc.
- Support 1000+ video and audio formats for super fast and high-quality conversion.
- Convert MTS files for smartphones and external devices with customized presets.
- Edit, enhance & personalize videos with trimming, merging, cutting, adding subtitles, etc.
- Burn MTS videos to playable DVD with an attractive free DVD template.
- Download or record videos from 10,000+ video sharing sites.
- Versatile toolbox includes fixing video metadata, GIF maker, casting video to TV, video compressor, and screen recorder.
- Supported OS: Windows 10/8/7/XP/Vista, macOS 11 Big Sur, 10.15 (Catalina), 10.14, 10.13, 10.12, 10.11, 10.10, 10.9, 10.8, 10.7, 10.6.
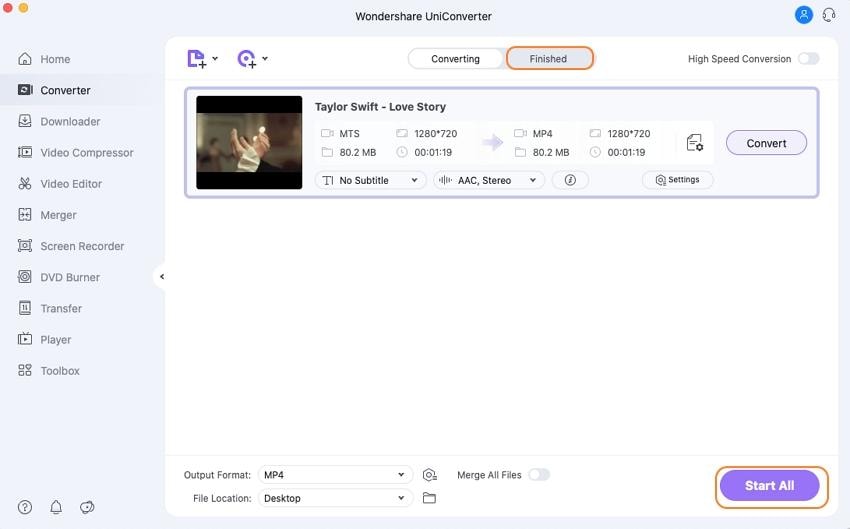
Steps on How to Convert MTS to Adobe Premiere on Windows/Mac:
Step 1 Add MTS files That Need to be Converted to Premiere.
Launch Wondershare UniConverter after download and install, and then click the ![]() button under the default Video Converter tab to add MTS video files you need to convert.
button under the default Video Converter tab to add MTS video files you need to convert.

Step 2 Select an Output Format for MTS Files.
Click the drop-down button beside the Output Format: option to open the output format list. You can choose MP4 or other formats under the Video tab as your target formats. Customized settings like changing video encoder, resolution, bitrate, and more others can be found by clicking the Create option.

Step 3 Convert MTS to Adobe Premiere Compatible Format.
Finally, click on the Start All button to start converting MTS to Adobe Premiere Windows/Mac. The converted files can be found under the Finished tab, and you can import them to Premiere smoothly now.

Tips
Wondershare UniConverter also supports video editing functions, you can easily trim, cut, merge, add subtitles/effects/watermarks to the video. Go to How to Edit Videos Easily >> to learn more details.
Part 2. How to Import MTS Files to Adobe Premiere
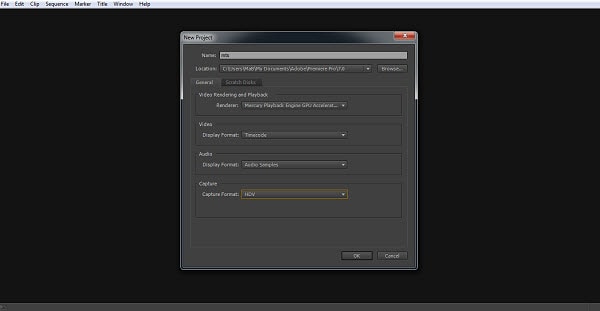
1. Dealing with MTS files.
Importing MTS files is a simple process, start a new project from the main menu

You can then give it a suitable name and adjust where the files are to be located as usual.
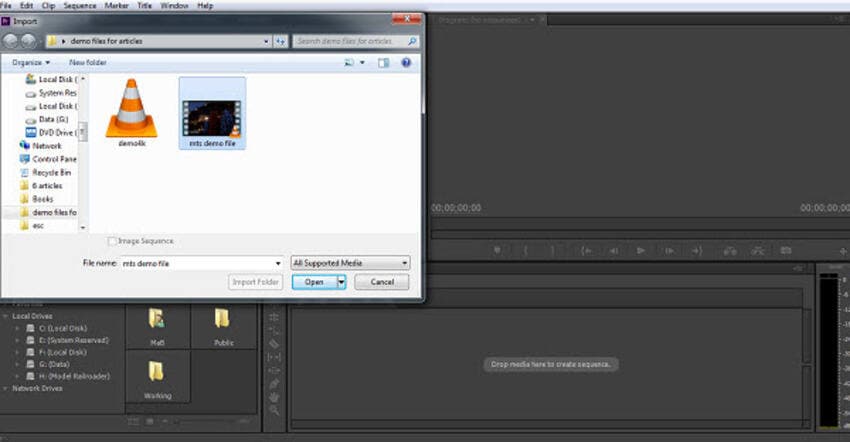
Once the project is created there are two ways to approach the import process.
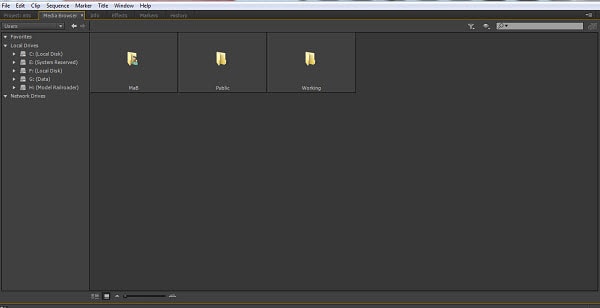
You can use the media browser to explore the media on your computer and attached drives as here

However, if you know where the file is the quicker method is to use file>import to bring up the standard operating system file browser interface and navigate straight to it as here.
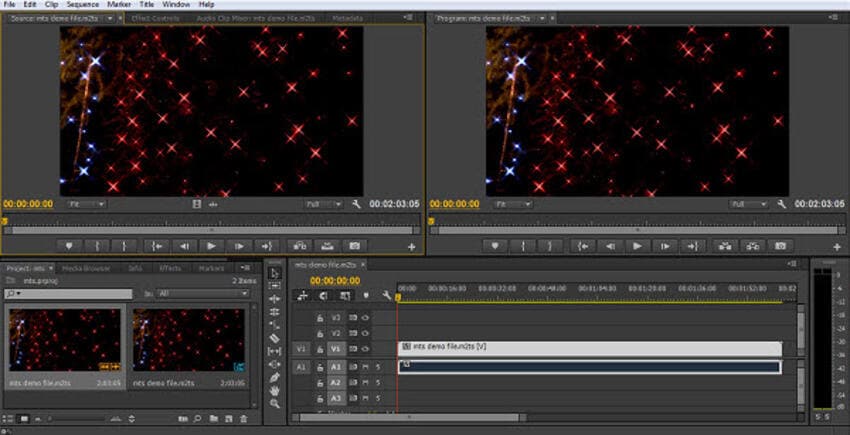
After processing the file, you are left with your project ready to go. Switch to the Project Panel and there is the imported media as we can see here.
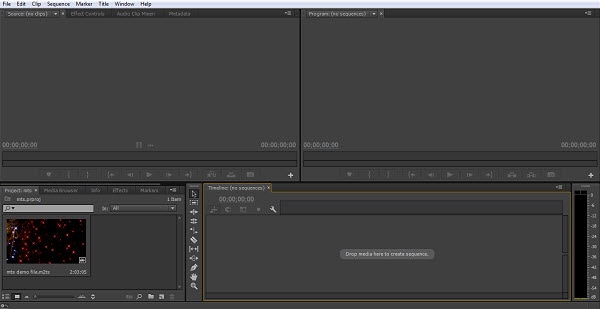
You can now drag the file into the Source and Timeline panels to start work on it as with any other project.
2. Video Camera Exceptions.
For some types of video cameras, there are issues that can be thrown up. The key when importing directly from camera output if you find issues is to use the media browser to import the entire folder structure of the AVCHD output from the camera, this ensures that any needed associated files are included with the MTS files for use. You end up with the same final point where the clips are in the Project Panel ready to be dragged onto the timeline for editing.
This is the contents of a card from a Panasonic Camera for instance
Now for this camera, I know that the video files themselves are located within the Private folder, but if you are unsure you can open each in turn, the media browser will show you the media files in each.
Although in most instances Premiere will set this automatically, there is a button at the top to highlight the file types you are importing, below is our private folder with the button displaying that it is in AVCHD mode.
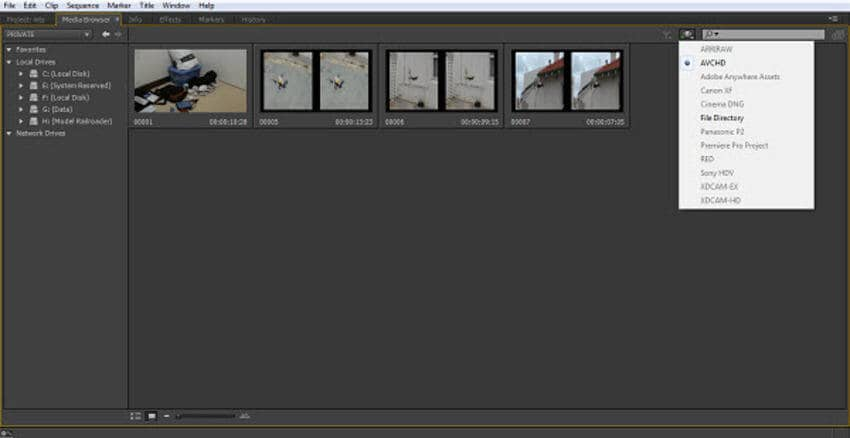
Simply select which clips you want to use and import them.
Part 3. Steps to Export Files as MTS from Adobe Premiere
The major factor in your export method is what you want to use the final file for.
1. Exporting to other file types.
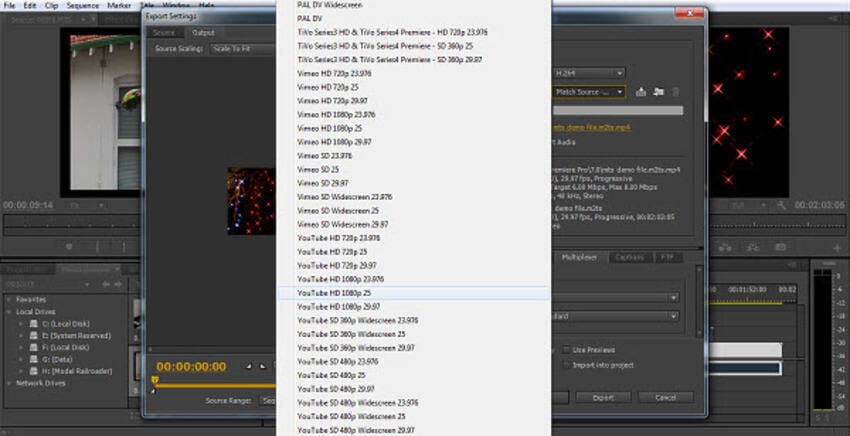
For most circumstances, you will probably wish to turn your MTS files into something else, and here the process is made easy for you by Premiere. For YouTube or similar you would choose the format and then use one of the many presets included in Premiere to suit the platform, here we are choosing a resolution and frame rate preset for YouTube that matches our original footage.
Selecting this and clicking export will render the sequence and automatically convert it onto the new file type for you, ready for upload to your desired medium.
2. Exporting as an MTS file.
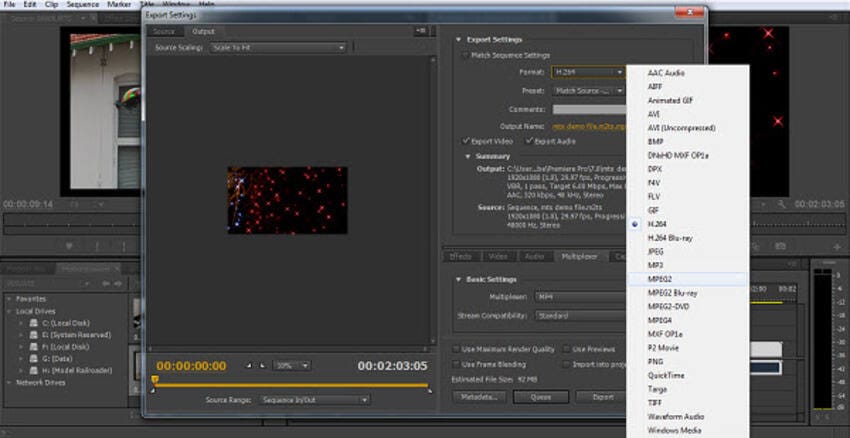
However, there are situations that you may find you wish to keep the MTS format. And at first glance, this may seem a step too far for Premiere with no option for it in the format menu as we can see here.
But there is a solution. Before we get to that though, I would say that for the vast majority of projects and applications, converting the MTS file at this stage is by far the best option, and for most people, this should be the route taken.
What you actually convert it to is, of course, dependent on how the final video will be used, but there are enough options within Premiere for more or less any eventuality or requirement.
With that out of the way, we can look at how to get around the lack of MTS format settings in the export dialogue as we have shown.
The first thing to do is to highlight the desired sequence within the Timeline or Project Panel and go through file>export>media to bring up the export dialogue as normal.

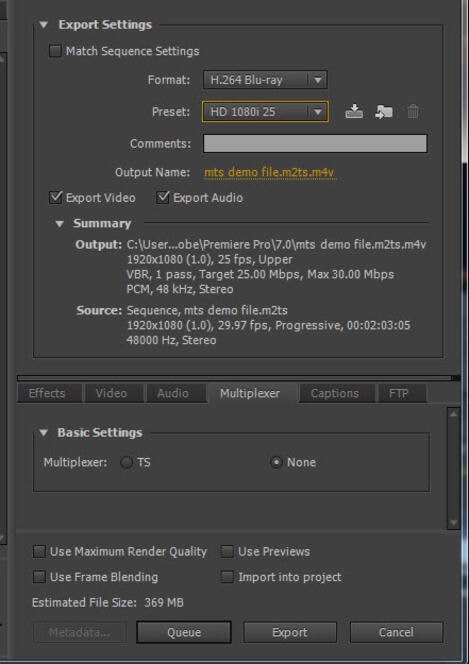
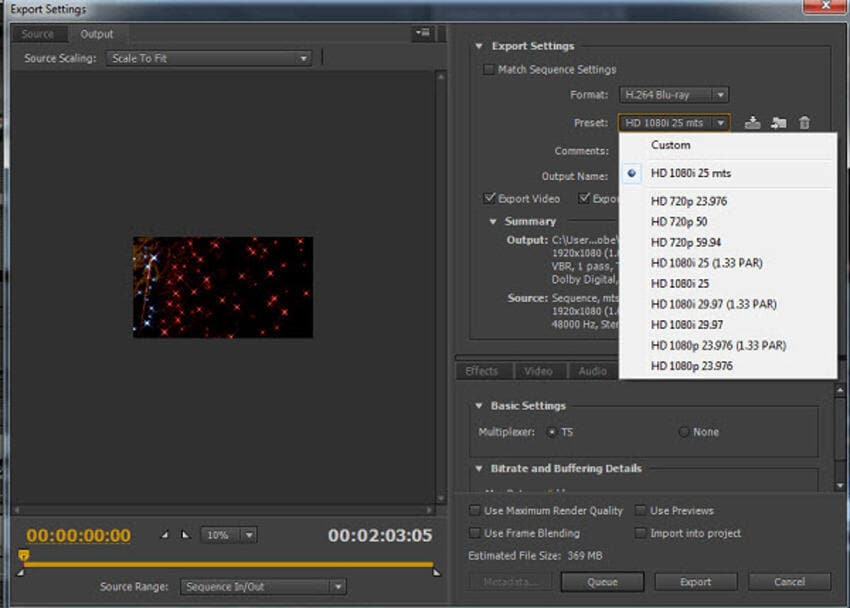
For our format, as the image shows, we have selected Blu-ray, and from here we are choosing a preset that is the closest match to our original footage in terms of resolution and frame rate.
With that selected, if we look at our output file in detail we can see that although the settings match the original file as we desired, the Output Name shows the file is a .m4v file, which is not the format we are looking for obviously.
However, you can see below we have switched to the multiplexer tab, which is by default set as ‘None’. If we now select ‘TS’, look at what happens to the file type.
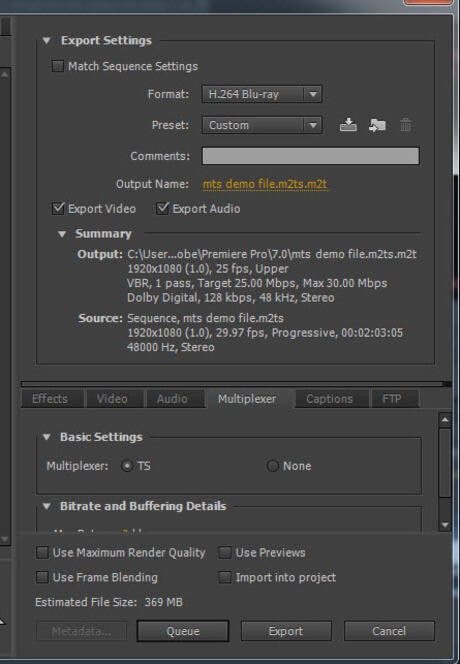
The settings are all still matching our quality, resolution, and frame rate targets, and the file is now, by default, outputting as an m2t file. This is actually the same format, and you can add the ‘s’ on the end for compatibility with no problem once it is created.
3. Creating your Preset
The last step that you can do here if you want to regularly output to MTS files is to save these settings as a custom preset.
With all the options you selected in place, you click on the button next to the Preset menu as shown here.
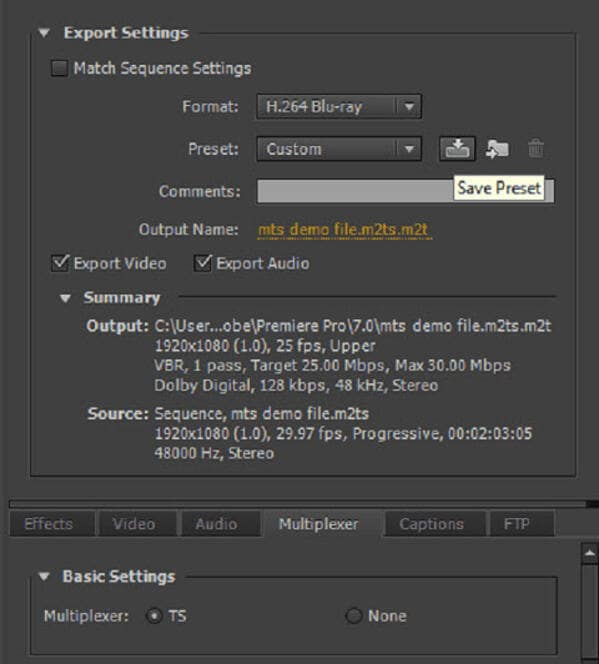
Clicking the button takes you to the save preset dialogue which allows you to rename the preset to something memorable so you know what it does

And finally, if you want to use it again at a later date, you select it like any other preset as here.
I hope this walkthrough has shown you that MTS files are not the end of the world to work with, the only tricky bit in the whole process of importing is ensuring that you allow Premiere to ‘see’ the folder structure if the media is coming directly from a camera, this ensured it imports all the various information it needs along with the video for a successful editing of the project.
Exporting is, as we can see, straightforward once you know where the option is buried, and saving that as a preset means it is always there with a single click just as every other preset included in Premiere is in the future.
This is a basic tutorial about Adobe Premiere, professional video editing software. However, if video editing is new to you, consider Wondershare UniConverter, which is a powerful but easy-to-use tool for users just starting out. Moreover, some formats can't be edited directly, you can also convert the format to editing with the software. Download the free trial version below.
- 3 Video Tools to Convert AVCHD to MP4 with Zero Quality Loss
- Top 5 Best MTS Converters for Mac (Mac OS Catalina Included)
- How to Convert TS to MP3 Easily
- How to Convert TS to MP4 Online and Free
- MP4 to TS: Top 4 Ways to Convert MP4 to Video_TS Easily
- How to Play MTS Files on iPad/iPhone Easily
- How to Play M2TS with Plex Media Server


Christine Smith
chief Editor