

The process of color grading photo is carried out by users to adjust the colors, tones, and overall aesthetic of the images for improved quality. It allows photographers and other content creators to take complete control over their content by enhancing the visual appeal. For advertising and social media influence, having a clear and enhanced photo is crucial. This helps them achieve a unique brand identity amongst a large market.
From warm tones to cool aesthetic ones, color grading enables a creator to tailor them to fit specific themes. Through this article, we will be looking into the key techniques to perform photo color grading to enhance the image overall aesthetic effectively.
In this article
Part 1. What is Color Grading?
To attract more viewers, users adjust the colors and tones of a picture to enhance the quality. It is widely used in photography, filmmaking, and digital content creation to transform ordinary visuals into captivating and polished masterpieces. While color grading focuses on artistic enhancement, color correction serves a more technical purpose.
Color correction is the initial step in post-processing to fix the exposure and white balance. Once this is done, color grading can be applied to enhance the picture further. Essentially, color correction ensures accuracy, while photo colour grading enhances creativity, allowing for a more visually compelling final result.
Part 2. How to Do Photo Color Grading Automatically [Instant Results!]
It can be challenging to get the perfect results while working on color grading, this is why it is crucial for you to opt for a high-end tool. The best software that can be used to enhance your images can be UniConverter AI Image Enhancer. This AI-powered tool uses advanced technology to apply different effects on images to improve their quality. Moreover, it also allows users to sharpen the quality of the pictures.
You also get the ability to improve the texture of the pictures to reduce noise in compressed or blurred images. UniConverter allows you to navigate through the tool with ease for the image color grading process since it has an easy-to-use interface.

Best AI Photo Color Grading Tool
Key Features of UniConverter
- AI Image Upscaler: The utility of this feature allows users to improve the overall quality of their picture in one click. It upscales your pictures up to 4K in a single click for effortless color grading.
- Batch Image Enhancement: Users get the ability to perform image enhancement of pictures in batches to speed up their workflow.
- AI Photo Restoration: In case you are working with old scratched-up images, utilize the photo restoration tool to bring them back to life.
- Portrait Enhancer: UniConverter allows you to enhance your portrait images into professional final results with clear and smooth facial features.
Steps of Using the Image Enhancer Feature for Color Grading
Step 1. Install UniConverter and Navigate to the Image Enhancer Feature
To start the color grading procedure with UniConverter, you need to download its latest version to your desktop. Then, at the main interface, navigate to the “Image Enhancer” feature.

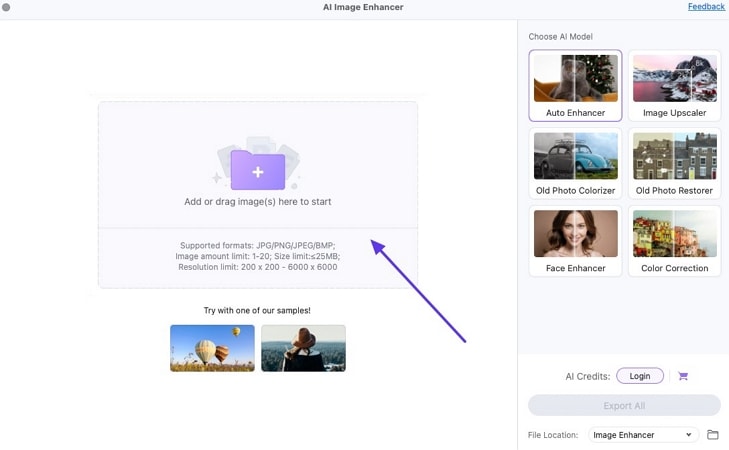
Step 2. Import Low-Quality Images to the Interface
Next, hit the “Import” section to add or drag images to the Image Enhancer interface of UniConverter.
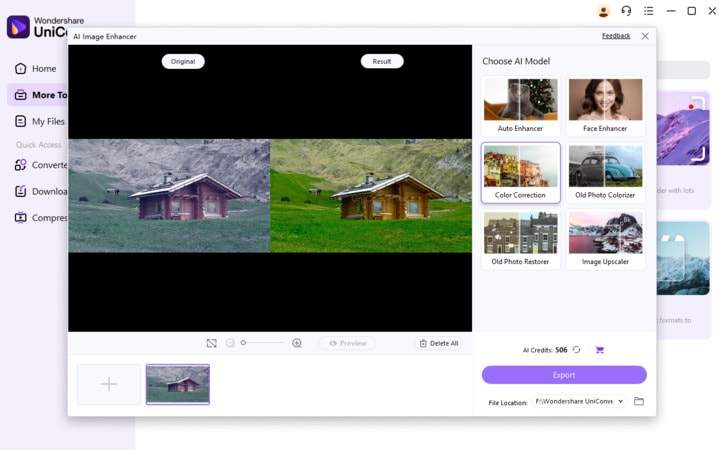
Step 3. Apply AI Auto Enhancer Model to Preview and Export Results
Once the image has been uploaded, you can add more by hitting the “+” button at the bottom left of the screen. Under the AI Models, you can pick the “Color Correction” feature to improve the overall image, including its color grading automatically. Then, hit “Preview” to review the results and hit the “Export All” button.
Part 3. Guide to Picture Color Grading in Photoshop
Photoshop is one of the most comprehensive tools used for color grading images, as it offers in-depth adjustments to the color shades. As they can fine-tune each detail it gives them the flexibility to take control over the picture. Color grading in Photoshop allows users to manipulate shadows and highlights individually. This guide will take you through the essential steps to achieving professional-grade color grading in Photoshop:
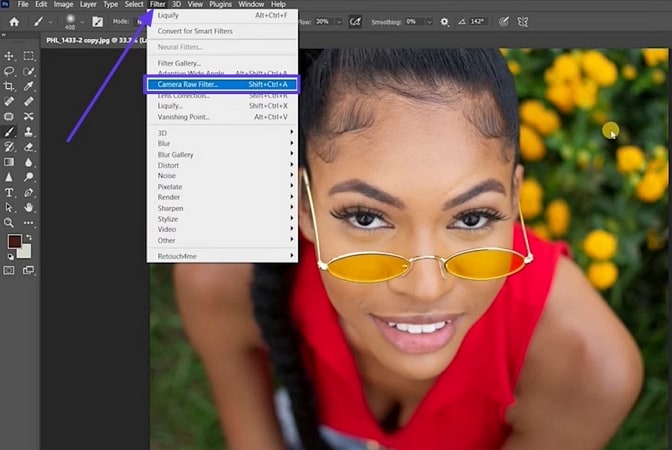
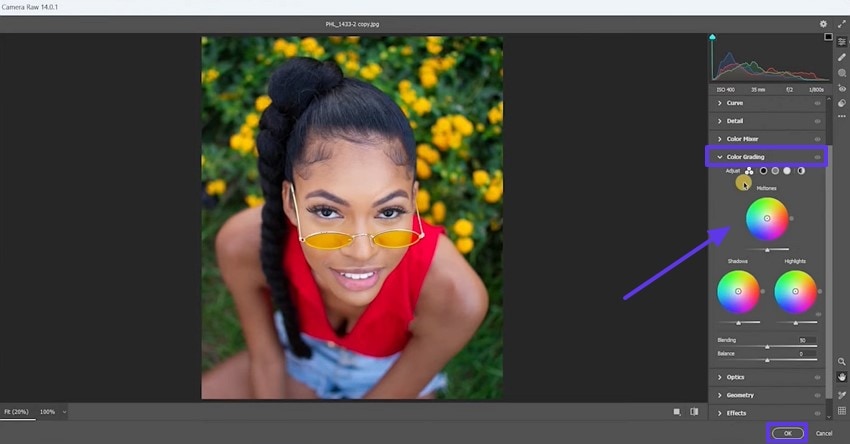
Step 1. Launch Adobe Photoshop and import an image you want to edit. At the editing interface, locate the “Filters” tab at the top navigation bar and pick the “Camera Raw Filter” option from the drop-down menu.
Step 2. At the right sidebar, look for the “Color Grading” section and click on it to get an extended menu. You can make further adjustments based on your requirements using the “Color Wheel.”
Key Features
- With the help of the adjustment layers features, use the color balance and curves tools to refine the tones.
- Photoshop’s gradient maps provide advanced control over color shifts by mapping colors across the image.
- The color wheel ensures you get to pick the exact color shades during the color grading procedure with this extensive tool.
Part 4. Guide to Image Color Grading in Lightroom
As one of the favorite software used amongst photographers, Lightroom provides an efficient photo color grading workflow with the help of its enhanced tools. It supports multiple image file formats to make sure you get to work on all files. The intuitive sliders ensure you get to adjust the hue, color balance, and more with ease. These steps will walk you through the procedure of performing color grading in Lightroom:
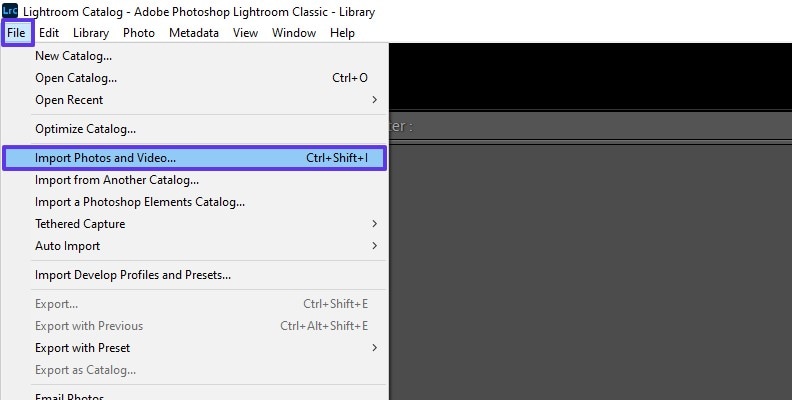
Step 1. Start the procedure of color grading by getting access to Lightroom and locate the “File” tab at the top left corner of the screen. Then, from the drop-down menu, pick the “Import Photos and Video” option to add the picture you want to work with.
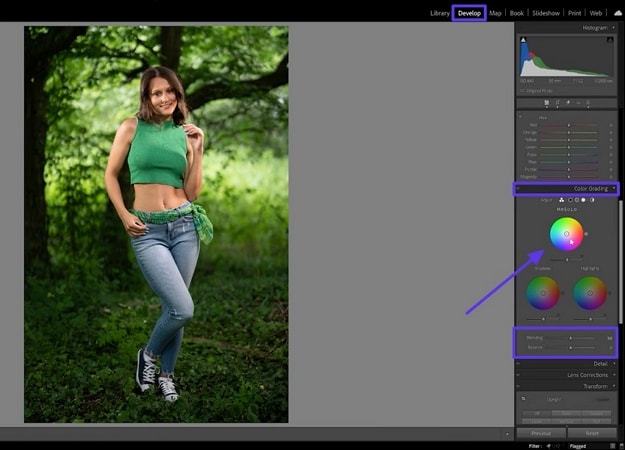
Step 2. Upon adding the picture, shift to the “Develop” interface from the right panel and start navigating to the “Color Grading” section. Here, you can adjust the color shades using the “Color Wheel.” You get to adjust the “Blending” and the “Balance” using their sliders.
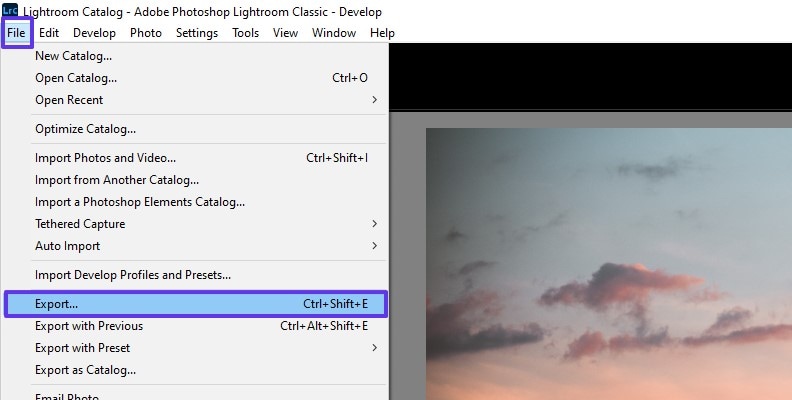
Step 3. Finally, move back to the “File” tab and choose the “Export” option from the list of options provided to save your enhanced image.
Key Features
- Enhances HDR photos by providing better control over highlights and shadows for a more balanced look.
- It uses AI technology to analyze images and suggest the best color grading adjustments or filters automatically.
- Lightroom provides three-way color wheels for adjusting shadows, mid-tones, and highlights separately.
Part 5. Photo Color Grading Online
Downloading software to your desktop device can be a hassle and does not allow you to work on the go. Instead, you can opt for a color-grading photo online method to speed up the workflow:
1. Color.io
Color.io is an online color grading tool that gives users enhanced color adjustments without requiring the users to install software. It features advanced AI-driven grading techniques and LUT creation, which makes this tool an ideal solution for photographers and designers. With real-time previews and flexible adjustment sliders, Color.io simplifies the process of achieving high-quality color grading images.
Step 1. First, you need to access the Color.io Match AI online tool on your browser. Here, click on the “Open Image” button to start the procedure.

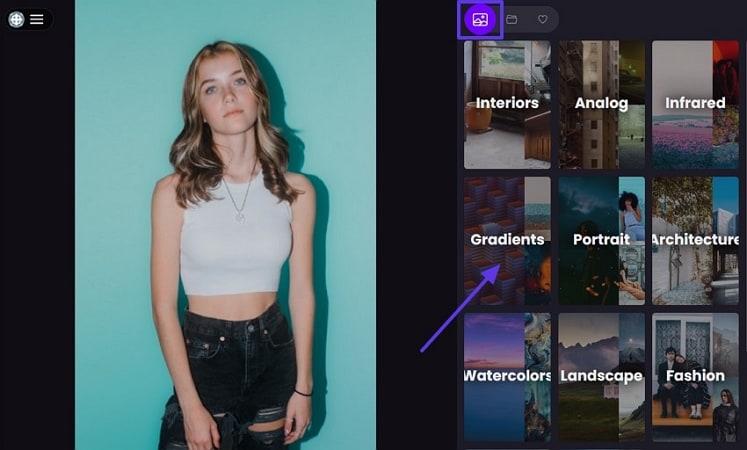
Step 2. Once you enter the editing studio of the tool, you enter the “Gallery” icon you get a lot of options for different genres of filters. Pick the one that best fits your requirements and move to the next step.
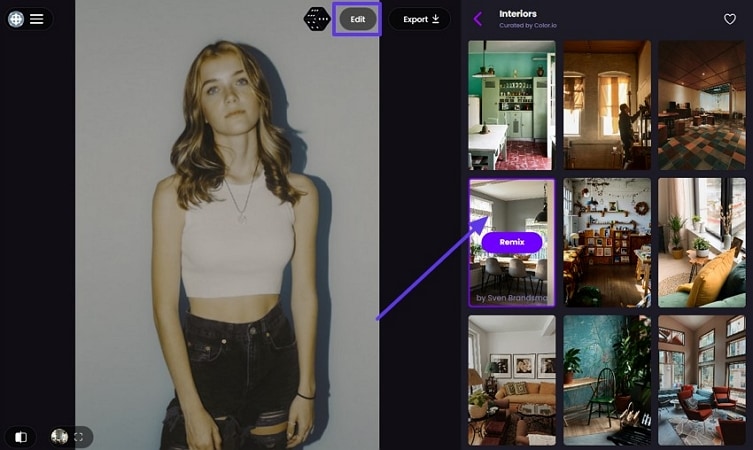
Step 3. Now, click the filter from the list of choices and hit the “Edit” button at the top right of the screen.
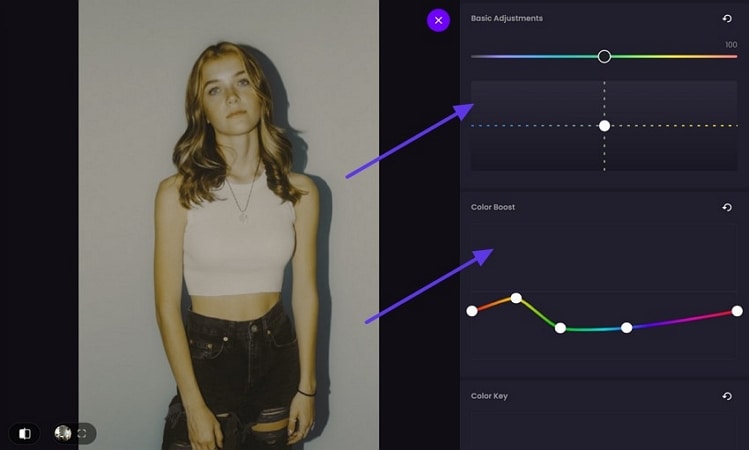
Step 4. You are shifted to another window where you can make the basic color adjustments. Finally, head back to the main editing interface and hit the “Export” button to save the enhanced image.
Key Features
- The dice button during its editing process allows users to shuffle through different filters in one go quickly.
- Color.io provides presents that mimic the look of classic film stocks for a vintage or cinematic feel.
- With the help of dynamic LUT blending, you get the ability to ensure a seamless blending between different LUTs to create unique color grading styles.
2. LightX
This online photo editor provides users with an easy-to-use interface for professional-level photo color grading online process. The manual settings allow you to take control of the image and adjust it based on your requirements. Moreover, LightX’s AI-integrated technology makes a quick color adjustment to help you speed up the procedure.
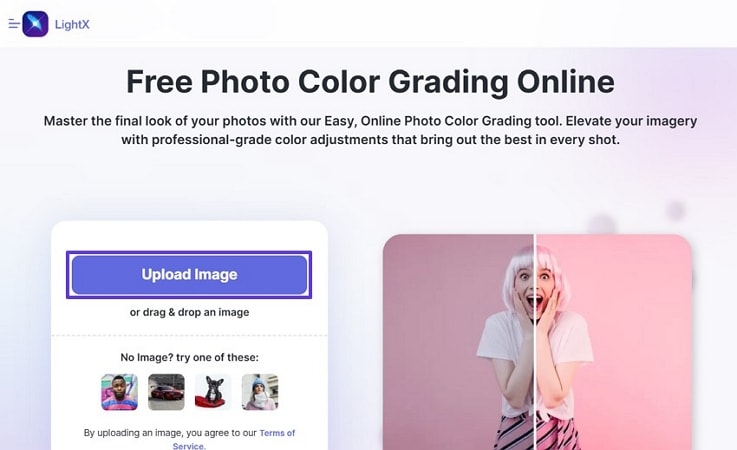
Step 1. Browse to the official LightX website to access the Free Photo Color Grading Online tool. At the main interface, hit the “Upload Image” button to add the picture you want to improve.
Step 2. Upon uploading the image, you get the ability to adjust the “Sliders” of all the colors. Then, select the "Apply" button to apply the changes made to the colors. Finally, hit the "Download" button at the top right corner to save the enhanced image to your device.

Key Features
- The tone curve adjustments enable precise control over shadows and highlights for advanced color grading.
- LightX has the feature of a tap filter for instant color grading effects for quick enhancements.
- Users can see the before and after versions of their pictures to see how the image has been enhanced.
Part 6. Top-Notch Color Grading Styles and Trends
Now that we know the tools used to carry out the procedure of photo color grading, here are some of the styles and trends of color grading:
- Cinematic Color Grading: To achieve a movie-like effect, filmmakers and content creators use this color grading style. This style enhances contrast and adds teal and orange hues for a dramatic look.
- Moody and Dark Tones: High contrast and desaturated colors create an intense, moody effect. This style is popular in portrait photography and cinematic storytelling.
- Pastel and Soft Color Grading: With the help of pastel tones, you get the ability to reduce harsh tones and introduce soft ones for a dreamy-like appearance. Image color grading works well for fashion and wedding photography.
- Vintage Effects: These styles replicate old film effects by adding faded tones, grain, and warm color casts. They are often used for nostalgic and timeless aesthetics.
- High-contrast and Vibrant Styles: This technique is widely used in commercial and product photography. The bright and bold colors make images stand out with strong contrasts.
FAQs on Color Grading
1. How is color grading different from color correction?
Color correction is used to fix the exposure, white balance, and color accuracy of images. At the same time, color grading enhances the aesthetic and style of the pictures. Both processes work together to create a visually appealing final result.
2. What are LUTs, and how do they help in color grading?
Look-up Tables are preset color adjustments that instantly apply a specific color grading style to an image or video. They save time and ensure consistency across multiple visuals.
3. What are common color grading mistakes to avoid?
Over-saturation, extreme contrast, and inconsistent grading can make images look unnatural. It's essential to maintain balance and subtlety to achieve a professional look.
4. What is the first rule in color grading?
The first rule in color grading is to start with color correction. Ensuring accurate colors before applying artistic adjustments results in a more natural and polished final image.
Conclusion
This article looks into the top software and offline tools you can opt for to streamline the photo color grading procedure. You can easily navigate through each tool and pick the best one that meets your requirements. We have introduced you to UniConverter, which is the most enhanced AI-powered tool with comprehensive features. Download UniConverter to your devices today to improve your color grading process and much more with ease.

