Recording Tips
- TRY FREE TRY FREE
- 1. Game Recorder+
- 2. Video Recorder+
- 3. Recording Software+
- 4. Screen Recorder+
- 5. Record Devices+
- 6. Recording App+
- 7. Other Tips+
- 8. Audio Recorder+
- 9. Format+
- 10. Screen Recorder+
- 11. Record Social Network+
-
- 11.1 How to Record Someone's Instagram Live with Helpful Ways
- 11.2 All Ways to Record Hulu
- 11.3 How to Record BBC iPlayer with All Ways
- 11.4 What’s the Best YouTube Recorder App in 2026
- 11.5 How to Record Gameplay on Xbox One for YouTube with All Ways
- 11.6 How to Record Videos from YouTube to Computer with All Ways
- 11.7 How to Record Netflix with All Ways
How to Record DVD to Computer with All Ways
by Christine Smith • 2026-01-21 18:52:10 • Proven solutions
Do you have a bunch of DVDs on the shelf that you never have time to watch? Well, then you might find it easier to watch it if you had it on your computer. And, lucky for you, there are now plenty of ways of accomplishing this. Continue reading to learn how to record a DVD to your computer in three different helpful ways.
- Part 1. Easiest Way to Record DVD to Computer
- Part 2. How to Record DVD to Computer on Mac
- Part 3. How to Record DVD to Computer with VLC
Part 1. Easiest Way to Record DVD to a Computer
If you want to record a DVD video on a computer with lossless quality, Wondershare UniConverter is the go-to app. It’s simple to use and packs excellent video manipulation features. Firstly, it features an outstanding multimedia player that can open any DVD file, including copy-protected ones. Secondly, you can use the screen recorder to capture a playing DVD file on full screen or custom mode. When recording, users can add voiceovers, video overlays or Picture in Picture effects, and annotations like shapes, texts, lines, drawings, and more. Best of all, users can edit the recorded video by trimming, cropping, adding watermarks, applying subtitles, etc.
Wondershare UniConverter – Best DVD Recorder
 Wondershare UniConverter - The Best DVD Recorder

- Record all computer screen activities like DVD movies, VoIP calls, browser tabs, and so on.
- It can capture a computer screen in full-screen mode or select a specific capture area.
- Users can add voice narrations, annotations, and PIP effects to their recordings.
- RIP all copy-protected DVD and Blu-ray discs quickly and easily.
- It offers a beautiful multimedia player for opening any video file.
- Edit videos (including recorded ones) by cropping, trimming, rotating, adding subtitles, etc.
- Convert between 1000+ video/audio/image formats with 30x faster conversion speed.
- Best DVD recorder for Mac OS X 10.9+ & Windows 10/8/7.
Step-by-step procedure on how to record DVD to your computer using Wondershare Screen Recorder:
Step 1Launch the Screen Recorder.
Install and run the software, then tap the Screen Recorder tab. After opening the Screen Recorder window, press the Camcorder icon to launch the video recording tool.
![]()
Step 2Choose a video recording area.
First of all, launch the DVD video using a media player of your choice. After that, crop the Screen Recorder’s frame inwards or outwards to set a capture area. You can also set it as Custom or Full Screen on the recording mode menu.
![]()
Step 3Adjust your recording preferences and settings.
To make sure that all the DVD sounds are picked up, click the System Audio menu, then choose an output device. If you want to add voice narrations, click the Microphone menu, then select a sound input device. You can also select a Facecam for adding a video overlay on the Webcam drop-down menu.
![]()
Now open the Advanced Settings menu, then chose an output format, frame rate, quality, folder path, and recording timer. Interestingly, users can customize the keyboard shortcuts the way they like.
![]()
Step 4Start recording the DVD video.
Start playing the DVD movie, then click REC to start recording it to your computer. As you record the video, launch the taskbar, then click Annotation to add texts, shapes, drawings, lines, and arrows. If satisfied, tap Stop. You can now preview and edit the recorded DVD on the Video Editor tool.
![]()
Part 2. How to Record DVD to Computer on Mac
Next, we're going to demonstrate how you can use VLC on Mac to do almost the same thing. This time, rather than live recording a DVD, we're going to use VLC's streaming and transcoding functions to grab the contents of the DVD automatically. It does take some time, but it might be preferable for those who are looking to record DVDs to their computer on Mac.
Step 1. Open VLC File Options
To start recording your DVD with the Mac version of VLC, launch the media player and then open up the File tab. Once opened, you'll be able to select the Open Disc… option. Do so to proceed. Tip: Now is the time to have your DVD inserted into your PC.
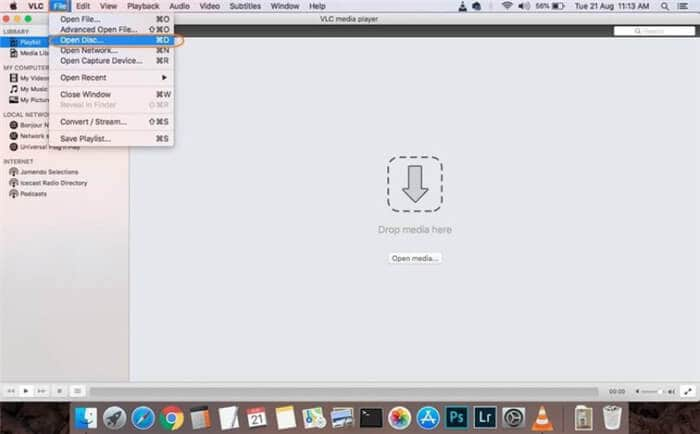
Step 2. Adjust Open Source Settings
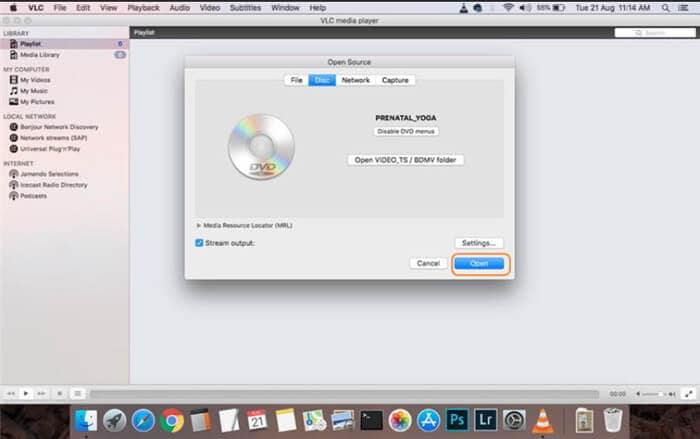
A floating window should appear on your screen called Open Source. On this window, make sure that your DVD has been read correctly and disable DVD menus. Next up, you should also make sure that the Stream Output option is toggled on.
Once done, click Settings to continue forward.
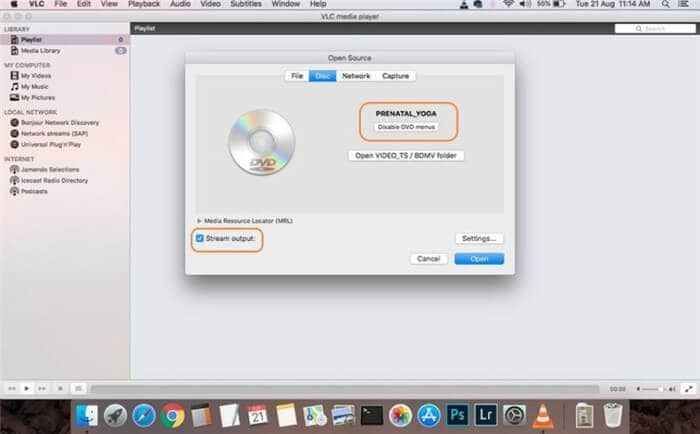
Step 3. Select Output Folder
Next up, on the Streaming and Transcoding Options page, click the blue Browser button to browse your computer for an output folder to store the recorded DVD into.
Once done, click Save to confirm.
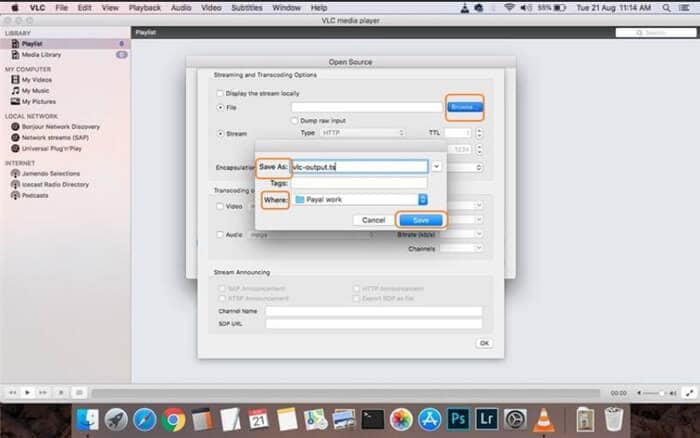
Step 4. Choose Output Format
Next, under the Encapsulation Method, select the file output format for your recorded DVD. It can be MPEG, AVI, QuickTime, ASF, MPEG 4, and so on.
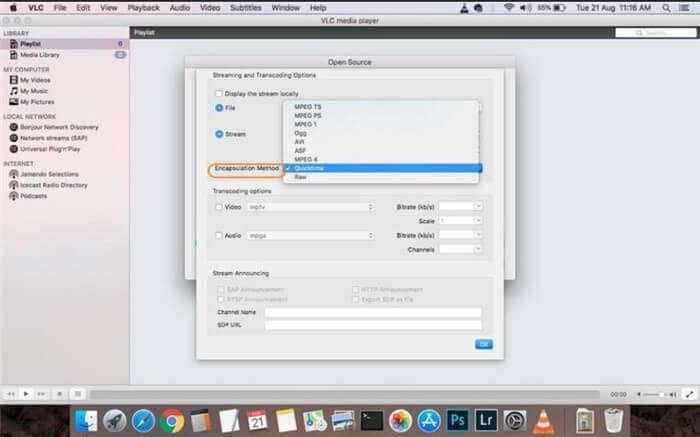
Step 5. Open to Record
With all the settings set up, you can now begin recording. For this, you can finally click the Open button on the Open Source floating window.
Part 3. How to Record DVD to Computer with VLC
At the last of all, we're going to use the Windows version of VLC to record DVDs on our computer. This method is similar, but not the same as the one previously shown. There are some minute differences between one and the other. And so, we decided to double things up a bit to make sure that Windows users are just as capable of recording with VLC as Mac users. If this applies to you, continue forwards.
Step 1. Open Media Tab
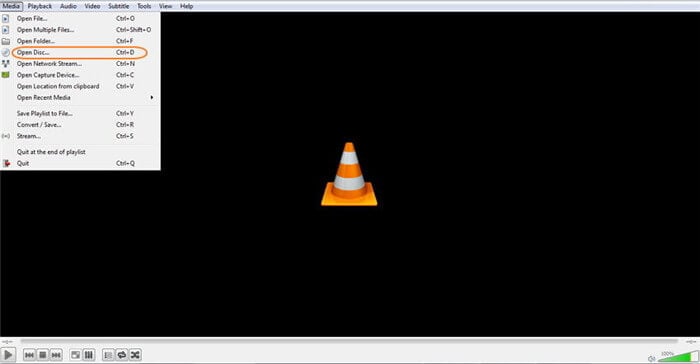
Unlike in the Mac VLC version, you'll need to open up the Media tab for this tutorial. Once there, however, you'll be able to select the same Open Disc… option to continue forward.
Again, this is the time to insert your DVD into your computer.
Step 2. Adjust Disc Settings
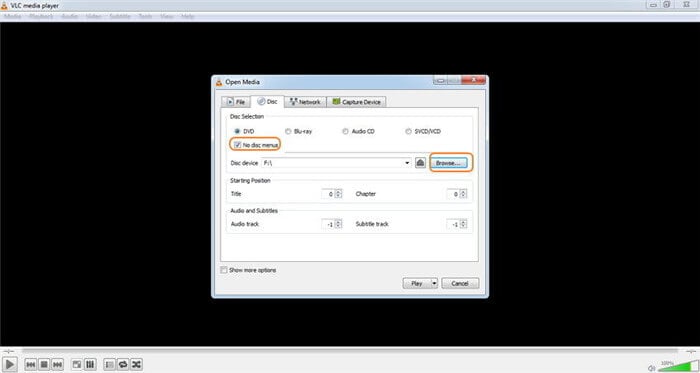
This part is not very different, either. Though the UI is not the same, you will still need to make sure that the Disc Menus are disabled. You will also need to click the Browse button to select the Disc Device you want to record.
Step 3. Convert DVD
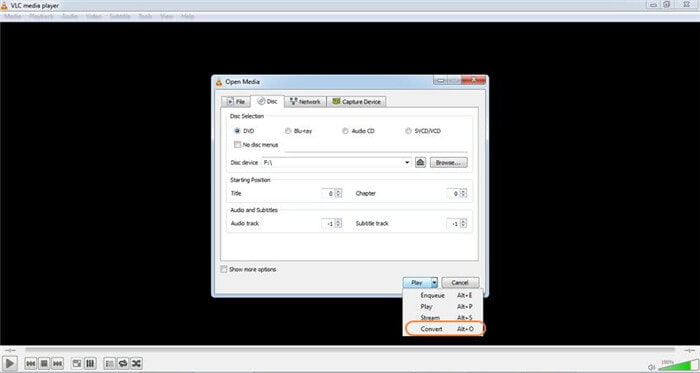
Next, click the Play button to open up another menu. Then, select the Convert option to record your DVD.
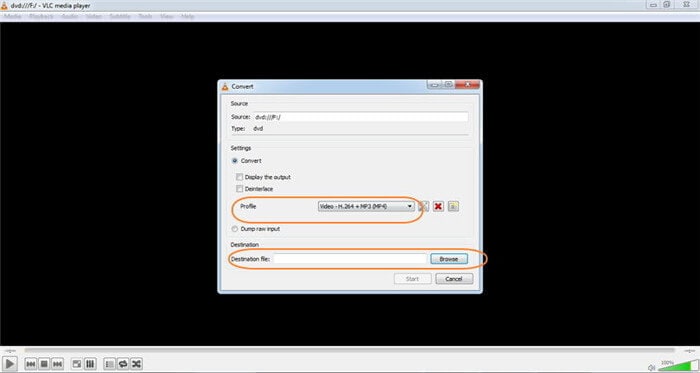
Step 4. Select Output Profile and Destination File
Next, under Profile, select your desired output format. The file formats are mostly the same as the ones available for Mac VLC. Once that is done, under Destination file, click Browse to select a folder in your computer to store the recorded DVD into.
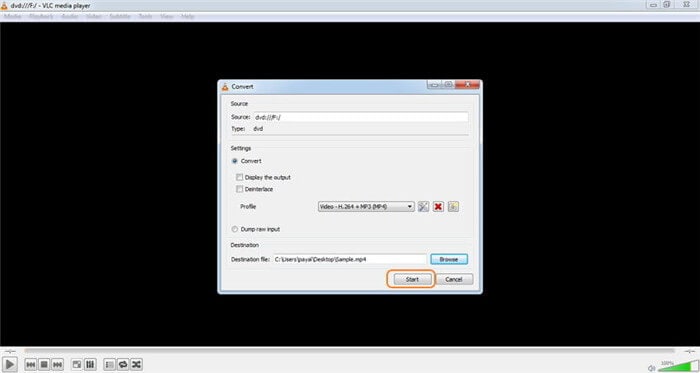
Step 5. Start Recording.
When all those settings have been set, click Start to begin.
Everything is set up so that once VLC has finished recording the DVD, it will automatically be saved to the output folder that you specified.
Conclusion
Having DVDs in a format that you can quickly move from device to device is the best way to enjoy the movies you know and love. So, take advantage of all the different methods we've thought of to record DVDs to your computer, whether it's VLC's advanced conversion functions or UniConverter's basic and intuitive DVD recording feature.

Christine Smith
chief Editor