GoPro Tips
GoPro Quik Tutorial: How to Edit GoPro Videos
by Christine Smith • 2025-01-13 14:34:07 • Proven solutions
You and your friends had a fantastic day swimming, visiting the park, dining at your favorite restaurant, and the drive back home was unforgettable. Thanks to the GoPro camera, this day’s memories will safely get stored on the SD card. However, do you know how best to use the GoPro Quik software? It will assist you in tweaking the videos a little and share them with your friends. In this article, we fully equip you with the knowledge to get this task done with a short GoPro Quik tutorial explicitly made to meet your needs. We shall also look at a way to edit GoPro videos easily using a third-party application.
- Part 1. What is GoPro Quick
- Part 2. How to Use GoPro Quik in Simple Steps
- Part 3. How to Edit Video with Best GoPro Quik Alternative
Part 1. What is GoPro Quick
GoPro Quik(https://gopro.com/en/hk/shop/softwareandapp/quik-%7C-desktop/Quik-Desktop.html) is a video, and photo editing tool, specifically for pictures and video clips captured using the GoPro camera. It is the best way to offload and enjoy media files stored on the camera. The app automatically imports the file footages and helps organize them nicely in a familiar location on your computer. This app is also available for smartphones and tablets. It facilitates quick editing and sharing of photos and video clips directly to YouTube and Facebook. Hence the name Quik.
Using the GoPro Quik app is effortless thanks to its video trimming tools that facilitate seamless creation and immediate sharing of short clips. The app comes with HiLight Tags to assist you in finding those epic moments in a video and secure them for future editing and sharing purposes. Furthermore, Quik has incredible features for viewing and editing burst and time-lapse pictures hence creating outstanding videos. For optimized performance, update your GoPro with the most recently upgraded features. If you face any technical difficulty, there is reliable customer support at your service.
Part 2. How to Use GoPro Quik in Simple Steps
The following is a guide on how to use GoPro Quik to edit GoPro videos. If you follow the steps given in this tutorial keenly, you won’t need to use the Quik app Help module. Let’s get started:
Step 1: Import video files
Once you connect the camera to the PC using its USB cable and launch the Quik app, it will let you import the video files easily. Alternatively, you can add the data from a folder in your computer using the Add Media option on the screen. The camera can also get updated from this interface.

Step 2: Selecting the videos to be edited
Next, choose the raw videos you wish to edit. To select all files, use CRTL + A. To select particular video files, press and hold CRTL, and tap on the data.

Step 3: Create Mode
Now open the selected video files in a Create Mode.

Step 4: Choosing HiLight
You will see the files you chose on the left side of the interface. When you hover over these files from left to right and back, a preview of the video will show on the right side of the interface.
Select the best HiLights by clicking on the file on the left side at the perfect moment. A blue dot will display, and Quik will automatically create Cut and adds the moment to the timeline below.

Apart from the blue dots, you may see yellow dots on the clips. Do not be alarmed as they are HiLights previously selected.
Step 5: Adjusting the length of the video
The maximum number of HiLights you can choose on Quik is 10. To select more, you have to adjust the duration of the video file. The default timing is 30 seconds. There are three options, i.e., 15 seconds, 30 seconds, and 60 seconds. Choosing the most extended clip (60 secs long) lets you select up to 20 HiLights.

Step 6: Shuffle or delete Cuts
After you are done selecting highlight moments, you can either remove the Cut with a single click on the icon of the video file in the timeline.

Or, you can shuffle the Cuts by dragging the clip to the desired location in the timeline.

Step 7: Adding music file
Quik comes with a couple of songs to choose from to add to your clip. Click on the button at the bottom left corner to select a track from the list of 10 provided. For more records, you need to subscribe to GoPro Plus.

Step 8: Save edited clip
Lastly, when you are satisfied with the edits you have made to the video, save it to a designated location on your PC. You can access it for further editing in the Edits module.
So, that was the Quik app tutorial.
Part 3. How to Edit Video with Best GoPro Quik Alternative
It is naïve to hide the fact that the Quik app has several shortcomings. For instance:
● A limited number of HiLights,
● The most extended clip is just 60 seconds long,
● Unable to add your music tracks and those available are few.
● The videos made are only good for sharing; they cannot be commercial.
Hence, the need for Quik app help, which is Wondershare UniConverter (originally Wondershare Video Converter Ultimate). With Wondershare UniConverter, you can trim your videos and get rid of unnecessary parts to create a smaller video. You can also split long videos into several clips. It lets you add subtitles to your video with ease from the web, locally or customized with font, size, style, transparency, and position as you wish. You will be able to enhance the quality of your video clip with special effects and filters contained in the software manually by adjusting the brightness, contrast, saturation, volume, or using the automatically enhance video option. You can preview these effects on the go. This platform allows you to crop and add watermarks to a clip as well. You can edit your video using the steps below:
Step 1 Launch Wondershare UniConverter.
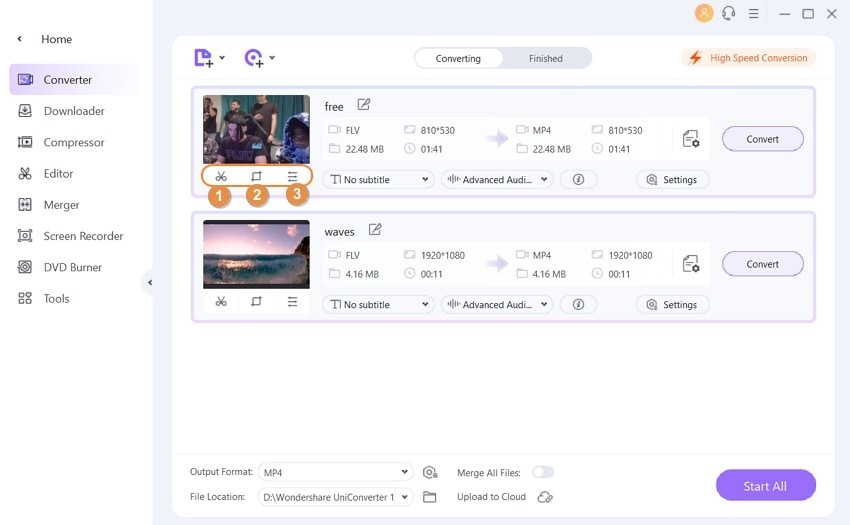
After you have downloaded the application on your computer, launch it and add files to it under the Converter or DVD Burner tab. Under the video thumbnail, you will see three editing icons, i.e., Trim, Crop, and Effect icons, respectively.
Step 2 Trimming.
Open the Trimming window by clicking on the Trim icon that’s on the left side. Now, there are four ways to trim a video.
- Trim the end/start of the video
To trim the beginning /end, move the cursor on the time slider, and a Scissor icon will appear. Click on it to write the very time you want to trim. Then click Cut to divide the clip into two parts.
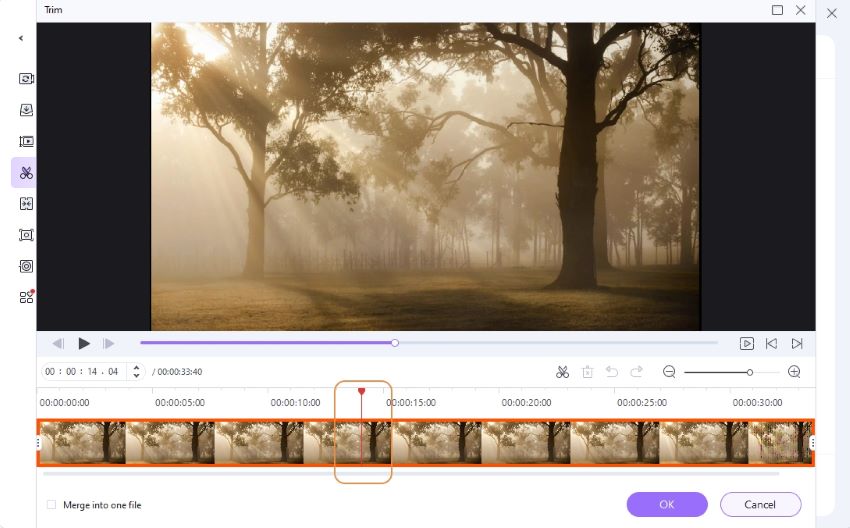
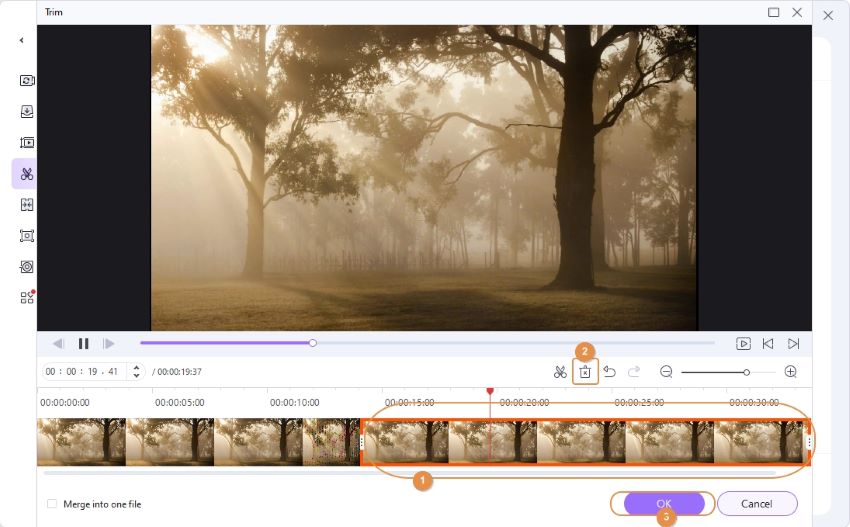
Select the part to be rid and click Delete then Save.
- Trim the middle of the video
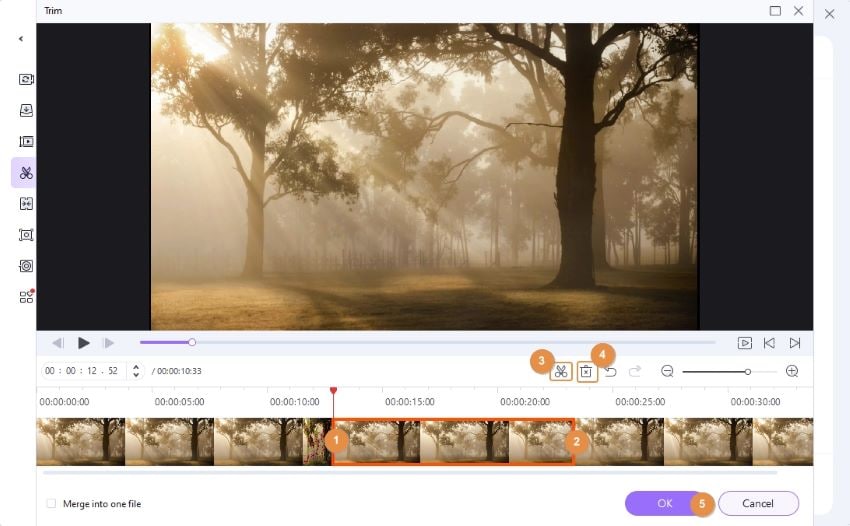
To delete a section in the middle of the video, drag the slider to the start of that redundant part then Cut. Do the same for the last point of that part then tap on Delete to get rid of that section. Click Save.
- Trim the unwanted part of one video
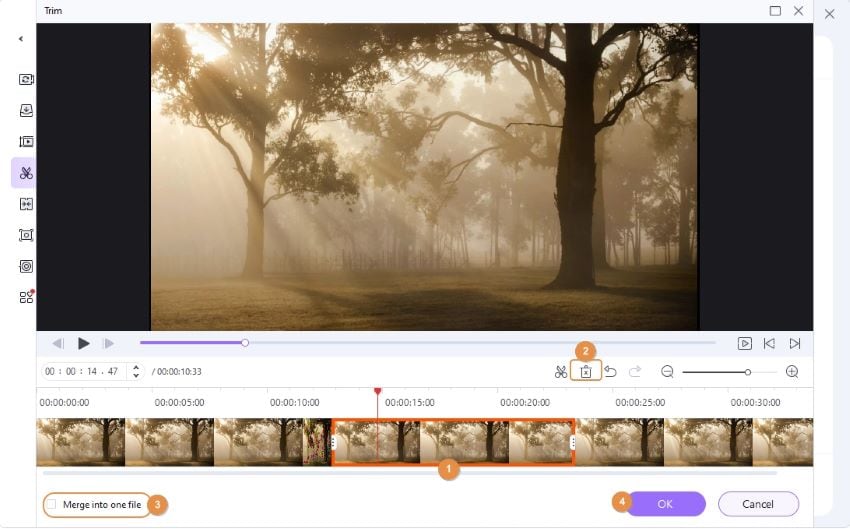
To delete a single section and then put back the remaining sections into one file, select the unwanted segment, and click Delete. Next, check the Merge into one file option at the bottom left corner and Save.
- Trim a long video into several clips
Now, to split one long video into small video files, drag the slider to the place you want to trim and tap on Cut to confirm, loop the steps to Cut the sections. The video will be divided into the selected parts and then click on Save to continue.

Find the video segments in the primary window named with segment numbers accordingly.
Step 3 Save the trimmed video file.
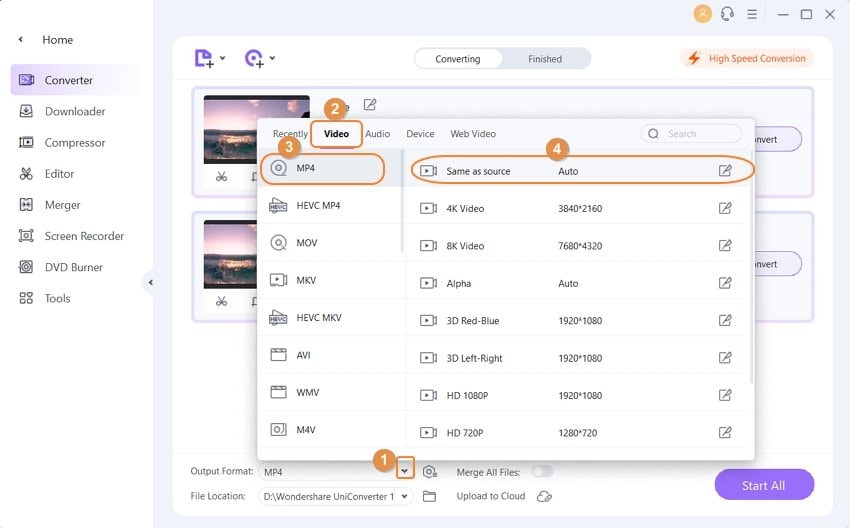
Lastly, tap on the drop-down button next to the Output Format: options to choose the output format for your edited video. Then click on Start All to complete the conversion process.
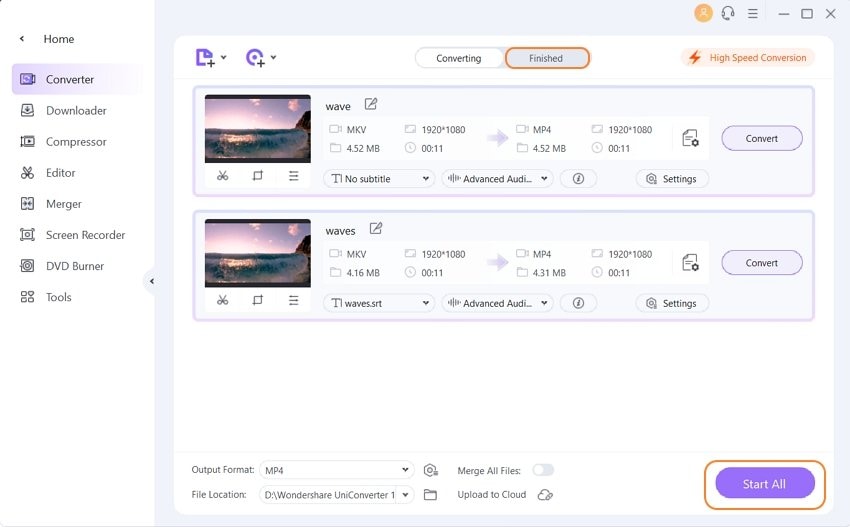
Find the edited video under the Finished tab in the program.
Conclusion
Penning off, I believe the GoPro Quik tutorial has been a lot of help while using GoPro Quik app with editing your GoPro videos and images. Despite its shortcomings, Quik is suitable for simple editing errands, and the ability to share the edited video file directly to YouTube and Facebook is cool. For an in-depth editing experience, feel free to transfer the videos and photos from GoPro camera to your computer then get Wondshare UniConverter. It is undoubtedly the top video editing tool that is simple to use and ensures an excellent output with little to no limitations.
Christine Smith
chief Editor