GoPro Tips
- TRY IT FREE TRY IT FREE
- 1. Edit GoPro+
-
- 1.1 Edit GoPro Videos on Mac
- 1.2 Download GoPro Videos
- 1.3 Rotate Gopro Video
- 1.4 Gopro Photo Editor
- 1.5 GoPro Video Format
- 1.6 GoPro Quik
- 1.7 GoPro Cineform Studio
- 1.8 GoPro Quik Alternative
- 1.9 GoPro Tutorial
- 1.10 GoPro 4k
- 1.11 How to Connect GoPro to Mac
- 1.12 GoPro Instagram
- 1.13 How to Flip GoPro Video
- 1.14 GoPro Video Player
- 1.15 GoPro Time Lapse Video
- 1.16 GoPro Live Stream Youtube
- 2. GoPro Software+
-
- 2.1 GoPro Software
- 2.2 Quik Video Editor
- 2.3 Camera GoPro 4k
- 2.4 GoPro Underwater
- 2.5 GoPro Desktop App
- 2.6 Gopro App Download
- 2.7 Gopro Desktop Software
- 2.8 Gopro App for Mac
- 2.9 Gopro Software mac
- 2.10 Gopro Video Editor for Mac
- 2.11 Gopro Video Converter
- 2.12 GoPro Editing App
- 2.13 Free GoPro Editing Software
- 2.14 Video Stabilization Software
- 3. Other Tips& Tricks+
How to Download GoPro Videos to Your Windows Computer
by Christine Smith • 2026-01-21 18:54:11 • Proven solutions
You recently had an awesome traveling vacation and experienced some of the most thrilling adventures and with your GoPro camera to capture those memories. Now you want to see them, but first, you need to download these GoPro videos to your PC. Keep in mind that whenever I say download, I mean import, so don't confuse between the two. So, how to download GoPro videos to your computer?
Well, look no further for you are in the right place and at the right time. In this article, we will address this very problem and find out how we can solve them. Keep in mind that your GoPro camera is compatible with both Windows and Mac desktops, and since Mac has more popularity amongst the GoPro users will be focusing on Mac desktops mainly.
It is not that tough as you might think. There are presently three methods to download or transfer video from GoPro to your computer:
- The SD Card Method;
- Auto-Import;
- Using GoPro Quik.
All these methods are useful in both the Windows and Mac platforms, with slight differences in the process.
- Part 1. How to Download GoPro Videos to Computer via SD Card Method
- Part 2. How to Download GoPro Videos to Computer via Auto-Import
- Part 3. How to Download GoPro Videos via GoPro Quik
- Part 4. Bonus Part: How to Edit GoPro Videos after Downloading GoPro Videos
Part 1. How to Download GoPro Videos to Computer via SD Card Method
First, we will look at the SD Card method and the steps involved in connecting your GoPro to your Windows computer and download/import videos on the same.
Step 1: Open the backside door on your GoPro camera and pop-out the SD Card. Insert the card into the reader and connect it to your Windows computer;

NOTE: You can also insert the card directly into the reader of your PC.
Step 2: On your PC, open the File Explorer either from This PC/My Computer or press Windows + E on your keyboard. At the side-bar of the explorer window, you will find the Removable Disk. Double-click the SD card section and you will find two folders naming DCIM & MISC;
Step 3: Open the DCIM folder by double-clicking it to find the 100GOPRO.In case, you have captured more than 9999 photos or videos, and the folder name might be like 101GOPRO, 102GOPRO, 103GOPRO, and so on.
Step 4: Open the folder containing your captured media to transfer them to your computer. You can:
- Drag the entire 100GOPRO folder to your desired location on your computer.
- You can copy/cut and paste them to the desired location.
- You can select the media files and drag and drop them.
Step 5: Once done, eject the SD card from the reader and continue using the GoPro camera.
Part 2. How to Download GoPro Videos to Computer via Auto-Import
Now we will see how to download GoPro videos in your Windows device using the auto-import method. It is the simplest way of importing media from your GoPro camera to the PC. We will be using the USB cable that has come along with the camera to proceed with this method. Also, you need to have the GoPro App installed on your PC to avail the Media Library.
Step 1: Connect your GoPro camera and your Windows computer with the USB cable & turn your GoPro on. The GoPro App will detect the camera and will show its details on the respective window;
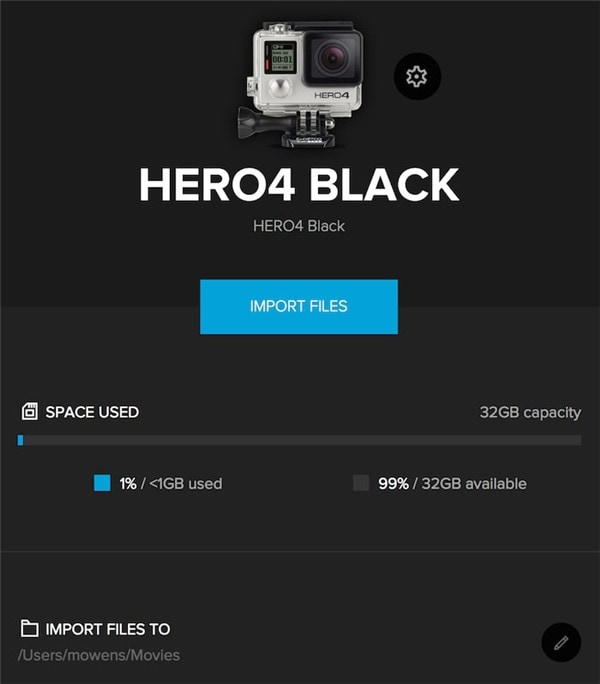
Step 2: Confirm the saving path from the IMPORT FILES TO option right below the window. Click on IMPORT FILES (the blue button) to start the process. Now, a window will pop up, seeking permission for automatically importing files when a camera will be connected. Select your option NO/ALWAYS IMPORT in accordance to your preference. You can change it anytime from Camera Settings.
Step 3: Now, in the My Devices section under Media Library, you will see the progress bar for importing files to your computer.
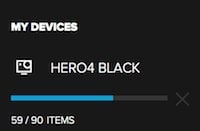
Step 4: Under the RECENTLY ADDED section of the Media Library, you will see all the imported media files. You will also be notified about how many files have been imported under the Alert Drawer.

Part 3. How to Download GoPro Videos via GoPro Quik
Most Windows possessors use the GoPro Quik app for GoPro video transfer operations. As such, here we will take Windows 10 as the operating system along with the GoPro Hero 5 Black edition. You can use the USB cable in much the same way as before; instead of the Finder app, you have the Windows File Explorer. Another way to do this is by creating a media folder and manually download GoPro videos to your PC.
Step 1: Create a Media Folder.You can either create a new media folder in the Media Library or manage existing media folders from the Settings Window;
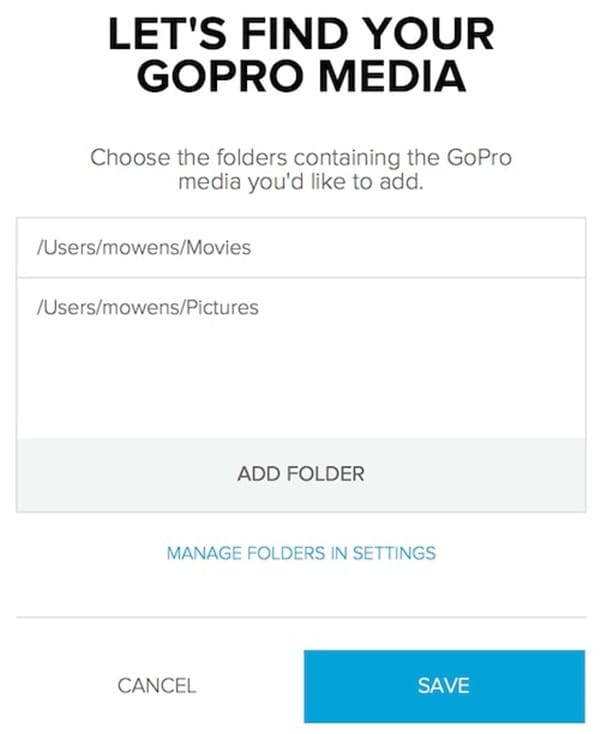
Step 2: Once you have your Media Folder, use the Windows File Explorer to transfer video from GoPro manually. Select the files you want to in your Quik and copy them. Keyboard shortcut: Ctrl + c.Browse to your Media Folder location and paste with Ctrl + v.
Step 3: On your Quik general settings window, click on Scan. Once scanning ends, click on the Back to Media button and return to the media library. Click on the Recently Added button and view your videos.
Note: Some people prefer to drag and drop files from one folder to another as opposed to keyboard shortcuts.
Part 4. Bonus Part: How to Edit GoPro Videos after Downloading GoPro Videos
Now that you have completed downloading your GoPro videos to your PC, you can enjoy your videos, or you can open them in a video editor and unleash your magical skills. You can consider using Wondershare UniConverter as it is not only helpful as a GoPro video download software but can also come in handy for editing your videos. So, how to do it?
 Wondershare UniConverter
Your Complete GoPro Video Toolbox

- Edit GoPro videos by trimming, cropping, cutting, applying effects, and other features.
- Adjust GoPro video parameters like resolution, frame rate, and other parameters to reduce the size.
- Convert GoPro video to over 1000 formats, like AVI, MKV, MOV, MP4, etc.
- Convert GoPro video to an optimized preset for almost all devices.
- 30X faster conversion speed than other common converters.
- Burn GoPro video to playable DVD with attractive free DVD template.
- The versatile toolbox includes GIF maker, DVD burner, and screen recorder.
- Supported OS: Windows 10/8/7/XP/Vista, macOS 11 Big Sur, 10.15 (Catalina), 10.14, 10.13, 10.12, 10.11, 10.10, 10.9, 10.8, 10.7, 10.6.
Step 1 Launch the Wondershare UniConverter on your PC and add files under the Converter section. You will find three editing options: Trim, Crop & Effect.
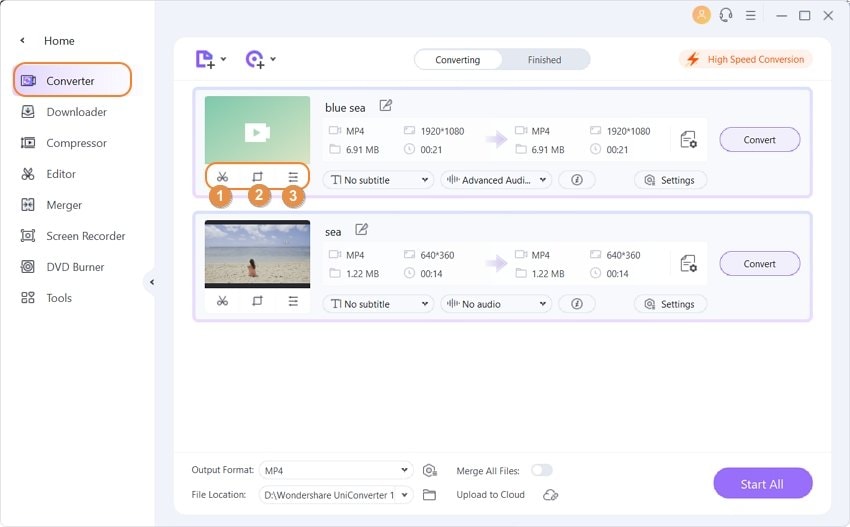
Step 2 Trim your video: Open the trimming window by clicking on the Trim button. You can trim in any way you want:
- Trim from the start/end:
Hang your mouse at the start/end of the video, click on Cut to split the video into two parts, and select the part you want to trim and click on Delete. Click on OK to proceed.
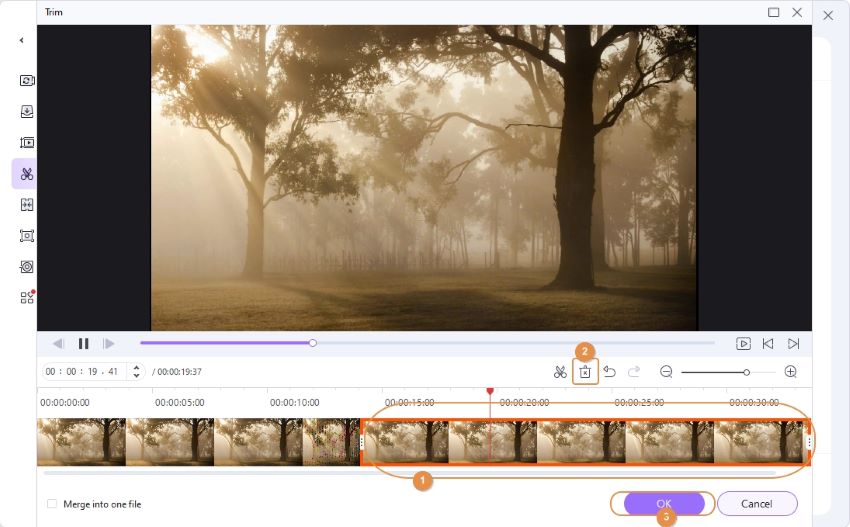
In the case of Windows OS, you can glide your mouse along the time-slider, and when an icon appears, click on it and write the exact time you want to trim. In a Mac, you can write it down directly at the space above the slider that shows the time.
- Trim from the middle:
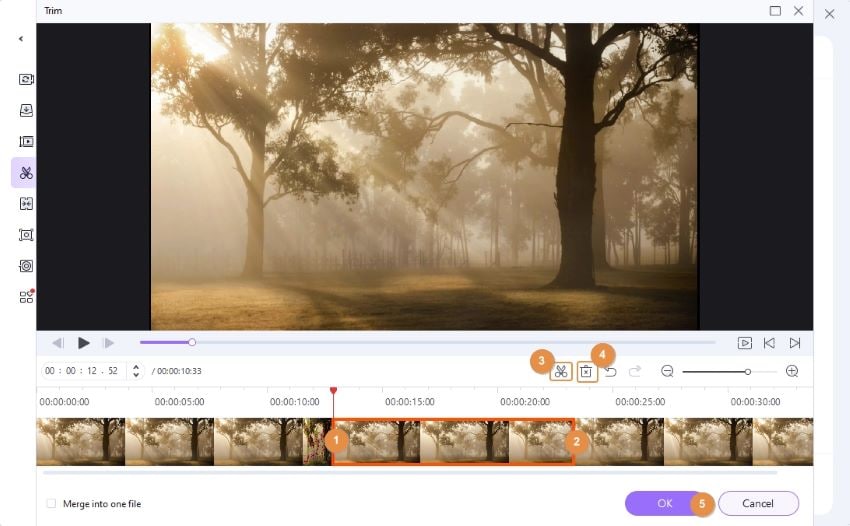
Move your mouse to the start point of the part you want to trim, click on Cut and drag to the endpoint and click Cut again. Click on Delete to trim the unwanted part, then the OK button, and proceed.
- Trim out unwanted parts and merge into one:
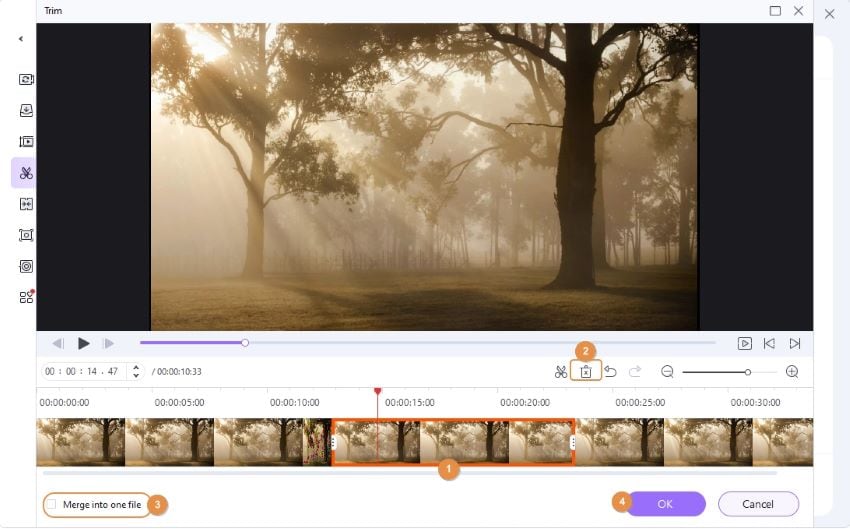
Choose the unwanted part(s) in the same way as before. Press Delete to remove unwanted parts. Check the Merge into one file check-box at the bottom left, OK, and proceed.
- Trim long videos into short clips:
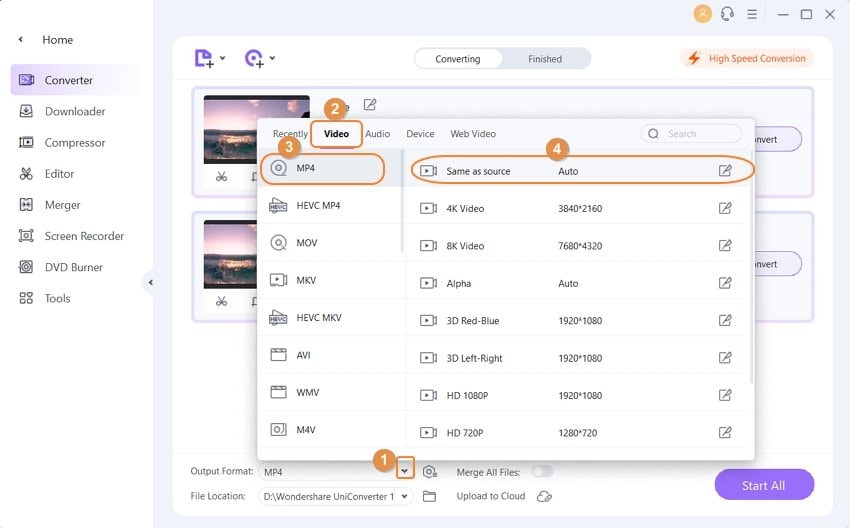
Drag the time-slider with your mouse to where you want to trim and press Cut. Repeat this to make all the short clips you want. Lets say you want five short clips, click on OK and proceed. After you have finished trimming, click on the drop-down menu by the Output Format: option and select the video format. Click on Start All, and your job is over.

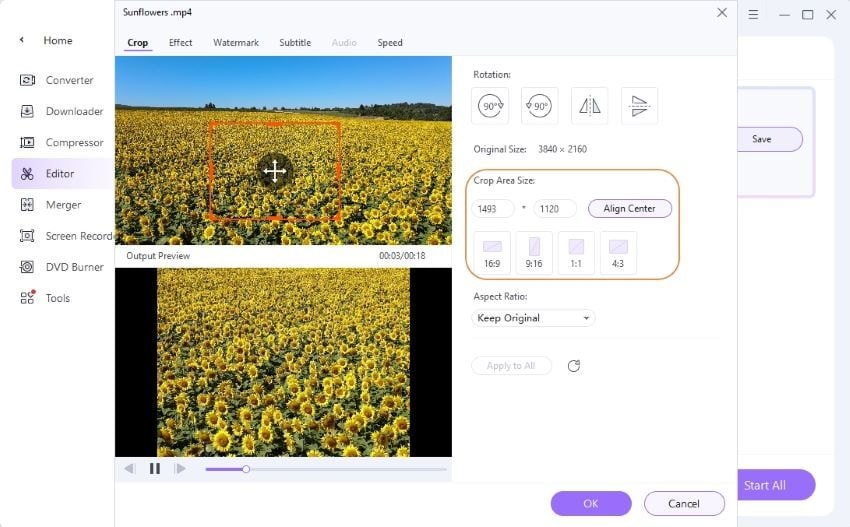
Step 3 Crop your video. Click on the Crop button to open the cropping window. Rotate your video clockwise, anti-clockwise, horizontally, or vertically by clicking on the respective button beside the preview canvas;
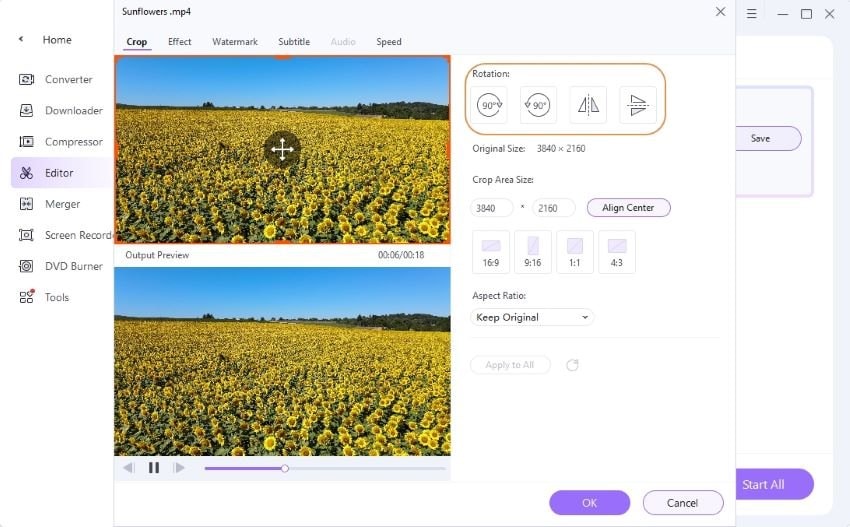
Crop your video size either by entering the width and height value you want or by dragging the mouse along the corner of the video frame;
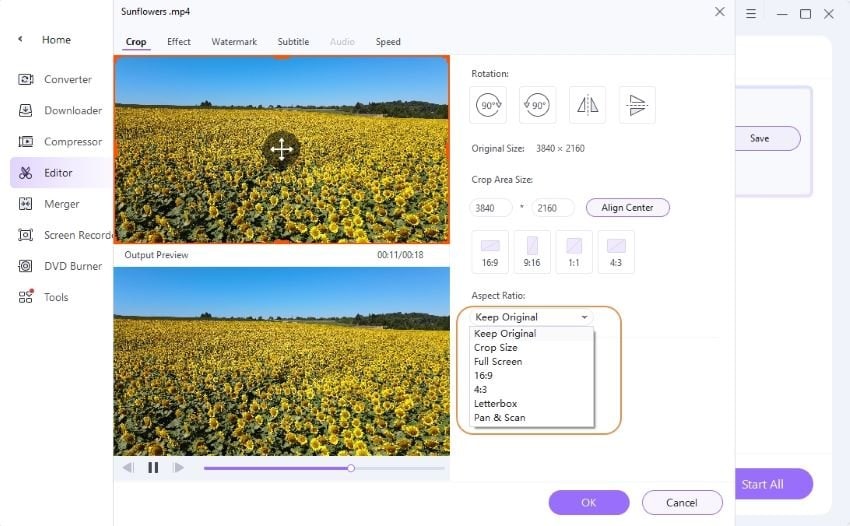
Click on the drop-down menu underneath the Aspect Ratio option to adjust the video ratio from many cases;
Click on OK to save all the changes. Press Reset to set at default;
In the same way as before, select the video format and press on Start All to complete.
Step 4 Add Effects to Your Video.
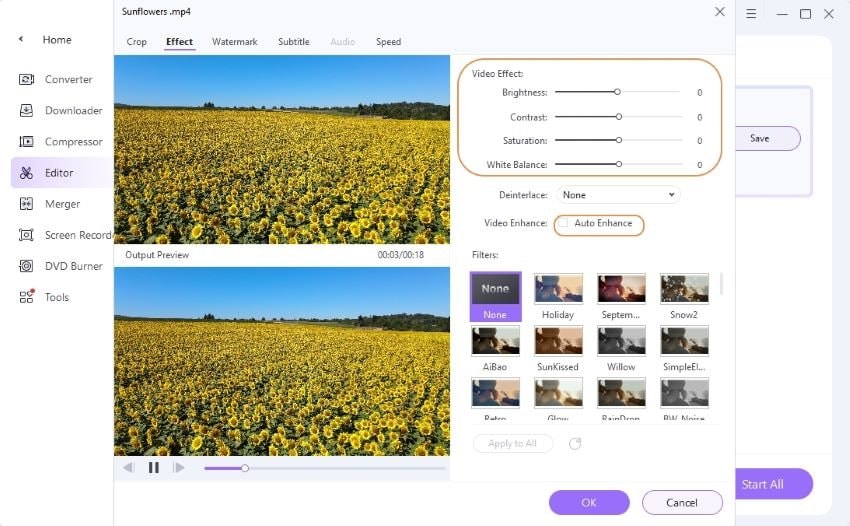
The Effects window opens when you click on the Effects button right next to the Crop button. To adjust effects, you can manually set the brightness, saturation, contrast, and de-interlace, or you can check the Auto Enhance check-box underneath them. You can add filters from the filters library with 19 mostly used filters;
Once again, save your work by converting it as before. As you hit THE Start All button and your edited video will get saved, and you can now enjoy it.

Tips
If you want to burn GoPro videos to DVD, just move to Burn videos to DVD Easily to learn more.
Conclusion
So, now that you know how to download GoPro videos to computer and how to edit them using the Wondershare UniConverter, I believe you will have no worries. Go through the steps explained above carefully before you start doing your thing. GoPro video download must be a piece of cake for you by now.

Christine Smith
chief Editor