GoPro Tips
- TRY IT FREE TRY IT FREE
- 1. Edit GoPro+
-
- 1.1 Edit GoPro Videos on Mac
- 1.2 Download GoPro Videos
- 1.3 Edit GoPro Video
- 1.4 Gopro Studio
- 1.5 Rotate Gopro Video
- 1.6 Gopro Photo Editor
- 1.7 GoPro Video Format
- 1.8 GoPro Quik
- 1.9 GoPro Cineform Studio
- 1.10 GoPro Quik Alternative
- 1.11 GoPro Tutorial
- 1.12 GoPro 4k
- 1.13 How to Connect GoPro to Mac
- 1.14 GoPro Instagram
- 1.15 How to Flip GoPro Video
- 1.16 GoPro Video Player
- 1.17 GoPro Time Lapse Video
- 1.18 GoPro Video Stabilization
- 1.19 GoPro Live Stream
- 1.20 GoPro Live Stream Youtube
- 2. GoPro Software+
-
- 2.1 GoPro Software
- 2.2 GoPro Video Editor
- 2.3 Gopro Studio VS Quik
- 2.4 Quik Video Editor
- 2.5 Camera GoPro 4k
- 2.6 GoPro Underwater
- 2.7 GoPro Desktop App
- 2.8 Gopro App Download
- 2.9 Gopro Desktop Software
- 2.10 Gopro App for Mac
- 2.11 Gopro Software mac
- 2.12 Gopro Video Editor for Mac
- 2.13 Gopro Video Converter
- 2.14 GoPro Editing App
- 2.15 Free GoPro Editing Software
- 2.16 Video Stabilization Software
- 3. Other Tips& Tricks+
Review on GoPro Studio vs Quik
by Christine Smith • 2026-01-21 18:46:09 • Proven solutions
However, best the GoPro camera may be, you always need additional editing tools for pro video editing. As the best facilities available, we came up with GoPro Quik and GoPro Studio for GoPro video editing. You can see an overview of GoPro Studio vs. Quik in this article and compare both the software easily with the comparison given below. For further facility and ease of use, we have also suggested the best alternative to it and even GoPro Quik review. So, stick with the whole article to know that alternative.
- Part 1. Overview on GoPro Quik and GoPro Studio
- Part 2. A Comparison Table between GoPro Quik and GoPro Studio
- Part 3. Best GoPro Quik/Studio Alternative to Edit and Convert GoPro Video
Part 1. Overview on GoPro Quik and GoPro Studio
GoPro Quik App Review
URL: https://gopro.com/en/in/shop/softwareandapp/quik-%7C-desktop/Quik-Desktop.html
Quik is an official product designed by GoPro. The software provides the easiest method to enjoy GoPro videos and photos. Installation of Quik requires the latest versions, so if you are working on the older version system, Quik is not for you. However, the program is excellent for selecting your GoPro footage and quickly edit it.

Features:
- GoPro Quik contains the 'HiLights’ option to help you find the best moment in your video to edit it quickly.
- You can apply graphs and gauges to show speed, GPS path, elevation gain, and more while shooting videos such as snowboarding, skydiving, etc.
- Subscription to GoPro Plus contains a pool of soundtracks to help you connect unlimited music in the video.
Pros:
- Easy to share files
- Good range of trimming tools
- Also includes features such as fisheye correction
Cons:
- High system requirements
So, this was a short, GoPro Quik app review.
GoPro Studio App Review
URL: https://gopro-studio.en.softonic.com/
GoPro Studio is a multimedia app made to edit GoPro videos with simple features. By using this software, you can add or remove music, trim unwanted sections, create fast or slow motions, add graphics and text, and much more. Unlike other complicated programs, GoPro Studio is quite simple to operate.
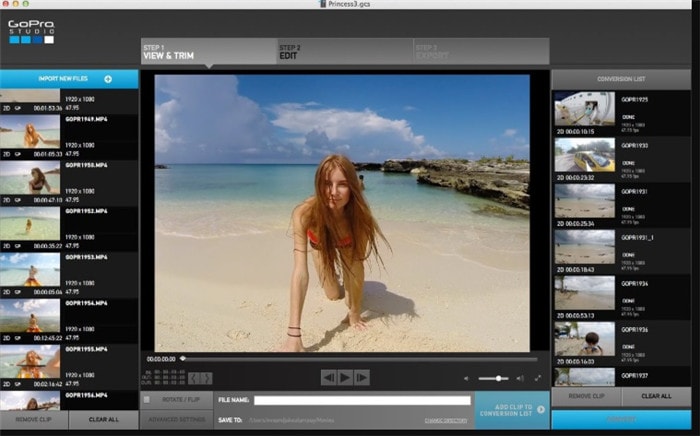
Features:
- Also, export and Time-lapse playback sequences of photos as videos.
- Its editing templates help you edit the videos with good edit points, dialing the music, adding titles and music, and audio tracks.
- GoPro Studio Dual Hero System also assists you in editing those immersive 3D videos.
Pros:
- Supports other cameras along with GoPro
- Simple interface
- Engaging editing styles
Cons:
- Cannot remove background noise
Part 2. A Comparison Table between GoPro Quik and GoPro Studio
Let’s make a discussion on GoPro Quik vs Studio as both are looking so similar and confusing in features.
| Features/File Format | GoPro Quik | GoPro Studio |
|---|---|---|
| Input support | It can only edit videos taken on the GoPro camera. | It also supports other cameras such as Nikon, Canon, etc. |
| Edit Templates availability | Not available | Available |
| Adding watermarks/subtitles/filter effects | Not available | Available |
| Changing playback speed | Cannot change | Can change |
| Adjusting fisheye | Not possible | Possible |
Part 3. Best GoPro Quik/Studio Alternative to Edit and Convert GoPro Video
Now that you have an understanding of GoPro Studio vs. Quik, you should also consider a better alternative to GoPro editing. Well, the Wondershare UniConverter software stands well in the competition and helps to edit GoPro videos in the following steps.
 Wondershare UniConverter - Best GoPro Video Editor Mac/Windows (Catalina Included)

- Convert GoPro videos to 1000+ formats with high-quality output
- Customize GoPro 4K videos by changing resolution, bit rate, encoder, frame rate, etc.
- Edit GoPro videos with trimming, cropping, rotating, adding subtitles, and more others
- 90X faster conversion speed than common converters with unique APEXTRANS technology
- Burn GoPro videos to DVD or Blu-ray disc with free DVD menu templates
- Transfer videos from computer to iPhone, iPad and other devices directly and vice versa
- Versatile toolbox: Add video metadata, GIF maker, video compressor and screen recorder
- Supported OS: Windows 10/8/7/XP/Vista, Mac OS 10.15 (Catalina), 10.14, 10.13, 10.12, 10.11, 10.10, 10.9, 10.8, 10.7, 10.6
Step 1 Download and Install Wondershare UniConverter
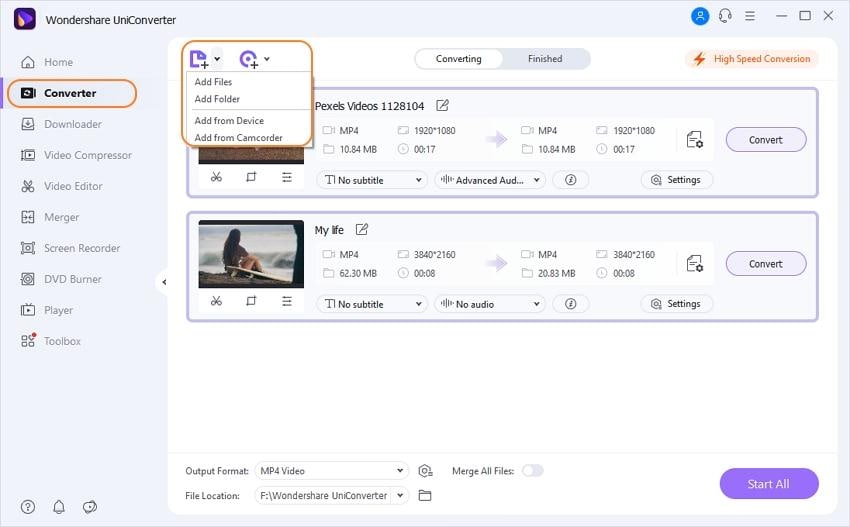
Download the program from the official website and install it upon your computer system. It will take a few minutes to install the software. First of all, upload video files you want to edit by clicking the Document icon. Proceed with further steps to trim, crop, apply effects and add watermarks on the video.
Step 2 Trim Videos
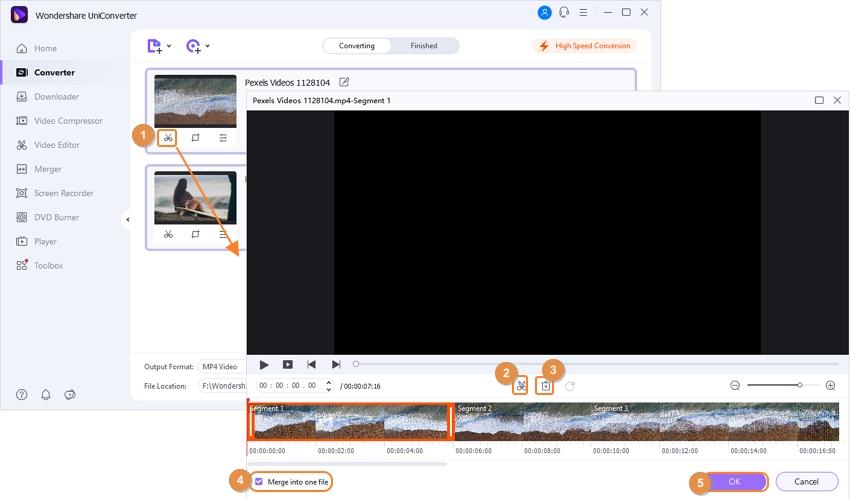
From the three options given below the video, select the first Trim icon. It will open you a trimming window. You have to adjust the slider on the video to be trimmed and hit the Cut button to make a new segment of the trimmed video. All the trimmed videos will be visible in individual parts. Tap the Delete button to remove the particular trimmed segment.
Choose the option Merge into one file from the file if you want to make a single file from the trimmed segments. Lastly, hit the OK button to confirm all the editing made.
In the next step, go to Output Format at the bottom-left corner. Choose Video and then select the format you want the video to convert. Then, click Start All tab to start the process.
Step 3 Crop Videos
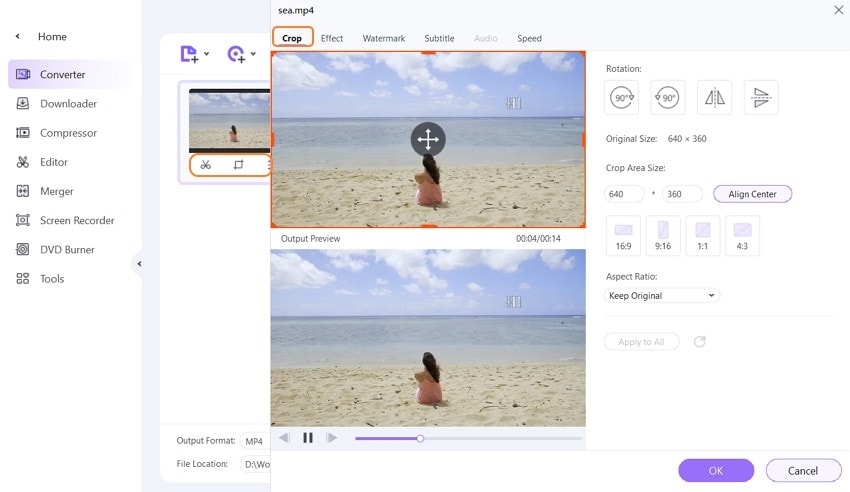
Select the middle crop icon from the three options. Adjust the rotation of the video firstly before you crop it. You can rotate the video 90 degrees either clockwise or anticlockwise. Or, flip vertically or horizontally. To see the difference, you can refer to the original preview and output preview window. Then, head over to select the crop area size.
Adjust the aspect ratio given below the option of crop area size. In the aspect ratio, you can set to Rotation, Original Size, Crop Area Size, and Aspect Ratio. Hit the OK button after making all the changes.
Here, go to Output Format at the bottom-left corner. Choose Video and then select the format for your video conversion. Then, click Start All tab to start the process.
Step 4 Apply Effects
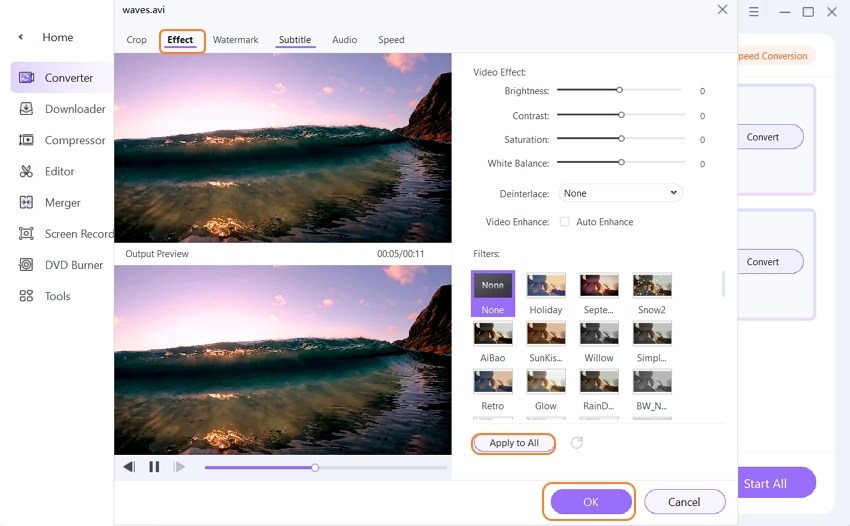
Click the Effects icon on the right side of three options. A new effects window will appear in front of you to make different changes. Here, you can choose to set contrast, brightness, saturation, enhance, or deinterlace. There are a total of 19 different options available to set the video filters. Click Apply to All to save changes. Then, hit the OK button.
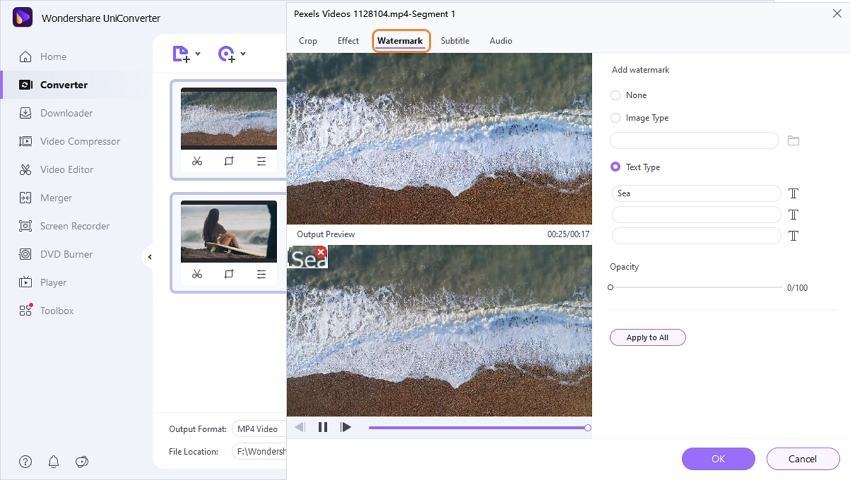
Adding watermarks is a cakewalk with the Text Type tab on the video. Click the T sign to set the format, size, and color of the text.
Again, like in the above segments, go to Output Format at the bottom-left corner, select the Video, and then the format you want your video to get converted. Finally, as above, click Start All tab to start the process.

Tips
Conclusion
Hopefully, you have better analyzed the comparison of GoPro Quik vs. Studio and the GoPro Quik review as well. So, now, I am sure you are capable enough to consider their best alternative as Wondershare UniConverter.


Christine Smith
chief Editor