Wondershare UniConverter
-
 Convert audios/videos to 1,000+ formats, including AVI, MKV, MOV, MP4, etc.
 - 30X faster conversion speed than other common converters
- Edit videos with trimming, cropping, merging, adding subtitles, and more

MP4 Tips & Tricks
- TRY IT FREE TRY IT FREE
- 1. Edit MP4+
- 2. Play MP4 on Different Devices +
- 3. Best MP4 Converters/Editors +
- 4. Other MP4 Tips +
All Topic
- AI Tools Tips
-
- AI Photo Enhancer Tips
- Voice Changer Tips
- AI Thumbnail Maker Tips
- AI Script Generator Tips
- Smart Summarizer
- AI Subtitle Generator Tips
- Watermark Remover
- Vocal Remover Tips
- Speech to Text Tips
- AI Video Tips
- AI Image Tips
- AI Subtitle Translator Tips
- Video Extractor Tips
- Text to Speech Tips
- AI Video Enhancer Tips
- DVD Users
- Social Media Users
- Camera Users
- Photography
- Creative Design
- Movie Users
- Travelling Fans
- Educational Users
- More Solutions
- Holidays and Commemoration
- Game Lovers
- Other Tips
How Can I Edit My MP4 with Adobe Premiere by Different Ways
by Christine Smith • 2026-05-20 17:32:14 • Proven solutions
It has been previously announced that Adobe Premiere does work with and support MP4 files. However, the MP4 files setting and codec might differ from other MP4 files that we have saved or exported from various devices, players or programs. Therefore, you might still be prompted by an error message reading an unsupported format or damaged file. If you are currently using an earlier version of the Adobe Premiere, most people would recommend you to upgrade it to the latest version, so it would recognize the MP4 file. It might not necessarily work in all cases as you might experience video glitches (i.e. such as slow playback speed or screen crash).
Another method tried and tested by users of Adobe Premiere to ensure MP4 files work is to either rename the MP4 files directly as an MPG, MOV, M4V or convert them to file types or formats that are compatible. The former is not the best option as the quality of the videos is not good enough for web use. Hence, we're going to share 2 effective solutions here to enable edit MP4 with Adobe Premiere.
- Part 1. How to export an MP4 video from old version of Adobe Premiere that doesn’t support MP4
- Part 2. How to export an MP4 video from adobe Premiere Pro directly
Part 1. How to export an MP4 video from old version of Adobe Premiere that doesn’t support MP4.
Undoubtedly, it would be better if you can convert the MP4 files with any video converter that you have handy on your PC. If not, you can probably try out the Wondershare UniConverter (originally Wondershare Video Converter Ultimate). UniConverter can certainly help you to convert your MP4 files to a format that’s accepted and supported by Adobe Premiere for your editing purpose like AVI, MOV, etc.
Wondershare UniConverter
-
Convert video to over 1000 formats, including MP4, AVI, WMV, FLV, MKV, MOV and more.
-
Edit, enhance & personalize your video files.
-
Burn and customize your DVD with free DVD menu templates.
-
Download or record videos from 10,000+ video sharing sites.
-
Industry-leading APEXTRANS technology converts videos with zero quality loss or video compression.
-
Versatile toolbox combines video metadata editor, GIF maker, video compressor, and screen recorder.
Steps on How to Export MP4 Video Supported by Adobe Premiere:
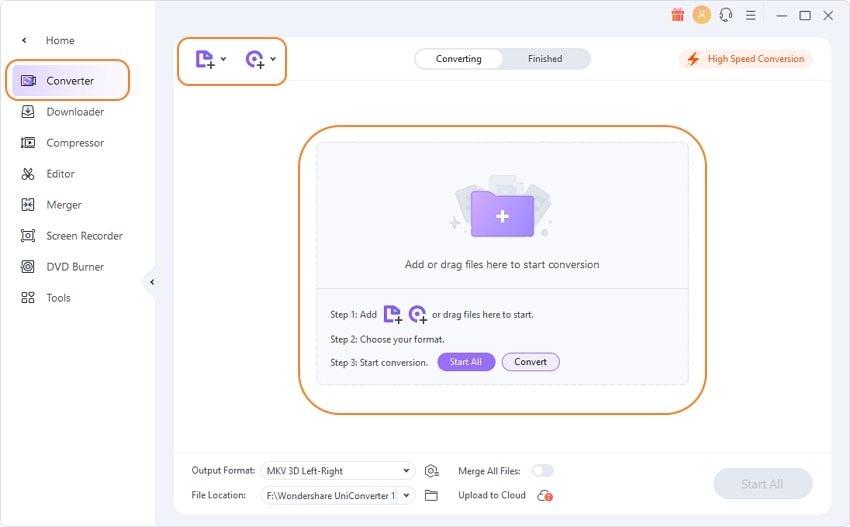
Step 1 Upload the MP4 files you want to edit.
Launch the video converter and then click the ![]() in order to add the files you want to convert. You can add several files in one go as the converter supports batch conversion.
in order to add the files you want to convert. You can add several files in one go as the converter supports batch conversion.
Step 2 Select your output format supported by Adobe Premiere.
Click the drop-down arrow beside Output Format: section, then select Video tab to choose Adobe supported format like MOV, AVI, WMV, etc. in the left sidebar and select the video resolution from the right section.
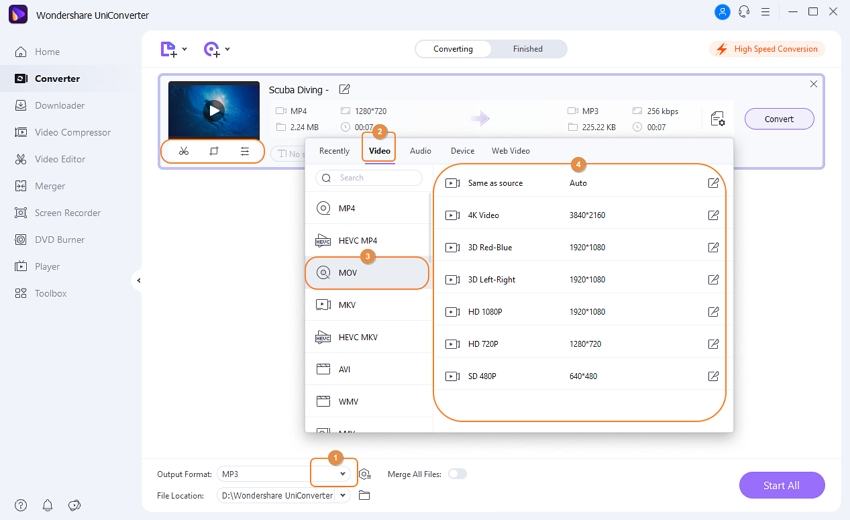
Note: Click the Create and you'll able to make further settings for video parameters, such as encoder, frame rate, bitrate, etc.
Step 3 Start MP4 conversion.
Hit the Start All button when everything is set and it will start MP4 conversion immediately.
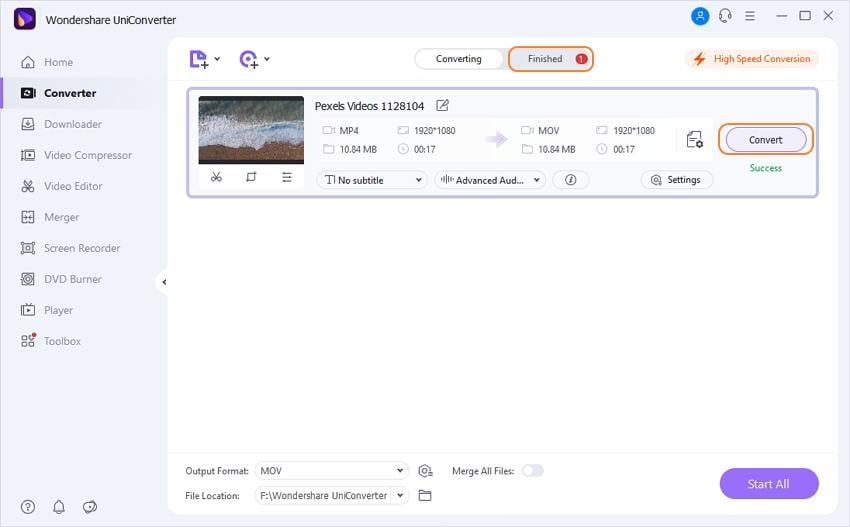
When the conversion process completes, you will see the converted files under the Converted tab. You can open the converted .mov file by clicking the file folder.
Part 2. How to export an MP4 video from adobe Premiere Pro directly.
It is no longer news that Adobe Premiere Pro can let you create MP4 videos that can be exported to other devices. While there are numerous problems that can arise during the export process, many of these issues can be traced back to some improperly set up exports. To avoid some of these issues arising from a botched export, it is important to make sure that your output settings match with your sequence settings and double-check it to be true. Exporting an MP4 video is not an exception, it still follows the process of selecting file, export, and media. The steps below will show us how to export an MP4 Video from Adobe Premiere Pro.
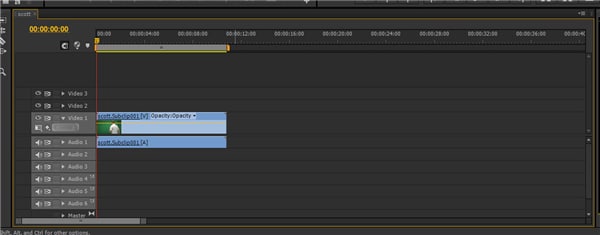
Step 1 Select the sequence.
You have to select the sequence you want to export in the timeline panel.
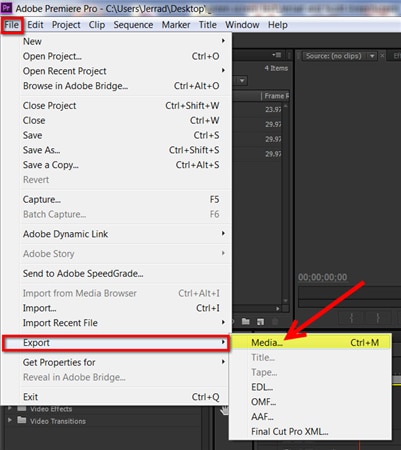
Step 2 Export the Media settings.
Select File > Export > Media from the menu bar.
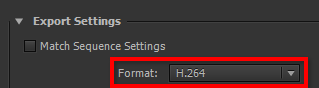
Step 3 Export Setting - Format.
Select on the right side of the export setting window. Note that will create an MP4 video file that is playable on most smartphones, tablets, and computers.
Step 4 Export Settings - Preset.
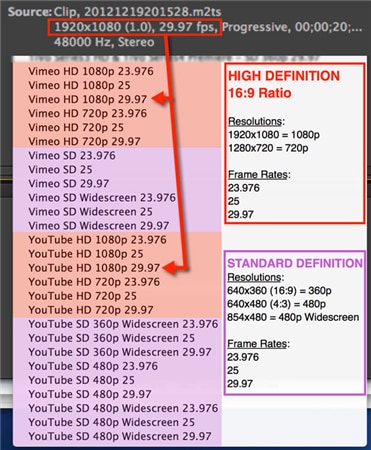
If we are exporting our MP4 video to web platforms like Vimeo and YouTube, then move your mouse to the bottom of the giant list of option and click on the black upside-down menu from the preset dropdown. Then move further down the list to the YouTube options.

Choose the best output based on your sequence.
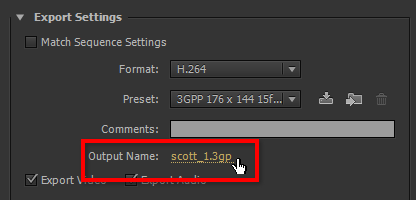
Step 5 Export Settings - Output Name.
Click on the output name to save the file and set it up on your hard drive. It is important to note that Adobe Premiere Pro always default to the last location that export as saved. You will have to double-check the save location by clicking on the output name so as not to search for the file later.
Step 6 Export Setting - Export or Queue.
Exporting an MP4 Video should be done when you are doing all your work and not intending to carry out more tasks on the computer. This is because the export task requires a whole lot of memory and as such all programs should be closed while the task is running.
If you choose Export, click the Export button at the bottom and start exporting the file.
Choosing the Queue button means you want to continue working with a plan of exporting the file at a later time. Click on Queue to send the export video file to Adobe media Encoder program which allows the export of videos in batches at a later time.

Step 7 Ensure you play before you upload.
Do not just upload it to YouTube immediately. It is advisable to play it on your computer to ensure that what you want to upload is of the highest quality that you expect to present for your viewing audience.
Note: Should you have your computer freeze or slow when exporting, you might need to turn off all programs except Adobe Premiere Pro.
Your complete video toolbox

Other popular Articles From Wondershare


Christine Smith
chief Editor