
When you are working towards polishing a podcast, fine-tuning a voiceover, or cleaning an important lecture recording, unnecessary echo is troublesome. For this purpose, a great option will be to use the Audacity echo reduction feature to clear out this sound. However, when using Audacity, you may have to deal with several limitations like no de-reverb effects built-in, eliminating noise after the recording, etc.
If you need a one-stop AI Audio Denoiser software, use Wondershare UniConverter because it makes the whole denoising process easier. In this article, you'll learn about the various problems arising from background noise and the best removal techniques.


Best AI Echo Remover
In this article
Part 1. The Rising Problem of Background Noise: Echo and Reverb in Audio
Echo and reverb most often happen when you are recording inside a room with naked walls, wooden floors, and poor acoustics. Essentially, echo is the reflection that returns after meeting a hard surface, and reverb is the subsequent reflections that remain after the sound. You can easily deal with them using the Audacity echo removal, but the main reasons behind these are as follows:
- Muddy Vocals: Echo and reverb produce vocals, which makes the speech less intelligible and becomes an issue for podcasters and voiceover actors.
- Distract Listeners: When the audio is distorted, the listeners would not be able to enjoy their audiobooks, video recordings, and more.
- Reduce Speech Clarity: If you have a fast or soft-spoken person recording for a shoot or video clips, these two lose their speech clarity.
- Editing Headaches: It’s a pain for audio editors to handle echo and reverb and apply a consistent audio treatment across the whole clip.
Part 2. Audacity Echo Reduction: All Possible Techniques
There are various noise reduction tools you can find in Audacity to achieve a smooth recording. Following is some of the best methods that you can try to remove echo in Audacity:
Technique 1. Audacity Echo Removal via Noise Reduction
The echo reduction in Audacity is designed to remove steady background sounds, such as fan hum or low-level static, to produce a smooth recording. In addition, it can also decrease mild echo with some manual adjustment, particularly in recordings that have a relatively uniform echo. Therefore, let's find out about using the noise reduction in the following steps:
Step 1. Open the recording of the echo on Audacity, identify the desired confused portion, and go to the “Effect” icon on the top menu. Under the drop-down menu, click on the “Noise Removal and Repair” and then click on the “Noise Reduction” option.
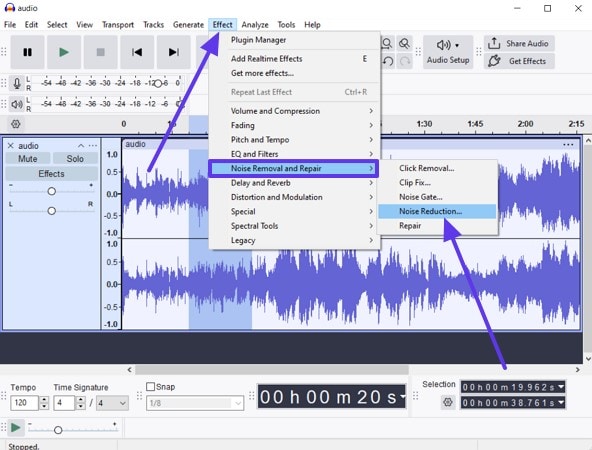
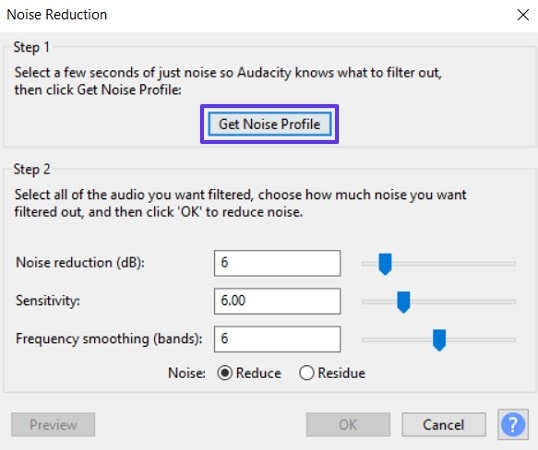
Step 2. Next, click the “Get Noise Profile” button under the “Step 1” section of the “Noise Reduction” dialogue box.
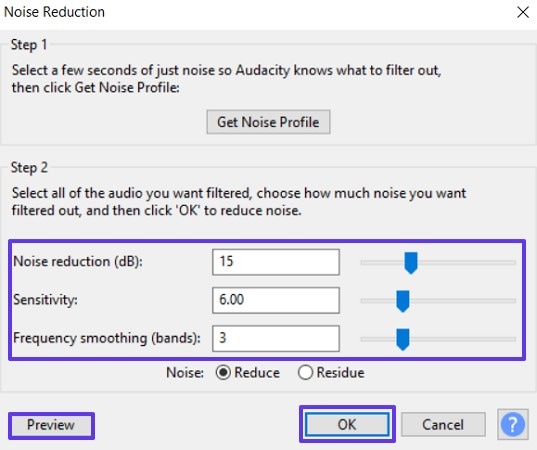
Step 3. After this option, select the whole recording along with the already chosen clip, and go to the “Noise Reduction” dialogue box again. Adjust the “Noise Reduction (dB)” to 12-18, “Sensitivity” to 4-6, and “Frequency Smoothing (bands)” to 3-6. Press the “Preview” button, and if satisfied with the adjustment, hit “OK.”
Technique 2. Echo Reduction Audacity With Noise Gate
Audacity removes echo, reverb, and more with its Noise Gate feature that works by silencing audio that falls below a certain volume threshold. It can remove trailing echoes that arise when you leave space between words or sentences, making the sound clear. Now, let's proceed to the next steps and see how to minimize the echo from your audio recordings:
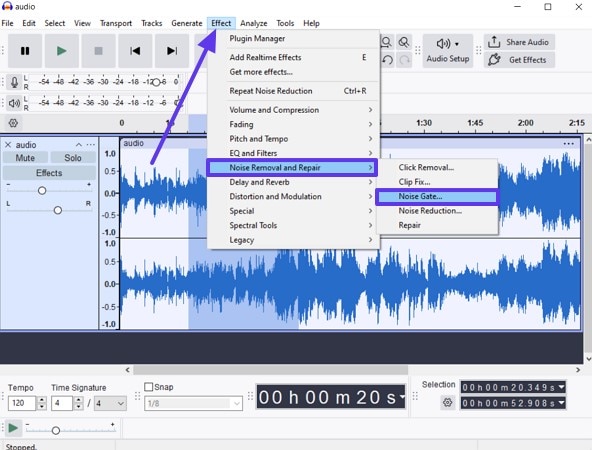
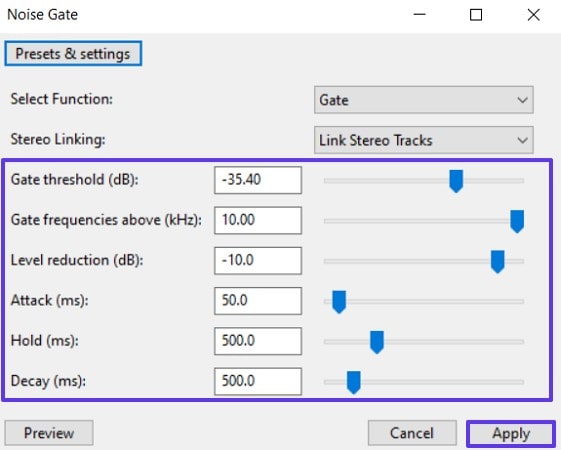
Step 1. Launch Audacity, open the echo-filled recording clip and access the “Effect” tab. Hover the mouse over “Noise Removal and Repair” and select the “Noise Gate” option.
Step 2. Inside the very small “Noise Gate” box, you must adjust the “Gate Threshold (dB)” from -30 to -40. Set “Gate Frequency above (kHz)” to 10, adjust “Level Reduction (dB)” to -10, and set “Attack” to 50 to 100 ms. Then, adjust the “Hold” and “Decay” to 500 ms, and click “Apply.”
Technique 3. Audacity Remove Reverb Using a Dereverb Plugin
There is no such built-in feature for Audacity to remove reverb, but you can download a third-party plugin. The plugin will help analyze the sound, subtract reflective characteristics from your audio, and produce streamlined audio. Moreover, you can create an accurate reverb profile through mentioned steps with no need for manual adjustments with the latest version of the plugin:
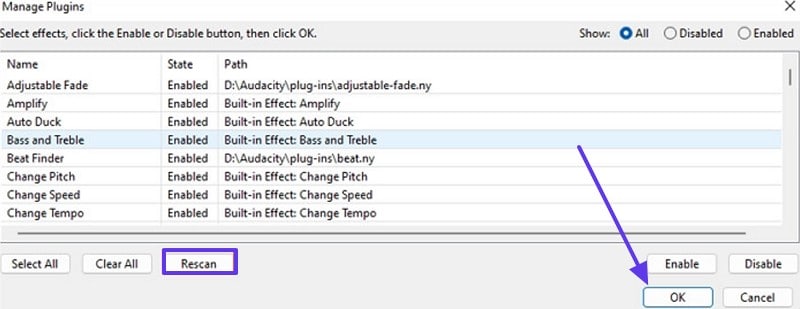
Step 1. First, download the suitable plugin from online, and drag the downloaded dereverb remover from the folder onto the software. After that, go to “Effect,” choose the “Plugin Manager” option, hit “Rescan,” and press “OK.”
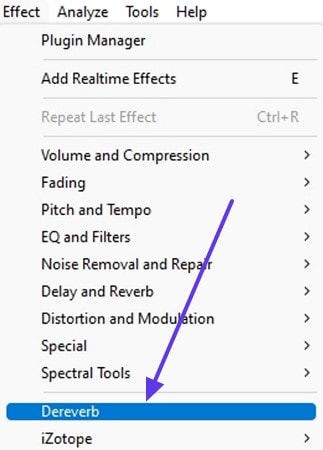
Step 2. Moving forward, open the audio with reverb and choose the “Dereverb” option from the “Effect” tab.
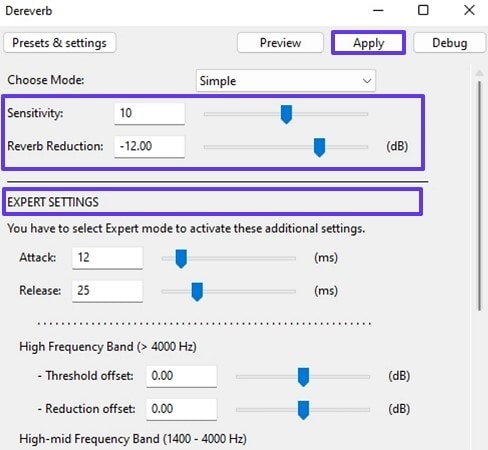
Step 3. Next, change the “Sensitivity” and “Reverb Reduction” options to 10-12 units. Now, under the “Expert Option” section, customize the “Attach,” “Release,” and other frequency choices to suitable ms and dBs. When satisfied, hit the “Apply” button and listen to the audio to later “Export” it.
Part 3. Limitations Common Users Face When Trying to Remove Echo in Audacity
As discussed earlier, the Audacity echo reduction feature is limited to various options that can cause editors to look for other software. The following are some of those limitations that you can face while removing echo in Audacity:
- Manual Trial and Error: You simply can't press a single button to achieve the optimum settings for echo removal in Audacity. There are no methods to adjust various effects, such as EQ and compression.
- Inconsistent Results: If you're not going to spend all day changing things and manually correcting, the results are going to be really different because of the echo. Additionally, with Audacity you might end up with robotic or unnatural-sounding audio.
- Plugin Compatibility Issues: The Audacity echo removal requires a dereverb plugin that is not easy to install and can pose compatibility issues. Also, the different setups of this plugin won't fully support Audacity’s interface.
- Learning Curve: Audacity is not ideal for beginners as it is hard to grasp audio concepts such as frequency bands, decay times, and attack/release limits. Due to this steep learning curve, some users find it confusing.
- No Native Dereverb Tool: Audacity doesn't come with a built-in echo or reverb remover. Therefore, users rely on workarounds, external plugins, or indirect methods, such as gating, which aren't designed specifically for this task.
Part 4. Remove Echo/Reverb from Audios/Videos in One Click
Considering the multiple limitations of Audacity echo reduction, the perfect alternative solution is to use Wondershare UniConverter and its AI Noise Remover feature. Rather than doing it manually and yet not being able to get the best results, UniConverter does it automatically with one click. The software removes background noise from video and audio files and improves them to make them high-quality.
Other than that, it can even remove echo, hum, static, and even background wind noise to provide you with professional-level sound. The AI detects and removes background noise automatically without needing any complicated settings.
Best AI Echo Remover
Features
- Supported Audio/Video Formats: It is capable of supporting more than 1000 various audio and video file types, so you can filter out noise from any audio file.
- Types of Noise: Working with any kind of background noise is very easy, e.g., wind, rain, traffic, static, etc.
- Batch Mode: You can delete background noise from all video and audio files more quickly and with greater stability.
- Enhanced Audio: Along with removing unwanted echo and reverb from audio, users can use various audio features to enhance their audio clips.
Comprehensive Steps on How to Remove Unnecessary Background Noise from Audio Recordings
Go through the following easy steps and learn how to remove unnecessary background noises from audio using this software’s AI Noise Remover feature.
Step 1. Open UniConverter and Access AI Noise Reduction
Install the software, and from the main interface of UniConverter, head to the “More Tools” tab from the left panel. Now, under the “Audio” tab, click the “Noise Remover” feature to proceed.

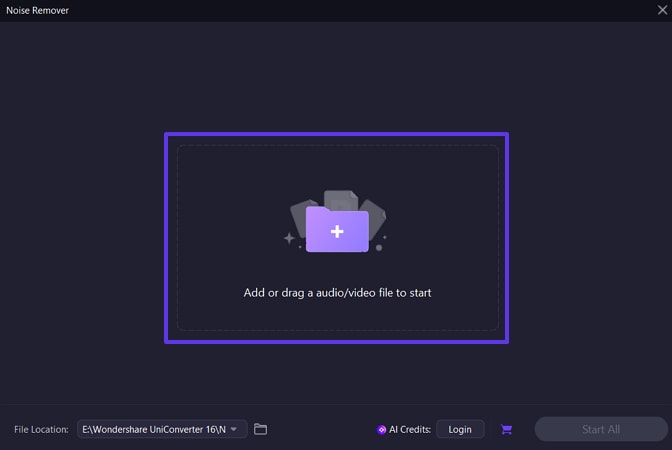
Step 2. Import Audio(s) For Echo-Reverb Removal
Afterward, press anywhere on the “Add or Drag an Audio/Video File to Start” area and import the distorted audio file.
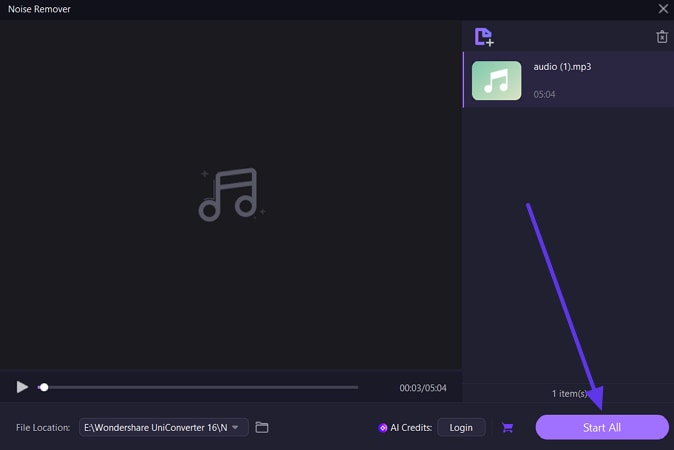
Step 3. Start the Automatic Removal Process
Once the audio is added, hit the “Start All” button to begin the automatic noise removal process, which gets downloaded onto your device.
Conclusion
In conclusion, this article sheds light on the matter of encountering echo and reverb noise in your audio recordings due to sound reflective surfaces, overlapping, and more. For that, we have explored the top 3 methods on how to utilize the Audacity echo reduction feature to remove noise. However, due to its various limitations, the recommended solution is Wondershare UniConverter and its automatic noise remover feature.

