This article presents a comprehensive discussion on “what video stabilization is” and how you can stabilize videos in CapCut on mobile and online.
Creating video-based content is the most effective way to attract your audience, customers, clients, or viewers. The reason behind this fact is that videos are the most powerful tools to attract the attention of the viewers. Video creators who wish to polish their skills and create professional content often get frustrated when they see shaky videos.
A shaky video can spoil everything. Therefore, a number of video stabilizers have been introduced to overcome this issue. CapCut is one of them. This article specifically focuses on how you can enhance video quality with the CapCut stabilizer. You will learn to stabilize videos on mobile phones, Windows, Mac, and online in this read. Let’s get into detailed specifics.
In this article
Part 1: What Exactly Does Stabilizing a Video Mean?
Suppose you have captured the beautiful moments from an unforgettable trip of your life, and you get to know that some of the videos you like are shaky. It definitely becomes frustrating. Right? Well, if this is the case, you are not alone. Millions of people from across the globe often face this issue and it is pretty common.
Removing jitters and unwanted shakes can help you enhance the quality of your video. This is what is known as video stabilization. A tool that improves the video quality by removing unnecessary shakes is called a video stabilizer. Now, you must be familiar with “what exactly video stabilization is.” Right? Let’s move forward.
Part 2: When Do You Need to Stabilize the Video?
Suppose you have visited a hilly area that is far away from your place and you plan to shoot a video of ice covering the mountains all around. You take out a high-quality camera from the bag and start capturing the natural scenes to cherish these moments later.
Once you record all the videos you wish and get back to your place, you sit back and play those videos to memorize those moments. When watching videos, you get frustrated to see that they are shaky. Then, you realize that you have captured all those scenes by moving the camera in hand. This is the most common reason behind the shaky videos.
You can’t visit that place again to recapture those scenes once more. This is when you need to stabilize the videos. Doing this removes shakes and makes videos look smooth while watching. Simply put, video quality is significantly enhanced.
Part 3: How to Stabilize Your Videos with CapCut on Phone?
Do you want to stabilize a shaky video on the phone? Searching for a reliable video stabilizer to get this job done? Look no further than CapCut.
CapCut was first released in 2019 by ByteDance. It is a powerful video editing tool that not only detects shaky portions in the videos but also removes them efficiently to make the video more appealing and smooth for all viewers. It is compatible with Android, iOS, iPad, Windows, and Mac.

Steps to Stabilize a Video On Your Mobile Using CapCut
To stabilize a shaky video on your mobile phone, all you need to do is follow the steps listed below.
Step 1: Download and install the CapCut video editor on your mobile.
Step 2: Launch the app and hit the “New Project” button, as shown below.

Step 3: Now, load the video you wish to remove the shakes from. Once you load it, go to the Timeline and click on the video. It will enable the editing options.
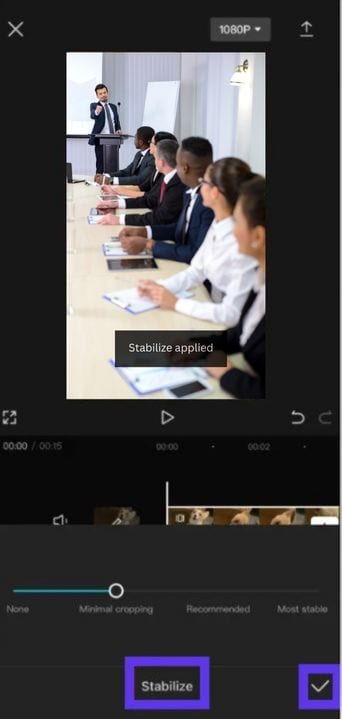
Step 4: Look for the Stabilize option and click on it, as shown below. It enables you to make the shaky video smooth. Once you adjust all the settings, tap on the tick icon.
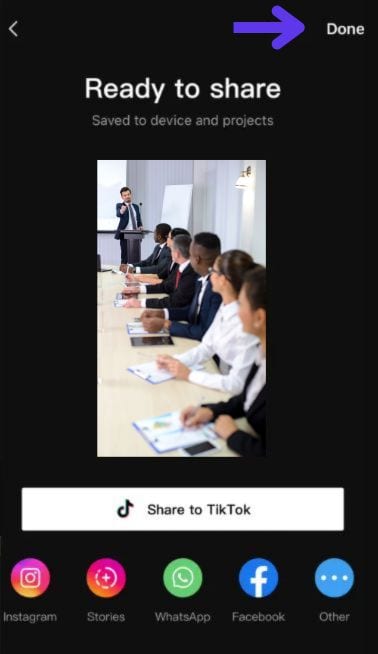
Step 5: Once the video is stabilized, you can share it on different platforms, including TikTok, Instagram, WhatsApp, Facebook, and more, as shown below. The CapCut app allows you to adjust the export setting, such as choosing the output format.
Part 4: How to Stabilize Your Videos with CapCut Online?
Would you prefer enhancing the quality of your video online? CapCut also offers an online video stabilizer to ease the job for you. This online tool is trusted by millions of users worldwide including some big names, such as Nvidia, Mobile Legends, and TikTok. One-click and gyroscope-based AI-powered video stabilization make CapCut online stand out in the market.

Steps to Stabilize a Shaky Video in CapCut Online
It is a simple and easy-to-follow 4-step guide. Let’s go ahead and see how it works.
Step 1: Visit the online CapCut stabilizer.
Step 2: Click the Upload button to upload a shaky video. Alternatively, you can drag the video directly on the interface.

Once the video is uploaded into the tool, you will see a message, “Generating…,” as shown below. CapCut online will automatically stabilize your video. Wait until the processing is completed.

Step 3: As soon as the video is stabilized, you will be able to see a preview. Play the video to see if unwanted shakes are removed successfully.

Step 4: Now, hit the Export button from the upper-right corner, as shown below.

CapCut online enables you to share videos across different platforms, such as TikTok, YouTube, Facebook, and Instagram. You can also download the video directly on your device.

Part 5: How to Stabilize Your Videos on Windows/Mac?
Are you looking forward to stabilizing your video on Windows or Mac operating systems? Look no further than Wondershare UniConverter. It is a powerful video stabilizer for PC and Mac. It offers support for over 1,000 video and audio formats. The incorporation of AI technology ensures lossless HD video processing and high-speed conversion.
The top features of UniConverter are elegant user interface, efficient video stabilization, merging videos, video conversion, video editing, video compressing, speech to text conversion, multi-format support, and the list continues.
The potential benefits of stabilizing a shaky video with Wondershare UniConverter are as follows.
- It does not compromise the quality when stabilizing your video.
- This software enables you to preview the stabilized video before you save it to your device.
- You can use this tool on both Mac and Windows devices.
Let’s now look at the steps required to stabilize a video with UniConverter.
Steps to Stabilize Videos with UniConverter on PC/Mac
A simple, 3-step guide is provided below. Ensure to follow all the steps with great attention.
Step1
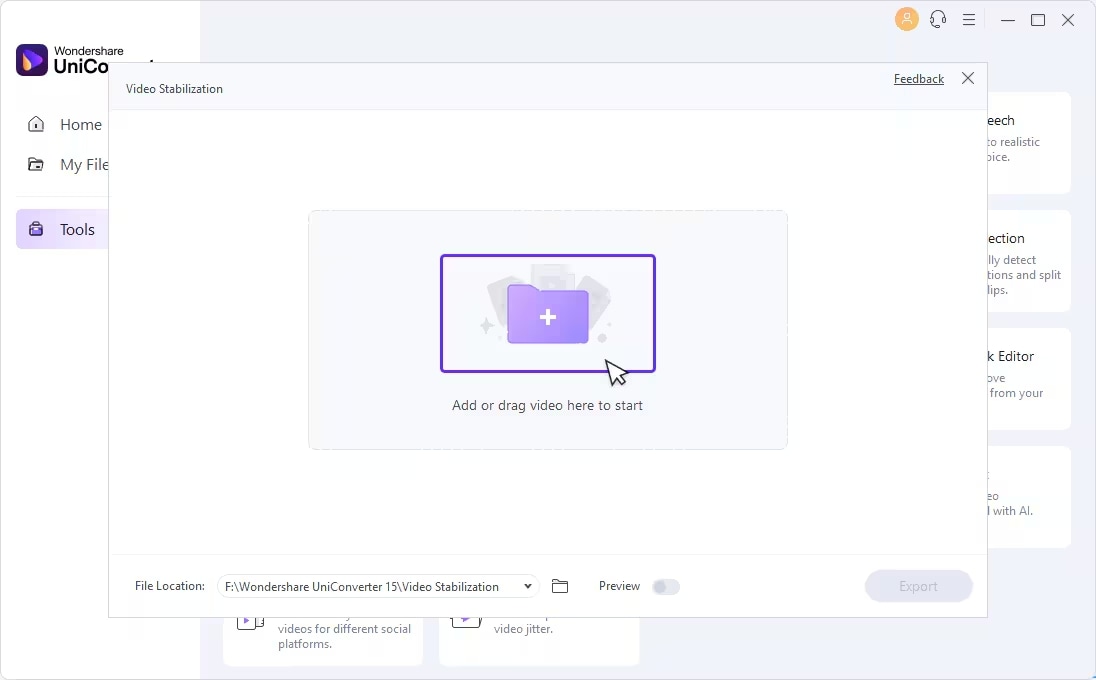
Launch Wondershare UniConverter on your device and choose Video Stabilization, as shown below. If you don’t have this feature installed, download it right away.

Step2
Tap on the “+” icon to load your shaky video into the tool. Once done, the video will be analyzed automatically.
Step3
Wait until the analysis is finished. Then, you can move the slider under “Crop scale” to reduce the video’s motion. If you want to change the edges of a stabilized video, you can choose any of the four options (None, Reflect, Tile, and Expand) under “Edge Processing.”
Once you make the desired changes, you can preview the video by enabling the Preview toggle button from the bottom of the screen, as shown below. If you are satisfied with the way UniConverter has stabilized your video, hit the Export button and save or share the file, keeping your requirements in mind.
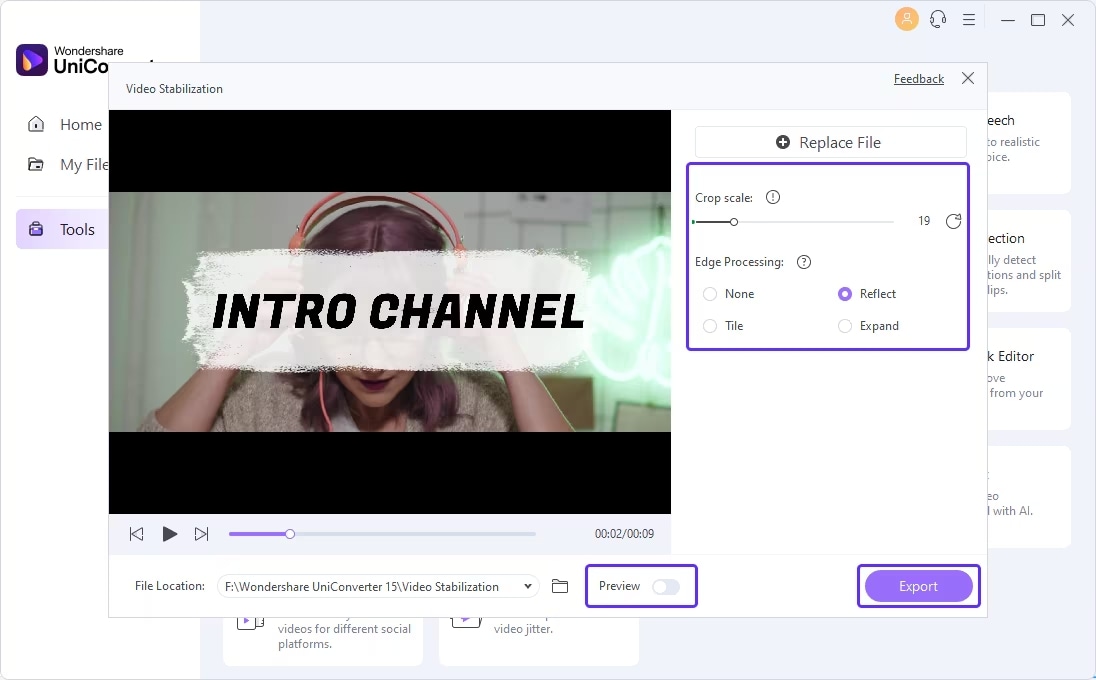
Carefully following the three steps listed above will perfectly stabilize your shaky video in no time with Wondershare UniConverter. Give it a try.
Conclusion
Do you want to make your shaky video smooth and clear? Need a tool with powerful stabilization algorithms? The CapCut stabilizer will be worth using. Whether you want to stabilize the video on an Android or an iOS device, CapCut is highly compatible with all. You can also use this tool to stabilize a video online.
If you prefer applying video stabilization algorithms on your PC or Mac, selecting UniConverter will be the best option. It not only identities unwanted jitters and shakes in your videos efficiently but also fixes them all without affecting the video quality. It allows you to reduce the video’s motion and change the edges to produce unmatched outcomes.


