

Posting a video to social media only to see important parts cropped or black bars ruining the frame is a common frustration for many iMovie users. When your footage looks perfect on your laptop or phone but appears distorted after editing, the issue usually comes down to aspect ratio settings. Knowing how to change the aspect ratio in iMovie helps you resize videos properly for different platforms or presentations.
With the right adjustments, you can keep your subject centered and make your videos look professional. This guide walks you through simple, practical steps to control video dimensions and achieve the perfect fit every time.
In this article
- What Aspect Ratios Does iMovie Support?
- How to Change Aspect Ratio in iMovie on Mac
- How to Change Aspect Ratio in iMovie on iPhone or iPad
- Pros and Cons of iMovie and Its Alternatives
- How to Easily Batch Change Aspect Ratios with UniConverter
- Common Problems When Changing Aspect Ratio in iMovie and Fixes
- Conclusion
- Frequently Asked Questions
Part 1. What Aspect Ratios Does iMovie Support?
iMovie supports several common aspect ratios through its project and cropping settings rather than fixed presets. By default, standard projects use a 16:9 widescreen format. It is ideal for modern displays and various streaming platforms. Moreover, you can adapt the video to different aspect ratios using this platform.
Differences Between iMovie on Mac and iMovie on iPhone/iPad
Although iMovie delivers the same core editing experience across Apple devices, the features and level of control vary depending on the platform. The table below highlights the key differences between iMovie aspect ratios on both platforms:
| Feature | iMovie on Mac | iMovie on iPhone/iPad |
| Aspect Ratio Control | Greater control using cropping, scaling, and project settings | Limited control, mainly optimized for vertical and square videos |
| Editing Interface | Timeline-based with precise frame-by-frame editing | Touch-based, simplified timeline |
| Video Orientation | Easily adjust horizontal and vertical videos | Auto-detects orientation with fewer manual options |
| Keyboard & Shortcuts | Full keyboard shortcuts for faster workflow | No keyboard shortcuts |
| Ease of Use | Better for detailed and professional edits | Ideal for quick edits and social media content |
Limitations of Aspect Ratio Control in iMovie
While iMovie makes basic video resizing easy, its aspect ratio handling has noticeable limitations on both Mac and iPhone/iPad. Mentioned below are some of the limitations that users who want to learn how to change the aspect ratio in iMovie might face:
No Direct Aspect Ratio Presets: You can’t select 1:1, 4:5, or 9:16 from a menu; adjustments rely on cropping and framing.
Quality Loss After Cropping: Heavy cropping can reduce video resolution and sharpness.
Limited Social Media Optimization: iMovie doesn’t offer platform-specific aspect ratio presets.
Less Flexibility for Horizontal Videos: Adapting landscape videos for vertical formats can be challenging.

Part 2. How to Change Aspect Ratio in iMovie on Mac
On Mac, iMovie offers multiple methods to change the aspect ratio using different approaches. Each approach suits a different scenario, whether you’re adjusting a widescreen video for social media or refining the frame to keep key elements in focus. Let us explore all the methods on how to change iMovie aspect ratio in detail:
Method 1 – Crop Video Using Crop to Fill
The method focuses on filling the entire frame by trimming excess edges from your footage. This approach removes black bars and keeps the video visually balanced, but it may cut out parts of the original scene if not adjusted carefully. To learn how to use this method for adjusting the aspect ratio, read the instructions provided next:
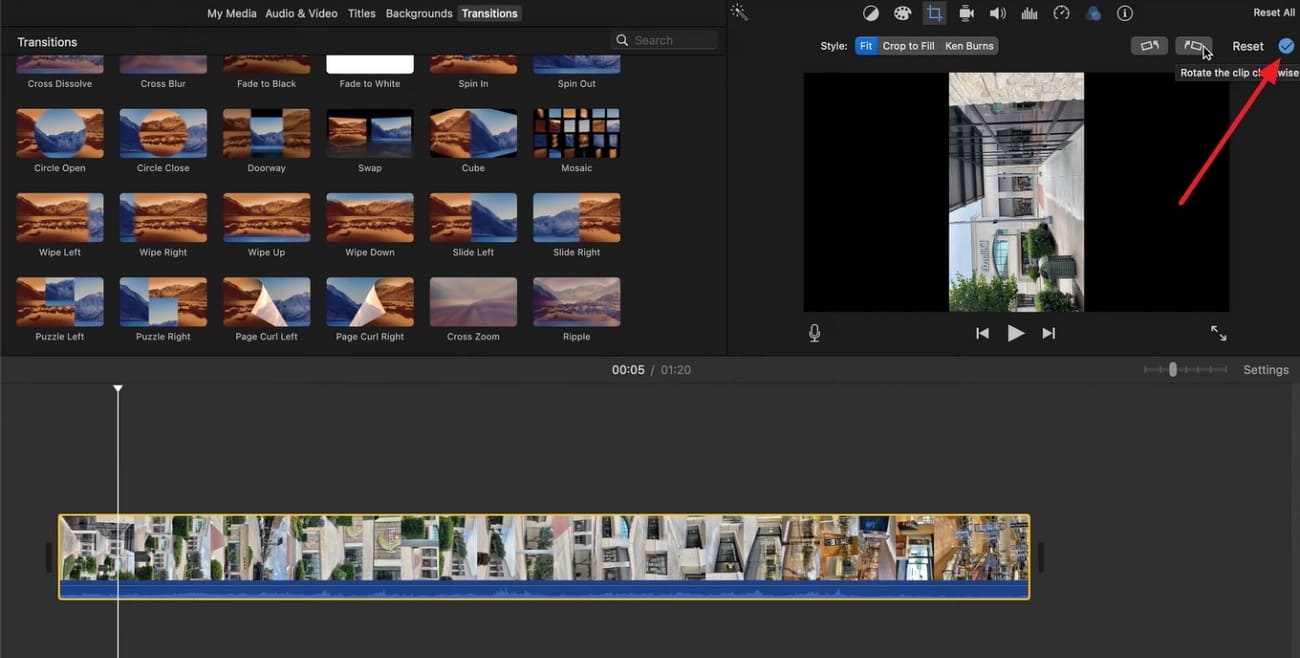
Instructions. After you have launched iMovie on your Mac, import the video for which you want to change the aspect ratio. Now, head to the toolbar located above the preview window and press the “Crop” icon. Next, choose the “Crop to Fill” option and adjust the frame within the preview window. Press the “Tick” icon once you have set the frame to apply the crop.
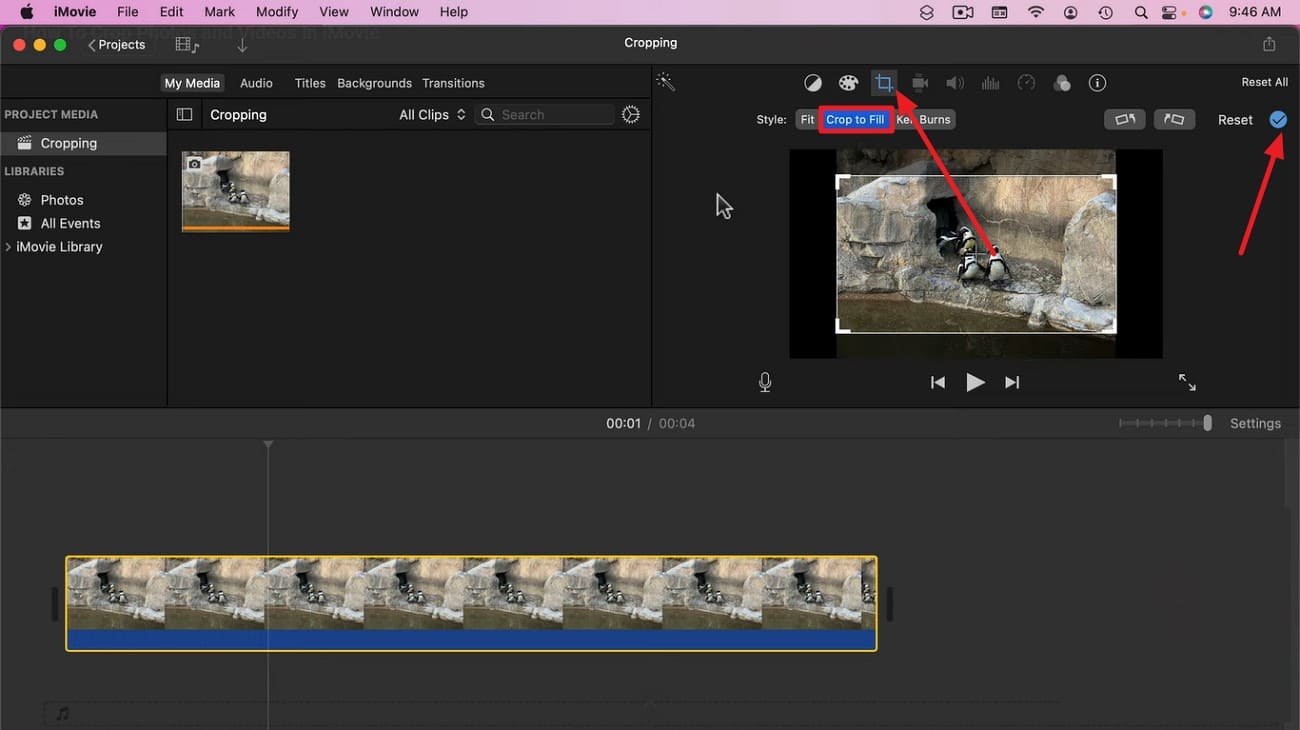
When to Use It: Use “Crop to Fill” when you want your video to fully match the target aspect ratio without black bars. It works best when the main subject is centered, and edge details are not critical.
Method 2 – Adjust Project Settings Before Importing Clips
This method allows you to change the aspect ratio in iMovie by defining the video’s dimensions at the very start of a project. By using a clip that already has the desired ratio, the project automatically aligns all subsequent footage to match. Follow the steps provided next to learn how to use this method for adjusting project settings:
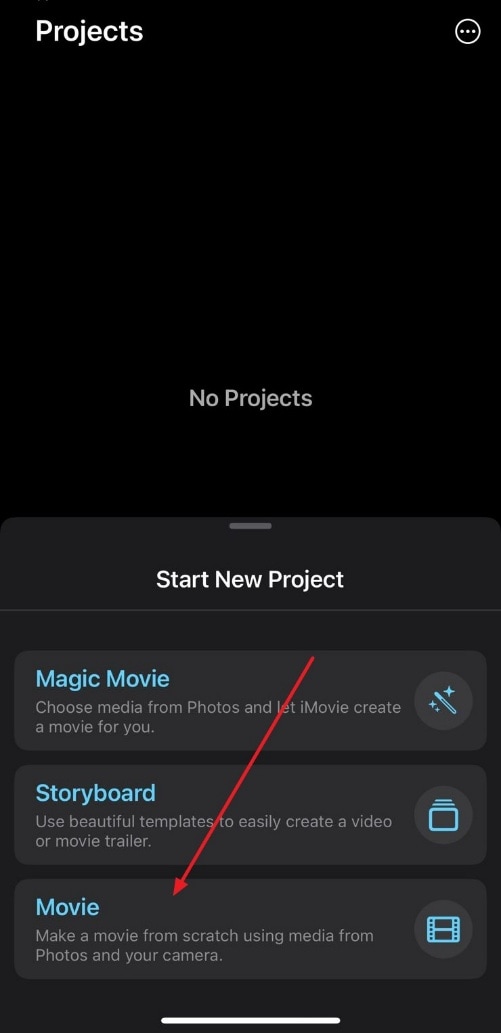
Step 1. Begin by launching iMovie and pressing the “+” option to create a new project. Now, choose the “Movie” option to continue to the following interface.
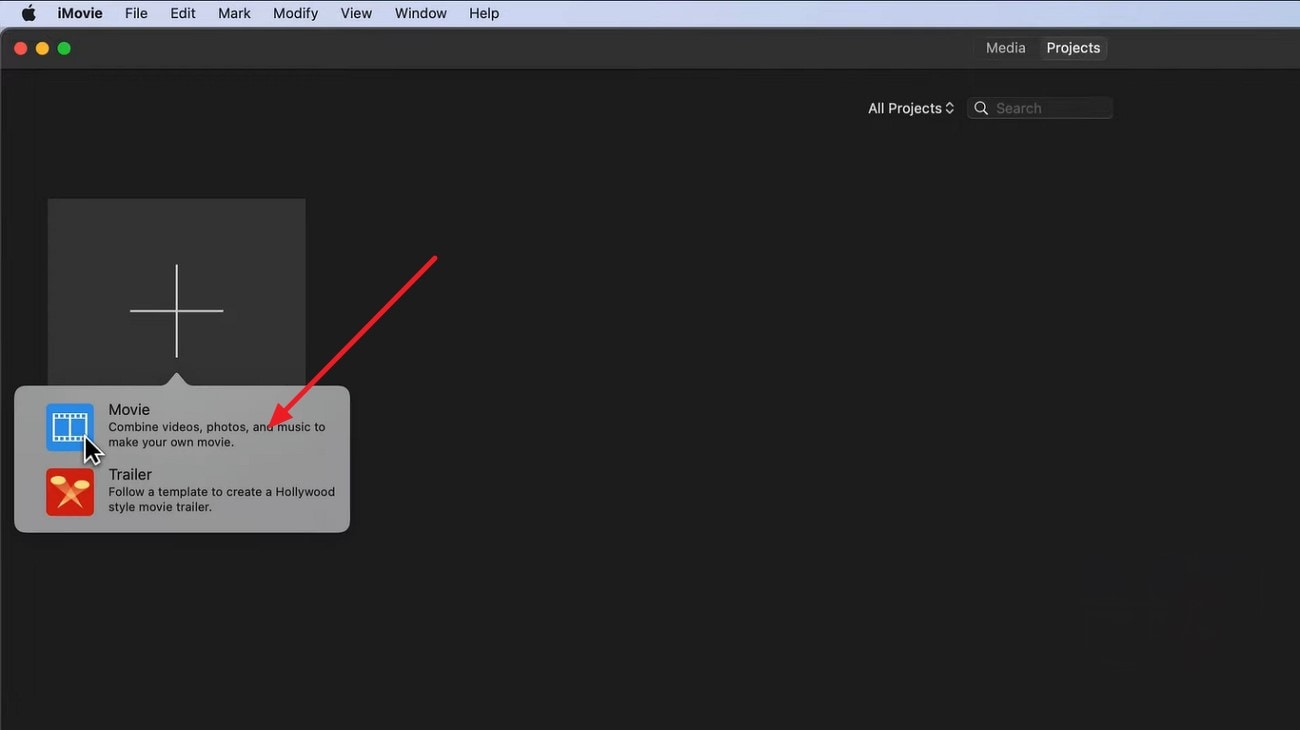
Step 2. Here, import the first video that you want the dimension for and drag it to the editing timeline to set the aspect ratio for the next clips.
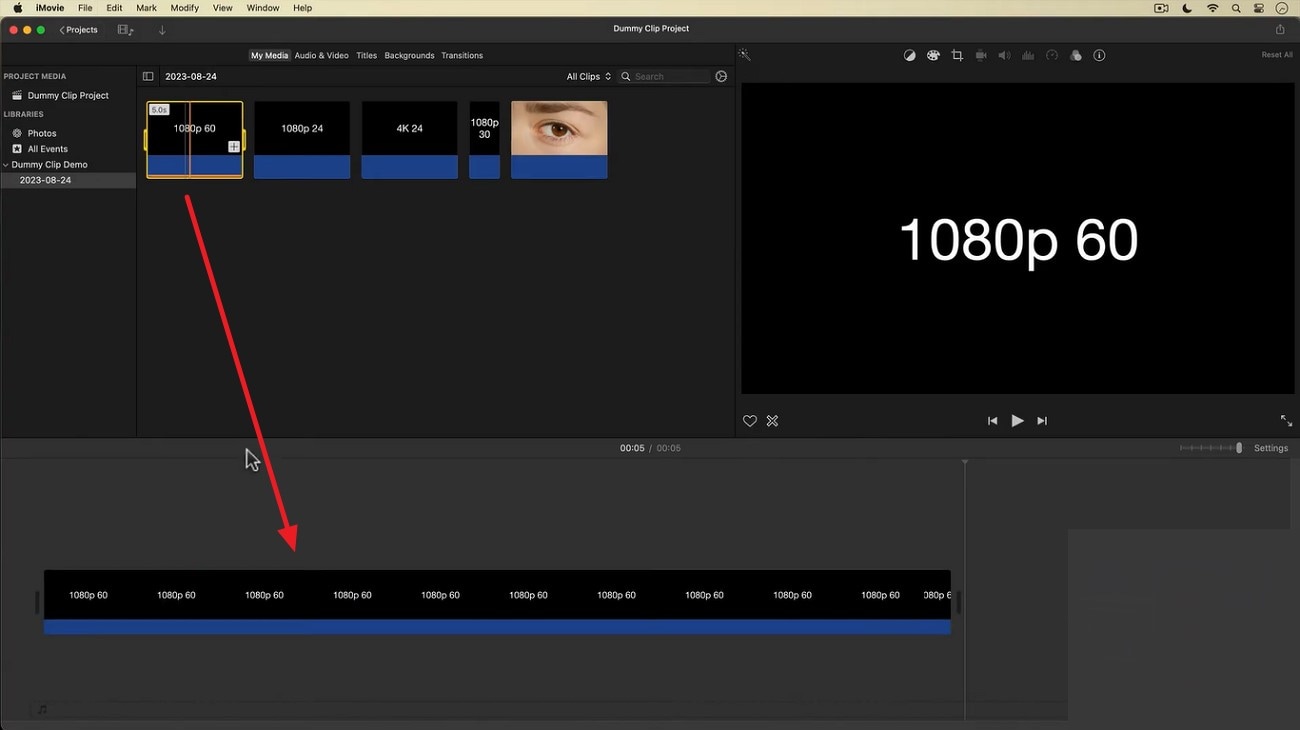
How iMovie Auto-Detects Aspect Ratio
iMovie automatically sets a project’s aspect ratio based on the first clip added to the timeline. The software reads the resolution and orientation of that clip and applies the corresponding ratio to the entire project. This ensures that all imported clips conform to the same frame dimensions.
Best Use Cases
- Social Media Videos: Quickly align clips to vertical (9:16) or square (1:1) ratios for platforms like Instagram, TikTok, or Facebook.
- YouTube Content: Maintain a consistent 16:9 widescreen ratio for professional-looking uploads.
- Short Films & Presentations: Ensure all footage fits a single cinematic frame for storytelling or slideshows.
- Repurposing Existing Clips: Adapt older footage to match a new project’s aspect ratio without manually resizing each clip.
Method 3 – Rotate Video for Vertical Aspect Ratio
Rotating a video is an effective way to change the aspect ratio in iMovie when working with portrait or vertical content. This method is particularly useful if your footage was recorded in landscape but needs to fit a vertical format. Read the steps provided next to learn how to rotate the video in iMovie on your Mac device:
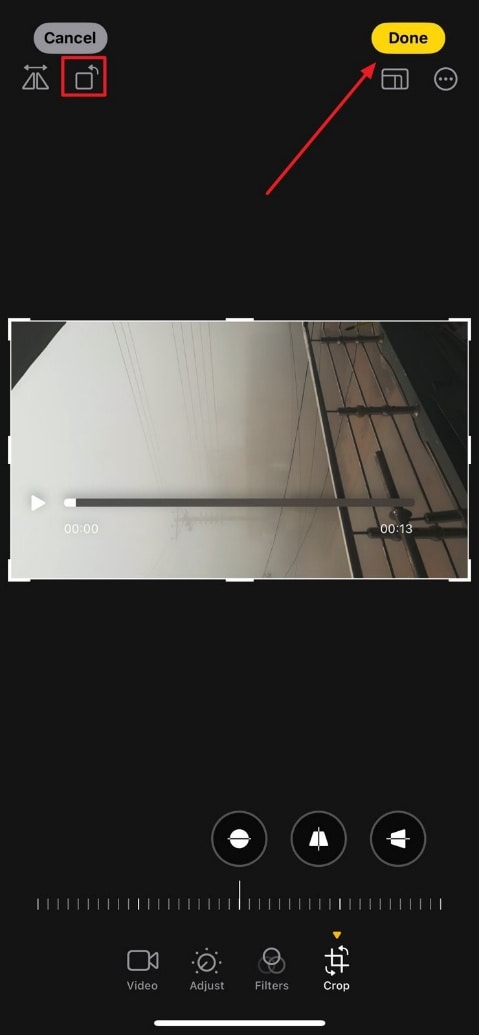
Step 1. After importing the landscape video to the tool’s interface, drag it to the editing timeline to process. Now, head to the toolbar located above the preview window and press the “Crop” icon. Locate the “Rotate” icons for rotating your video clockwise or anticlockwise.

Step 2. Once you press the “Rotate” icon, your video’s orientation will be switched from landscape to portrait in no time. Press the small “Tick” on right to save changes.
Tips to Avoid Black Bars
When changing aspect ratios in iMovie, one common issue is the appearance of black bars around your video. These bars can distract viewers and reduce the professional look of your content. To minimize or eliminate black bars, follow the tips provided below:
Reframe Your Subject: Adjust the position of key elements within the frame so they stay centered in the new aspect ratio.
Use Background Fill: Add a blurred or color-matched background behind your video to fill empty spaces.
Export with Platform-Specific Settings: Choose export dimensions that match the target platform to reduce automatic letterboxing.
Fit vs. Fill: Choose the right display option in iMovie to balance full-frame coverage and content visibility.
Part 3. How to Change Aspect Ratio in iMovie on iPhone or iPad
If you are on the go and need to edit videos quickly, you can change the aspect ratio in iMovie on iPhone or iPad with simple steps. While it doesn’t offer the full flexibility of the Mac version, it allows you to adjust videos for social media. Let us explore the methods in the section below:
Method 1 - Using Pinch-to-Zoom to Adjust Framing
The pinch-to-zoom method is a convenient way to change aspect ratio in iMovie iPhone by visually adjusting how your video fits within the frame. It lets you enlarge or shrink the visible area, ensuring the main subject stays centered.
Steps Guide on Pinch to Adjust Framing
Follow the steps provided below to learn how to change the aspect ratio in iMovie on iPhone using the pinch and zoom method:
Step 1. Launch the app on your phone and create a new project using the “Movie” option. Next, import the video from your device’s storage to enter the editing interface.
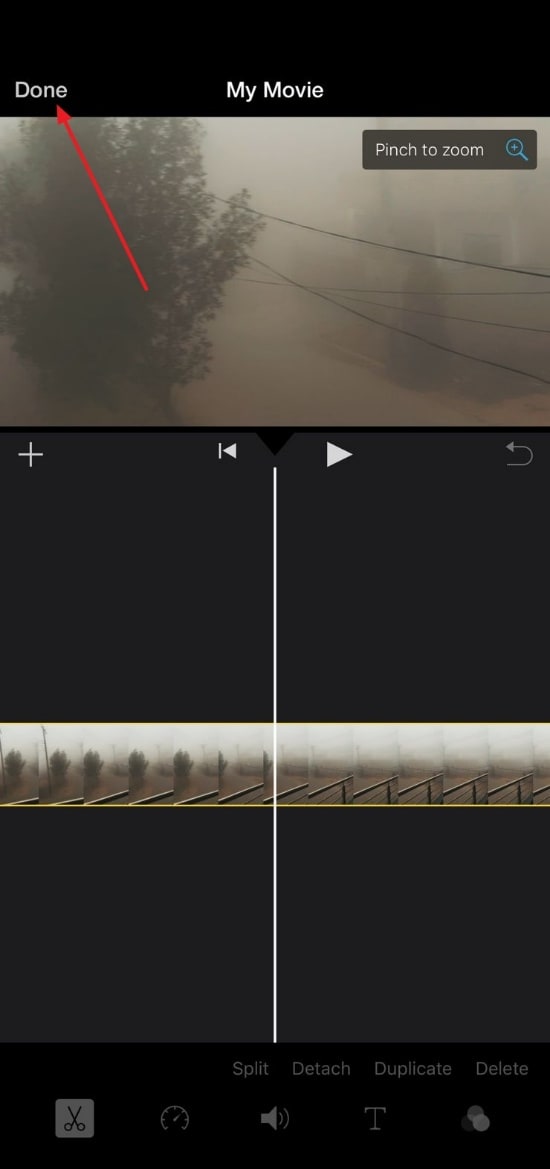
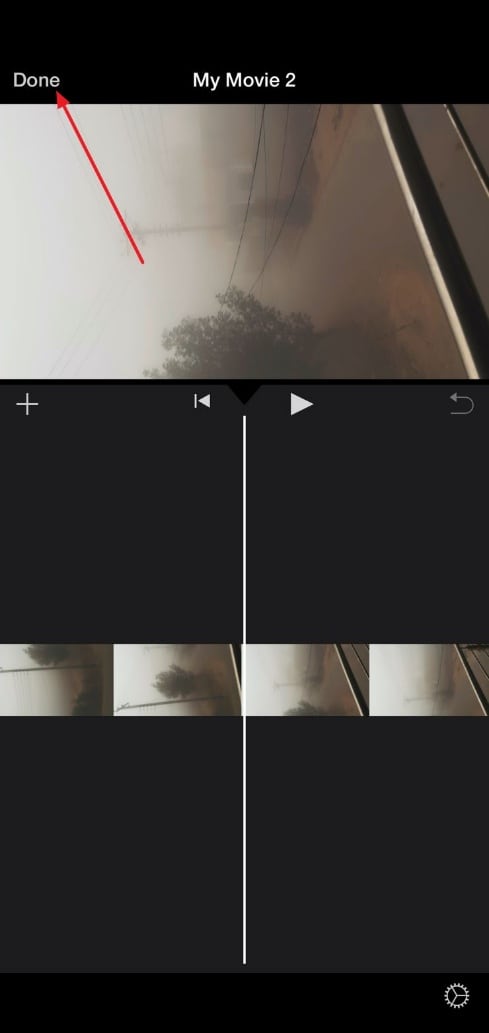
Step 2. Now, tap on the preview window and pinch your fingers on the screen to zoom. Adjust the frame according to your preferences and hit the “Done” button.
Limitations on Precise Ratio Control
While iMovie on iPhone and iPad is convenient for quick edits, it has some limitations when it comes to precise aspect ratio control. Provided below are some of the challenges that users might face when using this technique:
- No Numeric Input: You cannot enter exact aspect ratio values for your video.
- Variable Zoom Levels: Pinch-to-zoom relies on visual adjustment, which may be inconsistent.
- Edge Cropping Risk: Important parts of the video can be accidentally cut when adjusting framing.
- No Batch Adjustment: Each clip must be adjusted individually, making large projects time-consuming.
Method 2 - Switching Between Horizontal and Vertical Videos
iMovie on iPhone and iPad allows you to change the aspect ratio in iMovie iPhone by switching the orientation of your video between horizontal and vertical. This is especially useful when adapting content for different platforms. By simply rotating the video in the Photos app, you can keep the main subject centered.
How to Change Horizontal and Vertical Video Orientation
Learn how to change the aspect ratio in iMovie on iPhone by following the steps provided next:
Step 1. Open the video in the Photos app, and change the orientation by rotating it. Once done, press the “Done” option located on the corner of the screen.
Step 2. Now, open the video in the iMovie app and perform the required editing according to your preferences. Press the “Done” option to save the results once you are done.
How iMovie Adapts to Footage Orientation
The application detects the orientation of your footage and adjusts the project to match the clip’s dimensions. This ensures that videos maintain proper framing without stretching or distortion. However, the adaptation is limited to the initial clip’s orientation, so careful planning is necessary when combining clips with varying formats.
Best Practices for Social Media Videos
- Plan Orientation Before Shooting: Record in the aspect ratio that matches your target platform, such as 9:16 for TikTok or 1:1 for Instagram.
- Keep Subjects Centered: Ensure key elements remain within the safe area to avoid cropping when adjusting ratios.
- Use Pinch-to-Zoom Wisely: Adjust framing without cutting off important details.
- Maintain Consistent Ratios: Apply the same aspect ratio across all clips in a project to avoid black bars.
Part 4. Pros and Cons of iMovie
When adjusting aspect ratios, iMovie is a handy tool for Apple users, but it comes with both advantages and drawbacks. Considering alternatives can help overcome some limitations. Mentioned below are some of the pros and cons of using iMovie or its alternative to change the orientation:
Pros
- iMovie is easy to use, making it ideal for beginners.
- It is free for Mac and iOS users, offering good value.
- The software maintains good video quality during edits.
- Basic cropping and rotation tools are available for simple adjustments.
- Some alternative tools provide preset aspect ratios for social media platforms.
Cons
- It cannot batch process multiple clips, which can be time-consuming.
- Cropping may remove important edges from your footage.
- iMovie offers fewer professional editing controls compared to alternatives.
- Many alternative tools require paid subscriptions to access full features.
While iMovie is user-friendly, it has notable limitations for aspect ratio changes. Cropping can be imprecise, often cutting out essential parts of the frame. Its controls are basic, offering no advanced scaling or padding options to fit videos properly for different platforms without cropping. For more professional, efficient, and precise resizing—especially for multiple videos—a dedicated tool like UniConverter is a far more effective solution.
Part 5. How to Easily Batch Change Aspect Ratios with UniConverter
For people who want more than just the basics of changing aspect ratio in iMovie, especially for bulk videos, Wondershare UniConverter is a must-try. This AI-powered multimedia tool allows users to change the orientation of their videos in no time. The tool has a simple interface and lets users with minimal skill levels edit and enhance their multimedia in no time.
This incredible batch process video editor lets you import videos in batches and change their aspect ratio while saving the settings as presets. You can then access these presets in the future for instantly applying the same setting to your videos. UniConverter supports many individual video editing functions like subtitle editing, and helps to transfer videos from Mac to iPhone which is convenient for Apple users. Moreover, users get the ability to save the final results in the destination folder of their choice.
Coherent Features Offered by UniConverter
- Multiple Aspect Ratio Options: UniConverter offers a wide range of preset aspect ratios, making it easy to resize videos for different platforms without manual cropping.
- Customizable Orientation Adjustment: It allows precise control over video orientation, letting you switch between multiple frames.
- Multiple Export Formats: The platform supports exporting videos in various formats and resolutions, ensuring compatibility across devices.
- Rotate Videos: The tool enables smooth video rotation to correct orientation or adapt content for vertical viewing.
- Pan and Scan: UniConverter’s pan and scan feature helps reframe videos dynamically, keeping important subjects in focus.
Steps For Changing Aspect Ratio in Batch With UniConverter
As discussed, UniConverter allows users to change the orientation of videos in bulk with numerous customization options. Follow the steps mentioned below to learn how to change the iMovie aspect ratio using this efficient tool:
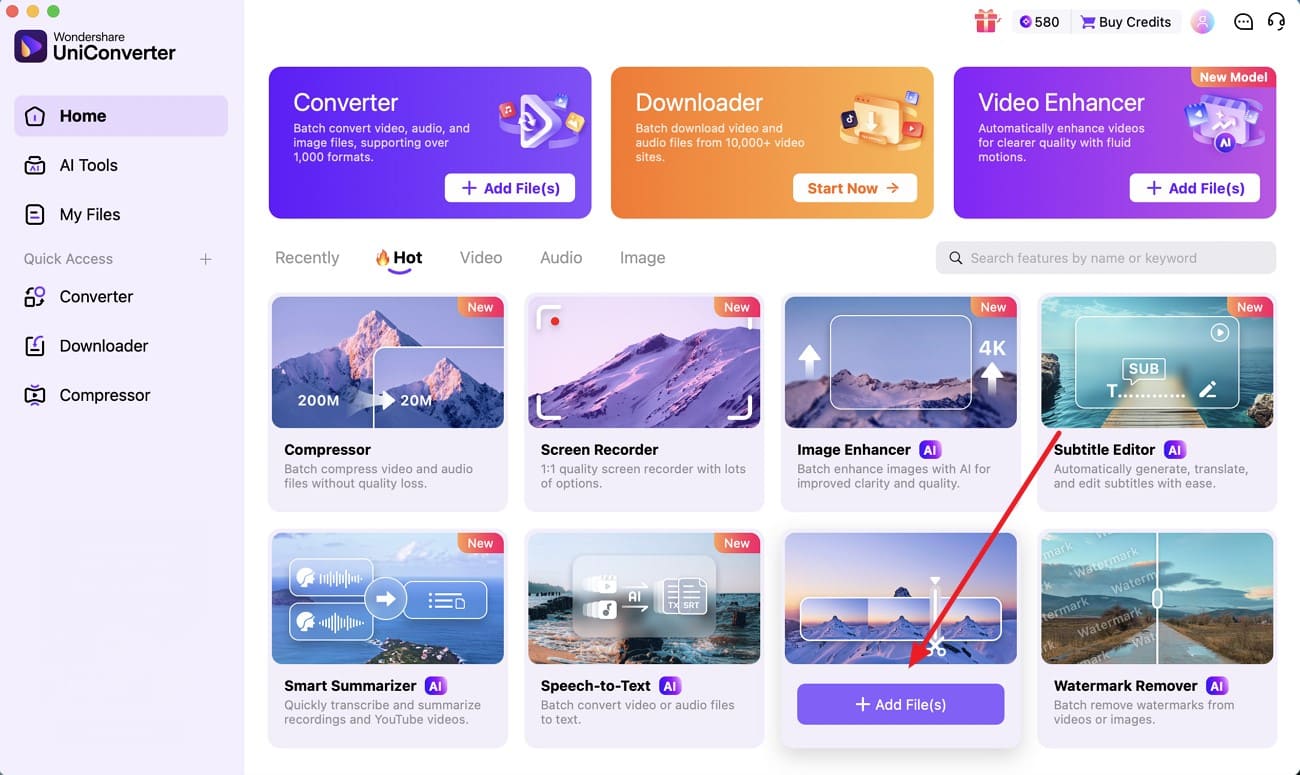
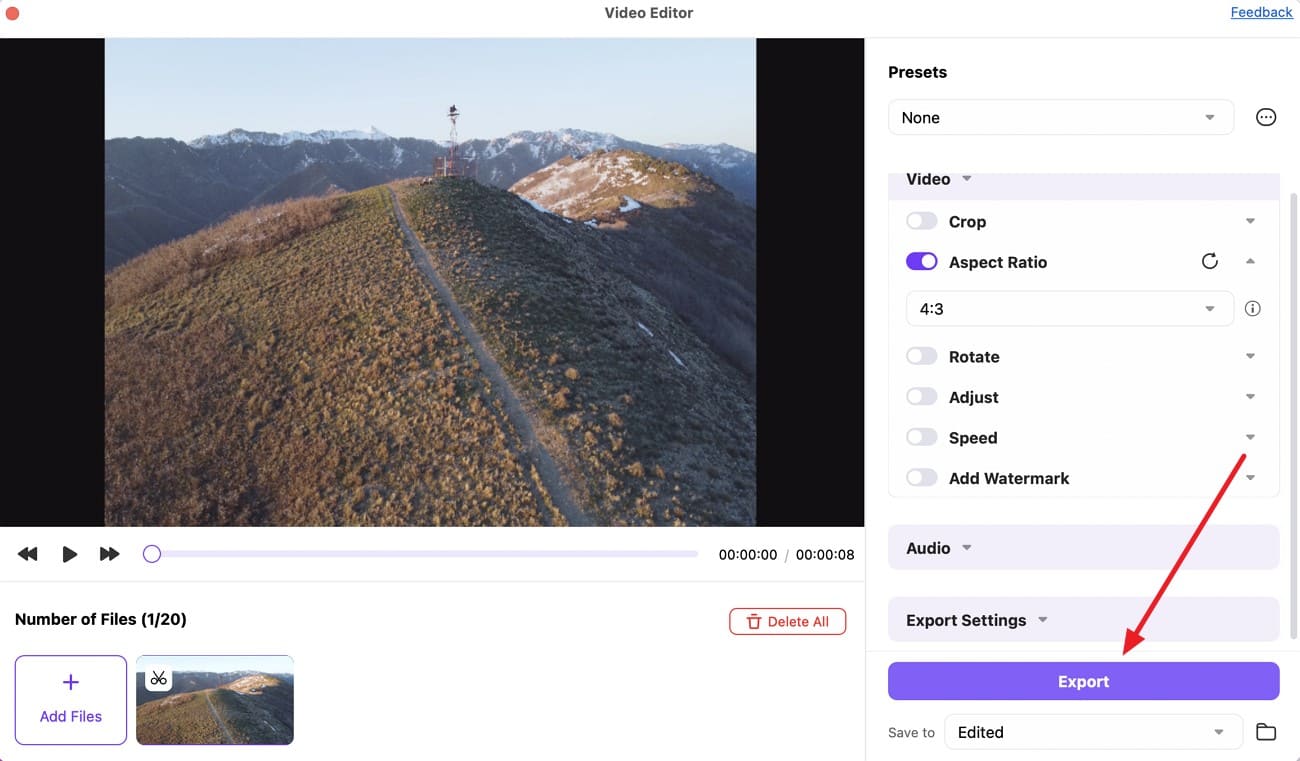
Step 1. Begin By Selecting Video Editor
To initiate, launch UniConverter on your device and select the “Video Editor” feature from the homepage. Click on it to import the videos for which you want to change the orientation.
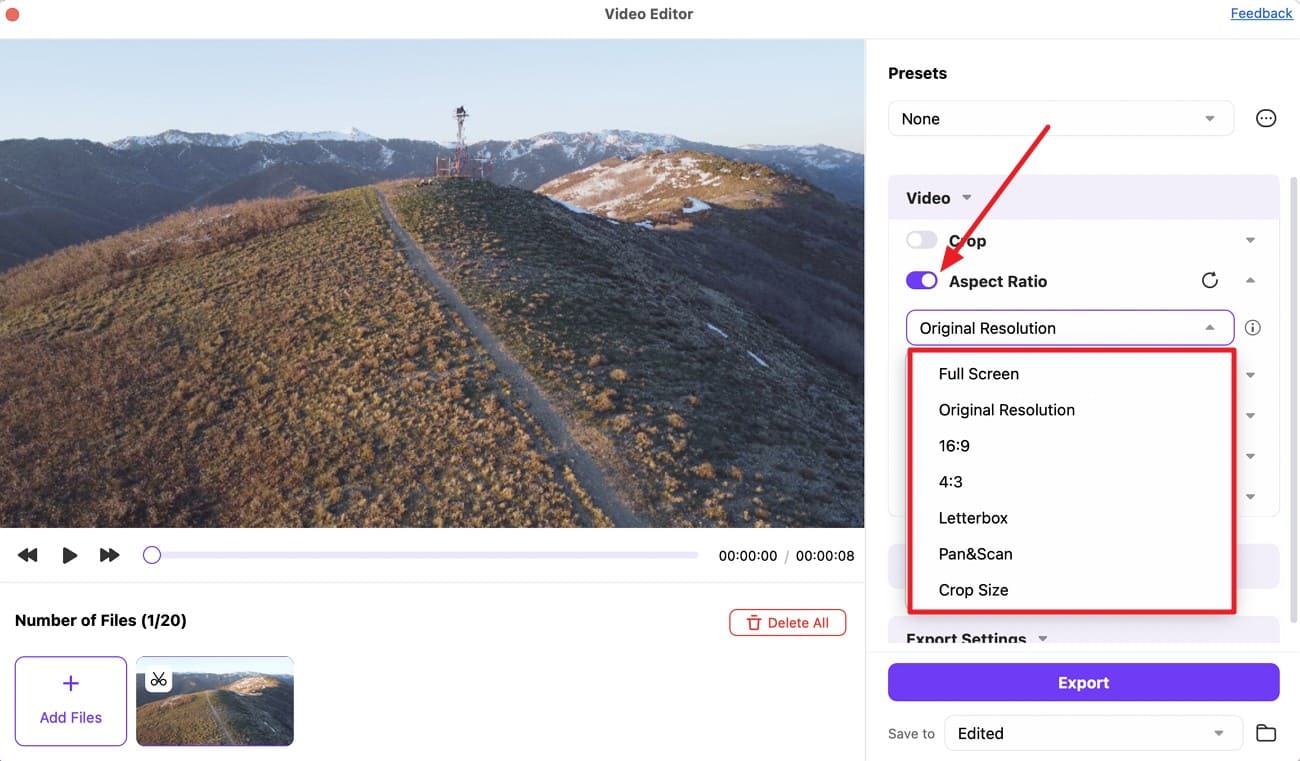
Step 2. Select Aspect Ratio
Once the videos are successfully imported, enable the toggle for “Aspect Ratio” on the right. Choose the aspect ratio option by expanding its drop-down list.
Step 3. Apply and Export
Apply the desired orientation by clicking on the option. Preview the results within the preview window, and once you are satisfied, press the “Export” button located at the bottom to save the results to your device.

Part 6. Common Problems When Changing Aspect Ratio in iMovie and Fixes
Changing the aspect ratio in iMovie can sometimes lead to unexpected visual issues. Understanding these common problems and their fixes will help you maintain the correct framing and avoid export errors:
Black Bars Appear After Export
This happens when the project aspect ratio doesn’t match the video’s native resolution. Fix it by using the “Crop to Fill” option or setting the project to match your clip’s dimensions before exporting.
Video Looks Zoomed in or Cropped
iMovie may automatically zoom the clip to fit the frame, cutting off edges. Select the clip, click “Crop,” and choose “Fit” instead of “Crop to Fill” to restore the full frame.
Vertical Video Doesn’t Fill the Screen
iMovie is optimized for horizontal formats, so vertical videos often leave empty space. To fix this, rotate the clip, scale it manually, or place a blurred background behind the vertical footage.
Aspect Ratio Changes Unexpectedly
Mixing clips with different resolutions can force iMovie to adjust the project ratio automatically. Start with the main clip first and keep all media in the same resolution to maintain a consistent aspect ratio.
Conclusion
In conclusion, this article was a detailed guide to changing the aspect ratio in iMovie. Although this tool is widely used for adjusting the video’s frame size, it tends to lose video quality in the post-processing. To ensure that the aspect ratio is changed and the original quality is intact, use UniConverter. This tool offers a lossless editing workflow, and its intuitive interface makes it an ideal choice for beginners.
FAQs
-
1. What is a video aspect ratio?
A video aspect ratio describes the width-to-height proportion of a video frame, such as 16:9 or 9:16. Choosing the correct aspect ratio ensures the video displays properly across different devices and platforms. -
2. Can I change the aspect ratio without losing video quality?
Yes. If the software supports smart scaling instead of aggressive cropping, quality loss can be minimized. Tools like UniConverter help preserve clarity while adjusting the frame size. -
3. Which aspect ratio is best for social media videos?
It depends on the platform. YouTube typically uses 16:9, while Instagram Reels and TikTok prefer 9:16. UniConverter provides preset aspect ratios optimized for different social media platforms. -
4. Do I need professional skills to change the video aspect ratio?
No. Modern video editors are designed to be beginner-friendly. UniConverter offers a simple interface with guided options, allowing quick aspect ratio changes without professional editing experience.

