Video Editing
- TRY IT FREE TRY IT FREE
- 1. Edit Video+
-
- 1.1 Top 10 Free 3D Video Makers
- 1.2 Free After Effects Plugins
- 1.3 Top 50 Music Players
- 1.4 Top 30 Flac Players
- 1.5 Top 20 Facebook Music Apps
- 1.6 Top 30 Xvid Player
- 1.7 Edit Any Format with Virtualdub
- 1.8 Top 10 Free Music Video Makers
- 1.9 Top 30 Online Music Players
- 1.10 3 Easy Methods to Speed up Videos on Windows
- 1.11 Top 3 Ways to Speed up Videos on Mac
- 1.12 Best YouTube Video Speed Changer to Slow down Video
- 1.13 Increase TikTok Video Speed When Watching or Recording
- 1.14 Top 12 Android Apps to Speed up Video
- 2. Other Editing Tips and Tricks+
-
- 2.1 Top 5 Apple TV Troubleshootings
- 2.2 Windows Media Player Crashes
- 2.3 QuickTime Playlist
- 2.4 Windows Media Player Plug-in
- 2.5 Torrent Links to Download iMovie
- 2.6 7 Ways to Repair Windows Media Player
- 2.7 Post Music Notes on Facebook
- 2.8 Avid Media Composer Shortcuts
- 2.9 QuickTime Plug-in for Chrome
- 2.10 QuickTime 64 Bit
- 2.11 Windows Media Player Not Working
- 2.12 How to Use Windows Movie Maker
- 2.13 Top 10 3D Video Cameras
- 2.14 Top 5 QuickTime codecs
- 2.15 Use Windows Media Player as a DLNA Server
- 2.16 History of Windows Movie Maker
- 2.17 YouTube Video Editing Software
- 2.18 10 Hilarious Graduation Speeches
- 2.19 Free Online iMovie Alternatives
3 Tips for QuickTime Playlist You Have to Know
by Christine Smith • 2026-01-21 18:53:52 • Proven solutions
QuickTime is a universal media player that does everything beautifully well except creating playlists. It is somewhat of a bummer to realize that even though QuickTime is a sophisticated application, it can’t support something as simple as creating playlists. That is the reason why most folks turn to iTunes if they want to create playlists for their movies.
There is one alternative though, and that is using Playlist Lite, which is a free app for Mac that allows for the creation of playlists that can be used by both QuickTime and iTunes. Since it is the ‘Lite’ version of the app, as the name clearly suggests, it only allows adding a maximum of 10 items in the playlist. Nonetheless, a great option for anyone who wants a playlist on their QuickTime player.
Let us take a look at this app now and see how to use it.
- Part 1. How to Make a QuickTime Playlist on Mac
- Part 2. How to Create a Playlist in QuickTime Player for Many Files in Separate Subfolders
- Part 3. How to Loop a QuickTime Playlist
Part 1. How to Make a QuickTime Playlist on Mac
Step 1: Download and install the app Playlist Lite on to your computer.
Step 2: After you have successfully installed the app, launch it. You would see that the interface of the app has 2 panels; 1st panel resembles the player control area with buttons similar to the ones you would find on iTunes. You will also find subtle differences such as the positioning of the loop and shuffle buttons which are given at the bottom of the app, unlike on the iTunes. The 2nd panel offers two collapsible lists - ‘Playlist’ that will contain the playlist you would create for QuickTime, and ‘iTunes’ that contains the playlists for iTunes.
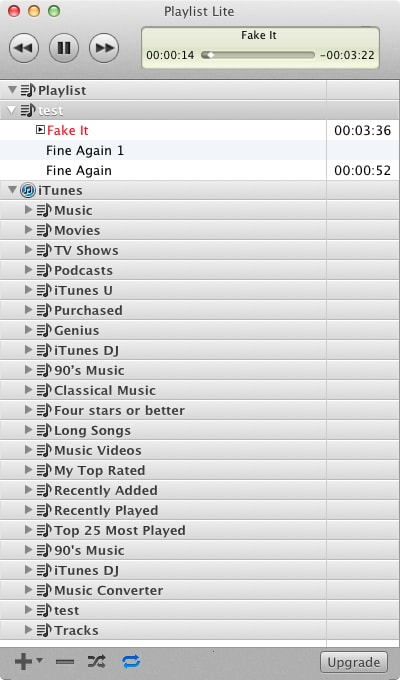
Step 3: You will also see that at the bottom, there are 4 distinct buttons. In order to add items to an existing playlist or creating a new one, you have to choose the button that looks like a plus sign.

Step 4: After you have clicked on the plus sign, you can either go to Playlists > Add Playlist to create a new playlist or simply select and existing playlist and then choose the option of ‘Add Files’ to add to it. Just remember that no matter what option you choose, you would only be able to add 10 items to the list at the most.
Part 2: How to Create a Playlist in QuickTime Player for Many Files in Separate Subfolders
Step 1: Launch QuickTime from your programs menu.
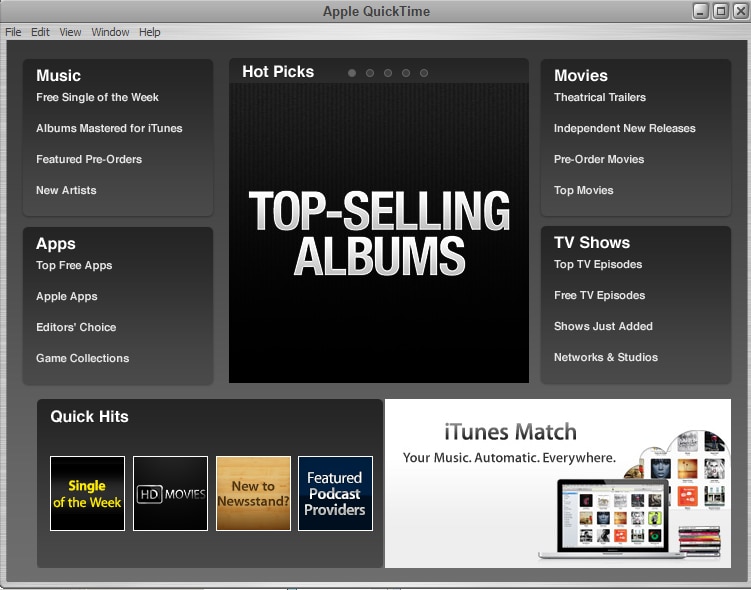
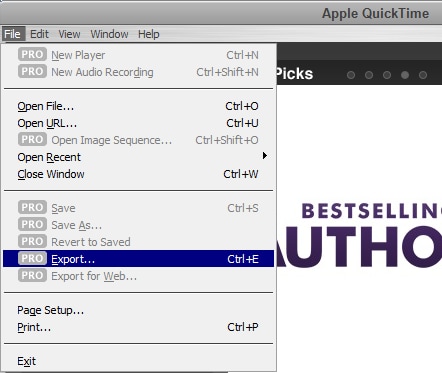
Step 2: Now, go to the File > Export from the menu bar given on the top of the screen.
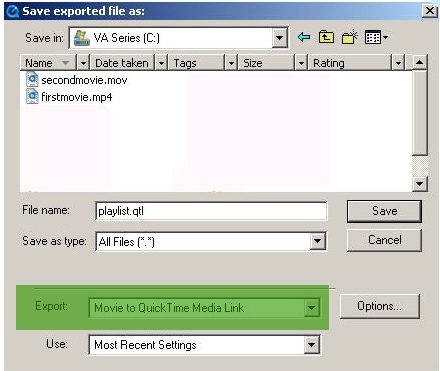
Step 3: This should now open a new popup window for you. From the drop down menu for Export, select the option of ‘Movie to QuickTime Media Link’ and then click on the button ‘Options’ which is right next to it.
Step 4: As soon as you click on the ‘Options’ button, it will open the QuickTime Media Link Settings dialogue for you (see the screenshot as given below).
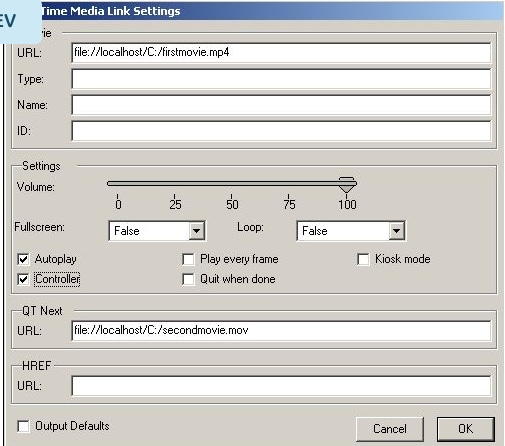
Step 5: You will see that the loaded movie is already reflecting on the movie URL path. Now, add an item key in the path of the clip using the ‘QT Next URL’ field and then click OK.
Step 6: You will now see that the clips will play in succession.
Part 3. How to Loop a QuickTime Playlist
In order to create a loop for your playlist on QuickTime, you simply have to follow these steps.
Step 1: Launch QuickTime, from the Start button (Windows) or Finder (Mac) and then go to File > Open to open the video you would like to watch.

Step 2: Now, select the option ‘View’ from the menu bar on top of the QuickTime player window and click on ‘Loop’.
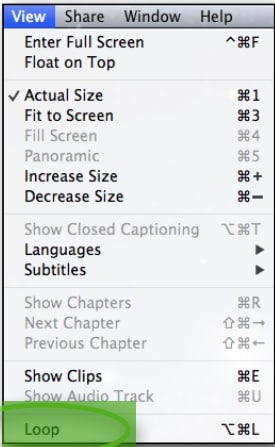
Step 3: That’s it, you have already done what you had to. Now, simply go ahead and play the clip or video and it will play in a loop i.e. continuously for you.
 Wondershare UniConverter - Best QuickTime Converter for Windows/Mac

- Convert Quicktime MOV to WMV, MP4, AVI, FLV and other 1,000+ formats.
- Customize Quicktime video formats for specific devices such as iPhone/Android devices.
- Edit videos with trimming, cropping, rotating, adding watermarks, editing subtitles, and more.
- Burn videos to DVD with free menu templates for easy playback on TV.
- Download online videos from YouTube, Vimeo, and other 10,000+ sites.
- 90X faster converting speed than other common video converters.
- All-in-one video tool: video compressor, video converter, GIF maker, screen recorder, image converter, and more.
- Supported OS: Windows 10/8/7/XP/Vista and Mac OS 10.15 (Catalina), 10.14, 10.13, 10.12, 10.11, 10.10, 10.9, 10.8, 10.7, 10.6.


Christine Smith
chief Editor