 Remove background noise with one click.
Mute video
- Mute Video Tips+
-
- 1. Remove audio from video tutorial
- 2. How to mute a video on WhatsApp
- 3. How to mute video on Instagram
- 4. Resolution for Facebook muted your video
- 5. Mute video app: Top 8 apps to remove audio from video 2021
- 6. Remove audio from video online free: Top 5 tools Recommended
- 7. How to remove audio from video in KineMaster Tutorial
- 8. How to remove audio from video and mute video call on Messenger?
- 9. How to mute a clip in Premiere Pro easily in 2021
- 10. How to mute videos on TikTok/Zoom easily?
- 11. Top 10 video editor to remove sound easily in 2021

All Topic
- AI Tools Tips
-
- AI Photo Enhancer Tips
- Voice Changer Tips
- AI Thumbnail Maker Tips
- AI Script Generator Tips
- Smart Summarizer
- AI Subtitle Generator Tips
- Watermark Remover
- Vocal Remover Tips
- Speech to Text Tips
- AI Video Tips
- AI Image Tips
- AI Subtitle Translator Tips
- Video Extractor Tips
- Text to Speech Tips
- AI Video Enhancer Tips
- DVD Users
- Social Media Users
- Camera Users
- Photography
- Creative Design
- Movie Users
- Travelling Fans
- Educational Users
- More Solutions
- Holidays and Commemoration
- Game Lovers
- Other Tips
How to remove audio from video in Premiere Pro Tutorial
by Christine Smith • 2026-05-20 17:37:04 • Proven solutions
Sound and picture in any video file are always two parallel tracks. Sometimes the sound spoils a good frame due to changes in volume, wind, distortion, or simply a bad microphone. If the original audio hack does not suit you, then you can remove the sound from the video with editing tools. For anyone who wants to know how to mute a dip in Premiere Pro, you've come to the right place! In this blog, you will know how to remove audio from video in Premiere Pro easily and the top 5 mute video alternatives. Read on!
- Part 1. How to mute a clip in Premiere Pro quickly?
- Part 2. Top 5 remove audio from video alternative in 2022
Part 1. How to mute a clip in Premiere Pro quickly?

Adobe Premiere Pro is a program that allows you to perform non-linear video editing. Adobe Premiere Pro is the perfect tool for any post-production or video editing process. The most important feature of this program is its free integration with other Adobe products. Most professionals use a bundle of Premiere Pro + After Effects + Photoshop. However, the program is demanding on computer resources.
Follow these simple steps to mute the video in Premiere Pro:
Step 1: First of all, install and open the Premiere Pro to mute the video.
Step 2: There, you can upload the video from your PC.

Step 3: Click the clip and select the "Unlink". You can use the "CTRL+L" keyboard shortcut to do this as well.

Step 4: Then, you can select the audio separately and hit the delete key to remove it. Now your audio part has been muted.
Step 5: Export the video in your desired format.
Let's briefly list the pros and cons of Premiere Pro:
Pros:
- The program interface is as convenient as possible and intuitive;
- The trimming function is pretty well thought out. You can perform high-quality trimming solely with the mouse, or go to dynamic trim using the keyboard;
- Working with audio is highly convenient. Audio Clip Mixer makes this process easy and enjoyable.
Cons:
- The trial version is valid for 30 days;
- It has compatibility issues and is not suitable for all computers.
Part 2. Top 5 remove audio from video alternative in 2022
1. Wondershare UniConverter
Wondershare UniConverter is widely used in over 200 countries around the world. It provides the best experience for its users. As a one-stop video tool, it also has a mute video feature. With UniConverter, you can easily remove audio from videos without leaving a watermark. It uses an automated process for quickly muting audio tracks from your videos. You don't need to learn any new editing skills to remove the sound from the video. Furthermore, the quality of the videos remains unchanged after editing.
Follow three simple steps below to learn how to remove audio from video quickly.
Step 1 Firstly, install and launch the Wondershare UniConverter.
To import your desired video, navigate to the Converter section and click the Add Files button.

Step 2 Select “Audio Track” from the drop-down menu.
Click the No audio option from the drop-down menu of the Audio track, and the audio in your video will be removed.

Step 3 Then, to save your muted video, click the "Convert" button.
UniConverter will begin to save the muted video once you click the Convert tab. You can find your processed video in the Finished tab.

2. Fastreel

Fastreel online video editor is the most suitable option if you need to create a video quickly and without unnecessary hassles. You need to select a tool on the site, upload a file, make the necessary settings - and the finished clip is already on your desktop. Among the shortcomings, it can note that you need to download and upload again for each stage of video editing. It increases the amount of processing time and also degrades the quality of the video.
You can easily mute the video by using Fastreel:
Step 1: Visit Fastreel mute video webpage to mute the video.
Step 2: You can upload the video from your computer.
Step 3: Then, you can see the "Volume" button there.
Step 4: Click on it to mute the video.
Step 5: Then export the video in your desired format.
Pros:
- easy to navigate the site
- preview templates
- own audio library
- availability of tools for working with sound
Cons:
- To download the video, you need to register on the site
- there is a limit on the duration of the video - up to 30 minutes
3. Pixiko

Pixiko is a split-screen video maker that allows you to quickly place two or more video clips in a single frame. All you have to do is upload your videos to Pixiko and combine them in a few clicks. Pixiko responds quickly to videos and offers basic functionality. It's easy to use and helpful in creating great moving content! Many valuable and handy video editing tools: add text to video, merge videos, rotate videos, crop videos, mute videos, add music, and more!
You can easily mute the video by using Pixiko:
Step 1: Visit Pixiko website to mute the video.
Step 2: Then click on Upload and upload the video.
Step 3: Then click on its timeline to activate the setting.
Step 4: Then click on the Sound icon and turn down the volume.
Step 5: Finally, export the video in your desired format.
Pros:
- Load video files from the hard disk for further editing.
- It has many editing features like adding text to videos and merging videos.
- Edit your video files online frame by frame.
- Provide advanced profile settings for each video project.
Cons:
- This online video merger is not free.
- Rendering output takes longer.
- No preset split screen templates.
4. Clideo

Clideo is another service in which all the most popular video editing and creation tools are divided into separate editors. In this tool, you can cut a fragment from a video file; in the other, you can combine several files into one with a music overlay; in the third, you can crop the video, etc. This approach may interest those users who need to quickly perform one action with their files and do not want to delve into complex functionality.
To mute the video on Clideo, follow these simple steps:
Step 1: Visit Clideo website to mute the video online.
Step 2: Upload a video by clicking the "Choose file" button. Alternatively, you can tap the arrow on the right side and paste a direct URL to, say, YouTube or another source. You can also upload a file from your cloud storage account (Dropbox or Google Drive).
Step 3: Clideo will automatically mute your uploaded file; you do not need to change any settings, select or click any buttons.
Step 4: You can download the muted video if you save the video.
Pros:
- no limitation on video quality for download in the free version
- beginner-friendly interface
Cons:
- watermark on the final result without a paid subscription
- tools are divided into separate editors
- slow processing of the finished result for download
5. KineMaster

The KineMaster video editor impresses above all with its well-thought-out operating concept and intuitive user interface. When it comes to the range of functions, almost nothing is left to be desired. This app is a powerful tool for video editing that can also be used to implement more demanding projects.
To mute the video on KineMaster, simply follow these three steps:
Step 1: Open KineMaster and tap the plus icon in the middle of the interface, select "Empty Project" to enter the tool.
Step 2: Navigate to the Media Browser and select the video clip you want to use from your smartphone's storage. Once it's selected, click the Tick icon in the upper right corner of the interface. The video will be added to the timeline for editing.
Step 3: Select the video on the timeline, and then click the 'Audio' button. You will be given a scale to adjust the audio volume; drag it to the extreme left to completely mute the video or hit the Mute icon.
Pros:
- Combine video clips, images, effects, text, and audio files on layers.
- Add voice-overs, background music, and built-in sound effects
- Control of color, speed, and other parameters.
Cons:
- Some features are paid.
- A watermark that cannot be avoided in the free version.
- Not enough themes to handle video.
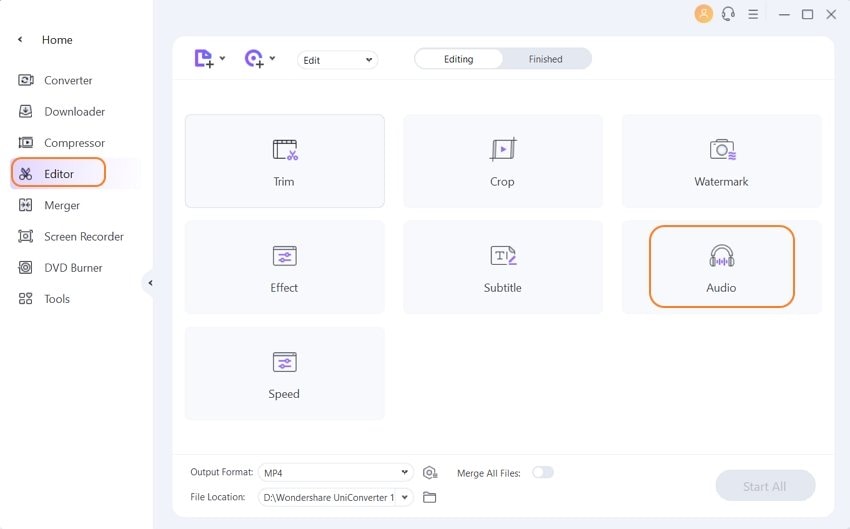
Bonus Tip: How to remove background noise from video with Wondershare UniConverter
Step 1: Upload your video.
Enable the UniConverter and go to the Video Editor tab, and then click the Audio button to upload your video.
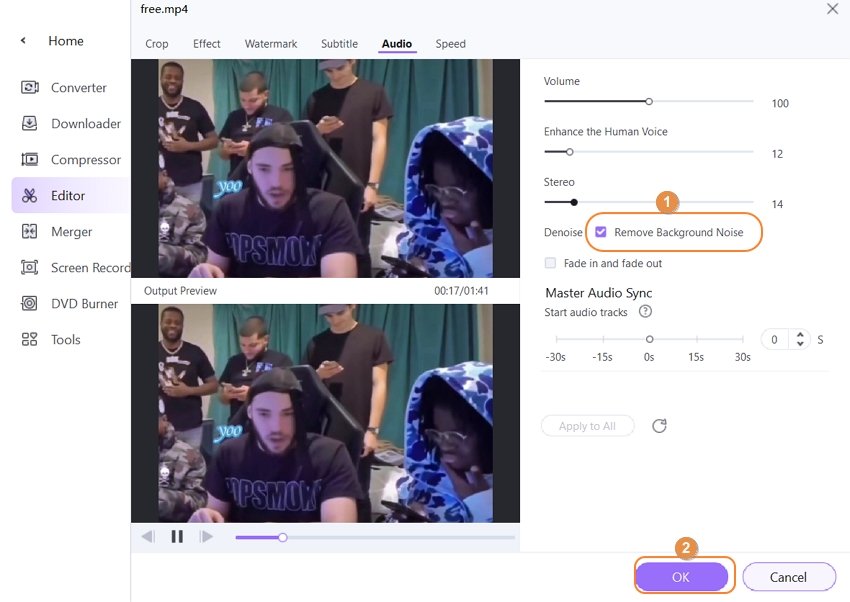
Step 2: Remove background noise.
Select the Remove Background Noise and the noise of your video will be removed. You can also adjust the volume, the human voice, and the stereo of your video.
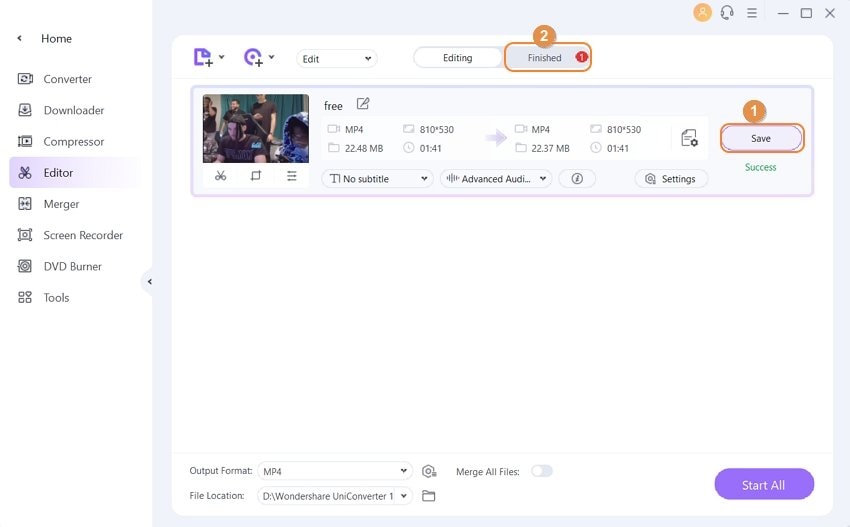
Step 3: Save the finished video.
Click Save to start removing noise from your video. The processed video can be found in the Finished tab.
Conclusion
Many video editing tools on the market can mute the audio from video, including free, paid options. But, Wondershare UniConverter is one of the best editing tools for removing the audio. It is easy to use and suitable for novices and provides high-quality video output. It also can convert video files quickly and is ideal for multiple operating systems. In conclusion, its functions and user-friendly interface make it better than other video editing tools. It is recommended for all users who want to edit their videos professionally.
Your complete video toolbox

Other popular Articles From Wondershare


Christine Smith
chief Editor