WMV
- TRY IT FREE TRY IT FREE
- 1. Convert WMV to Other Format+
-
- 1.1 Convert WMV to MP4
- 1.2 Convert WMV to MP4 Mac
- 1.3 Convert WMV to MP4 Online
- 1.4 Convert WMV to MOV
- 1.5 Convert WMV to MOV Mac
- 1.6 WMV to MOV Converter Online
- 1.7 Convert WMV to MP3
- 1.8 Convert WMV to AVI
- 1.9 Convert WMV to GIF
- 1.10 Convert WMV to VLC Online
- 1.11 Convert WMV to DVD
- 1.12 WMV to MKV Converter Online
- 1.13 Convert WMV to MPG
- 1.14 Convert WMV to Apple
- 1.15 Convert WMV to WAV
- 1.16 WMV to AVI Converter Online
- 2. Convert Other Format to MP4+
-
- 2.1 Convert MP4 to WMV
- 2.2 Convert MP4 to WMV Online
- 2.3 MP4 to WMV Converter
- 2.4 Convert MOV to WMV
- 2.5 Convert MOV to WMV Online
- 2.6 MOV to WMV Converter
- 2.7 Convert AVI to WMV
- 2.8 Convert QuickTime to WMV
- 2.9 Convert WLMP to WMV
- 2.10 Convert MP3 to WMV
- 2.11 Convert DAT to WMV
- 2.12 Convert AVCHD to WMV
- 2.13 Export Final Cut Pro to WMV
- 3. WMV Tools & Tips+
All Topic
- AI Tools Tips
-
- AI Photo Enhancer Tips
- Voice Changer Tips
- AI Thumbnail Maker Tips
- AI Script Generator Tips
- Smart Summarizer
- AI Subtitle Generator Tips
- Watermark Remover
- Vocal Remover Tips
- Speech to Text Tips
- AI Video Tips
- AI Image Tips
- AI Subtitle Translator Tips
- Video Extractor Tips
- Text to Speech Tips
- AI Video Enhancer Tips
- DVD Users
- Social Media Users
- Camera Users
- Photography
- Creative Design
- Movie Users
- Travelling Fans
- Educational Users
- More Solutions
- Holidays and Commemoration
- Game Lovers
- Other Tips
Step-by-Step Guide on How to Export WMV File from Final Cut Pro
by Christine Smith • 2025-10-21 20:05:20 • Proven solutions
You have a presentation next week, and you are working hard to come up with a clear presentation that incorporates videos and PowerPoint (PPT). What you need to do is to edit your videos well and then export them to a format that is supported by PPT. Therefore, you will need to edit your videos on Final Cut Pro software and export them as WMV format. After that, you will be able to insert the WMV video to PPT. This may sound hectic, but if you keep reading this article, you will know how to export files from Final Cut Pro like Pro and convert them to WMV format.
- Part 1. What is Final Cut Pro Supported Formats
- Part 2. How to Export Final Cut Pro Files to PC
- Part 3. How to Convert Exported FCP Files to WMV Format
- Part 4. External Knowledge: Best Quality Settings For Final Cut Pro
Part 1. What is Final Cut Pro Supported Formats
Final Cut Pro is a powerful video editing software that belongs to Apple Inc., although Macromedia Inc initially developed it. With this video editing tool, you will edit videos and audios of different formats. We have categorized the input and output formats supported by Final Cut Pro software in the table below.
| Supported Input Formats | Supported Output Formats |
|---|---|
| Container Formats: MOV (QuickTime), 3GP, AVI, MXF, MP4, MTS/M2TS | Compressor Settings: Apple Animation codec, AVC-Intra (MXF), QuickTime formats |
| Video Formats: XAVC (including XAVC-S), XDCAM HD/EX/HD422, XF-AVC, Apple Animation codec, Apple ProRes, Apple Intermediate codec, AVCHD (including AVCCAM, AVCHD Lite, and NXCAM), AVC-ULTRA (including AVC-LongG, AVC-Intra Class 50/100/200/4:4:4, and AVC-Intra LT), DV (including DVCAM, DVCPRO, and DVCPRO50), DVCPRO HD, iFrame, Motion JPEG (OpenDML only), MPEG IMX (D-10), , HDV, QuickTime formats, REDCODE RAW (R3D), Uncompressed 8-bit 4:2:2, Uncompressed 10-bit 4:2:2 | Master File Share Destination: XDCAM HD/EX/HD422, Apple ProRes (all versions), AVC-Intra Class 50/100/200, , HDV, DV (including DVCAM, DVCPRO, and DVCPRO50), DVCPRO HD, MPEG IMX (D-10), MXF, Uncompressed 10-bit 4:2:2, Uncompressed 8-bit 4:2:2 |
| Audio Formats: AIFF, AAC, BWF, CAF, MP4, MP3, WAV | Web Format: Facebook, Vimeo, YouTube |
| Image Formats: BMP, GIF, JPEG, PNG, PSD (static and layered), RAW, TGA, TIFF |
Now that you have edited your project on Final Cut Pro software, you can now export and convert them to WMV. Below are the detailed instructions on how to export and convert the FCP files.
Part 2. How to Export Final Cut Pro Files to PC
Step 1. Choose the project that you want to export by clicking on it. Next, click on the move the cursor to the upper right and click on the Export button. Alternatively, you can click on Share on the main menu and select the Export icon. In whichever option, you opt to select the Master File if you want quality output.
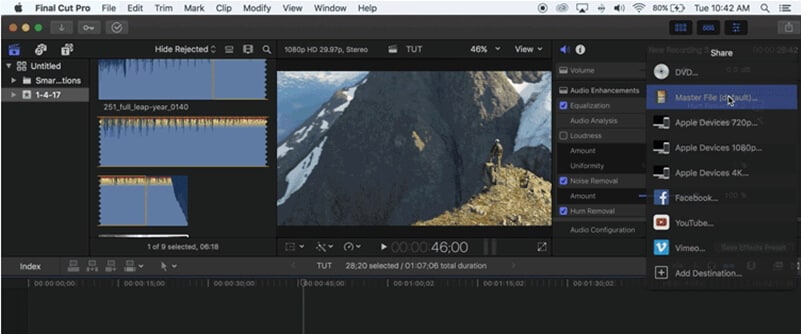
Tips: The shortcut for this export process is Command + E.
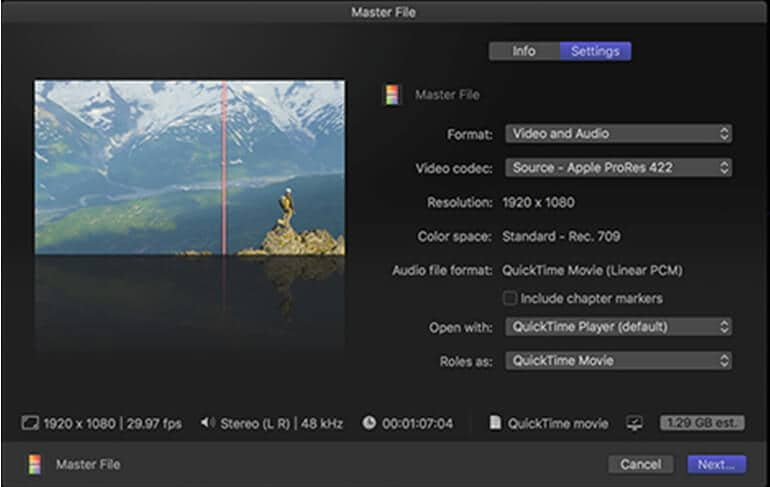
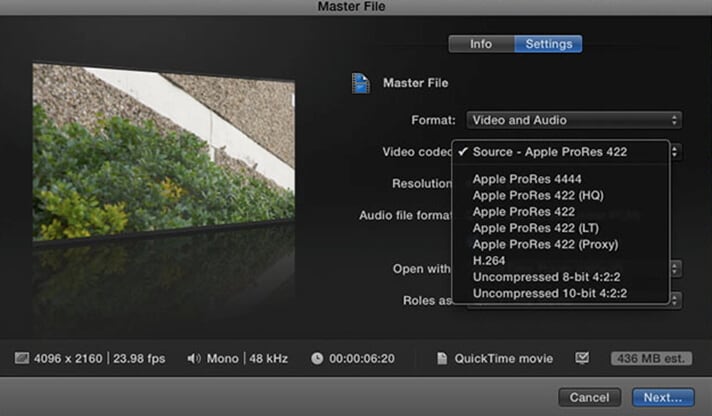
Step 2. Next, you can edit the info settings, name of the project, and tags. Under the Settings option is where you will define the output preferences. Select Video and Audio under Format to get both video and audio.
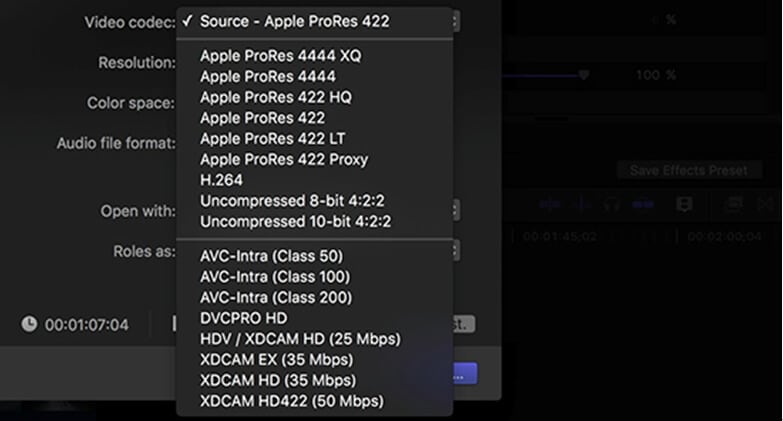
Step 3. Next, click on Video Codec. The higher the video quality, the larger the output file the software will output. Therefore, you can go for , which is relatively smaller compared to Apple ProRes codecs.
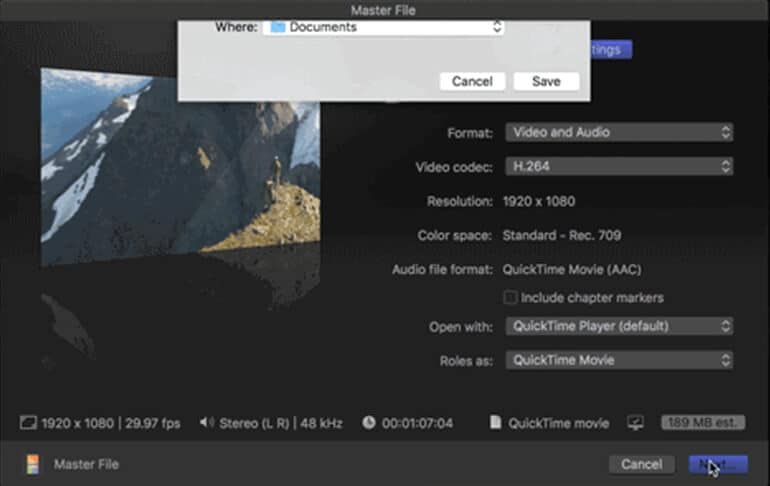
Step 4. You now export your file by clicking on Open With and select QuickTime Player (Default) and Roles As QuickTime and then click on Next. Select the appropriate folder to save your file and wait for the export process to be complete.
Part 3. How to Convert Exported FCP Files to WMV Format
After exporting the files on Final Cut Pro, you will need software supporting media files conversion to output formats such as WMV, MOV, AVI, MP4, ASF, etc. The tool to use is Wondershare UniConverter (originally Wondershare Video Converter Ultimate). This software will input files of different formats from your local computer drive, camcorders, and those from editing software and convert them to quality videos and audios.
Wondershare UniConverter - Your Complete Video Toolbox
-
Convert to 1000+ formats, like AVI, MKV, MOV, MP4, etc.
-
Convert to optimized preset for almost all of the devices.
-
Support 90X faster conversion speed than any conventional converters.
-
Edit, enhance & personalize your video files.
-
Burn video to playable DVD with attractive free DVD templates.
-
Support download or record videos from video sharing sites.
-
Versatile toolbox combines fixing video metadata, GIF maker, VR converter, and screen recorder.
-
Stream your videos from Windows or Mac to other devices, including Chromecast, Roku, Apple TV, Xbox 360, or PS3.
-
Supported OS: Windows 10/8/7/XP/Vista, Mac OS 10.15 (Catalina), 10.14, 10.13, 10.12, 10.11, 10.10, 10.9, 10.8, 10.7, 10.6
How to Convert Exported FCP File to WMV with Wondershare UniConverter (originally Wondershare Video Converter Ultimate)
Here are the steps of converting the exported FCP files to WMV once you have installed the program.
Step 1 Download Wondershare UniConverter via the download button above, then go to the Applications folder and open the installed program.
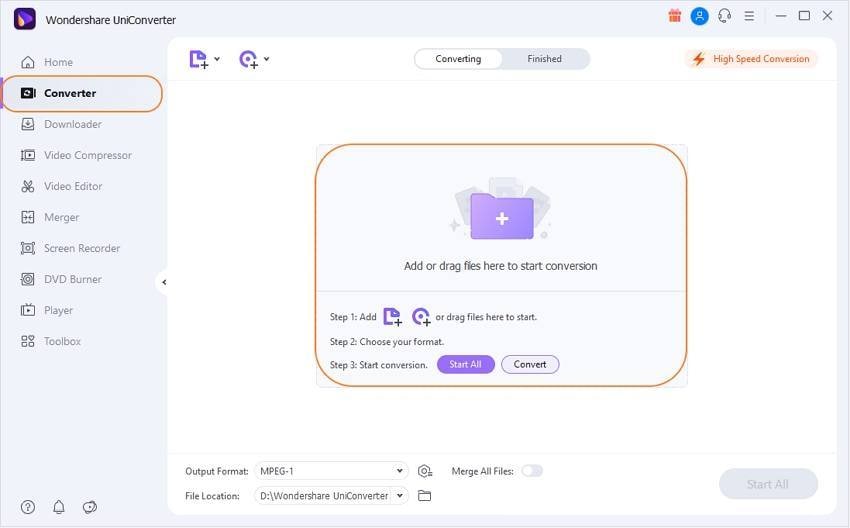
Step 2 Next, go to the Converter section in the top and click on Add Files, which will allow you to access and import the exported Final Cut Pro Files.
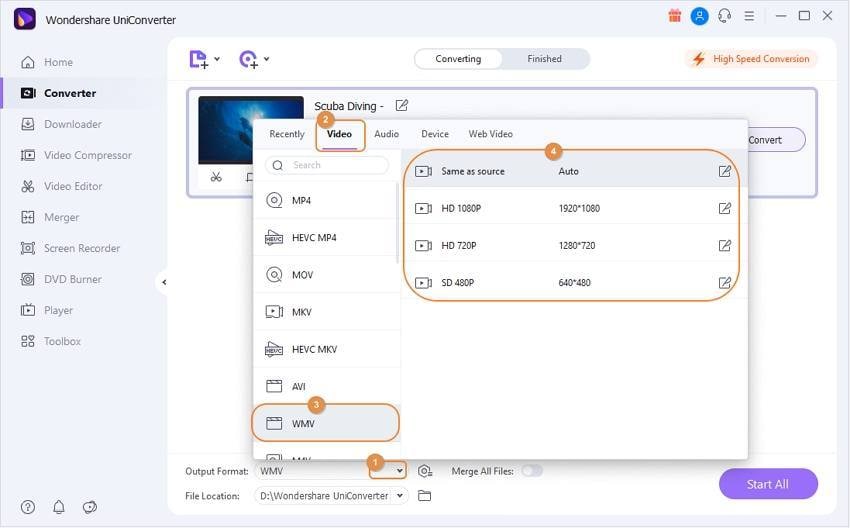
Step 3 Click the drop-down button in the Output Format section, then choose Video > WMV and select the right output quality.
Step 4 After that, specify the bottom's output location and click on the Start All button. The conversion will begin immediately, and the program will notify you once the files have been 100% converted.
Part 4. External Knowledge: Best Quality Settings For Final Cut Pro
Final Cut Pro allows you to export or share files to Master File, iDevices, Audio Format, Video Formats, etc. Let us look at a preferred quality for each.
1. Master File/ Export File settings
If you share with Master File, you can always customize the output settings, unlike when you opt for Export File. These two export formats often display a window shown below.
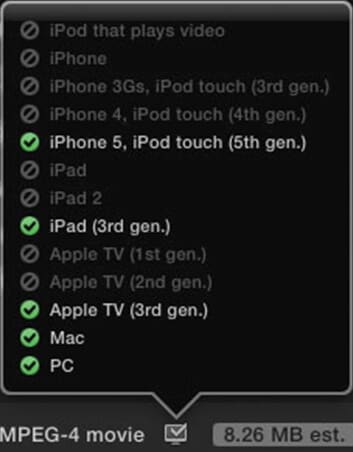
However, if you want to export to the Master file, you will customize it to the Mac option.
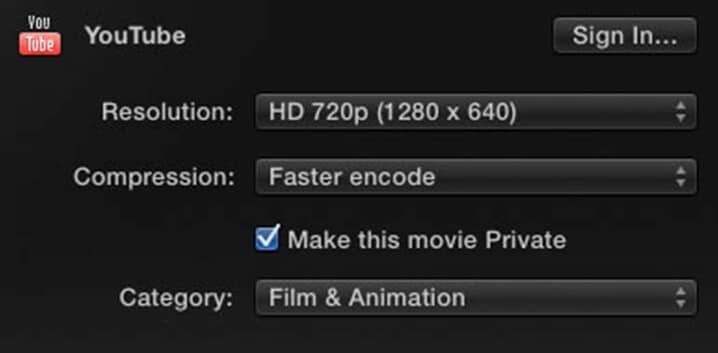
2. Web Format Settings
For web format, Facebook, Video, and YouTube, the best quality is HD 720p(1280 by 640). The compression settings can be a faster encoder or better quality.
3. DVD or Blu-Ray Settings
If you want to create a DVD or Blu- Ray, you can leave to Final Cut Pro to decide on the layers, whether Single layer or Double layer. The rest of the settings should be left, as in the image below.
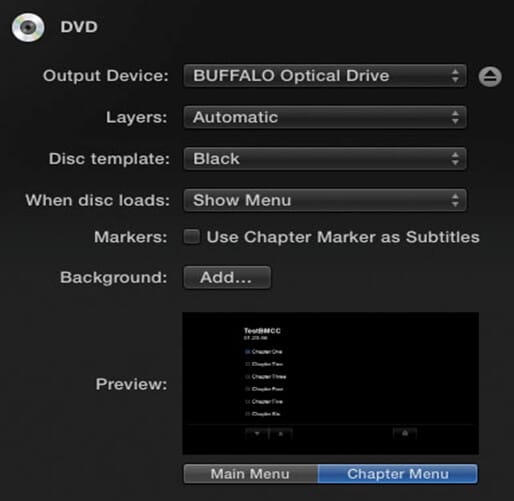
You will also use the same settings when creating Blu-Ray only that you can add a logo or image this time.
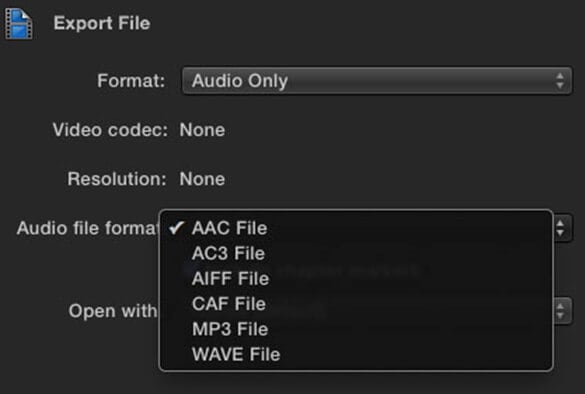
4. Audio Format Settings
When exporting as audio, ensure that you click on “Audio Only” on the “Format” tab. The preferred audio format is ACC. The video codec and Resolution cannot be customized.
5. Video Format Settings
You can also export the FCP file as Video. Here you can either go for 1080p or 720p with a resolution appropriate for your device. For Bitrate, you can select better quality or faster encoder.

There you go! You can now work on projects and output to preferred format with high quality.
* Some of the above codec formats may need to be supported by system.


Christine Smith
chief Editor