

Looking to resize a video for Instagram but struggling with cropping issues? Instagram has specific aspect ratios for Reels, Stories, and Feed, making resizing essential for a perfect fit. This guide covers the best tools to adjust your videos without quality loss. Whether you're using Windows, Mac, Android, or iPhone, you'll find simple solutions to get the perfect Instagram-ready video.
In this article
Part 1: Video Requirements for Instagram Stories, IGTV, and Feed: A Quick Guide
Instagram is a visual platform, and video is king. But not just any video will do. To make your content shine, it needs to meet Instagram's specific requirements. Here's a quick guide to ensure your videos look their best across different Instagram formats:
Instagram Stories & Reels
- Recommended Resolution: 1080 x 1920 pixels
- Aspect Ratio: 9:16 (portrait)
- Maximum Video Length: Stories: 15 seconds per slide | Reels: Up to 90 seconds
- File Size: Up to 4GB
- Supported Formats: MP4 (H.264 codec)
Instagram Feed Videos
- Recommended Resolution: 1080 x 1080 pixels (square), 1080 x 1350 pixels (portrait), 1080 x 608 pixels (landscape)
- Aspect Ratio: 1:1 (square), 4:5 (portrait), 16:9 (landscape)
- Maximum Video Length: 60 seconds (1 minute)
- File Size: Up to 4GB
- Supported Formats: MP4 (preferred)
Instagram IGTV (Now Integrated into Feed Videos)
- Recommended Resolution: 1080 x 1920 pixels (vertical) or 1920 x 1080 pixels (horizontal)
- Aspect Ratio: 9:16 (vertical) or 16:9 (horizontal)
- Maximum Video Length: 1-minute preview in Feed, up to 60 minutes for full IGTV video
- File Size: Up to 4GB
- Supported Formats: MP4 (H.264 codec)
Part 2: How to Resize Your Videos for Instagram on Windows and Mac
Resizing videos for Instagram on desktop is simple with the right tools. Whether you need to adjust resolution, aspect ratio, or prevent cropping, these three tools will help you resize video for Instagram efficiently.
1. UniConverter
UniConverter is a powerful tool to resize video for Instagram without losing quality. It offers AI-powered video enhancement and preset aspect ratios for Instagram Stories, Reels, and Feed. You can quickly adjust resolution, crop, and optimize videos for social media. With batch processing and fast exports, it's ideal for resizing multiple videos effortlessly.

Best Video Enhancer
Key Features
- AI-Powered Upscaling: Enhances video resolution intelligently, reconstructing details and minimizing noise for sharper, clearer images. Breathe new life into older footage for professional-looking Instagram content.
- Preset Aspect Ratios: Quickly select pre-configured aspect ratios optimized for Instagram Stories, Reels, and Feed. Ensure perfect formatting and avoid cropping with a single click.
- Customizable Resolution: Manually adjust resolution for fine-tuned control over output size and quality. Optimize for specific needs or internet speeds with granular settings.
- Batch Processing: Resize multiple videos simultaneously, saving time and effort. Streamline your workflow for Instagram campaigns or series of posts.
- Fast Conversion and Export: Optimized for speed, leveraging hardware acceleration for quick processing. Get your Instagram content ready without delays.
Steps to Resize Video for Instagram
Step 1: Open UniConverter and Navigate to Video Enhancer
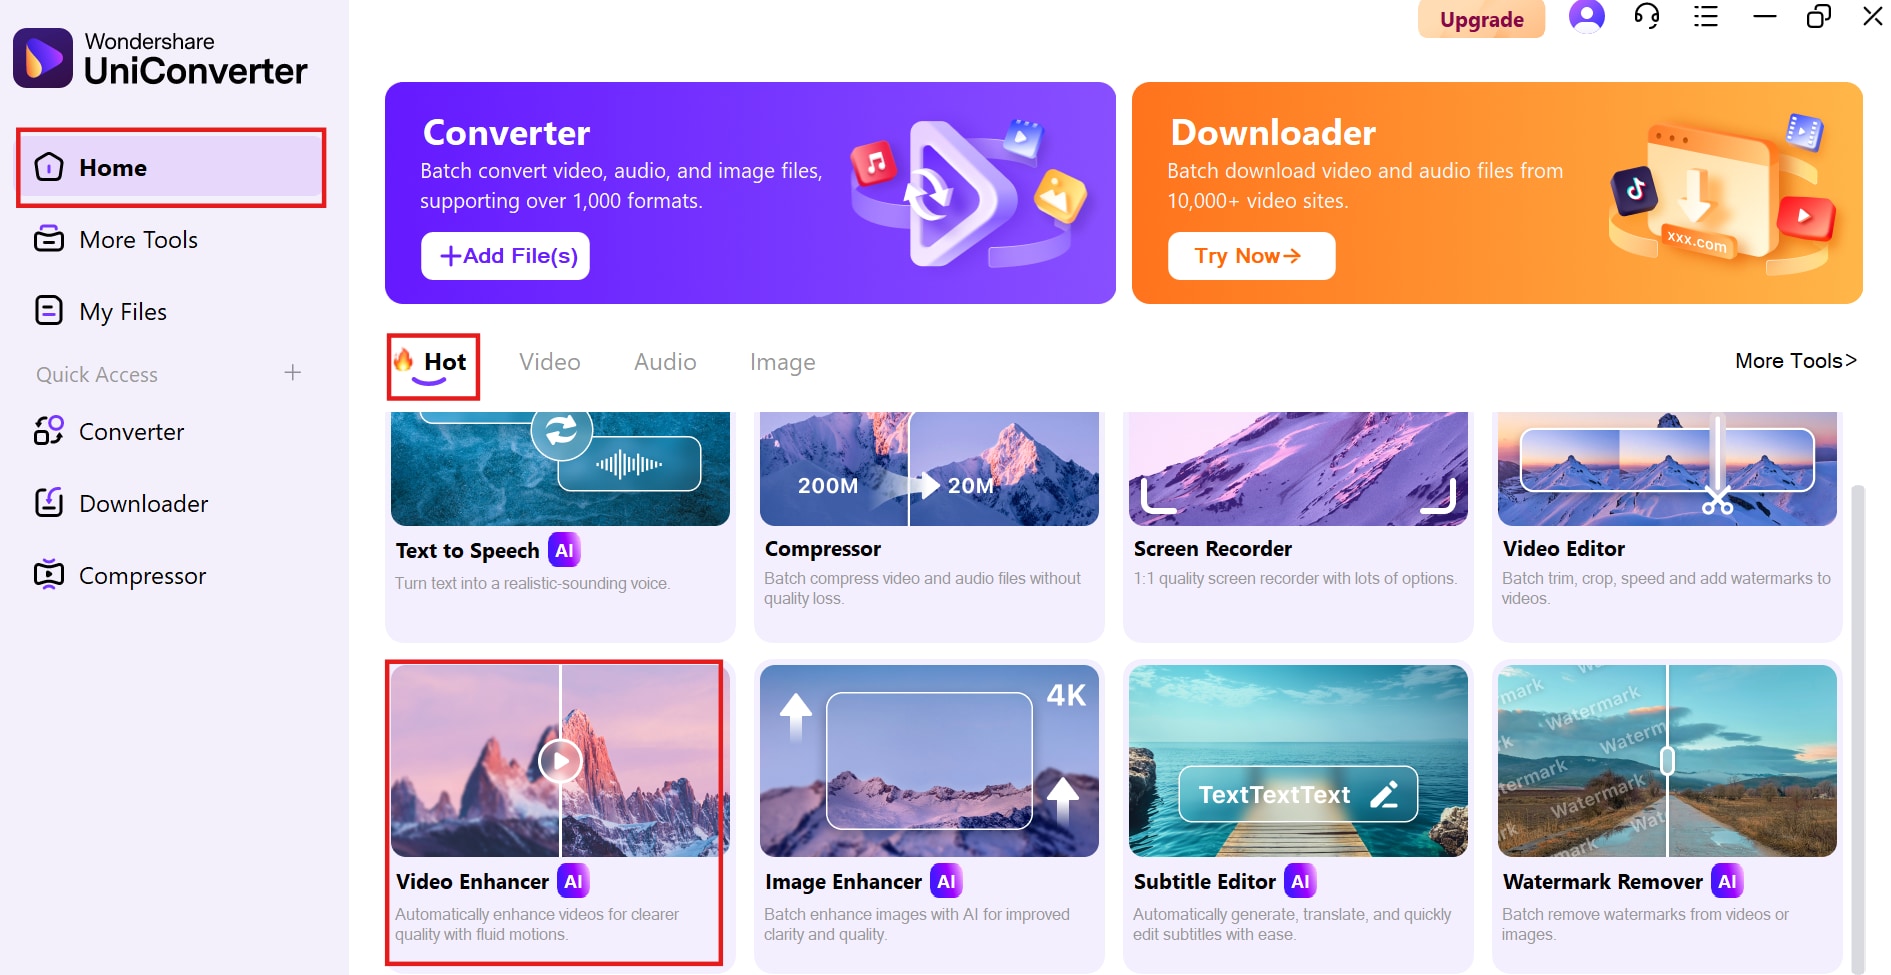
Launch Wondershare UniConverter on your computer. From the left panel, click on Home to access the main dashboard. Under the Hot section, locate the Video Enhancer tool. Click on it to proceed with enhancing and resizing your video for Instagram.
Step 2: Upload your Video and Select AI model
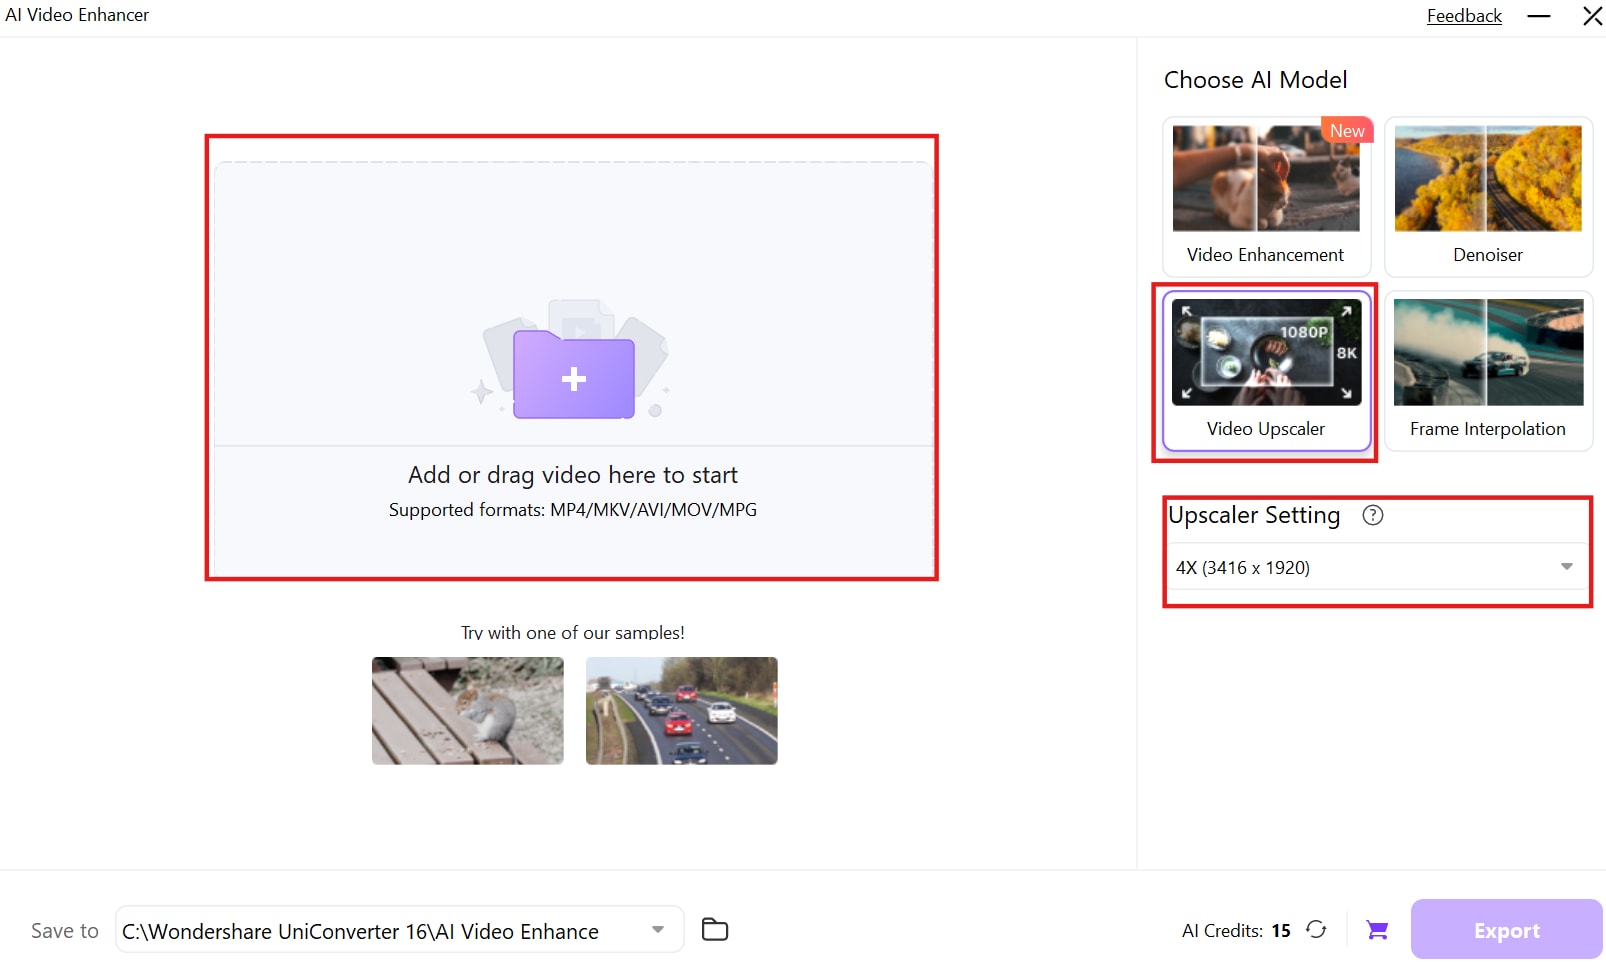
Click on the “+” button to upload the video you want to resize for Instagram. You can drag and drop your file into the upload area or browse your computer to select it. Once uploaded, go to the "Choose AI Model" section on the right and select "Video Upscaler" to enhance the resolution. Adjust the Upscaler Setting to your desired resolution, ensuring your video meets Instagram's quality requirements.
Step 3: Preview and Export the Resized Video
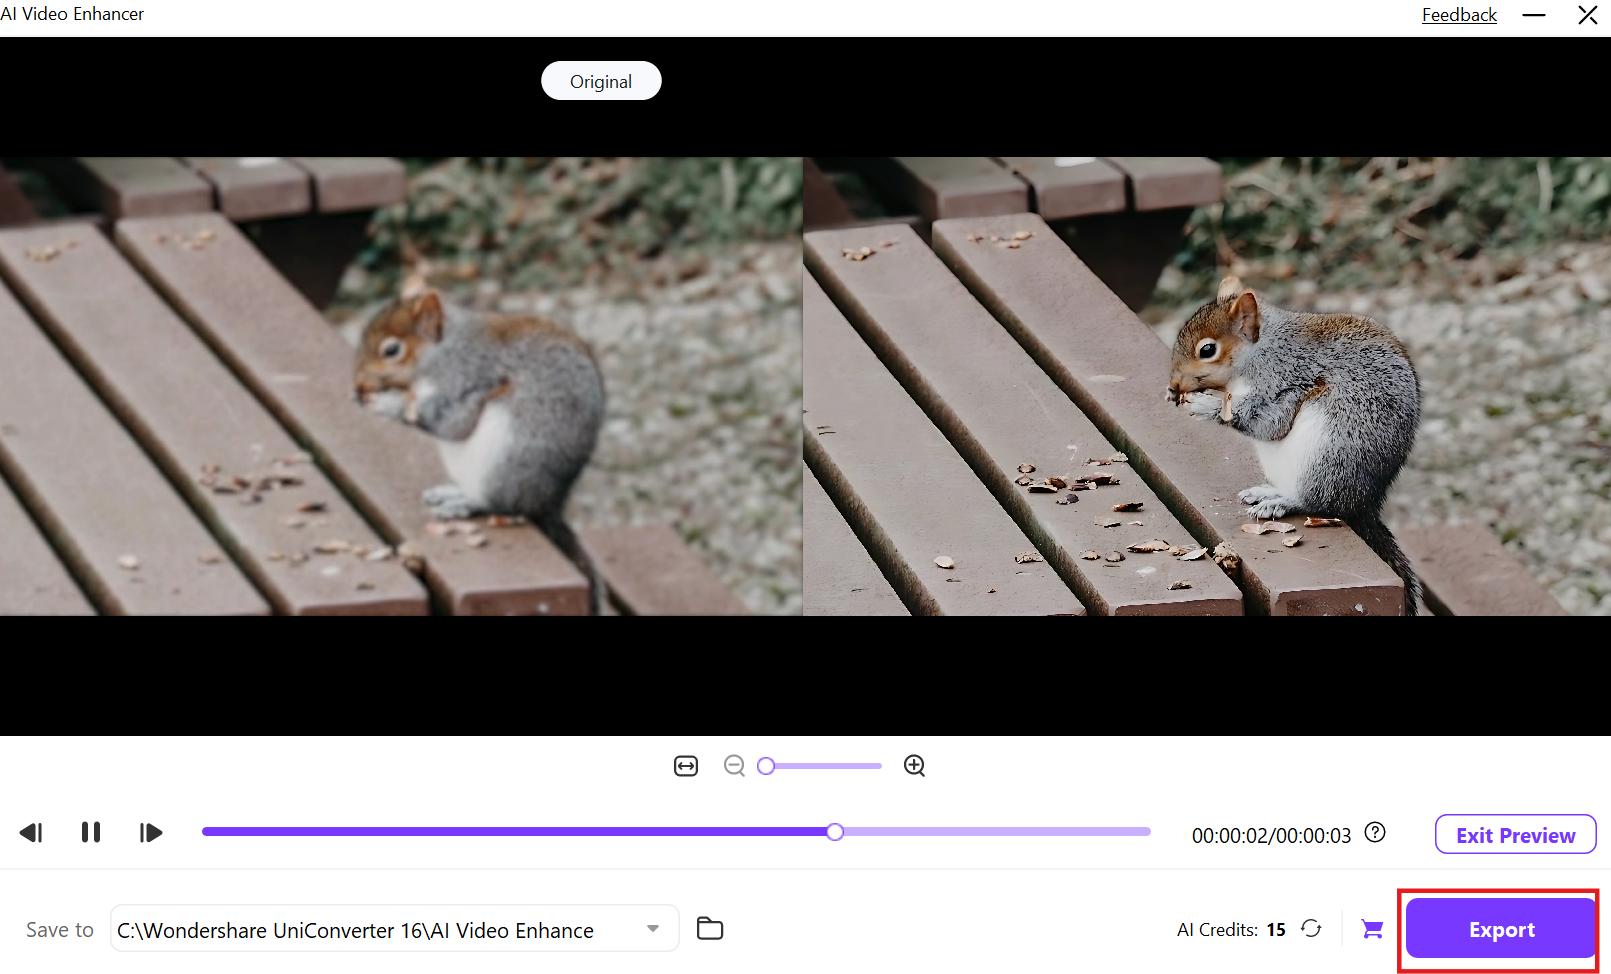
After selecting the Video Upscaler and adjusting the resolution, click on the Preview button to check how the resized video looks. Ensure that the aspect ratio and quality are optimized for Instagram Stories, Reels, or Feed. If satisfied, click Export to process and save the video in an Instagram-friendly format. Once the export is complete, your video is ready for uploading to Instagram.
2. Adobe Premiere Pro
Adobe Premiere Pro is a professional-grade editing tool that helps you resize a video for Instagram with precision. It allows you to customize aspect ratios, adjust frame positioning, and export high-quality videos for Reels, Stories, or Feed. The advanced editing options ensure perfect formatting for Instagram without compression issues. Though complex for beginners, it’s a great choice for high-quality video adjustments.
Key Features
- Precise Aspect Ratio Control: Adjust video dimensions with pixel-level accuracy to perfectly fit Instagram’s requirements, ensuring your content is properly framed without unwanted cropping.
- Advanced Cropping and Framing: Fine-tune the video composition by manually cropping and adjusting framing, keeping the subject in focus and ensuring a visually appealing layout for Instagram Reels, Stories, and Feed.
- High-Quality Export Options: Export videos in MP4 (H.264 codec) and other Instagram-friendly formats with customizable bitrates, ensuring optimal playback quality without compression issues.
- Motion Graphics and Effects: Add professional-grade motion graphics, effects, and smooth transitions to your resized videos, enhancing engagement and making your content stand out.
- Color Correction and Grading: Use advanced color correction tools to refine brightness, contrast, and saturation, making sure your resized video looks vibrant and polished before uploading to Instagram.
Steps to Resize Video for Instagram with Adobe Premiere Pro
Step1: Import your video to the timeline
Launch Adobe Premiere Pro and create a new project. Click File > Import to add your video, or drag and drop the file directly into the timeline. Premiere Pro allows you to work with high-resolution videos, making it ideal for resizing without compromising quality.
Step2: Adjust aspect ratio and framing
Go to Sequence Settings under the Sequence menu and change the frame size to match Instagram’s aspect ratio. Use the Scale and Position tools in the Effect Controls panel to ensure the video is properly framed. If needed, apply cropping or zooming to maintain focus on key elements and avoid unwanted black bars.
Step3: Export in Instagram-friendly format
After resizing, go to File > Export > Media and choose H.264 (MP4), the preferred format for Instagram. Set the resolution to 1080x1920 for vertical videos or 1080x1350 for feed posts. Adjust the bitrate to optimize quality and file size, then click Export to save your resized video.
3. Kapwing
Kapwing is an easy-to-use online editor that lets you resize Instagram video directly from your browser. It provides one-click aspect ratio presets for Instagram Stories, Reels, and Feed, making resizing hassle-free. Since it's web-based, you don’t need to download any software, and it works seamlessly on both Windows and Mac. It’s a great option for quick video resizing without installation.
Key Features
- One-Click Resizing: Quickly resize videos for Instagram Reels, Stories, and Feed using preset aspect ratios, eliminating the need for manual adjustments.
- Simple Interface: Designed for ease of use, Kapwing’s intuitive interface allows even beginners to resize videos effortlessly without requiring advanced editing skills.
- Cloud-Based Editing: Edit and resize videos directly from your browser, eliminating the need for software installation and allowing seamless access from any device.
- Collaboration Features: Share projects and collaborate with team members or clients, making it easier to work on Instagram video content together in real time.
- Free and Paid Options: Offers a free version with basic resizing tools, while premium plans provide additional features like higher-resolution exports and watermark-free editing.
Steps to Resize Video for Instagram with Kapwing
Step1: Upload video to Kapwing editor
Visit Kapwing.com and click Start Editing to access the online video editor. Upload your video by dragging and dropping it into the workspace or selecting it from your device. Kapwing works entirely online, eliminating the need for software downloads.
Step2: Select an Instagram format
Once your video is uploaded, click the Resize button and choose from preset aspect ratios for Instagram Stories (9:16), Feed (4:5), or Square Posts (1:1). The tool automatically crops or resizes your video while keeping the essential content in focus. You can also add borders or background colors to maintain the full video without cropping.
Step3: Export and download the resized video
After making adjustments, click Export Video to process the resized file. Kapwing will generate the final video, which you can download to your device or share directly to Instagram. If using the free version, there will be a watermark, but a paid plan removes it.
Part 3: How to Resize Instagram Videos on Android/iPhone
Resizing videos for Instagram on mobile is easy with the right apps. Whether you're adjusting aspect ratios for Instagram Reels, Stories, or Feed, these three tools help you resize videos seamlessly on Android and iPhone.
1. InShot
InShot is a popular mobile video editor that makes it easy to resize a video for Instagram free with just a few taps. It offers preset aspect ratios for Stories, Reels, and Feed, allowing users to quickly adjust their videos without cropping important content. The app also provides basic editing tools like trimming, adding borders, and adjusting backgrounds. With its user-friendly interface, it’s a great choice for quick Instagram video resizing.

Key Features
- One-Tap Instagram Aspect Ratio Presets: Easily resize videos to 9:16 for Stories/Reels, 4:5 for Feed, or 1:1 for Square posts with built-in templates.
- Border and Background Fill: Add blurred, colored, or custom background fills to fit resized videos within Instagram’s required dimensions.
- Basic Editing Tools: Trim, cut, and adjust speed to refine your video after resizing, ensuring a polished final output.
- Format Conversion for Instagram:Export videos in MP4 (H.264) format with Instagram-friendly resolution and size settings.
- High-Quality Exports: Supports HD output up to 1080p, ensuring resized videos maintain sharpness and clarity.
How to Resize Videos for Instagram with InShot
Step1: Import your video
Open the InShot app on your phone and tap Video to start a new project. Browse your gallery and select the video you want to resize for Instagram. You can also record a new video within the app if needed. Once imported, the video will appear in the editing timeline for further adjustments.
Step2: Select an Instagram aspect ratio
Tap on Canvas, where you’ll find preset aspect ratios for Instagram. Choose 9:16 for Reels/Stories, 4:5 for Feed, or 1:1 for Square posts. If the video doesn’t fit perfectly, you can adjust its size by pinching to zoom in or out. You can also add a blurred or solid background to fill any gaps without cropping the video.
Step3: Export and save the resized video
Once you’re satisfied with the resized video, tap Export in the top-right corner. Select the desired resolution (1080p recommended for Instagram). After the export is complete, save the video to your device and upload it directly to Instagram through the app.
2. CapCut
CapCut is a feature-rich video editing app that provides precise resizing options for Instagram videos while maintaining high quality. It includes auto-cropping, frame adjustments, and motion effects, ensuring your videos fit Instagram’s formats without distortion. The app supports 4K exports and has no watermark, making it ideal for professional-looking Instagram videos. Whether you're resizing for Stories, Reels, or Feed, CapCut offers an efficient and high-quality solution.
Key Features
- Auto-Fit Cropping and Resizing: Automatically resizes videos to fit Instagram’s aspect ratios without cutting off important content.
- No Watermark for Free Users: Export resized videos without watermarks, making it ideal for professional-quality Instagram content.
- Motion Adjustments and Effects: Resize videos while adding smooth transitions, speed adjustments, and special effects.
- 4K and High-Resolution Export Support: Maintain top-tier video quality with support for Full HD (1080p) and 4K exports after resizing.
- Direct Instagram Sharing: Instantly upload resized videos to Instagram from within the app for a seamless workflow.
How to Resize Videos for Instagram with CapCut
Step1: Upload video to CapCut
Launch CapCut and tap New Project to begin. Select the video from your phone’s gallery, or add multiple clips if you're working on a longer Instagram post. CapCut supports different file formats, so even high-resolution videos can be easily resized.
Step2: Adjust the aspect ratio
Tap Format, where you'll find preset aspect ratios for different platforms, including Instagram. Choose 9:16 for Reels/Stories, 4:5 for Feed, or 1:1 for Square posts. Use the pinch-to-zoom feature or the Resize and Position tool to adjust how the video fits within the frame. This ensures that important parts of your video remain visible after resizing.
Step3: Export the video in high quality
Once you've finished resizing, tap Export at the top-right corner. Choose a high-quality resolution like 1080p or 4K to maintain sharpness. You can also adjust the frame rate (30fps is standard for Instagram). Once the export is complete, your resized video will be ready for sharing on Instagram.
3. VN Video Editor
VN Video Editor is a professional-grade mobile editing tool that allows users to resize Instagram videos while maintaining full control over framing and quality. It features custom aspect ratio adjustments, batch resizing, and high-resolution exports without watermarks. With its frame-by-frame editing tools, it’s perfect for content creators looking to fine-tune their Instagram videos with precision. The app also supports direct sharing to Instagram for seamless posting.

Key Features
- Custom Aspect Ratio Adjustments: Manually set precise aspect ratios, ensuring Instagram videos are resized without unwanted cropping.
- Batch Resizing for Multiple Videos: Resize multiple videos at once, saving time when preparing Instagram content in bulk.
- Frame-by-Frame Editing for Precision: Adjust each frame carefully to maintain composition and focus when resizing.
- No Watermark and Free High-Quality Export: Export resized videos without watermarks in 1080p or 4K, maintaining professional quality.
- Multi-Layer Video Editing Tools: Add overlays, text, and effects while resizing, giving your Instagram videos a creative edge.
How to Resize Videos for Instagram with VN Video Editor
Step1: Import the video into VN Editor
Open VN Video Editor and tap New Project to create a workspace for your video. Browse your gallery to select the video you want to resize for Instagram. If you have multiple clips, VN allows you to merge and resize them in one project.
Step2: Resize and adjust framing
Tap on Crop & Resize, then choose an Instagram-optimized aspect ratio such as 9:16 for Reels/Stories, 4:5 for Feed, or 1:1 for Square posts. VN also provides precise positioning tools, so you can drag the video within the frame to ensure key elements remain visible. You can also add a background fill to avoid cropping if the video doesn't fit perfectly.
Step3: Export the resized video
Once resizing is complete, tap Export and choose a resolution of 1080p or higher to keep the video crisp and clear. VN allows additional settings like bitrate adjustment for better quality. After exporting, the video will be saved to your phone, ready for direct upload to Instagram.
Part 4: How to Resize Videos for Instagram: 10 Key Tips
Resizing videos for Instagram Stories, Reels, and Feed requires proper formatting to avoid cropping, distortion, or quality loss. Follow these 10 essential tips to resize your videos effectively while maintaining high quality.
- Use the correct aspect ratio: Instagram has different aspect ratios: 9:16 for Stories and Reels, 4:5 for Feed, and 1:1 for Square posts. Choosing the right size prevents unnecessary cropping and ensures a perfect fit.
- Select the right resizing tool: Use UniConverter, CapCut, InShot, or VN Video Editor to resize videos easily. These tools provide preset aspect ratios and auto-cropping features to fit Instagram formats.
- Maintain high resolution after resizing: Always resize videos to at least 1080x1920 pixels for Stories and Reels or 1080x1350 pixels for Feed posts to prevent blurriness. Avoid resizing low-quality videos that might appear pixelated.
- Keep key content within the safe zone: Instagram may crop videos slightly, especially in Stories and Feed previews. Keep important subjects, text, and elements centered to prevent them from getting cut off after resizing.
- Use auto-fit resizing to prevent black bars: Some tools like InShot and CapCut offer an auto-fit feature that resizes videos to fill the screen without adding empty black spaces or distorting the frame.
- Adjust video length before resizing: Instagram has strict duration limits, so trimming the video before resizing can prevent unnecessary cropping. Stories are limited to 15 seconds per slide, Reels can be up to 90 seconds, and Feed videos can be up to 60 minutes.
- Use AI upscaling for low-resolution videos: If your video is lower than 1080p, use AI-powered tools like UniConverter’s Video Enhancer to upscale it before resizing. This helps maintain clarity even after adjusting the aspect ratio.
- Apply background or borders instead of cropping: If resizing changes the frame too much, adding a blurred background, solid color, or borders using VN Video Editor or InShot can help maintain the full video without awkward cropping.
- Choose the correct file format while resizing: Instagram recommends MP4 (H.264 codec) for the best compatibility. Some resizing tools allow you to adjust file formats while resizing to ensure smoother playback and better upload quality.
- Avoid excessive zooming or stretching when resizing: When adjusting a video's size, avoid stretching it too much to fit Instagram’s format, as this can distort visuals. Instead, use proper cropping techniques or resizing tools that maintain the video’s original proportions.
Conclusion
Resizing videos correctly is essential to ensure they fit Instagram Stories, Reels, and Feed without cropping or black bars. This guide covered Instagram’s video requirements, the best tools for Windows, Mac, Android, and iPhone, and key tips to resize video for Instagram while maintaining high quality. UniConverter’s AI Video Enhancer ensures resized videos remain sharp and clear. It also includes Auto Crop for automatic aspect ratio adjustments and AI Watermark Remover to remove unwanted text or logos. Try UniConverter for an effortless way to resize and enhance videos for Instagram.
FAQs
1. What is the best aspect ratio to resize video for Instagram?
The ideal aspect ratio depends on the format: 9:16 for Stories and Reels, 4:5 for Feed, and 1:1 for Square posts. Using the correct aspect ratio prevents cropping and ensures your video fits perfectly.
2. Can I resize a video for Instagram without losing quality?
Yes, using tools like UniConverter’s Video Enhancer helps resize videos while maintaining sharpness and clarity. Always export in 1080p or higher to preserve quality.
3. How can I resize Instagram video on a mobile device?
Apps like InShot, CapCut, and VN Video Editor allow you to resize Instagram video with preset aspect ratios. These apps ensure your videos fit Instagram formats without manual cropping.
4. What file format should I use after resizing?
Instagram prefers MP4 (H.264 codec) for smooth uploads and playback. If your file is in a different format, convert it while resizing to ensure compatibility with resize video Instagram settings.
5. Why do I need to resize my videos for Instagram?
Resizing ensures your videos fit Instagram's specifications, preventing cropping, distortion, or upload issues. It also optimizes them for mobile viewing.

