Subtitles
- Try It Free Try It Free
- 1. Add Subtitles+
- 2. Extract Subtitles+
- 3. Download Subtitles+
- 4. Tips and Tricks+
-
- 4.1 Top 10 Subtitles Players
- 4.2 Play Dual Subtitles
- 4.3 Video Players with Subtitles
- 4.4 Convert IDX to SRT
- 4.5 Convert TXT to SRT
- 4.6 Convert SUB to SRT
- 4.7 Convert Video with subtitle
- 4.8 Best Subtitle Converters
- 4.9 Subtitle Editor Tools
- 4.1 Adjust Subtitle Delay in VLC
- 4.11 Best Subtitle Maker
- 4.12 Tips about Subtitle Editing
- 4.13 Synchronize Subtitle Tool
- 4.14 Best Font for Subtitles
- 4.15 How to Create SRT File
- 4.16 Turn On/Off Subtitles
- 4.17 Several Tips about Subtitles in Windows Media Player
How to Free Synchronize Subtitle with Movies with 4 Effective Methods
by Kayla Morrison • 2026-01-21 18:53:26 • Proven solutions
Ever experienced the effect of improper synchronization of subtitle lines in your favorite movies or videos? It is often possible due to the inappropriate specification of time delay and speed of loading of the subtitle lines. But you can fix them. You can synchronize subtitles to a movie or video in 4 effective methods that are entirely free of cost. Read further today's article and implement them in your daily life.
- Part 1. How to Re-Sync Subtitles and the Video with VLC
- Part 2. How to Sync Your Subtitles Online
- Part 3. Best Subtitle Tool You Can't-Miss (Further Reading)
Part 1. How to Re-Sync Subtitles and the Video with VLC
As we all know, VLC is one of the open-source, free cross-platform media player used by various users to date. You can play audio, video, and also add a subtitle to a video of another language. Have you ever added subtitle files to a video successfully but facing inconvenience due to incorrect synchronization effects? Well, you can perform resync with VLC at ease, and this session will teach you how.
Step 1: Open the VLC media player and open the media file with subtitles.
Step 2: There are two modes of technique is offered to alter the subtitle pace in the VLC media player.
Mode 1: By Keyboard shortcut
If the subtitle loading is slow and if you wish to speed up the process, press G that will speed up by 50ms.If the subtitle loading is fast and a delay is to be introduced, press H key that will reduce the subtitle speed by 50ms.
Mode 2: Manual method
Perform the Tools, then choose the Track Synchronization.
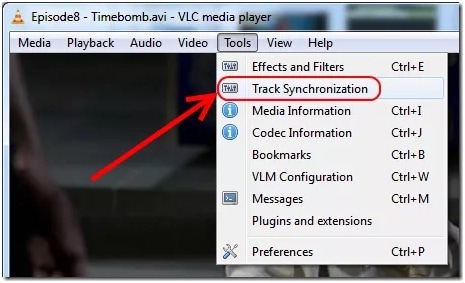
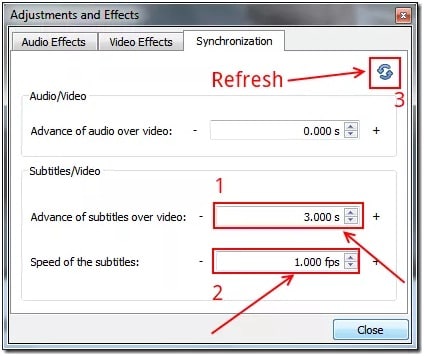
You will reach the window of the following interface with adjustment and effects for subtitles. Go to the Synchronization tab and change the specification of the subtitle. And it will now get resynced to the video and you can start enjoying your favorite video in VLC.

Info
Try UniConverter for Free - Best Subtitle Maker and Editor for Mac/Windows
Part 2. How to Sync Your Subtitles Online
You can also resync subtitles successfully with the aid of some of the online subtitle resync tools available for free. We have listed three such software in this session for your practical use.
1. Subtitletools
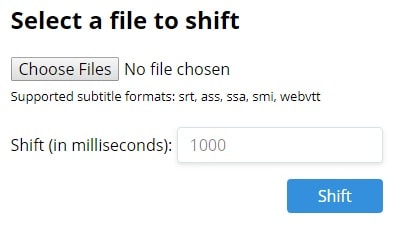
Subtitlestools is our first online subtitle resync tool that can permanently sync a subtitle file by specifying a particular timing in milliseconds. Note: If the delay is uniform throughout the subtitle file, this tool is easy to use. However, if the delay differs in different parts of the subtitle files, then you will need a partial shifter tool to carry over the process.To sync subtitle effectively for a video with Subtitle tools, all you have to do is:
Step 1: Open the Subtitletools in your default browser.
Step 2: Hit on the Choose Files icon and choose the subtitle file you want to resync. Specify the shift period in milliseconds and once complete, hit on the Shift button.
2. Move Your Sub
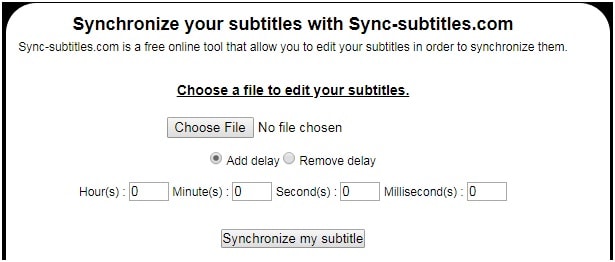
Open the Move your Sub subtitle sync tool. As you can look at the below interface, the Move Your Sub is simple to use. You can add or remove the delay in the desired subtitle also.To sync the subtitle file to your video with the help of Move your sub:
Step 1: Open the Move Your Sub in your browser.
Step 2: Choose the subtitle file and specify what process is required; Is it to add or remove the delay in the data. Then accordingly put the value in the time mode. For example, if subtitles get delayed by 1 min and 30 sec, then on the mentioned time criteria enter the value.
Step 3: After entering the values to synchronize the subtitle file and you need to hit on the Synchronize my subtitle icon once done.In 3 steps, your subtitle will be synced by Move your sub for free online, and you can add it to your video.
3. SubShifter
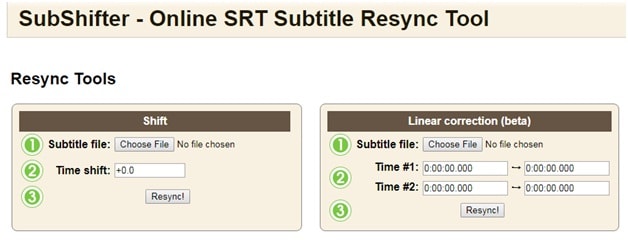
SubShifter is our last free online subtitle sync tool that is used to shift the time stamp of the subtitle file. It is specially formed to synchronize the slight change or slight offset between two different sources. Last but not least, it supports the SRT file format that is supported by media players at present.
Step 1: Open the SubShifter in your browser. It is the first step to sync your subtitle file with the SubShifter tool.
Step 2: Choose the subtitle file and enter the time shift value and hit on the Resync button. Another option in SubShifter is linear correction mode in which you can specify different time shift value for better synchronization. This way is how the subtitle synchronization is carried out for the video for free with SubShifter.

Info
Try UniConverter for Free - Best Subtitle Maker and Editor for Mac/Windows
Part 3. Best Subtitle Tool You Can't-Miss (Further Reading)
As you can see, the methods above can be confusing to use, especially to beginners. Even worse, these apps don't let users customize their subtitle tracks. That's why you need Wondershare UniConverter installed on your computer. With this desktop software, users can enjoy a wealth of subtitle editing features. Firstly, you can make custom subtitles with unique fonts, opacity, positioning, and more. Secondly, users can download thousands of free SRT subtitles for free. And above all, you can edit subtitle tracks and timings quickly and easily.
 Wondershare UniConverter - Best Subtitle Tool MOV Mac/Windows (Catalina Included)
- Modification of subtitles font, style, size, or other details.
- It is one such software that is suitable for all sorts of audio and video format conversion.
- At 90X faster speed, all forms of audio and video conversions are made to more than 1000 available formats.
- With the help of UniConverter, you can perform converting, editing, downloading, transferring, and burning a video to DVD too.
- You can download videos from UGC sites, Record videos from streaming sites, and save videos from more than 10,000 locations in just a single click.
Below are the steps to create and edit subtitles with Wondershare UniConverter:
Step 1 Run Wondershare UniConverter and Upload your Video File.
Install and launch Wondershare UniConverter before clicking the Toolbox button. Proceed to click the Subtitle Editor tab on the Video Editor window. You can now locate the video file you want to edit, then open it on Wondershare Subtitle Tool.
![]()
Step 2 Download and Upload a Subtitle File.
On the subtitle editing window, you'll see the following buttons:
- Create Subtitles – Do you want to make your own unique subtitles and add them to the video? Click the New button. Here, you only need to enter the subtitle text and timing to create a new subtitle track. After that, press the Add icon to create another subtitle track.
- Search Subtitles – Sometimes, you don't have to go through the pains of creating a subtitle file from scratch. That's because Wondershare Subtitle Tool lets you download thousands of free subtitles and add them to your video file.
- Import Subtitles – After downloading a subtitle file, you can easily upload and add it to your video file. To do that, click the Import, or click the Add button. Your subtitle tracks will load below the preview screen.
![]()
Step 3 Customize Subtitle Settings.
After uploading a subtitle file or creating brand new subtitles, it's time to customize them professionally. Wondershare Subtitle Tool lets you adjust the font size, font type, font color, subtitle position, and outline width. If satisfied, press the Apply to All button before clicking the OK to confirm your changes.
![]()
Step 4 Convert and Save the Video.
Now let's encode your video to another format. Go to the Converter before you click the Output Format, then select a new video format under the Video tab. You can also set the saving folder under the File Location. Finally, press the Start All to begin converting and saving the video. That's it!
![]()

Tips
With Wondershare UniConverter, you can convert AVI to Any Video as well. Move to How to Convert AVI to Other Formats>> to learn more.


Kayla Morrison
staff Editor