

Optimizing images for the web is essential for faster loading speeds, improved SEO, and a better user experience. Large images can slow down websites, leading to higher bounce rates and lower conversions. By using image compressors and optimizers, you can reduce file sizes without losing quality. Whether you're an online store owner, blogger, or web developer, optimizing photos for websites helps enhance performance and engagement. This guide covers top online and offline tools to help you optimize images like a pro.
In this article
Part 1: Detail Points for Image Optimization
Optimizing images for the web is essential for improving website speed, reducing bandwidth usage, and enhancing user experience. Choosing the right format, compressing images, and implementing efficient loading techniques can significantly impact SEO rankings and page performance. Below are key factors to consider when optimizing images for websites.
1. Choose the Right Image Format
Selecting the correct image format is crucial for balancing quality and file size. JPEG is best for high-resolution photographs and detailed images due to its ability to compress colors efficiently. PNG is ideal for images that require transparency, such as logos and icons, but typically results in larger file sizes. WebP is a modern alternative that offers 30-50% better compression than JPEG and PNG while maintaining high quality, making it a preferred format for web optimization.
2. Compress Images Without Losing Quality
Lossy compression removes some image data to achieve a significant reduction in file size. This is useful for websites that need fast-loading visuals without high-quality requirements. Lossless compression maintains all original image details while reducing file size, making it the preferred method for logos and graphics that require perfect clarity. By using an image compressor for WebP, PNG, or JPEG, website owners can optimize images while maintaining sharpness and color accuracy.
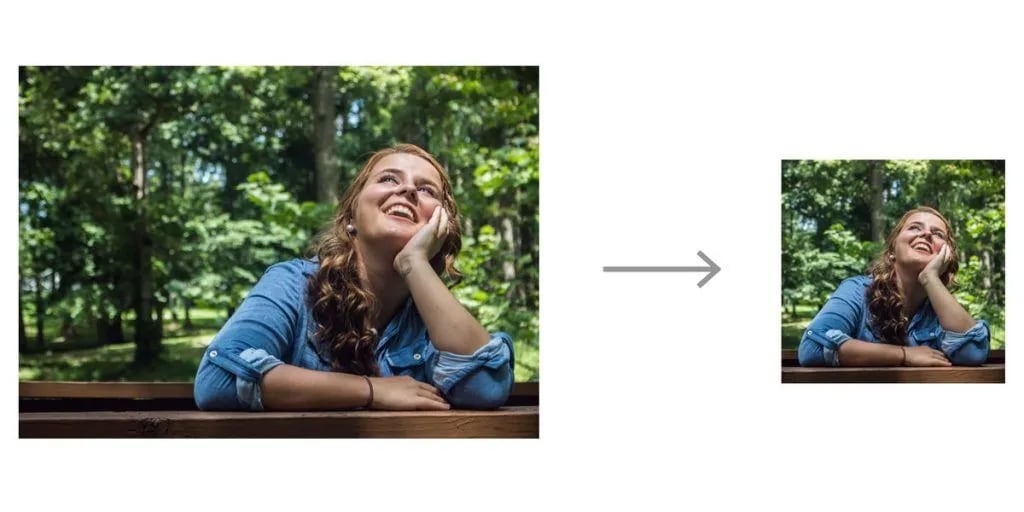
3. Resize and Scale Images Properly
Uploading unnecessarily large images can slow down website performance and increase bandwidth consumption. Images should be resized to match the required dimensions for specific web layouts. For example, if a website only displays images at 800x600 pixels, there’s no need to upload a 3000x2000 pixel version. Using tools like UniConverter, Photoshop, or online image resizers, users can scale down images while maintaining visual clarity.
Part 2: Why Image Optimization Matters: Insights & Statistics
Optimizing images for the web is essential for improving website performance, enhancing user experience, and boosting SEO rankings. Below are key statistics and insights that highlight the importance of image web optimization.
1. Faster Page Load Times Improve User Retention
Studies show that 40% of users abandon a website if it takes more than 3 seconds to load. Unoptimized images are one of the biggest culprits behind slow load times, leading to higher bounce rates. By using an online web image optimizer or compressing images for websites, businesses can significantly improve page speed and retain visitors.
2. Optimized Images Improve SEO Rankings
Google prioritizes fast-loading websites in search rankings, and images play a crucial role in website speed optimization. Pages with large, uncompressed images take longer to load, negatively affecting SEO performance. By optimizing images for the web, businesses can improve their search engine ranking, visibility, and organic traffic.
3. Reducing Bandwidth Saves Hosting Costs
Large images consume more bandwidth, leading to higher hosting expenses for website owners. Optimizing photos for the web reduces file size, resulting in faster site performance while minimizing server load and bandwidth consumption. Using an image compressor for WebP or JPEG can significantly cut down hosting costs and improve overall efficiency.
4. Better Mobile Experience for Users
Over 60% of internet traffic comes from mobile devices, where loading speed is even more critical. Slow-loading pages due to unoptimized images frustrate mobile users and increase bounce rates. Web optimize photos by resizing, compressing, and converting them to WebP format to ensure a smooth browsing experience across all devices.
Part 3: How to Optimize Images for Websites Online[5 Tools]
Optimizing images online is a quick and efficient way to reduce file sizes, improve website performance, and enhance SEO rankings. Online image optimizers allow users to compress images for websites without the need for software installation. Below are five top-rated online tools for optimizing images for the web, including their features, user reviews, and step-by-step guides.
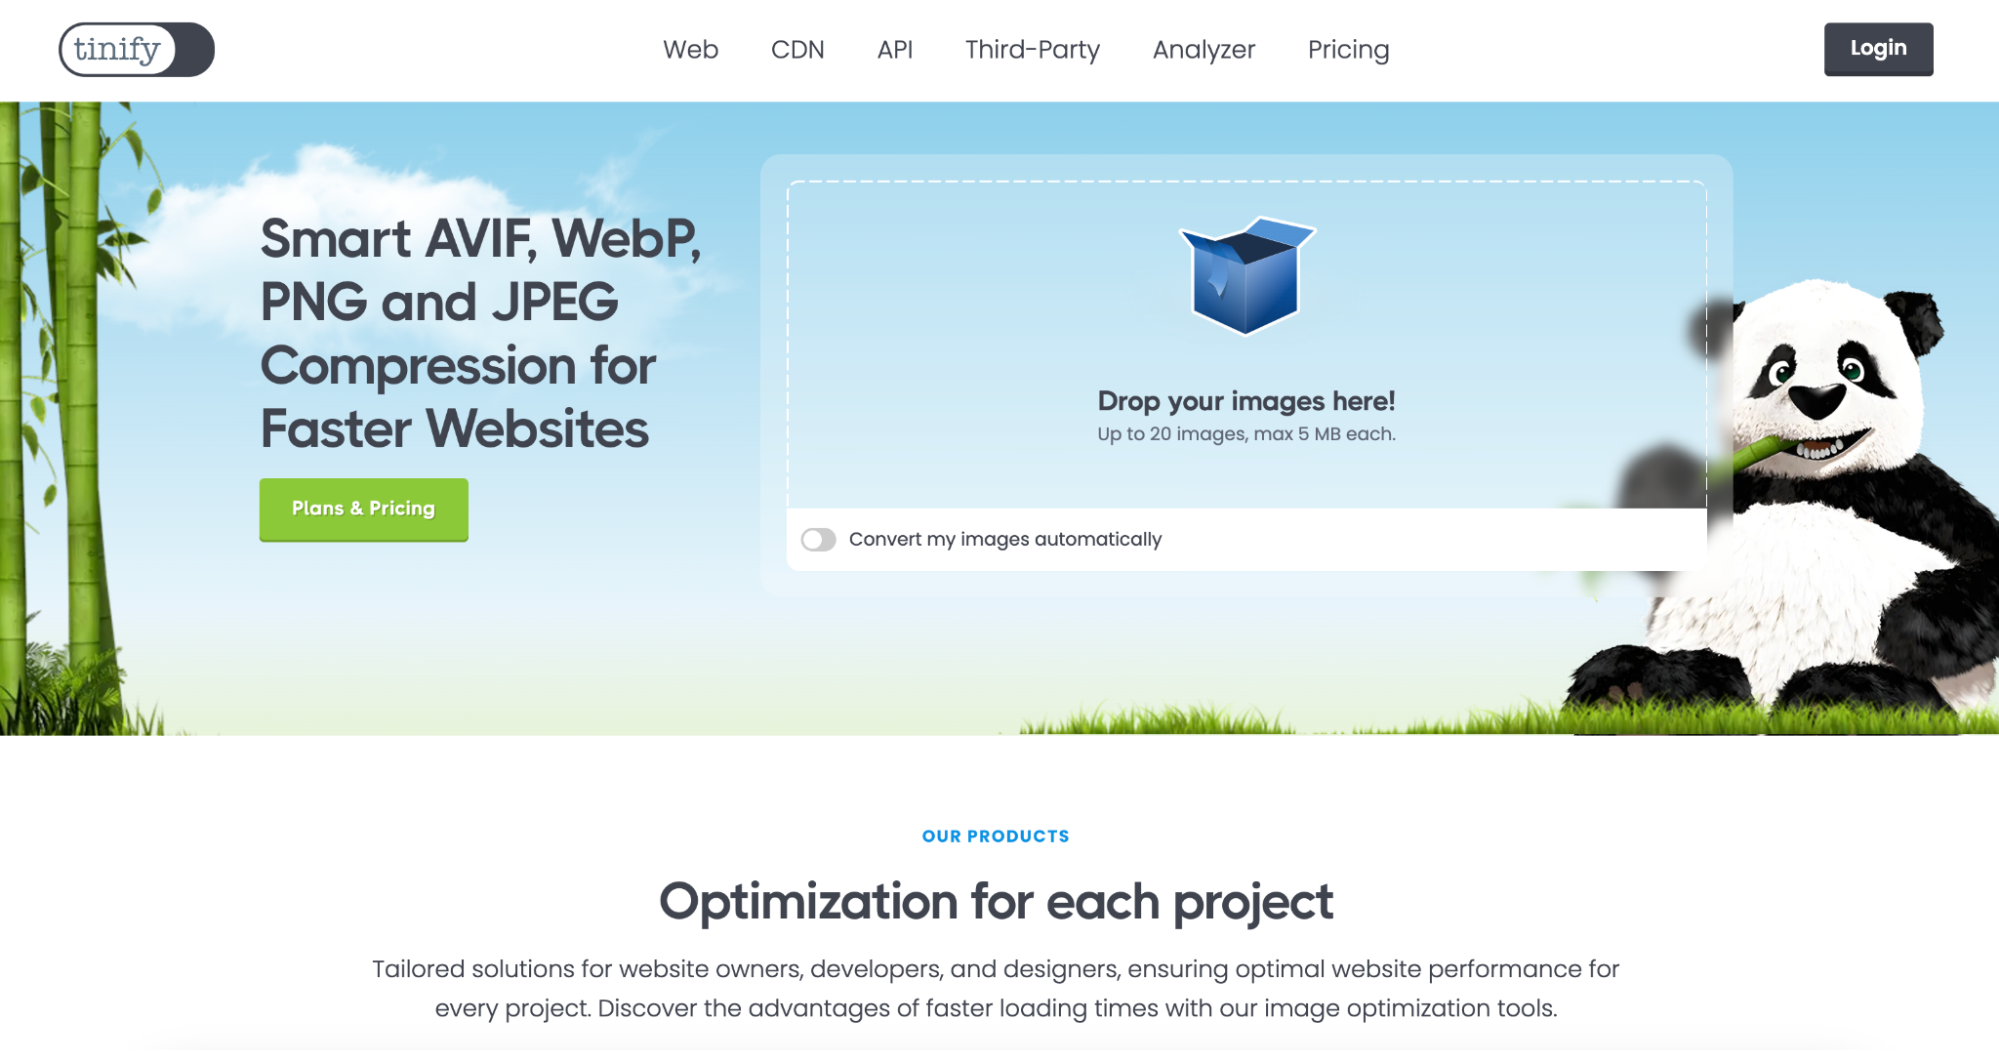
1. TinyPNG – Best for Lossless Compression
TinyPNG is a lightweight online image optimizer that uses smart lossy compression to reduce file sizes while maintaining quality. It supports JPEG, PNG, and WebP formats, making it a reliable option for web developers and content creators. The tool is user-friendly, with a simple drag-and-drop interface for quick processing. TinyPNG ensures that optimized images load faster on websites, improving SEO performance. It also provides an API for developers to integrate automatic image compression into their workflow.
User Reviews:
- TinyPNG is my go-to tool for optimizing images for websites quickly without losing quality.
- Super easy to use—just drag and drop the images, and it does all the work!
- Works great for compressing images for websites, and the WebP support is a big plus.
Key Features:
- Smart Lossy Compression: Reduces file sizes while maintaining image quality.
- Supports Multiple Formats: Optimizes JPEG, PNG, and WebP files for websites.
- Batch Processing Available: Allows users to compress multiple images at once.
- Developer API Integration: Helps automate image compression within websites and applications.
- Drag-and-Drop Simplicity: Users can instantly optimize images without complex settings.
How to Use TinyPNG to Optimize Images for Websites:
Step 1: Upload Your Image
Go to TinyPNG.com and drag-and-drop or manually upload your JPEG, PNG, or WebP file. The tool will instantly begin processing your image.
Step 2: Let the Tool Compress the Image
TinyPNG uses smart lossy compression to reduce file size while keeping image quality intact. It automatically processes the uploaded images without manual adjustments.
Step 3: Download the Optimized Image
Once the compression is complete, click the download button to save the optimized image. You can now use it on your website for faster loading and better SEO performance.
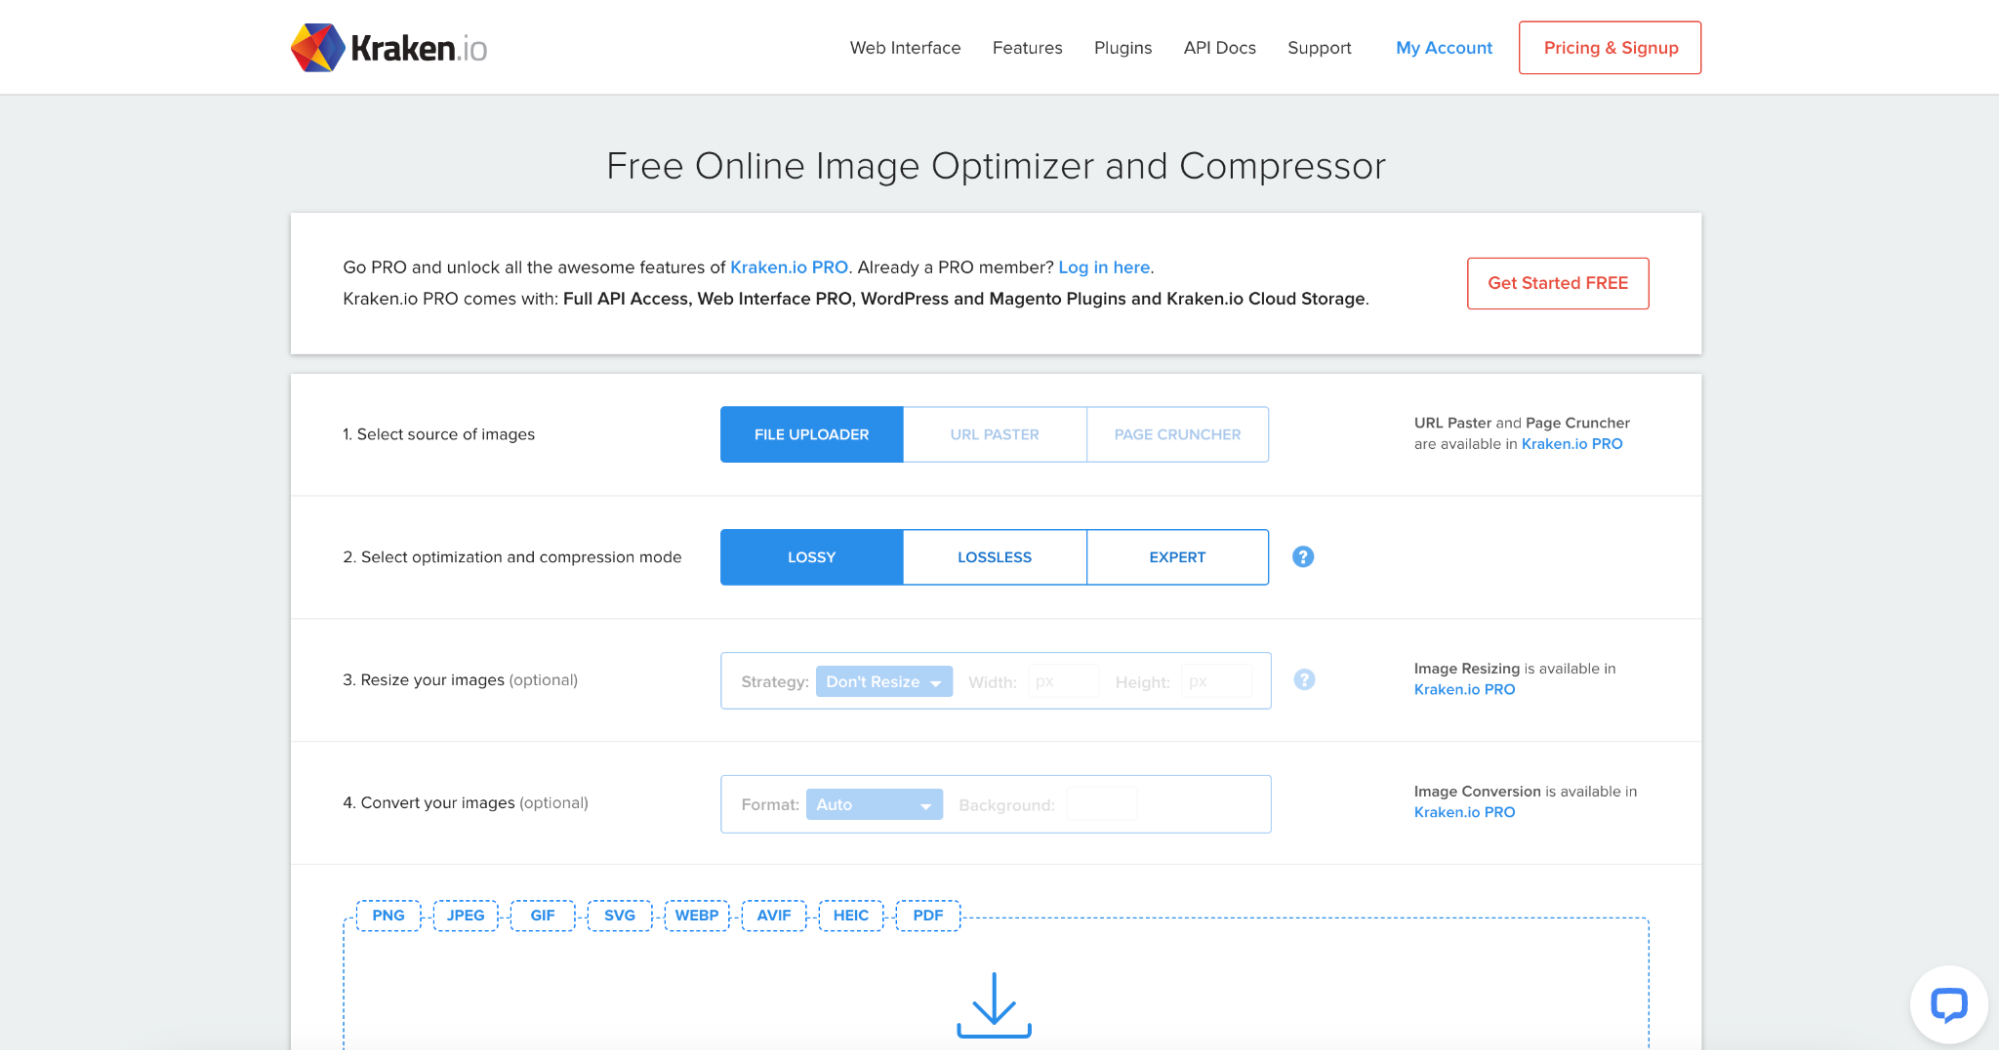
2. Kraken.io – Best for Advanced Image Optimization
Kraken.io is an efficient and feature-rich image optimizer that offers both lossy and lossless compression. It is designed for web developers, bloggers, and e-commerce sites that require bulk image optimization. The tool allows WebP conversion, ensuring compatibility with modern browsers while reducing file size. Kraken.io also offers cloud integration, enabling users to export optimized images directly to Google Drive and Dropbox. With its fast and secure compression technology, it significantly improves website speed and performance.
User Reviews:
- Kraken.io gives me total control over image compression while keeping file quality intact.
- I love the lossless compression option—great for optimizing photos for websites!
- The WebP conversion feature is perfect for reducing image size without quality loss.
Key Features:
- Lossy & Lossless Compression: Users can choose between maximum compression or preserving quality.
- WebP Conversion Support: Allows easy conversion to WebP format for faster loading.
- Cloud Storage Integration: Connects with Dropbox and Google Drive for seamless workflow.
- Bulk Image Processing: Optimize hundreds of images simultaneously to save time.
- PageSpeed Insights Integration: Helps analyze website performance improvements after optimization.
How to Use Kraken.io to Optimize Images for Websites:
Step 1: Upload or Drag Images
Visit Kraken.io, click the upload button, or drag and drop multiple images into the tool. It supports JPEG, PNG, GIF, and WebP formats.
Step 2: Choose Compression Mode
Select between lossy or lossless compression based on your needs. Lossy compression reduces file size more, while lossless keeps all image details.
Step 3: Download Optimized Images
Once Kraken.io completes processing, click Download File to save your optimized image. You can also export files to Dropbox or Google Drive.
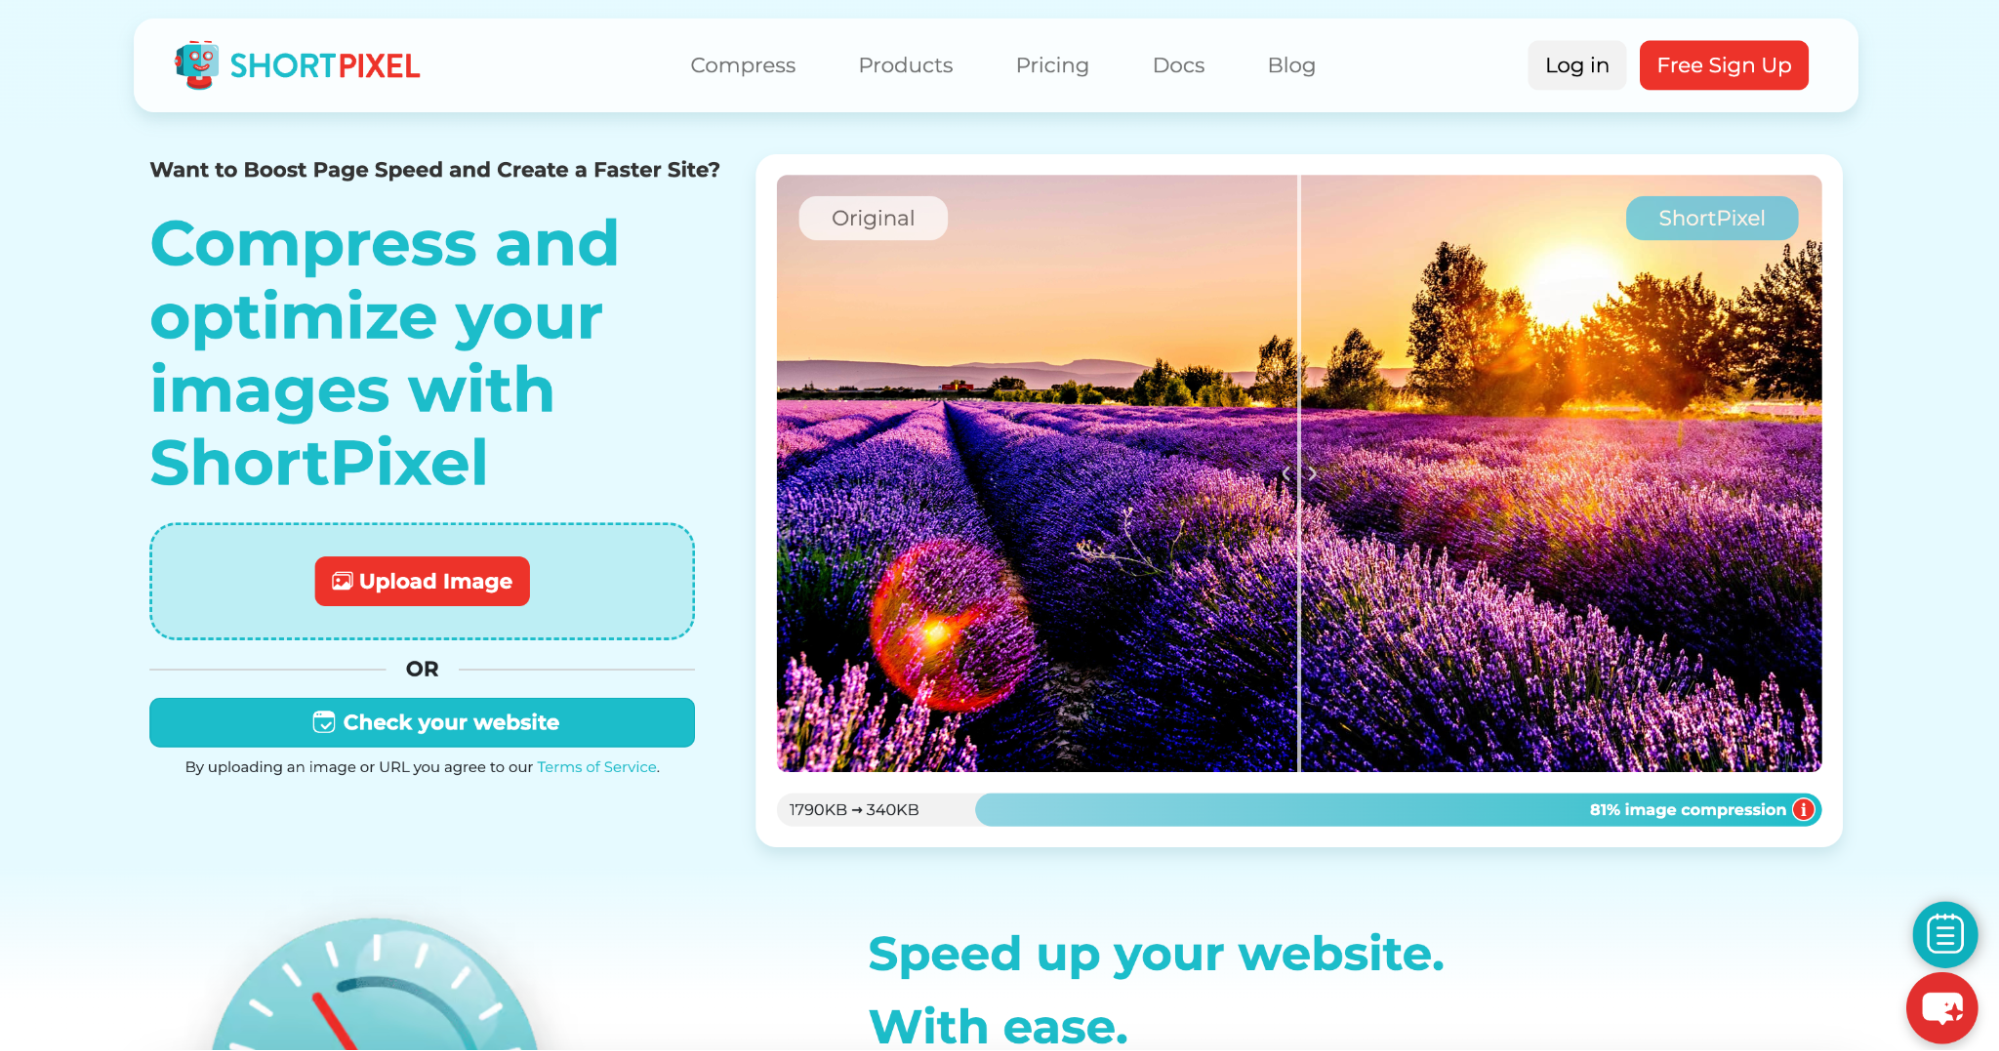
3. ShortPixel – Best for WebP and Automatic Optimization
ShortPixel is a cloud-based image compression tool that automatically optimizes images upon upload. It is particularly useful for WordPress users, offering seamless plugin integration for real-time optimization. The tool supports WebP and AVIF formats, allowing websites to load images 30-50% faster. ShortPixel offers three levels of compression—lossy, glossy, and lossless, providing flexibility based on user needs. It ensures that image quality remains high while drastically reducing file size for faster website performance.
User Reviews:
- ShortPixel automatically optimizes images for my WordPress site, making my pages load faster.
- Great for compressing images for websites with its WebP conversion feature.
- The automatic optimization feature saves me a lot of time!
Key Features:
- Automatic Image Optimization: Compresses images on upload without manual effort.
- WebP & AVIF Support: Converts images to modern web-friendly formats.
- API & WordPress Plugin: Provides integration for automatic website optimization.
- Unlimited Image Processing: Offers flexible pricing with unlimited compression options.
- Backup Original Files: Keeps a copy of the original images before compression.
How to Use ShortPixel to Optimize Images for Websites:
Step 1: Upload or Connect Website
Go to ShortPixel.com, and either upload images manually or connect your WordPress site for automatic optimization.
Step 2: Select Compression Type
Choose from lossy, glossy, or lossless compression, depending on whether you prioritize smaller file sizes or perfect quality preservation.
Step 3: Download or Apply Optimization
Click Download File to save the optimized image. If using WordPress, apply changes directly to your website with the plugin.
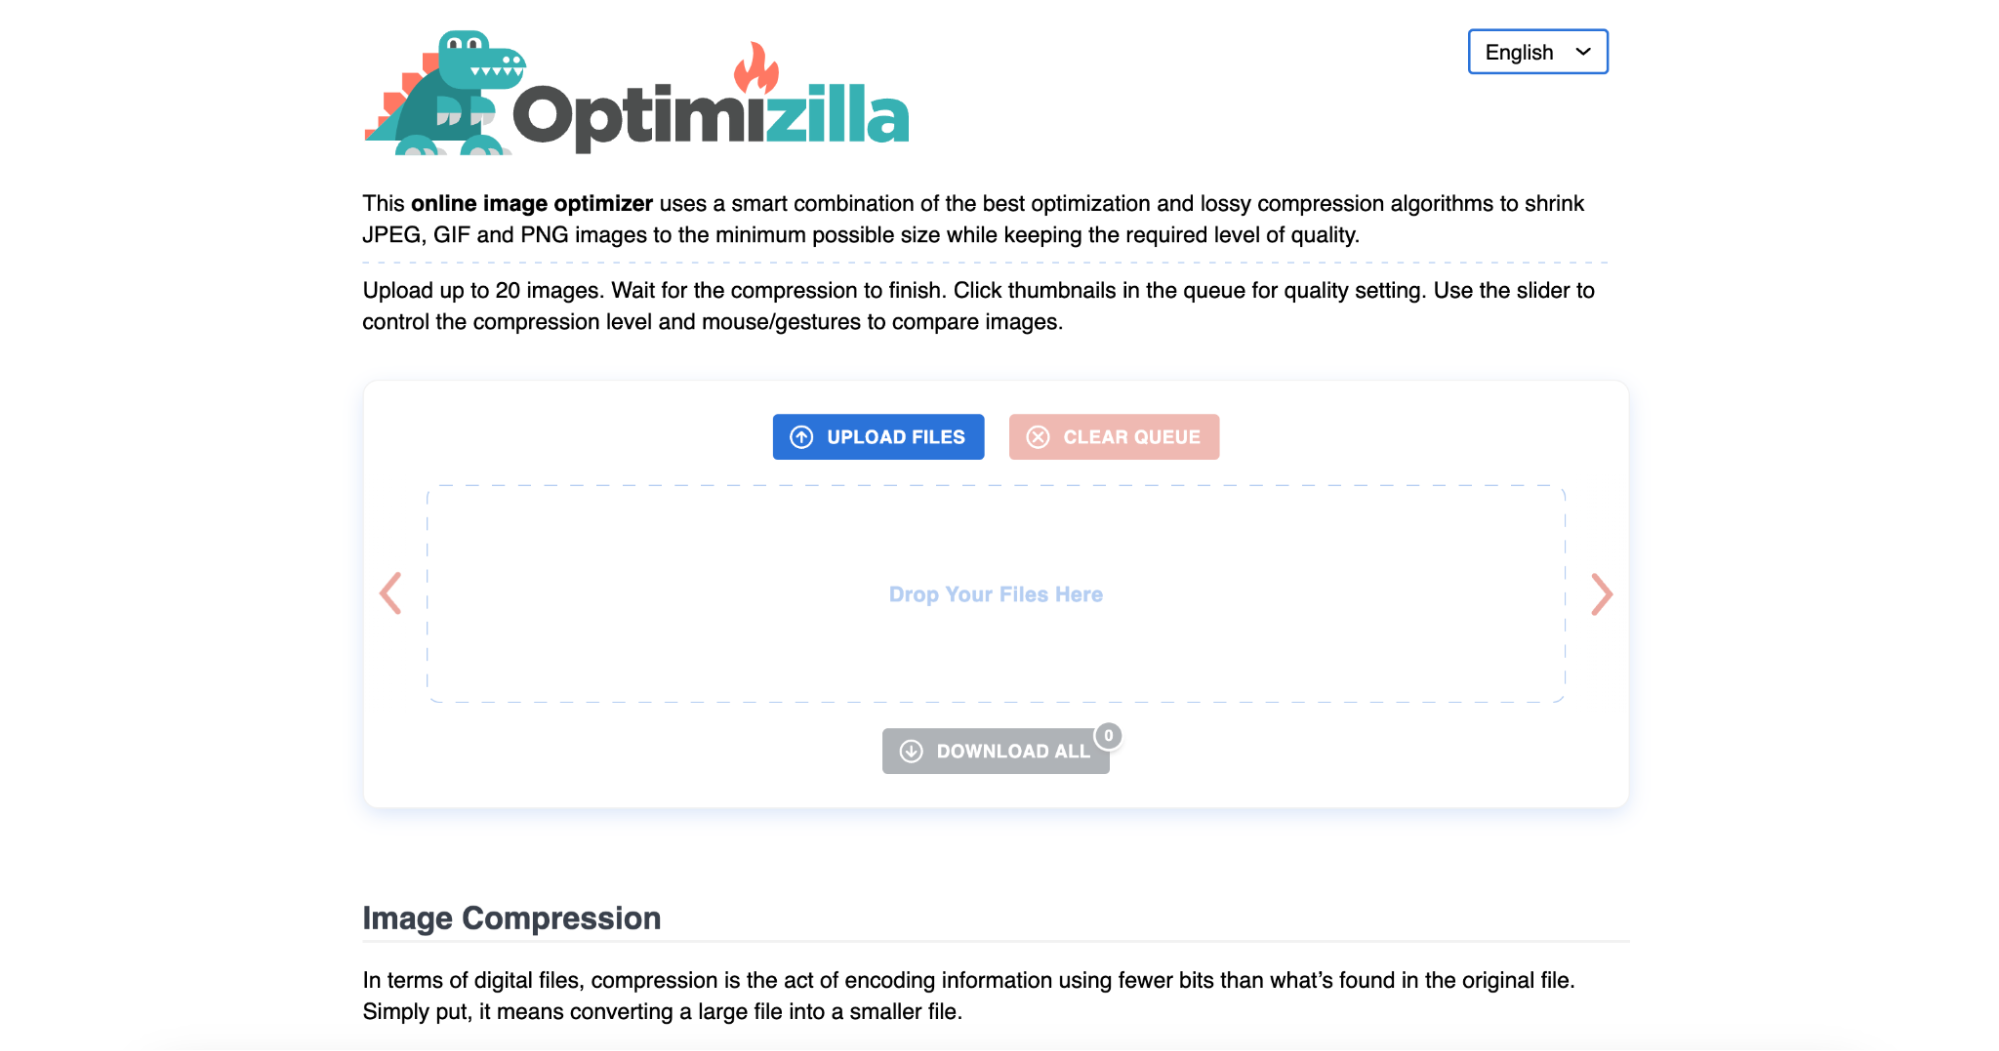
4. Optimizilla – Best Free Bulk Image Optimizer
Optimizilla is a free online tool that efficiently compresses JPEG and PNG images for web use. It uses a smart algorithm to balance image quality and file size, making it ideal for bloggers and small businesses. The batch processing feature allows users to optimize multiple images at once, saving time. Optimizilla also provides a real-time compression preview, so users can fine-tune settings before downloading. With no registration required, it is a quick and convenient solution for picture optimization for web.
User Reviews:
- Optimizilla is my go-to for free, quick image optimization!
- It gives me control over the compression level while keeping quality high.
- Batch image compression is a time-saver!
Key Features:
- Drag-and-Drop Simplicity: Instantly upload and optimize images.
- Compression Slider Control: Adjust compression levels manually.
- Batch Optimization: Process multiple images at once.
- Live Quality Preview: See quality changes in real time.
- No Registration Required: Use the tool without signing up.
How to Use Optimizilla to Optimize Images for Websites:
Step 1: Upload Image Files
Visit Optimizilla.com and upload one or multiple JPEG or PNG images. The tool will instantly prepare them for compression.
Step 2: Adjust Compression Level
Use the compression slider to find the perfect balance between quality and file size before finalizing the optimization process.
Step 3: Download Optimized Images
Click "Download All" to save the optimized images in bulk. They are now ready for use on websites, blogs, and e-commerce platforms.
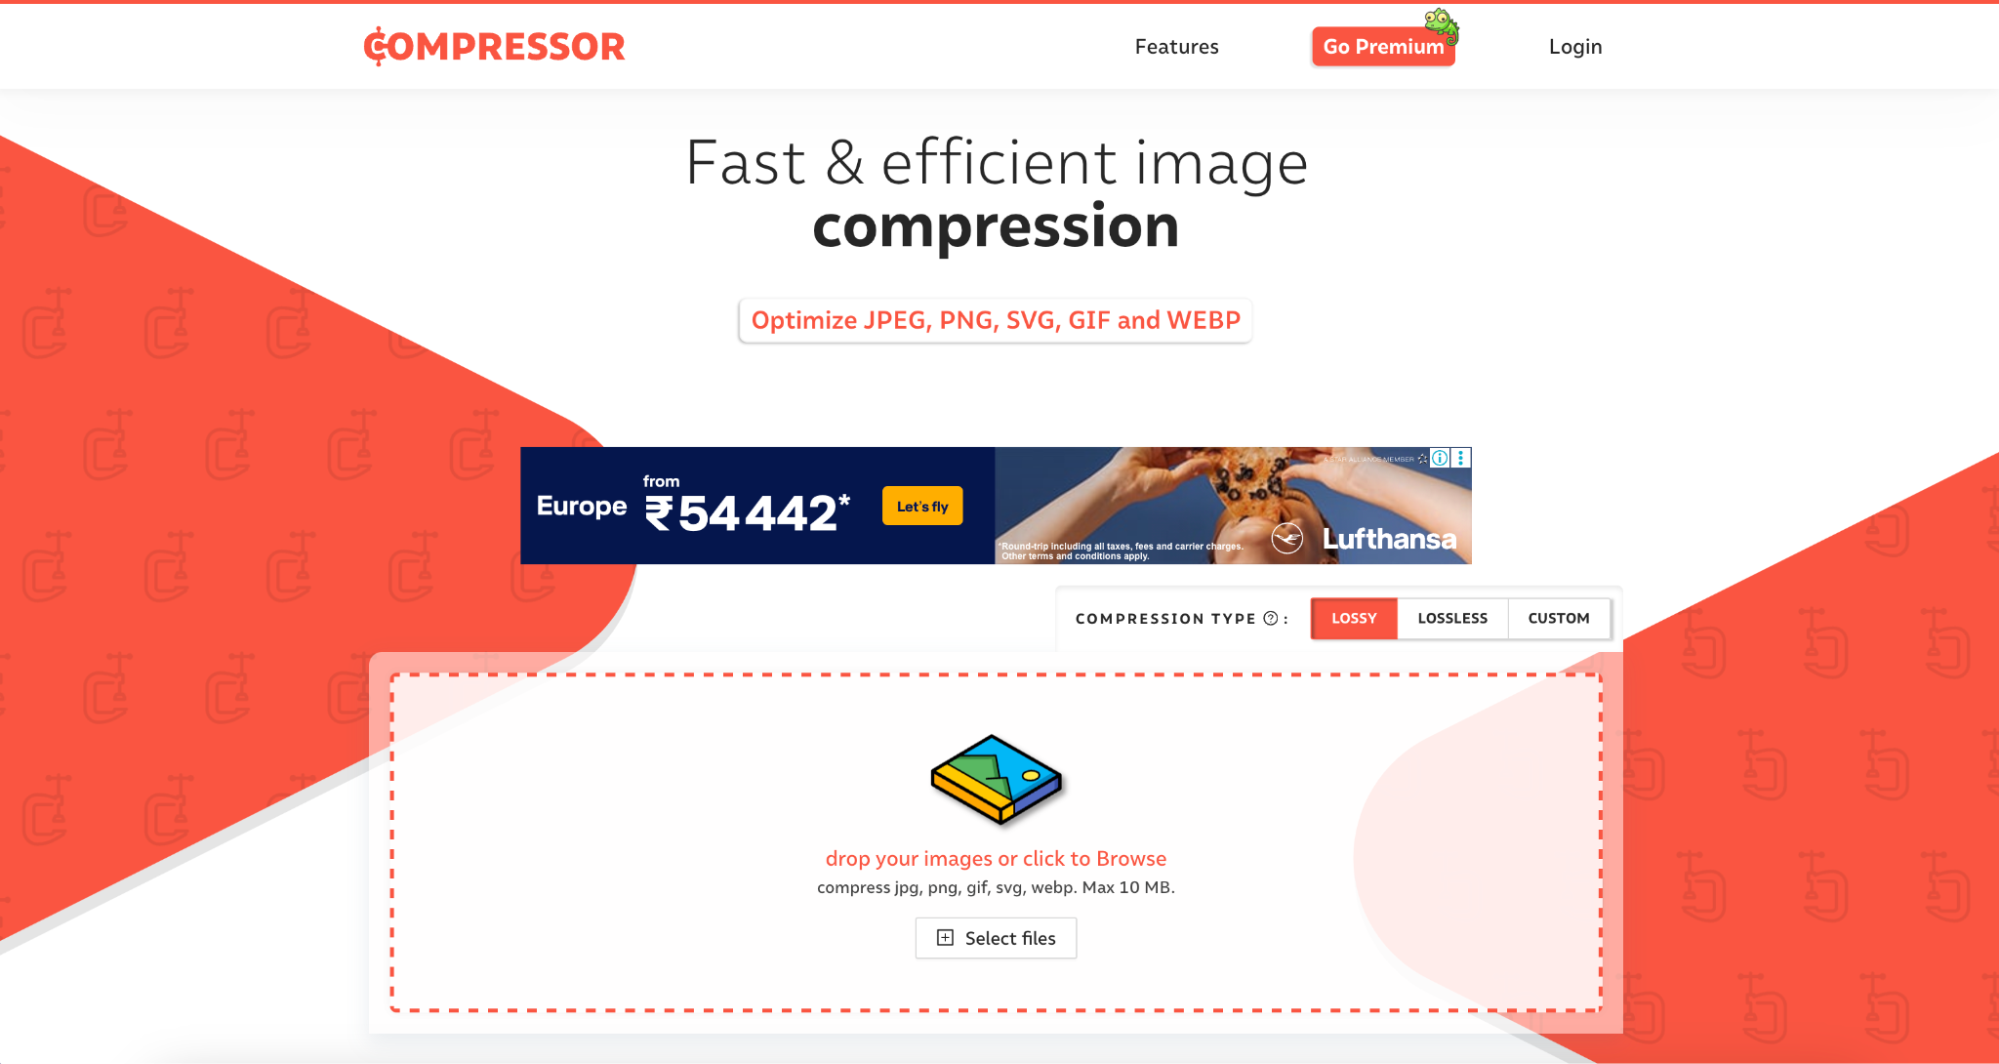
5. Compressor.io – Best for Multi-Format Support
Compressor.io is a versatile online image optimizer that supports JPEG, PNG, GIF, SVG, and WebP formats. It provides both lossy and lossless compression, allowing users to control image quality and file size. The tool is perfect for graphic designers, photographers, and website owners looking to improve performance. Compressor.io ensures secure processing, automatically deleting uploaded images after compression. With its simple interface and powerful compression engine, it helps websites load faster and more efficiently.
User Reviews:
- Compressor.io reduces my image sizes without affecting clarity—great for high-quality photos!
- Supports multiple formats, including WebP, making it very versatile.
- Simple interface with powerful compression results!
Key Features:
- Supports Multiple Image Formats: Compresses JPEG, PNG, WebP, SVG, and GIF.
- High Compression Efficiency: Reduces file size without noticeable loss.
- Simple and Fast: One-click optimization for quick results.
- Secure Processing: All images are automatically deleted after compression.
- Free & Premium Plans: Offers unlimited compression with premium plans.
How to Use Compressor.io to Optimize Images for Websites:
Step 1: Upload Your Image
Visit Compressor.io, then drag and drop your image or select files manually from your computer. It supports JPEG, PNG, WebP, GIF, and SVG formats.
Step 2: Select Compression Type
Choose between lossy and lossless compression. Lossy provides maximum file size reduction, while lossless retains full image quality with slight compression.
Step 3: Download the Optimized Image
Once compression is complete, click "Download" to save the optimized file. Your image is now web-ready with improved loading speed and performance.
Part 4: How to Optimize Images for Websites Offline[5 Tools]
For users who prefer offline image optimization, desktop tools provide more control, batch processing, and advanced compression settings. These tools allow you to compress images for websites without an internet connection, making them ideal for professionals handling large volumes of images. Below are five powerful offline tools, including their features, user reviews, and step-by-step guides for optimizing images.
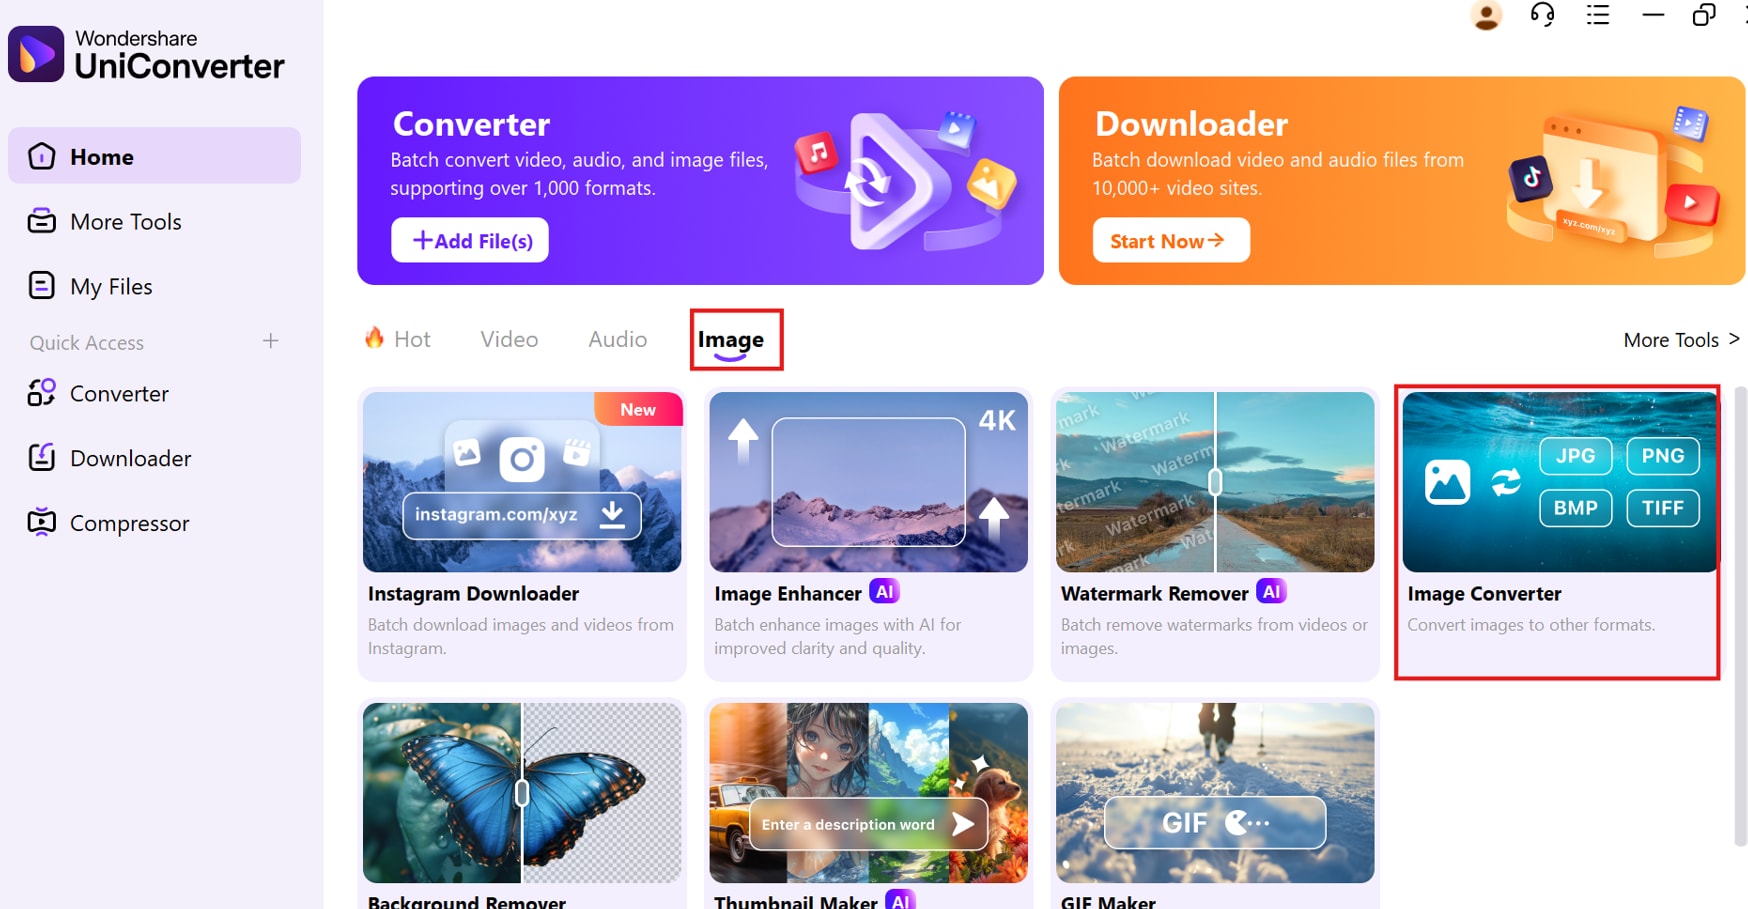
1. UniConverter
UniConverter is a versatile offline tool that provides advanced image compression, WebP conversion, and batch optimization. It allows users to compress images for websites while preserving high quality. The tool also includes a noise remover, ensuring optimized images look clear and professional. UniConverter supports multiple image formats like JPEG, PNG, WebP, BMP, and TIFF, making it a great choice for content creators. With AI-powered image enhancement, UniConverter ensures fast and efficient image optimization for any web project.

Best Image Compressor
User Reviews:
- UniConverter’s batch image compressor saves me a lot of time when optimizing photos for my website.
- The WebP image compressor feature is great for reducing file sizes without losing quality.
- I love that UniConverter includes noise removal, which keeps my images sharp and clean.
Key Features:
- Batch Image Compression: Optimize multiple images at once to improve efficiency.
- WebP Image Converter: Easily convert images to WebP format for better compression.
- Noise Remover for Clarity: Removes image noise while reducing file size.
- Multi-Format Support: Supports JPEG, PNG, WebP, BMP, and TIFF file types.
- Customizable Compression Levels: Adjust image quality settings to balance file size and clarity.
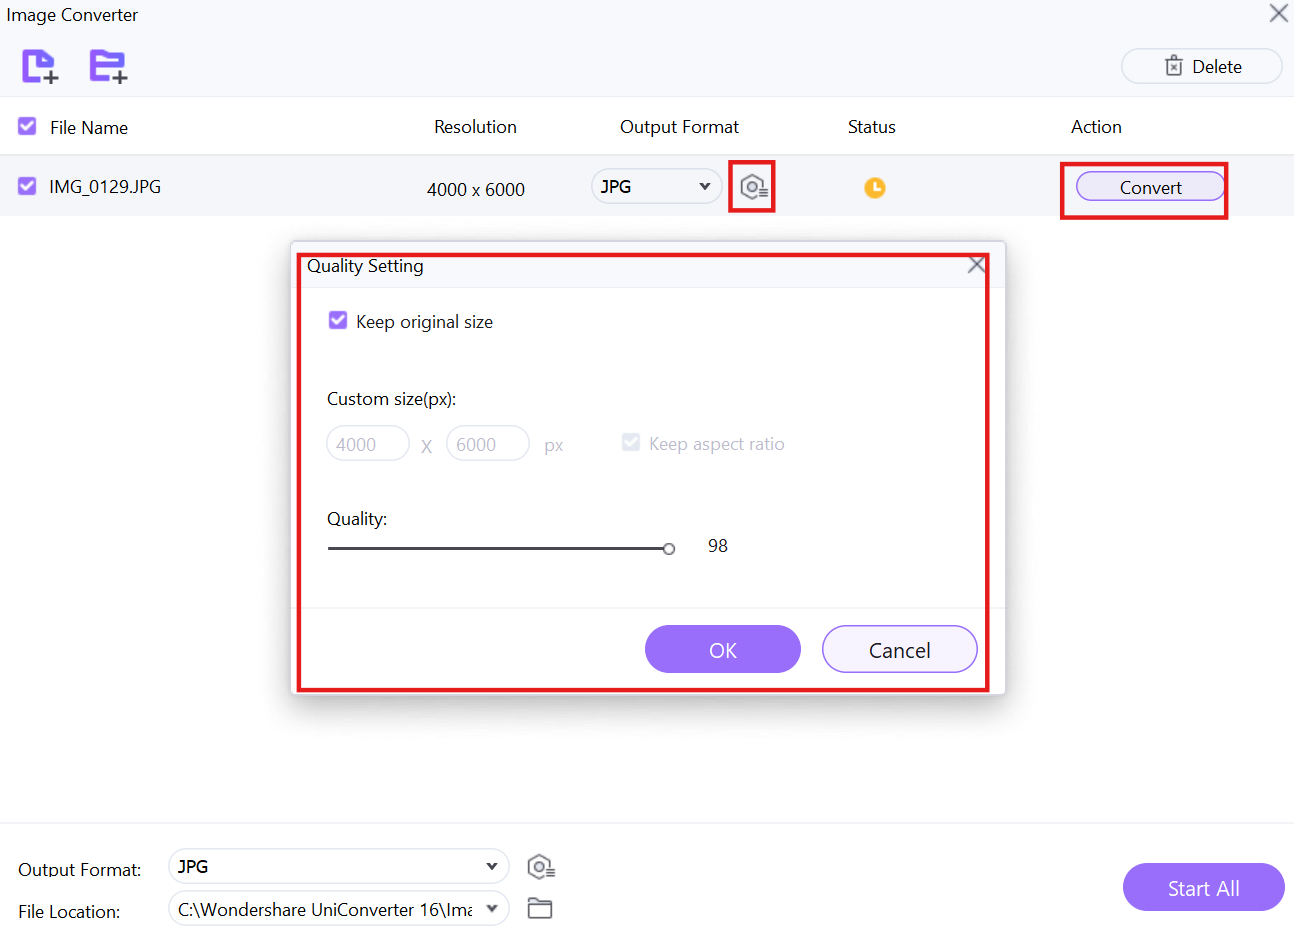
How to Use UniConverter to Optimize Images for Websites:
Step 1: Open UniConverter and access the image converter
Launch Wondershare UniConverter on your computer and navigate to the Image Converter section. This feature allows you to compress, resize, and convert image formats for improved web optimization.
Step 2: Upload images for optimization
Click the "Add Files" button to upload images. You can select multiple images or an entire folder for batch compression, making the process efficient. UniConverter supports JPEG, PNG, BMP, and TIFF formats, ensuring compatibility with different website requirements.
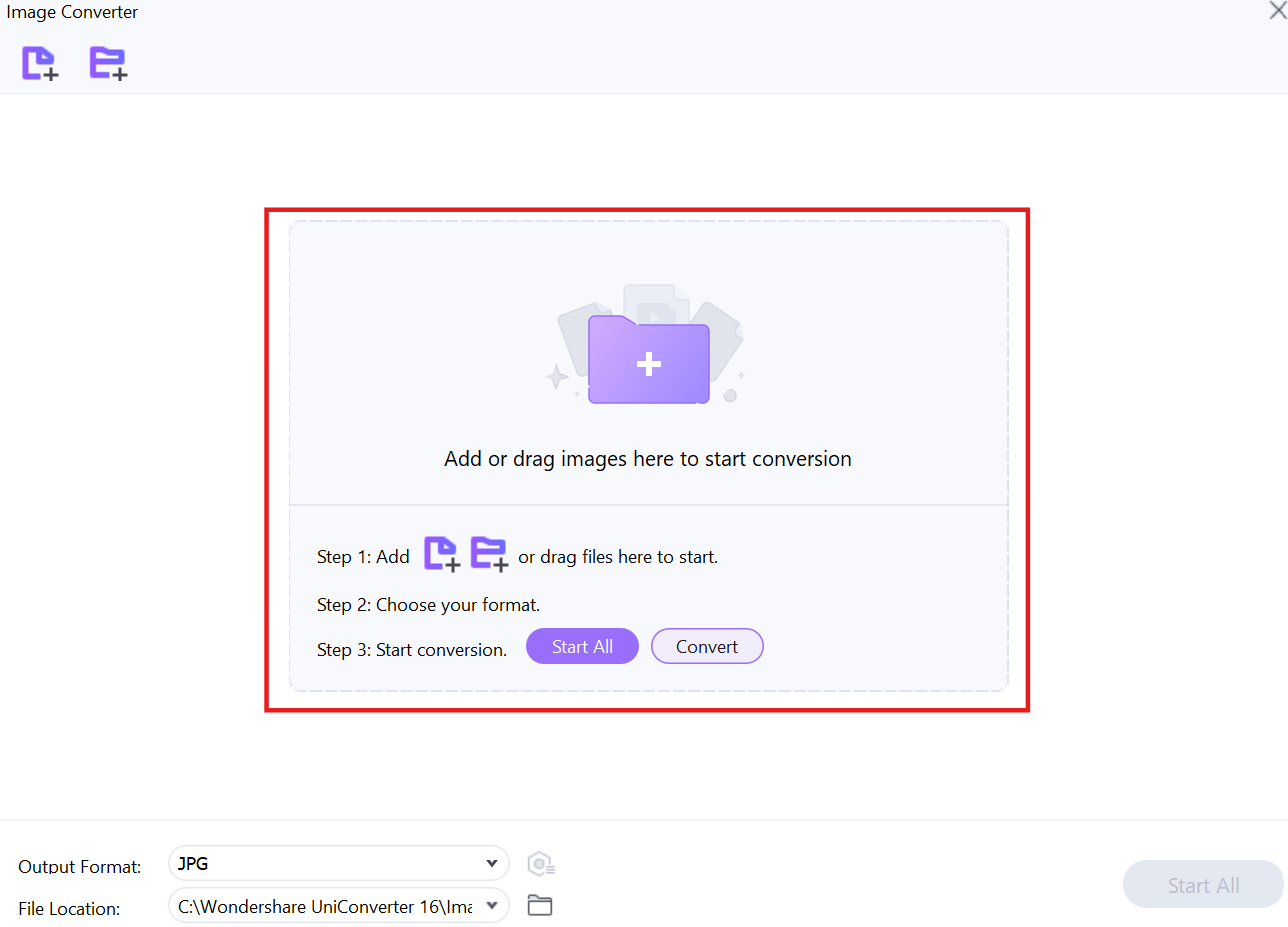
Step 3: Adjust settings and start compression
Click the settings (gear) icon to adjust compression levels, resolution, and output format. Lowering the resolution and quality will reduce file size while maintaining visual clarity. Once you’ve customized the settings, click "Convert" to begin optimization, and the compressed images will be saved to your chosen destination folder.
2.Adobe Photoshop – Best for Professional Image Optimization
Adobe Photoshop is a leading professional image editing tool that includes a Save for Web feature for precise image compression. It allows users to manually adjust file size, format, and quality settings to optimize images for websites. The software supports multiple file formats, including WebP, which ensures better compression and faster web loading. Photoshop is widely used by designers, developers, and content creators for high-quality image optimization.
User Reviews:
- Photoshop gives me full control over image compression for web use.
- The Save for Web feature helps me balance file size and quality perfectly.
- Exporting to WebP has drastically improved my website's loading speed!
Key Features:
- Save for Web Feature: Customize compression settings for optimized image output.
- WebP Export Support: Convert images into WebP format for better performance.
- Manual Compression Control: Adjust file size and image quality as needed.
- Batch Processing: Optimize multiple images simultaneously for large projects.
- Supports All Major Formats: JPEG, PNG, GIF, WebP, and more.
How to Use Photoshop to Optimize Images for Websites:
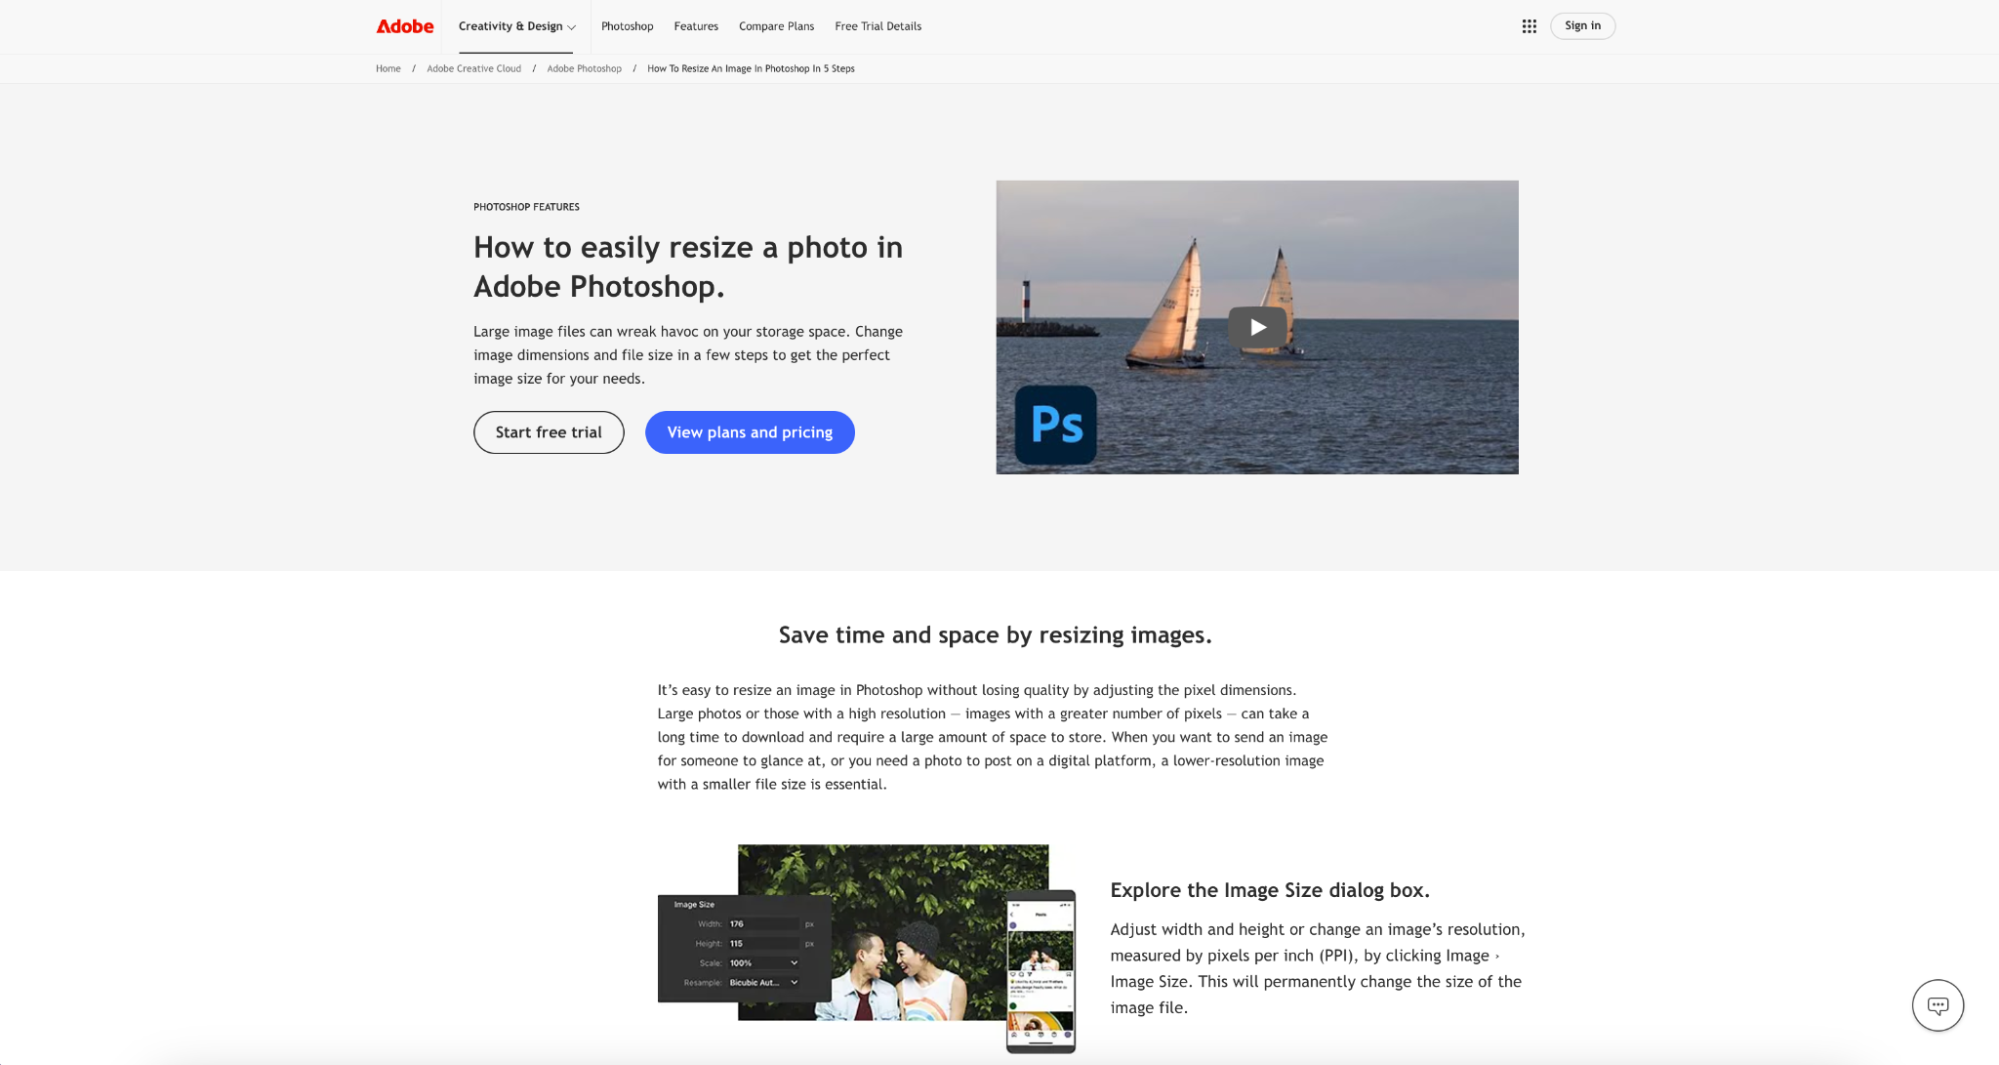
Step 1: Open the Image in Photoshop
Launch Photoshop, open your image, then go to File > Export > Save for Web (Legacy) to begin optimization.
Step 2: Select Format and Adjust Settings
Choose JPEG, PNG, or WebP, adjust the compression level, image quality, and file size, and preview the optimized result.
Step 3: Export and Save the Optimized Image
Click Save, select a destination folder, and download the optimized image for website use.
3. GIMP – Best Free Photoshop Alternative for Image Optimization
GIMP is a powerful open-source image editor that provides high-quality image compression and optimization for websites. It offers customizable compression settings, allowing users to fine-tune image size and quality based on web requirements. The tool includes support for JPEG, PNG, WebP, and GIF, making it a great free alternative to Photoshop. GIMP is ideal for freelancers, web designers, and bloggers who need an effective offline image optimizer.
User Reviews:
- GIMP is a great free tool for compressing images for websites without quality loss.
- I love that it supports WebP export, making my website load faster!
- The compression settings give me full control over how my images look online.
Key Features:
- Free and Open-Source: A cost-effective alternative to Photoshop.
- WebP Support: Convert images to WebP for better compression.
- Customizable Compression Settings: Adjust quality settings manually.
- Batch Image Processing: Optimize multiple images at once.
- Supports Various Formats: JPEG, PNG, GIF, WebP, TIFF, and more.
How to Use GIMP to Optimize Images for Websites:
Step 1: Open the Image in GIMP
Launch GIMP, open your image, then go to File > Export As to access compression options.
Step 2: Choose File Format and Adjust Settings
Select JPEG, PNG, or WebP, set the compression level, and adjust the quality settings as needed.
Step 3: Export the Optimized Image
Click Export, confirm the settings, and save the optimized file for web usage.
4. RIOT – Best Lightweight Image Optimizer
RIOT (Radical Image Optimization Tool) is a lightweight and efficient image compression software for fast and easy web optimization. It provides adjustable compression levels, allowing users to balance quality and file size effectively. The tool also supports batch image processing, making it ideal for bulk image compression. RIOT is perfect for small business owners, bloggers, and web developers looking for an easy-to-use optimization tool.
User Reviews:
- RIOT is lightweight, fast, and perfect for quick image optimization!
- The batch processing feature saves me a ton of time!
- It’s a simple but powerful image web optimization tool.
Key Features:
- Simple Interface: User-friendly for quick image optimization.
- Batch Processing: Optimize multiple images at once.
- Adjustable Compression Levels: Fine-tune quality and file size.
- Preview Before Exporting: See real-time compression effects.
- Supports JPEG, PNG, GIF, and WebP: Works with multiple formats.
How to Use RIOT to Optimize Images for Websites:
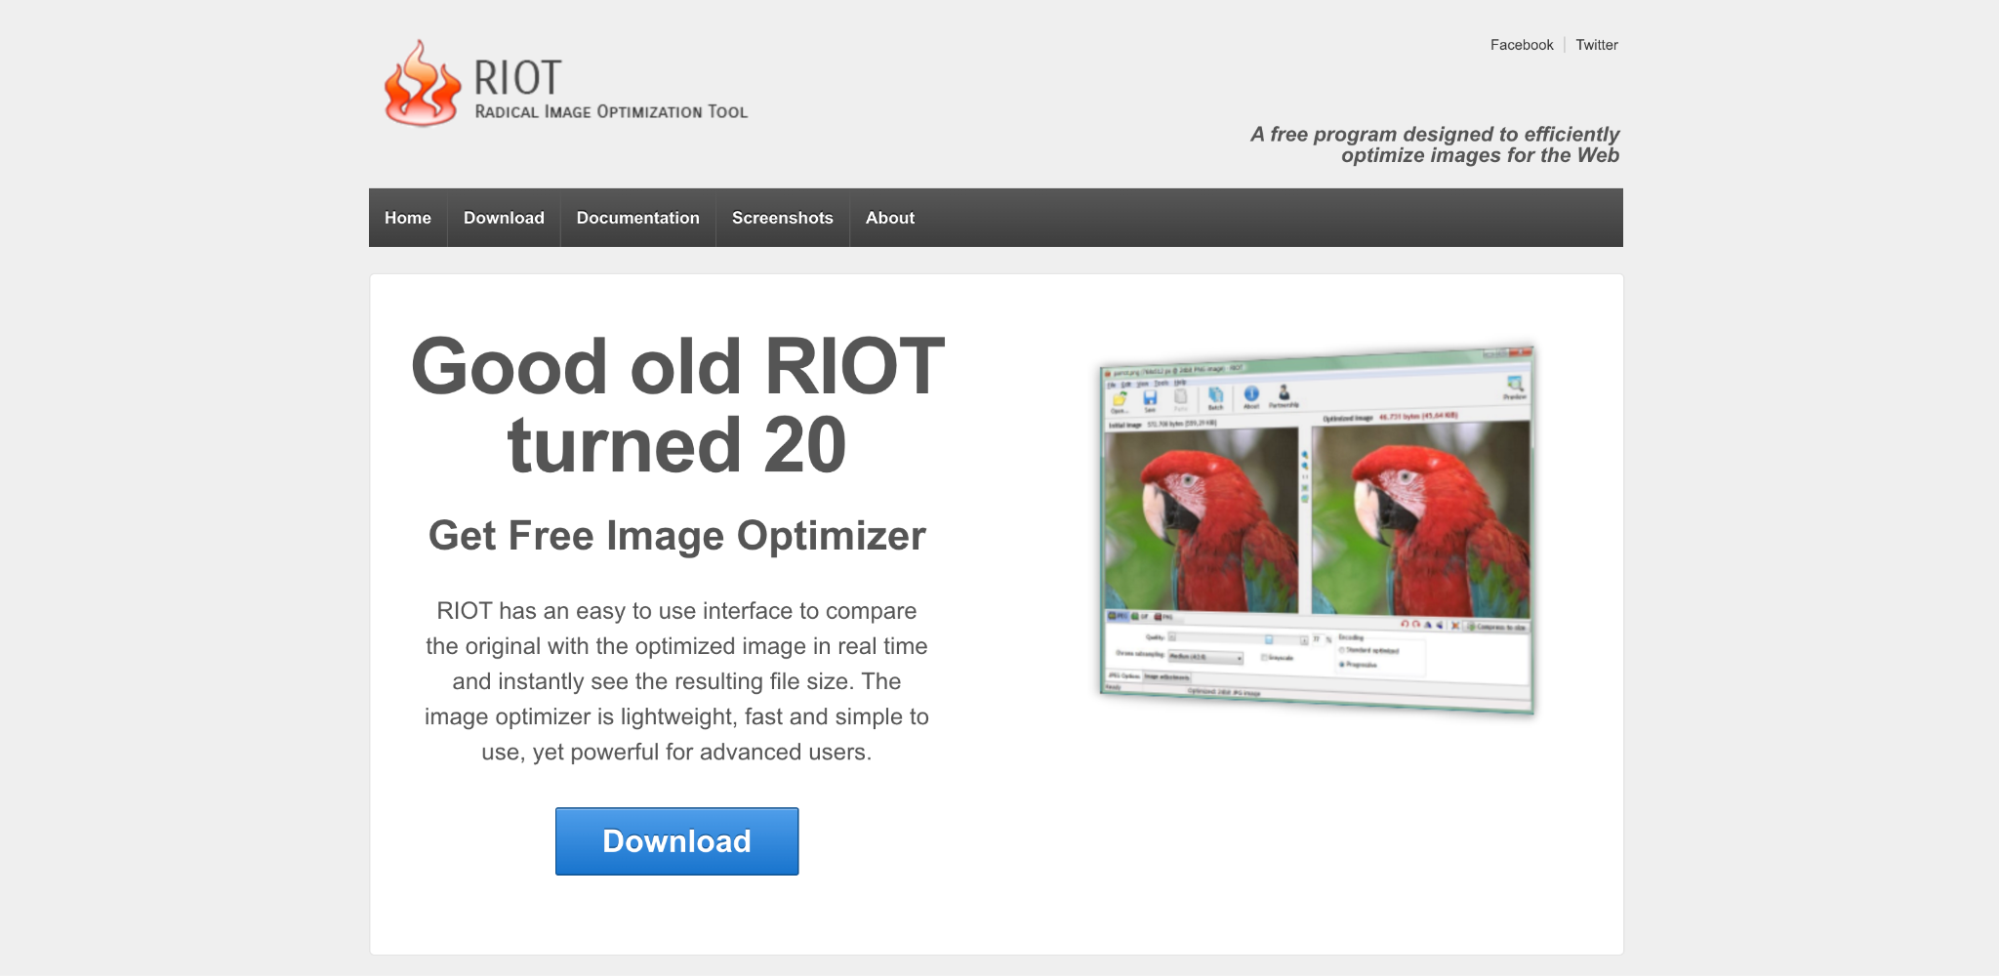
Step 1: Open RIOT and Load Image
Launch RIOT, click Open, and select the image you want to optimize for web use.
Step 2: Adjust Compression Settings
Modify the file format, compression ratio, and quality settings to achieve the desired file size.
Step 3: Save and Export
Click Save, select a location, and download the optimized image for faster website performance.
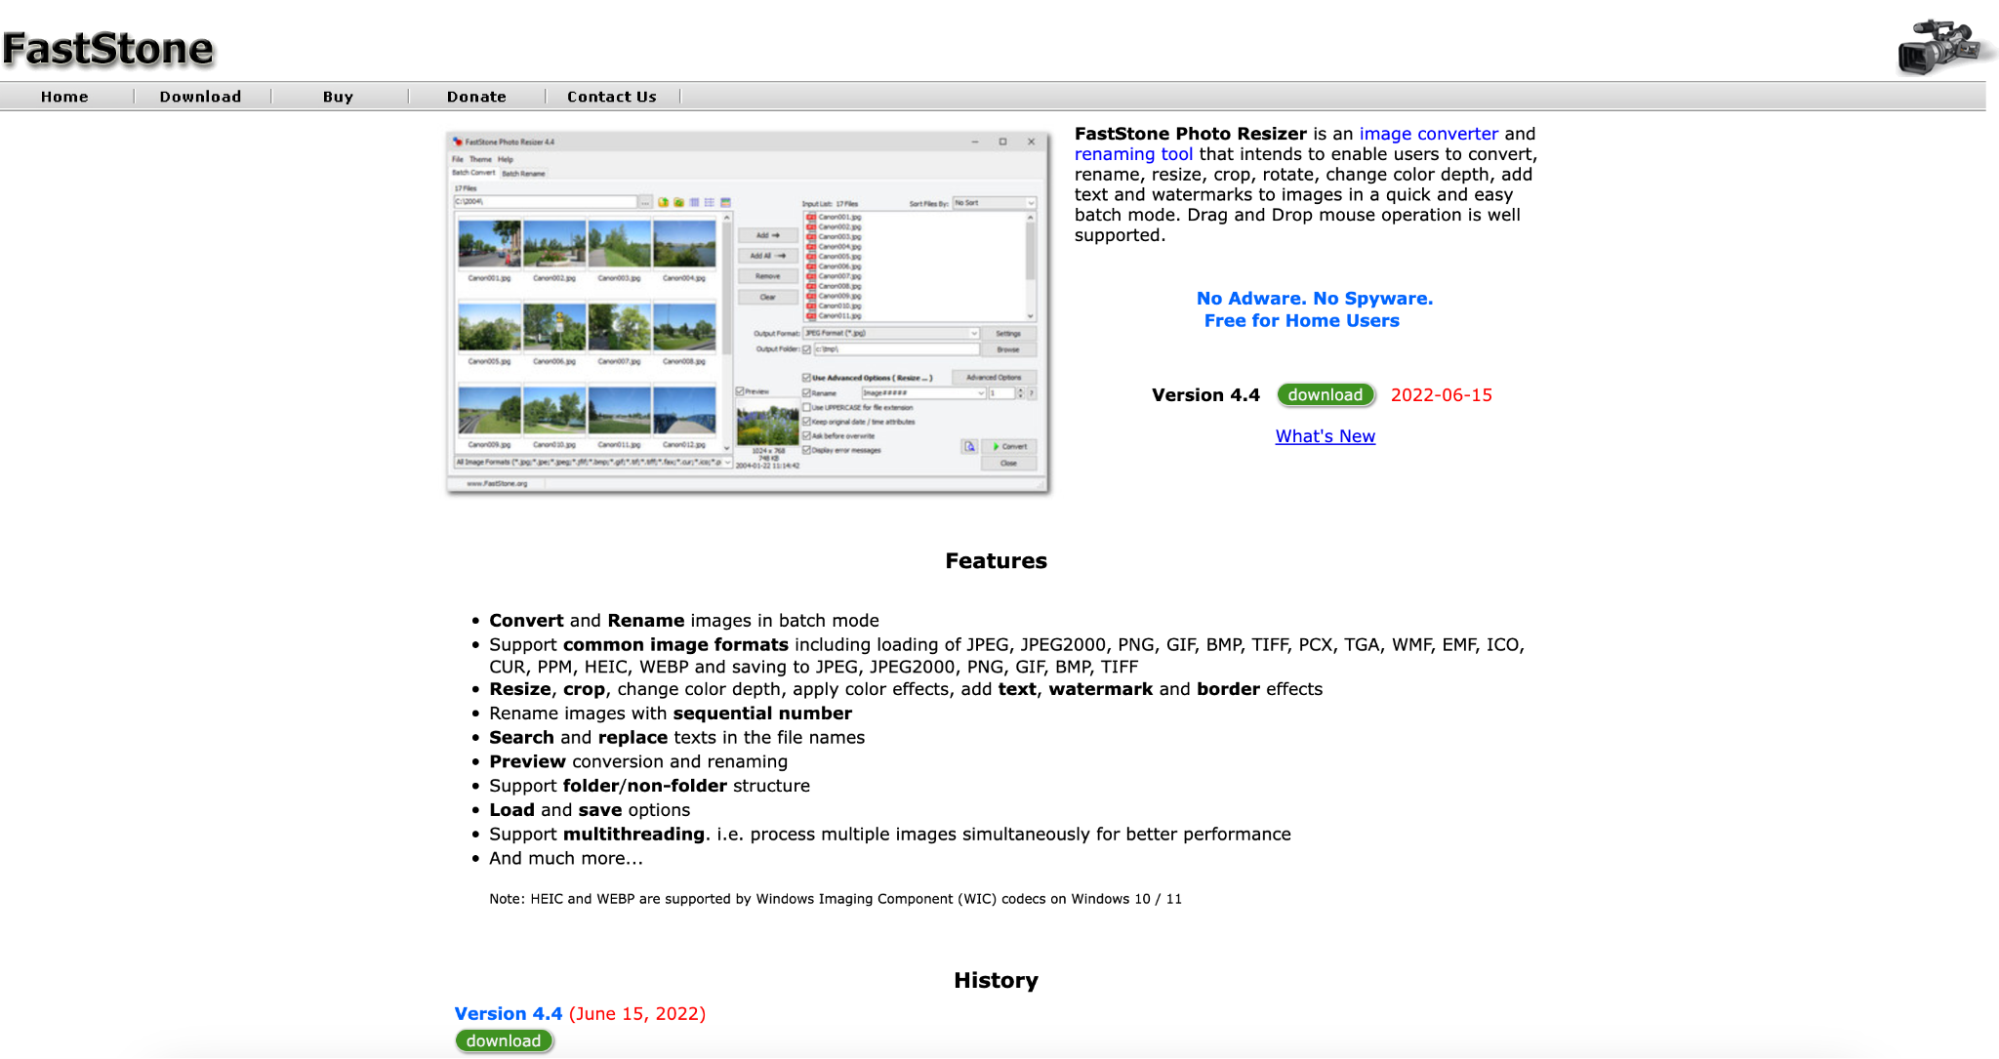
5. FastStone Photo Resizer – Best for Bulk Image Resizing and Compression
FastStone Photo Resizer is a versatile tool that combines image compression, resizing, and renaming for web optimization. It supports JPEG, PNG, BMP, and WebP formats, making it suitable for various web applications. The software allows batch processing, enabling users to optimize multiple images at once efficiently. With its simple interface and fast processing speed, FastStone is perfect for e-commerce sites, photographers, and content creators.
Key Features:
- Batch Processing: Resize and compress multiple images at once.
- Customizable Compression Settings: Adjust size and quality.
- Supports JPEG, PNG, BMP, and WebP: Works with multiple formats.
- Easy-to-Use Interface: Simple drag-and-drop functionality.
- Lossless Compression Option: Ensures high-quality output.
How to Use FastStone Photo Resizer to Optimize Images:
Step 1: Open the Tool and Add Images
Launch FastStone Photo Resizer, click Add Files, and select multiple images for batch processing.
Step 2: Adjust Compression and Resizing Options
Set the compression level, output format, and image dimensions to optimize the images for web usage.
Step 3: Save and Export the Optimized Images
Click Start, let the tool process the images, then save the optimized files for use on your website.
Conclusion
Optimizing images for websites improves loading speed, enhances user experience, and boosts SEO rankings. Whether you prefer online web image optimizers or offline tools like UniConverter and Photoshop, the right tool depends on your needs, file format preferences, and batch-processing requirements. UniConverter stands out as a versatile solution, offering image compression, WebP conversion, and noise removal for high-quality web-optimized images. Additionally, it features an AI image enhancer that improves image clarity and sharpness, ensuring professional-quality visuals. The AI thumbnail maker allows users to generate optimized thumbnails for better click-through rates and engagement. By implementing proper image web optimization, you can enhance website performance, reduce bandwidth usage, and improve search rankings, making your website more efficient and visually appealing.
FAQs
1: What is the best way to optimize an image for the web?
The best way is to compress images using online tools like TinyPNG or offline tools like UniConverter. Converting images to WebP format also improves optimization without losing quality.
2: How can I optimize images for a website without losing quality?
Use lossless compression tools like UniConverter, ShortPixel, or ImageOptim. These tools remove unnecessary data while maintaining image clarity.
3: What image format is best for website optimization?
WebP is the best format for web images, as it offers high compression with better quality compared to PNG and JPEG. Most modern browsers fully support WebP.
4: Can I bulk optimize images for a website?
Yes! UniConverter, Photoshop, and Kraken.io allow batch compression, letting you optimize multiple images at once to save time.
5: How do I compress images for a website while keeping them sharp?
Use a WebP image compressor or adjust compression levels manually in tools like UniConverter or Photoshop. This ensures a balance between sharpness and file size.

