
Have you ever played a recording only to hear your voice bouncing off the walls like it's stuck in a tunnel? The unwanted replay or hollow sound is called an echo in an audio context. It happens when sound mirrors off a surface and is a little delayed, which makes the music feel distant and unclear. You can be a podcaster or someone who wants clean sound, but echo can ruin your audio quality.
That's why it's essential to remove echo from audio because poor sound can disappoint listeners, no matter how good your content is. Hence, this guide will walk you through what causes this issue and how to get rid of it. From powerful software to online tools, we’ll show you 6 practical ways. Plus, you’ll also get to know the pro tips to avoid capturing it in the first place.
In this article
Part 1. What Is Echo in Audio and Why Does It Occur in Recordings
In audio, echo refers to a distinct reflection of sound that returns to the listener or recording after the original sound has stopped. Rather than blending in with the initial sound as reverb does, echo is typically delayed by 50ms or more. This is perceived as an apparent repetition, and it depends on the distance to the reflective surface. Before we learn to reduce echo in audio, let’s understand the causes behind it:
- Echo Surfaces: Sounds reflection off textures such as walls or windows can cause delays that show up as an echo in the recording. A room with high ceilings or low absorptive materials tends to amplify these reflections.
- Incorrect Placement: Placing the mic too far from the sound source or excessively near the reflective surface raises the level of indirect sound. The greater the distance of the sound capture from the source, the more ambient space and reverberation it will capture.
- Feedback Loops: If the microphone picks up the audio from nearby speakers and re-amplifies it, which can cause this issue, as a feedback loop can occur. This is especially common during a live conference or when using speakers for monitoring.
- Multiple Active Devices: Employing numerous recording devices in a common area may result in echo-like distortions from overlapping sounds recorded at various intervals. Every microphone can capture delays from other microphones, leading to phase discrepancies and echo effects.
- Improper Settings: A recorder with significant gain or sensitivity captures a greater amount of surrounding reflections and room noise, such as echo. The mic that is too sensitive or an incorrectly adjusted input level in software can worsen echo problems.
Part 2. 6 Practical Ways to Remove Echo from Audio
Now that you know the reason behind this issue, you might want to learn how to remove the echo from audio. The following section will provide you with the top 6 methods that you can utilize for this purpose:
Method 1. Remove Echo from Sound with One Click
Starting with the most reliable software, Wondershare UniConverter, which offers a Noise Remover tool letting you extract echo. Whether you want to remove noise from a video or an audio, this tool enables you to do it all with one click. The tool is easy to use at any time and from anywhere.
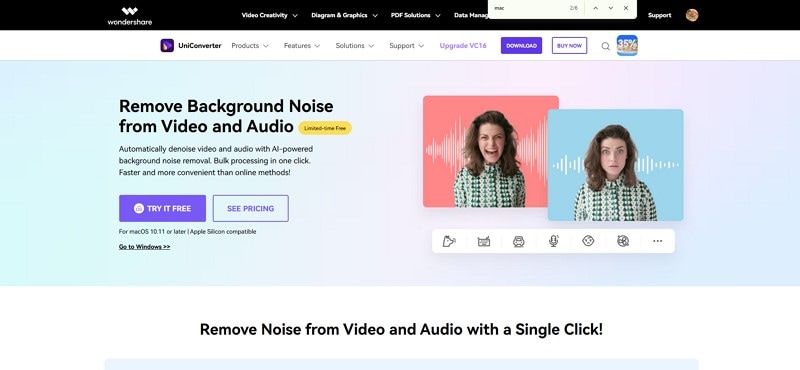
Not only that, but it also uses advanced AI technology, which does not require a lengthy procedure to reduce echo from your video and does the work in minutes. Users can select the file location where they want to download the results after they remove reverb from audio.
Key Features
- Format Support: It is a reliable choice for everyone because the tool works with up to 1000 video and audio formats.
- Bulk Echo Remover: If you have more than one project, you can extract the echo from all of them at once using its batch processor.
- Preview the Results: Users can play the audio or video before downloading it to see if the noise is removed or not.
- Different Types of Noise: UniConverter lets you remove any kind of noise, whether it's humming or even wind noise, without any difficulty.
- Compatible Platform: It works with both Windows (11/10/8/7 (64-bit OS) and Mac (For macOS 10.11 or later).

Best AI Echo Remover
How to Remove Echo from Sound Using UniConverter
Step 1. Choose the Noise Remover from the Audio Tab
Grab the tool and go to the “Home” tab from the left panel of the screen. Next, choose the “Audio” tab to select the “Noise Remover” tool and begin the process.

Step 2. Add the Target Audio or Video
From the next screen, press the “Add or Drag Audio/Video File to Start” button and insert the file from where you want to remove the echo.

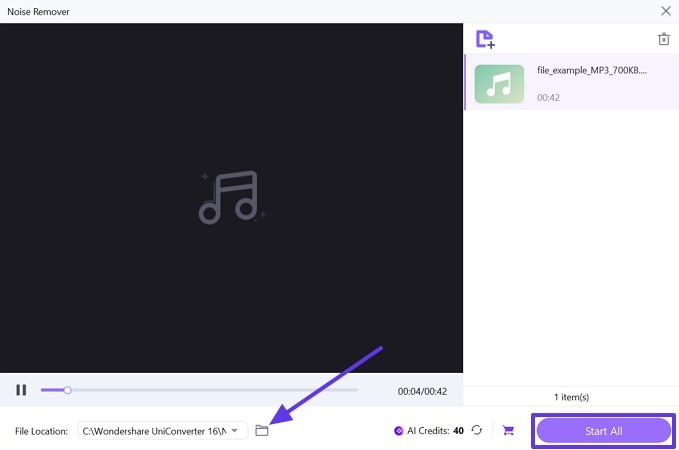
Step 3. Recheck the File and Start the Process
Click the “File Location” icon to select your desired folder and press the “Start All” button to automatically save the new file in the chosen location on your computer.
Method 2. Reduce Echo in Audio Using DeReverb in Adobe Audition
Compatible Platforms: Windows and macOS
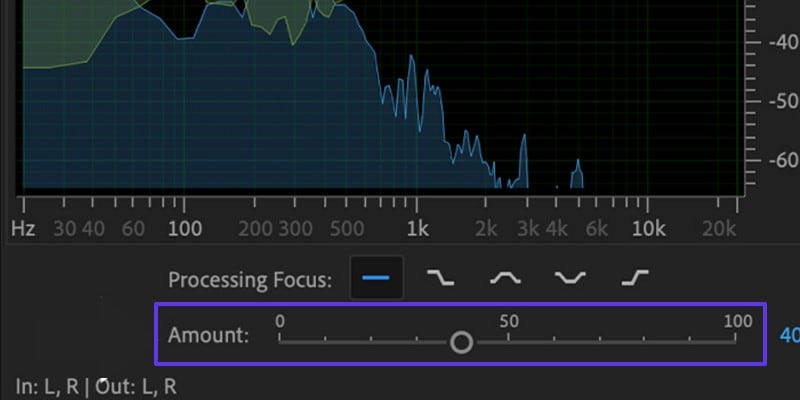
To remove echo sound, this method is a built-in tool of Adobe Audition to reduce echo and ambient reflection from audio recordings. It offers a Noise Reduction feature with DeReverb that allows you to adjust the amount of echo using its toolbar accordingly. This is especially useful for improving the direct signal and helps to produce cleaner audio quality.
Key Features
- It ensures your audio complies with the loudness standards of specific platforms like Spotify or YouTube, preventing distortion or rejection when uploading.
- You can save time by copying EQs and reverb settings between tracks without starting your setup over.
- Waveform analysis and live meters assist in identifying issues such as echo, clipping, or noise before they compromise your final mix.
A Stepwise Guide to Extracting Echo from Audio Using Adobe Audition
If you want to know how to use the DeReverb feature, follow the given instructions:
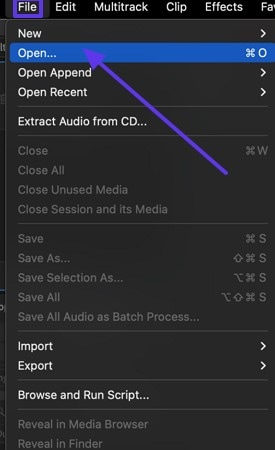
Step 1. Click the “File” tab in the right corner of the tool and select the “Open” option to upload the audio you wish to reduce echo from.
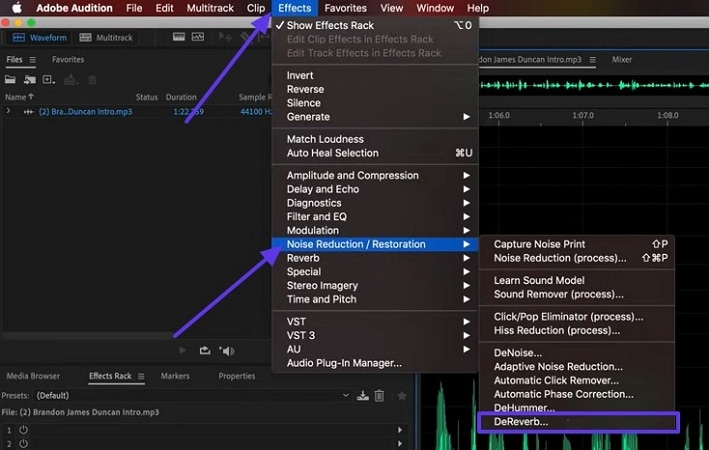
Step 2. Following up, click the “Effect” tab and select the “Noise Reduction/ Restoration” option from the drop-down menu list. Then, another extended list will appear where you choose the “DeReverb” option to proceed.
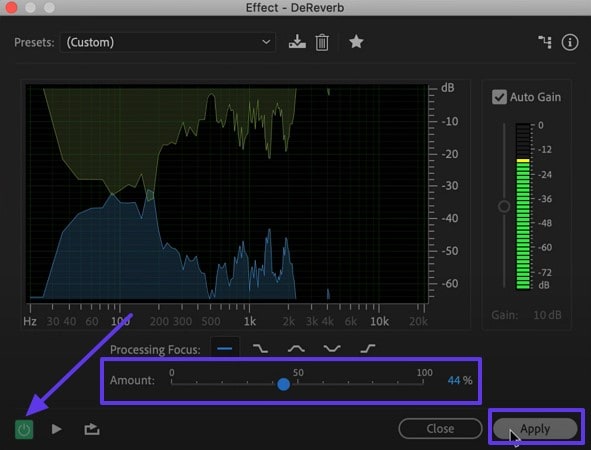
Step 3. From the “Effect-DeReverb” pop-up screen, click the “Switch” button in the left corner to turn on this feature. Next, drag the toolbar beside “Amount” to adjust it as you like and hit the “Apply” button.
Method 3. Remove Echo from Audio via Audacity
Compatible Platforms: Windows, macOS, and Linux
It is an open-source and free editor that provides several tools to assist in minimizing echo in your recordings. Audacity lacks a specific DeReverb effect, but you can manually diminish noise through effects such as Noise Reduction and Compression. This approach needs some adjustments, yet it's an excellent choice for users seeking a cost-free way to manage their audio.

Key Features
- It enables you to create and synchronize music accurately with live monitoring that’s ideal for tempo-centered editing.
- Whether you’re fine-tuning the dialogue or trimming music clips, a full suite of editing tools gives you the control to perfect every detail.
- Edit and pre-merge multiple audio tracks at once, which can speed up your workflow by applying effects or fixes to various tracks in one go.
A Comprehensive Guide To Reduce Echo in Audio With Audacity
To cater to this situation, let’s learn how to remove echo by using this method:
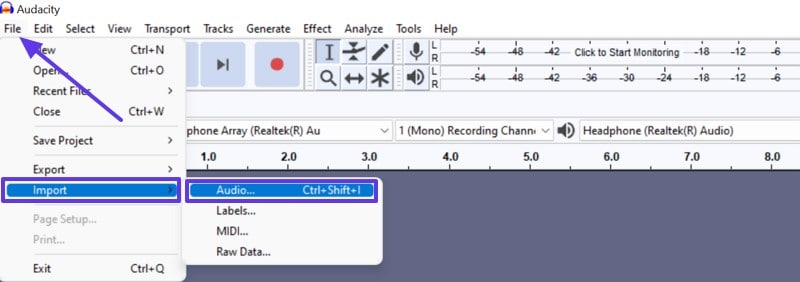
Step 1. Access the Tool and press the “File” tab to choose “Import” and “Audio” options from the drop-down menu.
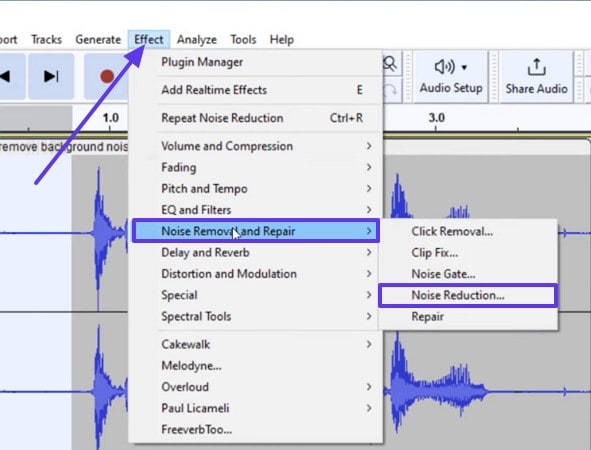
Step 2. Next, select the “Effect” tab and hover over the Noise Removal and Repair” option from the extended list to choose the “Noise Reduction” option.
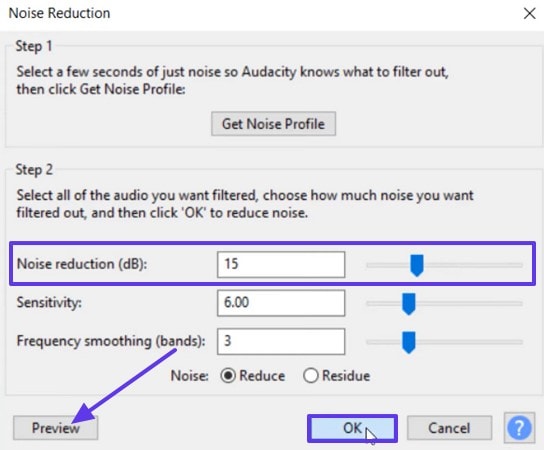
Step 3. From the pop-up screen, drag the toolbar to adjust the “Noise Reduction” as per your needs and press the “Preview” button to check the result. Once done, hit the “OK” button to save the edit results on your audio file.
Method 4. Remove Echo Sound via Adobe Premiere Pro
Compatible Platforms: Windows and macOS
Adobe Premiere Pro includes an essential sound panel with a built-in DeReverb effect that helps reduce echo in audio directly within your video timeline. The tool analyzes the audio and lowers ambient reflection, which makes the sound clearer and more professional. It’s a convenient option for content creators who want to clean up echo and noise without switching to separate audio software.

Key Features
- This software automatically detects and labels elements like speech and other sound effects, which makes it easy to locate a specific part of the audio.
- You can edit your audio like a document by deleting or rearranging spoken words directly from transcribed text, saving time.
- It is ideal for spoken word content, which streamlines tasks like removing filter words and produces clean and polished audio.
Stepwise Tutorial to Remove the Echo and Noise from Adobe Premiere Pro
The following section will provide detailed steps to extract the noise from the audio file:
Step 1. Once you add your target file, press the “Effect” tab from the toolbar and expand the “Noise Reduction and Restoration” option to pick the “DeReverb” option.

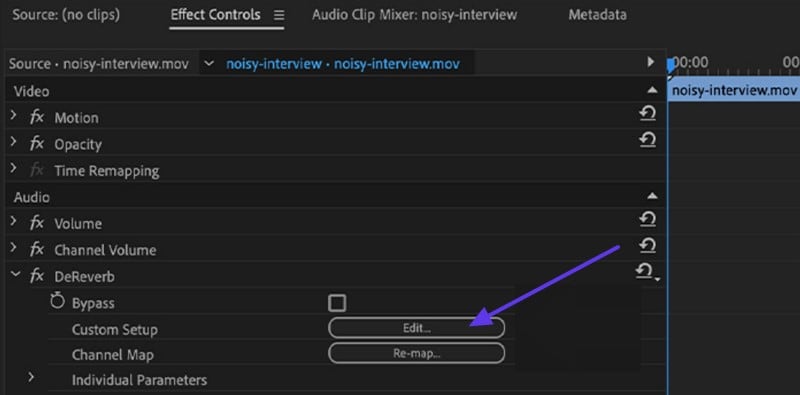
Step 2. Drag the DeReverb tool and drop it on the audio in the timeline and press the “Edit” button to open the custom setup.
Step 3. Adjust the sound noise and echo by dragging the toolbar beside the “Amount” option and fine-tune it accordingly.
Method 5. Use an Online Tool to Remove Echo Sound
Compatible Platforms: PC and Mac to iOS and Android devices
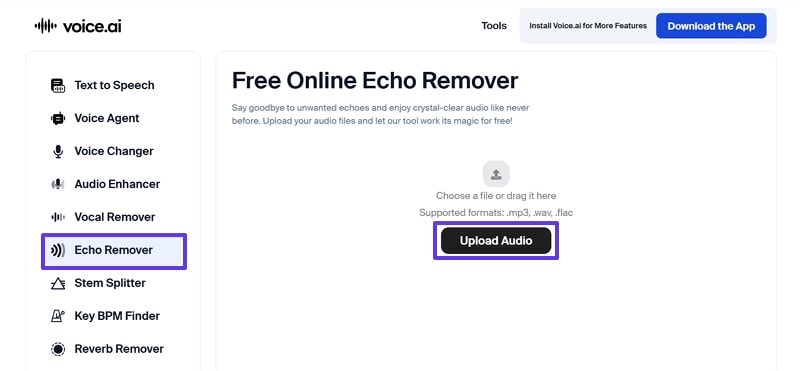
When you need to remove echo from audio, an online tool can be a good option as well, and for that, you can use Voice.AI. This platform offers an Echo Remover and extracts the noise instantly using advanced AI technology. It supports a wide range of popular file formats, such as MP3 and many more, which makes it easy to integrate into your usual editing workflow.

Key Features
- The tool is built to preserve natural voice clarity and ensure ambient reflections are reduced without compromising the tone and quality.
- You can get high-quality output using its Audio Enhancer, which makes the audio crisp and clear.
- Users can also remove vocals apart from the echo, making it ideal for creating karaoke versions or remix-ready stems.
How to remove echo from audio with Voice.AI
For your better assistance, follow the given step-by-step guide to use this online tool for echo removal:
Step 1. Access the tool from a browser and choose the “Echo Remover” tab from the left panel, then hit the Upload Audio” option to add the file.
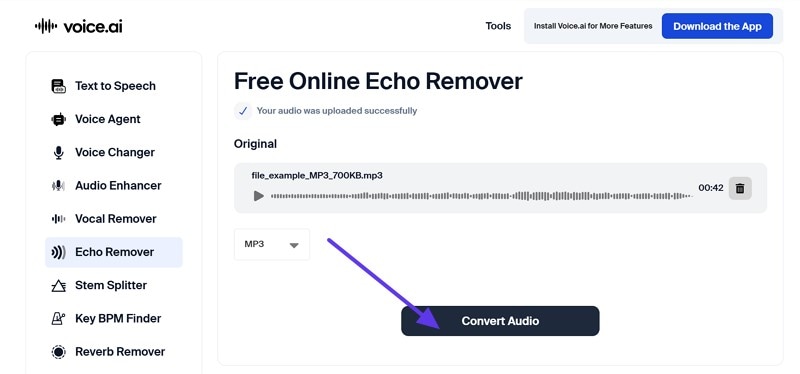
Step 2. After you are done uploading the target audio, press the “Convert Audio” button from the main interface to start the process.
Step 3. Next, the tool will provide two separate files, one with vocals and the other with Noise. Then, select your preferred option and click the “Download” button to store it on your device.

Method 6. Remove Echo Using GarageBand via Its Noise Gate Feature
Compatible Platforms: Windows, iOS, and Mac
If you want to remove echo from sound, this software offers a built-in Noise Gate feature that helps to reduce background noise and mild echo by blocking low-level ambience sound. By setting a threshold, the Noise Gate ensures any louder, intentional audio, like speech or music, passes through, blocking softer sounds. It is an easy and effective way for Mac Users to improve vocal recordings without using complex tools.

Key Features
- It offers various tools, such as virtual instruments and sound effects, to make your audio more defined.
- The tool allows more than one user to work on the same project, letting them collaborate easily.
- You can use it without any cost; it is a free tool that comes pre-installed on all Apple devices.
An Extensive Guideline to Remove Echo with GarageBand’s Noise Gate Feature
Now that you know the features of the tool, if you want to learn how to use it, follow the given stepwise guide:
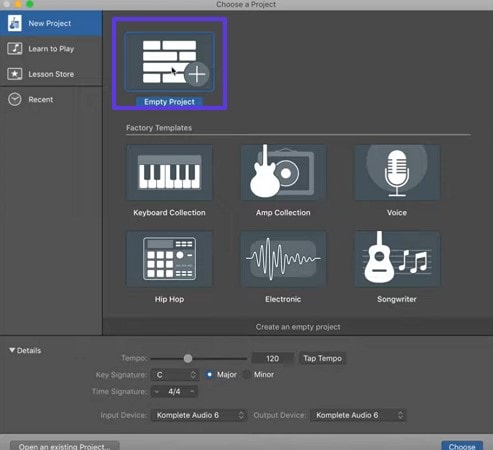
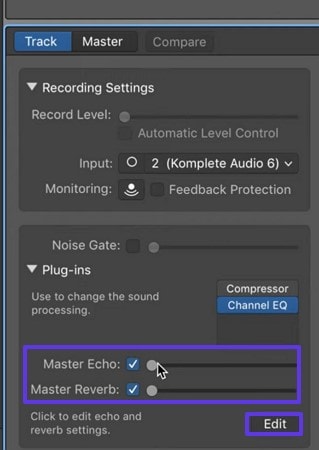
Step 1. Open the tool and press the “Empty Project” to add the audio file from your device, and choose the “Track” button to expand the plug-ins.
Step 2. From the “Tack” tab, uncheck the “Master Echo” and “Master Rever” options and hit the “Edit” button to proceed.
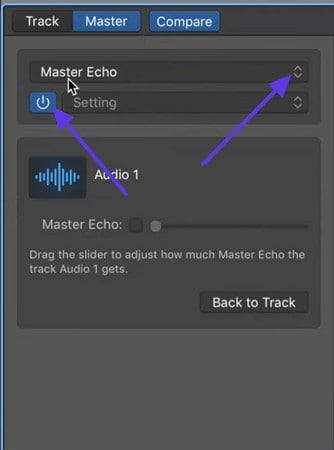
Step 3. From the next pop-up menu screen, turn off the “Master Echo” options and click the “Drop down” arrows to expand the list.
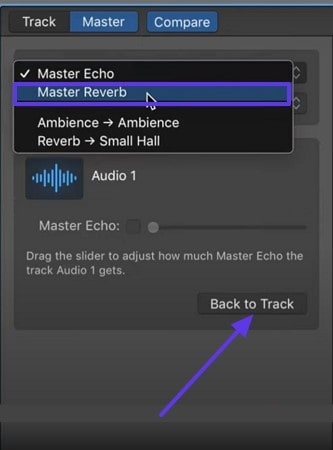
Step 4. Choose the “Master Reverb” option to disable that feature as well and hit the “Back to Track” button.
Part 3. Tips to Avoid Having to Remove Echo from Sound in the Future
Now that you know all the methods to remove echo sound, it is essential to understand how to avoid this issue. It's time for a few tips that can save you from getting an echo in your sound for future purposes:
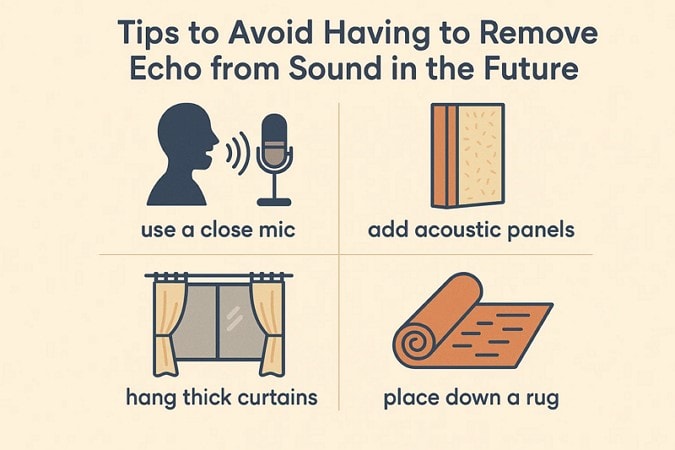
- Right Room: Select a recording area with carpet, curtains, or a pillow and avoid hard surfaces like tiles or glass, which reflect sound. Furnishing the room with bookshelves or even hanging fabrics can significantly absorb or scatter reflections.
- Acoustic Treatment: Use a foam panel or moving blanket, especially around your microphone, to absorb sound before it bounces back. You can use the temporary DIY solutions to reduce echo at a low cost dramatically.
- Microphone Placement: Place your mic close to the sound source, around 6-12 inches, to prioritize the direct signal and reduce ambient reflections. Use directional devices such as a cardioid or shotgun device pointed away from the reflective surfaces to further avoid picking up room echo.
- Use Headphones: Always record with closed-back headphones to prevent your microphone from capturing playback and creating echo loops. This not only improves clarity but also gives you real-time monitoring to adjust levels and catch echo issues early.
- Control Mic Sensitivity: Lower your input sensitivity so the mic picks up less background noise and reflected sound. Enable the echo cancellation in your audio or conferencing software to suppress real-time feedback if it's available.
Conclusion
In conclusion, echoes can ruin the whole quality of the video and make it unbearable for listeners. Therefore, this guide has introduced 6 practical ways to remove echo from audio. From high-end software to an online tool with a detailed stepwise guide. However, UniConverter is the most reliable one among them as it offers loads of features such as bulk processing to save your time and effort.

