 Batch convert MOV to MP4, AVI, 3GP and vice versa easily.
Adobe Premiere Tips
- TRY FREE TRY FREE
- 1. Import and Edit Tips+
-
- 1.1 mp4 to adobe premiere
- 1.2 convert avchd to adobe premiere
- 1.3 mov to adobe premiere
- 1.4 edit mp4 with adobe premiere
- 1.5 premiere-prores
- 1.6 mts to adobe premiere
- 1.7 premiere editing
- 1.8 import mkv to adobe premiere pro
- 1.9 fcpx to premiere
- 1.10 import and edit gopro video
- 1.11 adobe video maker
- 2. Export Tips+
- 3. Other Tips+
All Topic
- AI Tools Tips
-
- AI Photo Enhancer Tips
- Voice Changer Tips
- AI Thumbnail Maker Tips
- AI Script Generator Tips
- Smart Summarizer
- AI Subtitle Generator Tips
- Watermark Remover
- Vocal Remover Tips
- Speech to Text Tips
- AI Video Tips
- AI Image Tips
- AI Subtitle Translator Tips
- Video Extractor Tips
- Text to Speech Tips
- AI Video Enhancer Tips
- DVD Users
- Social Media Users
- Camera Users
- Photography
- Creative Design
- Movie Users
- Travelling Fans
- Educational Users
- More Solutions
- Holidays and Commemoration
- Game Lovers
- Other Tips
Tutorial on Slow Motion in Adobe After Effects (or Fast Motion)
by Christine Smith • 2026-05-20 17:37:20 • Proven solutions
Adobe After Effects is a professional-grade tool that will handle almost any video creation task on Mac or Windows. With this software, you can generate excellent visual effects like slow motion and fast motion. However, learning how to apply slow motion in After Effects is not everyone's cup of tea. That's because this app's UI can be intimidating, especially for green hands. So, in this guide, we'll go through the step-by-step guide on how to slow down and speed up video in After Effects. Let's learn!
- Part 1. What is slow and fast motion?
- Part 2. 2 Workable Methods to Speed Up or Slow Down a Video in After Effects
- Part 3. FAQ for Using After Effects to Speed Up Clip
Part 1: What is slow and fast motion?
Before we discuss how to speed up a video in After Effects, it's essential to learn the basics first. So, what is a slow-motion effect? Abbreviated as slow-mo or slo-mo, slow-motion basically refers to a film effect where the average playback time is reduced. Typically, this effect is achieved when the frame rate is faster than the standard 24 fps. Remember, slo-mo videos have a longer playback time.
On the other hand, the fast-motion video effect happens when the video time moves faster than usual. In this case, the film frames are more spread out compared to the viewing frequency. For example, if a video is captured at 2 fps and played at 30 fps, it means the result will appear 29x faster than the average speed. Usually, videos captured between 8 fps and 22 fps fall under the fast-motion category.
Part 2: 2 Workable Methods to Speed Up or Slow Down a Video in After Effects
Without further ado, let's learn the simple steps to create a slo-mo on After Effects with two simple methods.
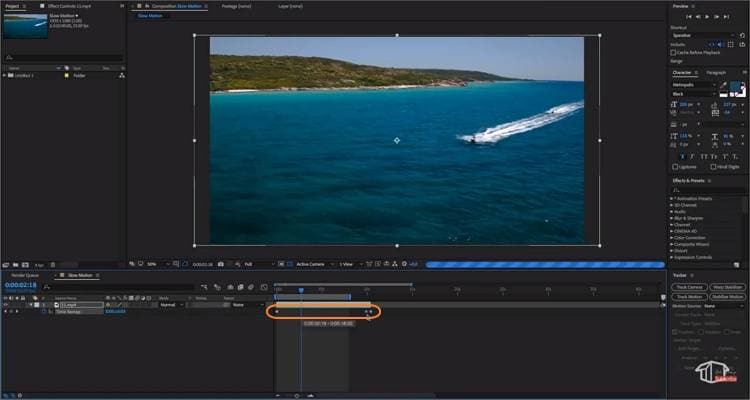
Method 1: Use Time Stretch (Easy)
This is undoubtedly the simplest way to slow down a clip in After Effects. However, using this method to reduce the playback speed can make still frames, although you can remove them with Frame Blending. Here are the steps:
Step 1. Install the program, create a new composition, and then import the video clip you want to edit.
Step 2. Now right-click the video on the timeline, then click Time before choosing Time Stretch.
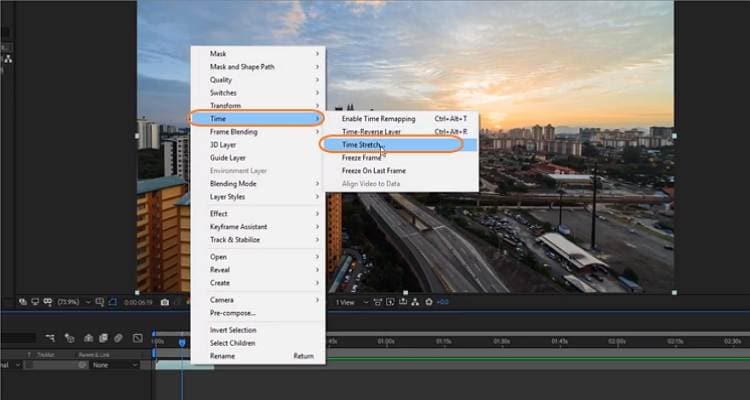
Step 3. Next, change the percentage value on the Stretch Factor section. In this case, choosing any value more than 100 will create a slo-mo clip, whereas any value below will create a fast-motion video. This is the opposite of what you'll get in other apps like the Premiere Pro.
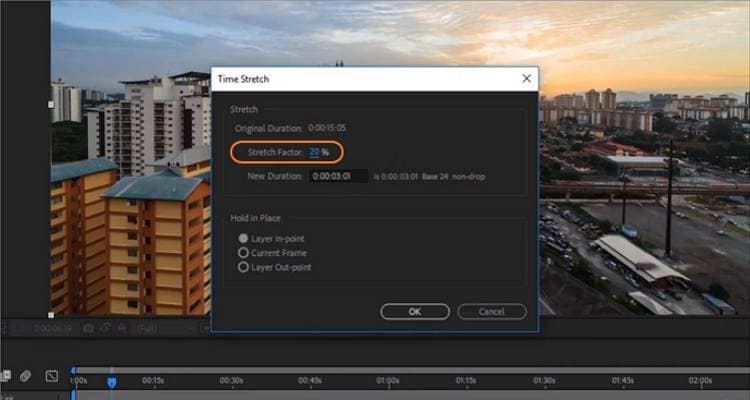
Step 4. You can also enter a brand-new video playback duration if you want to create a video with precise playtime.
Step 5. If everything is looking fine, hit the Ok button and enjoy!
Method 2: Use Time Remapping (A bit challenging)
The Time Remapping option makes it seamless to work with slow-motion footage or videos with higher frame rates. Unlike the first method, Time Remapping allows users to add frame blending, giving you higher quality outputs. Below are the easy steps:
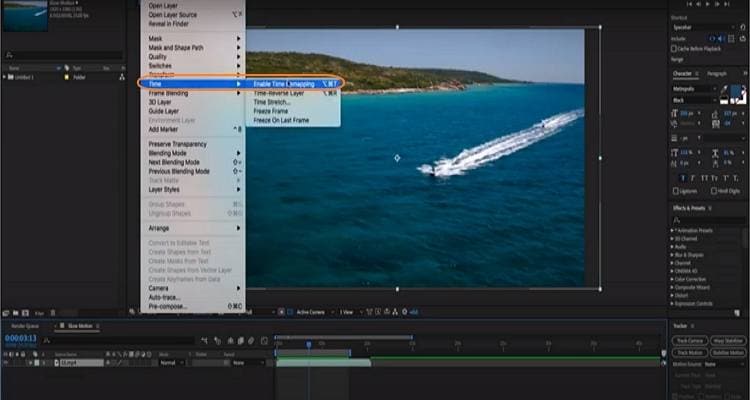
Step 1. First, you have to enable the Time Remapping effect by selecting the video clip and then click the Layer tab at the top. Now press Time, and then choose Enable Time Remapping. You'll notice two keyframes at the start and stop points of your composition.
Step 2. Secondly, select the video section you want to slow down and then create a keyframe there. To slow down the video, you'll drag the new keyframe to the end keyframe. You can also speed up the playback speed by moving the keyframe to the start keyframe. Your video will slow down automatically when you play it.
Step 3. You'll notice some still frames on the eventual video. In other words, your clip will look a bit jittery. So, to remove the still frames, activate the composition's Frame Blending icon and then on the layer. This will create brand-new intermediate frames, giving your video a smooth view.
Part 3: FAQ for Using After Effects to Speed Up Clip
1. Is After Effects suitable for beginners?
Despite boasting a lot of video production tools, I find After Effects perfect for experienced users. Simply put, this program can be intimidating if you're a beginner. Even worse, the subscription plan is a bit steep. But fortunately, you can get all that After Effect offers plus many more by using Wondershare UniConverter. This computer app has a beginner-friendly UI and comes with advanced video editing tools that will excite seasoned video editors. With it, you can create fast-motion or slow-motion video clips with a single click. And after that, you can edit your video by applying filters, color correction, background music, rotating, and so on.
Key features:
Wondershare UniConverter - Best Video Converter for Mac/Windows
-
Edit all video file formats, including MTS, MOV, 3GP, VOB, MP4, among others.
-
Convert between all standard video, audio, and image formats.
-
Speed up videos by up to 2x the original playback speed and slow down by up to 0.25x.
-
Retouch videos by adding effects, filters, background audio, subtitles, and more.
-
Excellent multimedia player for opening any audio/video file.
-
The best video editor for macOS and Windows 10/8/7.
Below are the steps on how to slow down or speed up footage on Mac/Win with UniConverter:
Step 1Upload the footage you want to slow down or speed up.
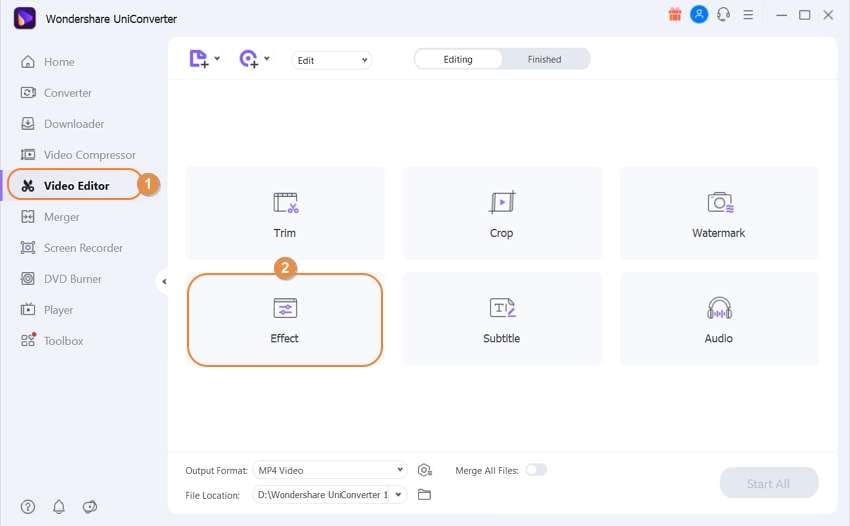
Visit Wondershare's official website and download the UniConverter desktop app. Then, install and run the program before clicking the Video Editor button. Now choose Effects to launch your media library and upload footage.
Another way is to click Converter on the left, then drag-n-drop your clip on the platform. Alternatively, press Add Files or Load DVD to upload video files. Now press the Effect icon on the video thumbnail.
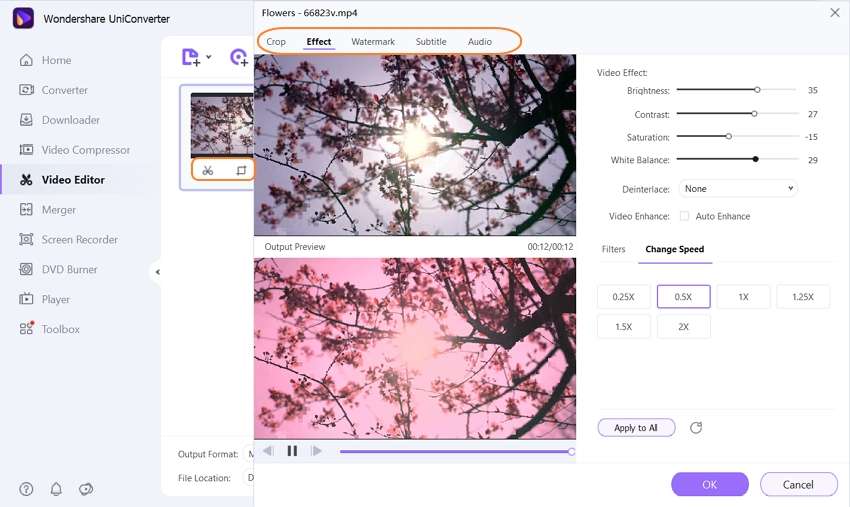
Step 2Slow down/speed up the video clip.
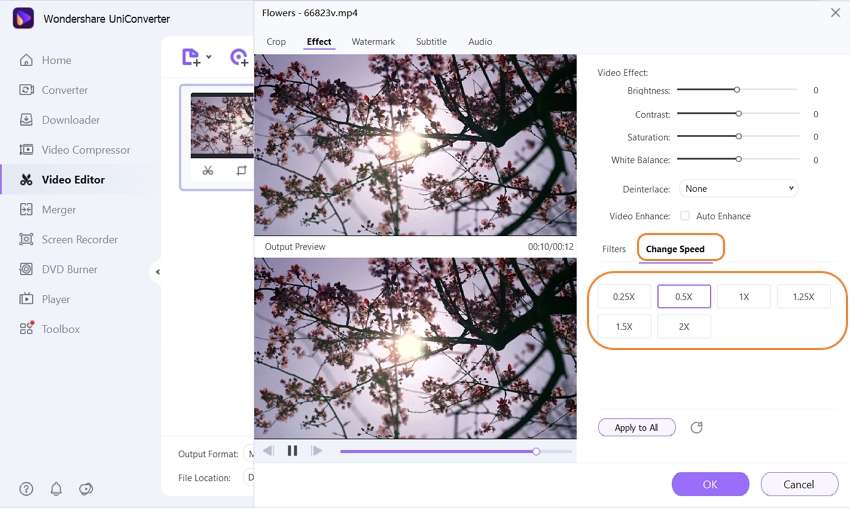
Next, press the Change Speed tab, where you'll view all the available video speed options. If you want to increase the speed, choose 1.25x, 1.5x, or 2x. To slow it down, click 0.5x or 0.25x. Remember, 1x is the average playback speed.
Step 3Retouch the video clip further (optional).
Sometimes, you may want to edit the footage further to make it more attractive and presentable. Luckily, UniConverter lets you do that as well. Do the following:
- Add effects and filters- Launch the Effect tool and then adjust the brightness, contrast, saturation, and white balance sliders to customize these features. Also, press the Filters tab to add 30+ unique filters to your video.
- Crop, rotate and flip - Now press the Crop tab at the top and adjust the crop area of your video. You can do that by entering the exact frame dimensions. Users can also flip their videos vertically/horizontally and rotate clockwise/anticlockwise.
- Apply text or image watermarks - Are you planning to share your video on social media? In that case, click the Watermark tab to apply unique and colorful logos to your footage.
- Adjust audio -If your video's audio volume or quality isn't up to scratch, edit it by clicking the Audio tab and then drag the volume slider. You can also enhance stereo, human voice, and remove background noise.
- Trim and split -Lastly, close the editing tool, then press the Trim symbol on the video thumbnail. Now drag the keyframes at the start and stop points of the video to trim it. Alternatively, choose a specific area, enter the exact duration, and then press Cut.
Step 4Save your new video file.
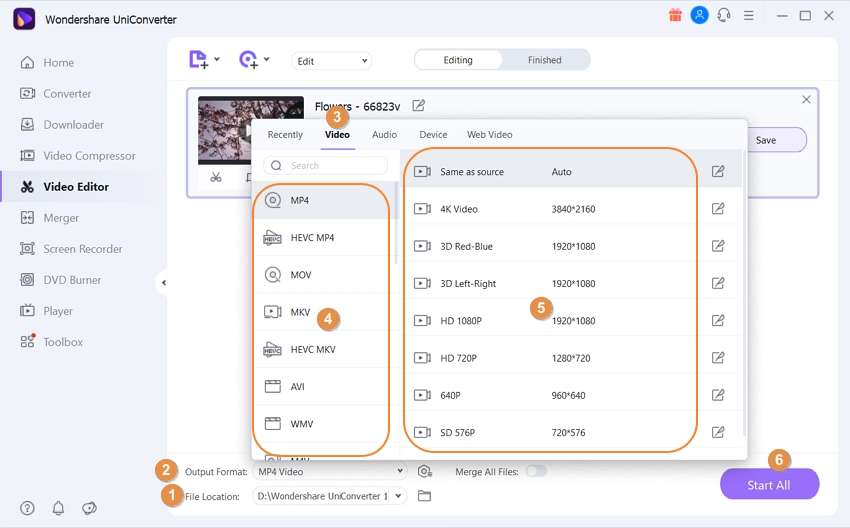
Is the footage looking clean and polished? Start by choosing a folder path on File Location. After that, click Output Format, press Video, and then select a target format. And finally, press Start All. Wondershare UniConverter will process your new footage without losing the original video quality.
2. How do I make After Effects preview faster?
Although Adobe Effects is a powerhouse in the video production industry, this app does have its downfalls. That is especially true when you're previewing your compositions. In other words, things can be sluggish whether you're using 8GB or 64GB RAM size.
Luckily, there are multiple solutions. First, make sure you get it right with the pre-composition pixel size. Typically, the pre-comp default size is 1920 x 1080 pixels. But if you're editing a still graphic with a 500 x 500-pixel area, it means the remaining space will have nothing to do. In that case, resize the pre-comp area down to 500 pixels to enjoy faster preview results.
Another trick is to preview your composition in a lower resolution. Although this one might seem pretty straightforward, some computers don't work well with high-resolution videos. So, to reduce the preview resolution, scroll down the comp window and find the Full drop-down menu. Now preview your composition at lower resolutions and see if it works for you.
Conclusion
Evidently, applying fast-motion or slow-motion effects in Adobe Effects requires prior knowledge. But don't be intimidated if you're a beginner because you only need a few sessions with this app, and you're good to go. In the meantime, use Wondershare UniConverter to convert, compress, and edit your video files effortlessly. And, of course, use high-quality videos to get the best possible quality.
Your complete video toolbox

Other popular Articles From Wondershare


Christine Smith
chief Editor