Transfer Tips
- TRY FREE TRY FREE
- 1. Transfer to Phone+
-
- 1.1 The Easiest Way to Transfer Audio Files to iPhone in 2026
- 1.2 Best Way to Transfer Video to iPhone Photo Gallery in 2026
- 1.3 The Most Simple Way to Transfer YouTube Video to Phone Gallery in 2026
- 1.4 Simple Ways to Transfer Videos Between iPhone and Android in 2026
- 1.5 One-Click to Transfer Media Files Between Your Computer and Android in 2026
- 1.6 Top 10 Apps for Video Transfer from PC to iPhone in 2026
- 1.7 Recommended Ways to Transfer Videos to Mobile Phone in 2026
- 1.8 The Easiest Way to Transfer Videos from Computer to iPhone in 2026
- 1.9 Best 6 Third-Party Apps to Transfer Videos from Mac to iPhone in 2026
- 1.10 What Is the Best Way to Transfer Videos from PS4 to Phone in 2026
- 1.11 10 Tips for Transferring Video to Android Devices in 2026
- 2. Transfer to Computer+
-
- 2.1 Simple Ways to Transfer YouTube Offline Videos from Mobile to Laptop in 2026
- 2.2 8 Recommended Ways to Transfer Video from Android to Mac in 2026
- 2.3 Easy Ways to Transfer GoPro Videos to Computer in 2026
- 2.4 Best Ways to Transfer Media Files from Android to PC in 2026
- 2.5 Best Way to Transfer 4K Videos from iPhone to PC in 2026
- 2.6 3 Simple Ways to Transfer Videos from iPhone to Windows 10 without iTunes in 2026
- 2.7 7 Ways to Transfer Videos from iPhone to Computer in 2026
- 2.8 Best Ways to Transfer Videos from Phone to PC in 2026
- 2.9 5 Solutions to Video Transfer from iPad to PC in 2026
- 3. Transfer to iPad+
- 4. Other Transferring Tips+
-
- 4.1 Best Ways to Watch Videos from Your Phone on A TV in 2026
- 4.2 5 Simple Methods to Transfer Videos to SD Card in 2026
- 4.3 Best Methods to Transfer Music Between iTunes and Windows Media Player on PC 2026
- 4.4 Fast Way to Transfer Video from DJI Osmo Pocket in 2026
- 4.5 Best Way to Transfer A YouTube Video to iMovie in 2026
- 4.6 Best Choices to Transfer Large Video Files in 2026
- 4.7 Easy Ways to Transfer Video to MP4 Device in 2026
- 4.8 Simple 4 Ways to Transfer Videos to DVD in 2026
- 4.9 Easy Ways to Transfer Videos from iPhone to USB Flash Drive in 2026
Simple 4 Ways to Transfer Videos to DVD in 2026
by Christine Smith • 2026-01-21 18:52:07 • Proven solutions
Transferring home videos to DVD is very common nowadays. In order to transfer videos to DVD, you need a reliable way so that your videos stay safe in the process. In this article, we are going to introduce you to the best four ideas on how to transfer videos from a computer/phone to a DVD. These ways are perfectly tested and accounted for you, so if you are not an expert in this, there is no need to worry. We will help you with simple guidelines and correct information so that you can continue with ease. Let's get to the central part, shall we?
- Part 1. Transfer Videos to DVD on Mac with Wondershare UniConverter
- Bonus. Save Favourite Online YouTube Videos and Music for Free
- Part 2. Transfer Videos from Phone to DVD on Win
- Part 3. How to Transfer Video to DVD with DVD Burner
- Part 4. How to Transfer Video to DVD with Video Capture Device
Part 1. Transfer Videos to DVD on Mac with Wondershare UniConverter
The best way to transfer video to DVD is by using a powerful toolbox named Wondershare UniConverter (originally Wondershare Video Converter Ultimate). It is an ultimate video converting toolbox that can solve almost every video related problem anyone faces in their daily life. It has all the exciting features that will help you to transfer old videos to DVD. If you don't know how to transfer videos from computer to DVD, then the guideline below will help you use this powerful toolbox and solve your problem in no time.
 Wondershare UniConverter - Best Video Tool for Mac/Windows

- It can convert videos into more than 1000 file formats.
- The conversion speed is 30 times faster than normal speed.
- It will allow you to convert videos for many devices.
- The video compressor will allow you to use pre-set customizable formats and video settings.
- It will allow you to burn, convert, edit DVD files, and even use free DVD templates.
- Burn video to playable DVD with attractive free DVD template.
Steps for Using UniConverter to Transfer Videos to DVD on Mac:
Preparation: Prepare and Download Needed Videos
Before transferring videos to DVD, you need prepare all your videos first. If you want to add some online videos or audio, such as YouTube videos and music, you can go to bonus part to download online videos for free.
Step 1 Download and Add Files
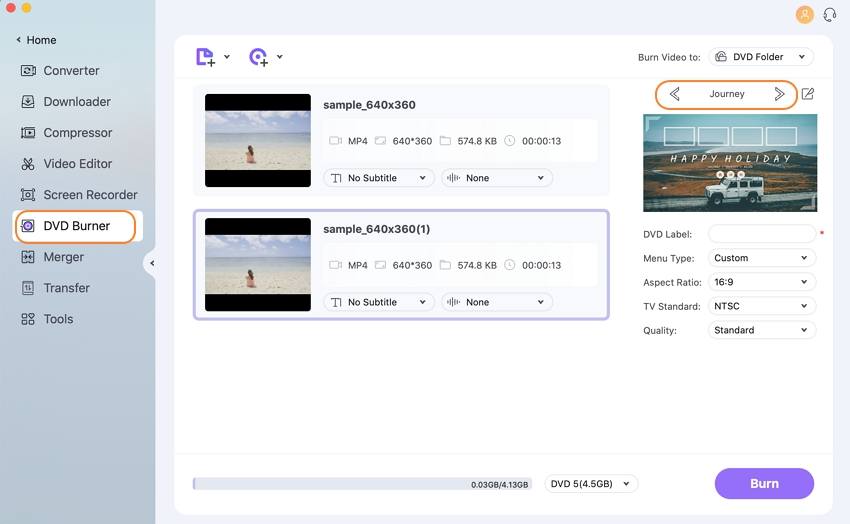
First, you need to download and install the program on your computer. Then start the program and go to the DVD Burner tab from the main interface. Then add your videos to the program by clicking on the Add Files button. There is also a way to drag and drop the files into the program.

You can also add Convertedvideos to the Burn section, by right-clicking on the video and selecting Add to Burn List option.

Step 2 Choose DVD Templates
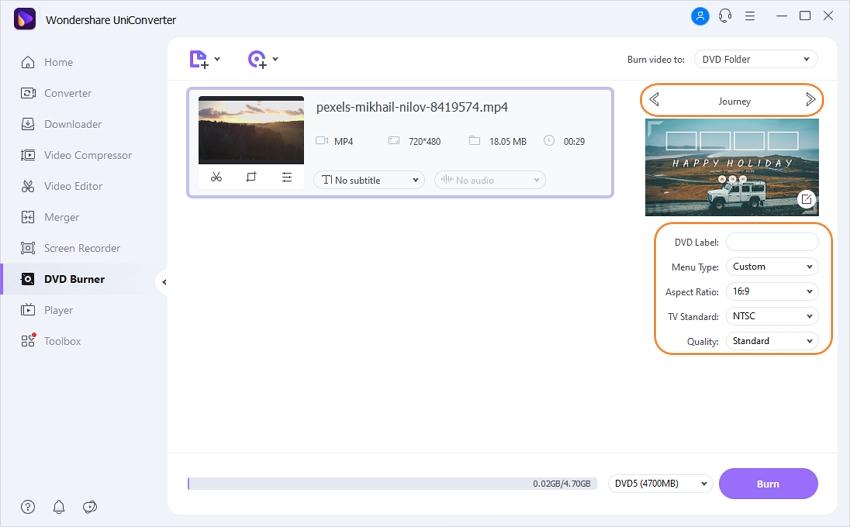
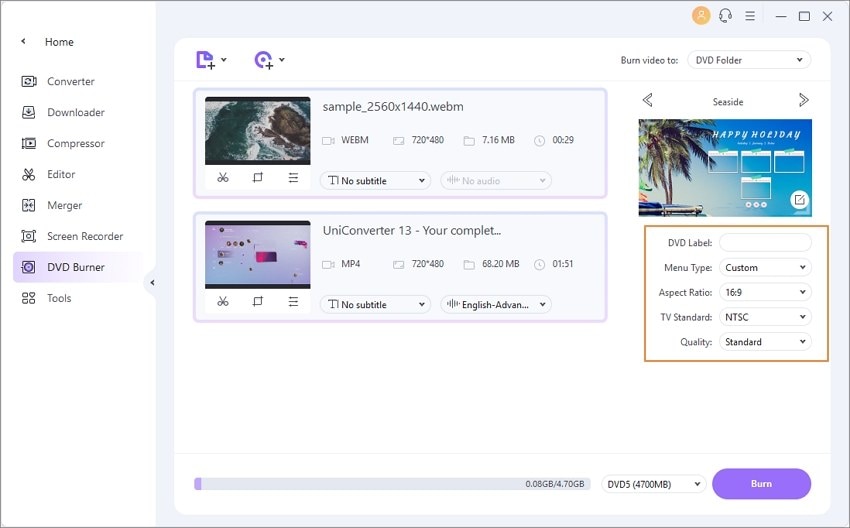
Then, you need to choose a DVD template or theme for your desired videos from the program's free DVD templates and themes on the right side of the program window. Just move the right or left arrows to check the templates and choose one.

Step 3 Customize DVD Settings
You can give your desired name for the DVD under the DVD Label section. You can also select the Aspect Ratio, Menu Type, TV Standard, and Quality from each drop-down options.

Step 4 Burn Videos to DVD
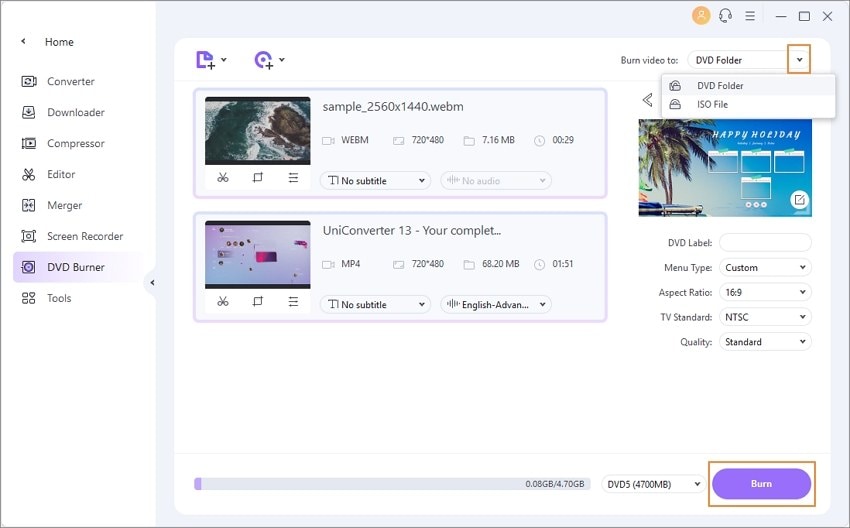
Now you need to insert a blank disc into your computer and chose the output folder of the DVD from the Burn video to option of the right corner window. You can also burn videos into a DVD folder or create an ISO file. Finally, click on the Burn button to start the burning process.

Bonus. Save Favourite Online YouTube Videos and Music for Free
If you want to make your DVD more attractive, you may consider inserting some clips from YouTube or adding background music. Now, here is the best solution to save YouTube videos in three steps for free:
Step 1 Open the Video on the Browser
Open your browser and go to the video you want to export. It can be the video you prefer to directly use it in thr DVD, or only the music of thr video you like.
Step 2 Copy the URL of the video
Copy the address of the video from the top of the screen.

Step 3 Paste the URL
Open the software UniConverter – a complete video toolbox. If you don't have it on your computer, you can try it for free by clicking the download button below.
Then, go to the Home interface and click Downloader.

If you have copied the URL, UniConverter will automatically recognize it and start to download the video. Otherwise, you can click the adding link icon and choose what you want to download. Then, paste the URL.


Tips
If you only like the music of the video, you can click Download MP3 and then paste the URL. UniConverter will help you extract the ausio from the video and export it as MP3 file.
After that, UniConverter will analyze the video URL and save the video to the default file location when finishing downloading. If you want to change the file location, you can change the setting by clicking the file button.

Tips
The video will be saved as MP4 format by default. If you need to resize the file for DVD, just move to MP4 Compressor: Full Solutions to Compress MP4/MPEG/MPG Video on Windows & Mac to learn more.
Part 2. Transfer Videos from Phone to DVD on Win
If you want to learn how to transfer videos from phone to DVD, then this part will help you the most. For this process, you need to use Wondershare DVD Creator software. It will help you to burn or transfer videos from phone to DVD in a short time. It's a great DVD burning software that supports Windows10/8/7/Vista/XP and macOS. It will allow you to burn videos to DVD and Blu-ray discs in a straightforward process. You'll find various dynamic and static templates available on the program to match your video theme. Some options include creating new chapters, adding background image or music, and some other template customization. Like UniConverter, it also has a built-in video editor that will allow you to personalize phone videos before burning them into DVDs.
Here is a step by step guide for Using This Tool to Transfer Videos from Phone to DVD:
Step 1: Download and Install Program
First, you need to download, install and launch the software on your computer. From the main homepage, choose the Create a DVD Video Disc option.

Step 2: Import Videos from Phone
Now connect your phone to the computer and click on the + icon at the center of the program interface. Then from the new window, browse and select the videos that you want to import to the program. Click the open button to import them, or you can drag and drop the videos into the program to import them.

Step 3: Edit Videos If Needed
After importing the videos, you can click on the Edit icon to open the video editor of the program. There you can easily crop and trim videos, apply effects, add watermarks, and do more things. After you finish editing the video, click on the OK button to save the changes you made.

Step 4: Select DVD Template
Next from the Menu tab, you'll find a list of template designs that you can choose for the DVD. You can also use the download icon to download more designs if needed. Just select a template of your choice and customize them if required by adding background music or image, create new chapters, set aspect ratio, etc. You'll find the icons for customizing the templates are at the top of the program interface.

Step 5: Preview and Burn Videos
Click the Preview tab to check the video for the final time. If you need to make more changes, then go to the Source tab or Menu tab and make the changes. Then click on the Burn tab, and a Settings window will open. Now you need to insert a blank disc into the computer and choose the Burn to disc option. Then provide the Disc label and set other parameters. Finally, click on the Burn button to start the burning process.

Part 3. How to Transfer Video to DVD with DVD Burner
Another way to transfer home videos to DVD is by using a DVD burner. You need a specially designed DVD recorder that works with analog connections for this process. Here is how to transfer old videos to DVD with an external DVD burner:
Step 1: Connect the VCR to the external DVD burner first.
Step 2: Now activate the video transfer process on the external recorder. You will find the video recorded in real-time on a DVD.
Part 4. How to Transfer Video to DVD with Video Capture Device
Last but not least, another way for DVD video transfer is with a video capture device. The process is easy and here is the guideline for you:
Step 1: First, you need to connect the composite (yellow) video and RCA analog stereo (red/white) outputs of the VCR to the proper inputs on a DVD recorder.

Step 2: Now, choose the input on your DVD recorder where the VCR is connected.

Step 3: You need to insert the tap into the VCR that you need to transfer to DVD.
Step 4: Next, you need to insert a blank DVD into the DVD recorder.

Step 5: Finally, you can start the DVD recording process first and then press the play button on the VHS VCR to start the playback process.
Conclusion
This article is a clear guideline for you if you don't know how to transfer videos from a computer/phone to a DVD. You can use any of these 4 ways to transfer videos from phone/computer to DVD, but there is always the best way suitable for everyone. And you already know that the best way is Wondershare UniConverter without any doubt. This incredible toolbox will surprise you with its various features and confirm successful video to DVD transfer every time.


Christine Smith
chief Editor