Transfer Tips
- TRY FREE TRY FREE
- 1. Transfer to Phone+
-
- 1.1 The Easiest Way to Transfer Audio Files to iPhone in 2026
- 1.2 Best Way to Transfer Video to iPhone Photo Gallery in 2026
- 1.3 The Most Simple Way to Transfer YouTube Video to Phone Gallery in 2026
- 1.4 Simple Ways to Transfer Videos Between iPhone and Android in 2026
- 1.5 One-Click to Transfer Media Files Between Your Computer and Android in 2026
- 1.6 Top 10 Apps for Video Transfer from PC to iPhone in 2026
- 1.7 Recommended Ways to Transfer Videos to Mobile Phone in 2026
- 1.8 The Easiest Way to Transfer Videos from Computer to iPhone in 2026
- 1.9 Best 6 Third-Party Apps to Transfer Videos from Mac to iPhone in 2026
- 1.10 What Is the Best Way to Transfer Videos from PS4 to Phone in 2026
- 1.11 10 Tips for Transferring Video to Android Devices in 2026
- 2. Transfer to Computer+
-
- 2.1 Simple Ways to Transfer YouTube Offline Videos from Mobile to Laptop in 2026
- 2.2 8 Recommended Ways to Transfer Video from Android to Mac in 2026
- 2.3 Easy Ways to Transfer GoPro Videos to Computer in 2026
- 2.4 Best Ways to Transfer Media Files from Android to PC in 2026
- 2.5 Best Way to Transfer 4K Videos from iPhone to PC in 2026
- 2.6 3 Simple Ways to Transfer Videos from iPhone to Windows 10 without iTunes in 2026
- 2.7 7 Ways to Transfer Videos from iPhone to Computer in 2026
- 2.8 Best Ways to Transfer Videos from Phone to PC in 2026
- 2.9 5 Solutions to Video Transfer from iPad to PC in 2026
- 3. Transfer to iPad+
- 4. Other Transferring Tips+
-
- 4.1 Best Ways to Watch Videos from Your Phone on A TV in 2026
- 4.2 5 Simple Methods to Transfer Videos to SD Card in 2026
- 4.3 Best Methods to Transfer Music Between iTunes and Windows Media Player on PC 2026
- 4.4 Fast Way to Transfer Video from DJI Osmo Pocket in 2026
- 4.5 Best Way to Transfer A YouTube Video to iMovie in 2026
- 4.6 Best Choices to Transfer Large Video Files in 2026
- 4.7 Easy Ways to Transfer Video to MP4 Device in 2026
- 4.8 Simple 4 Ways to Transfer Videos to DVD in 2026
- 4.9 Easy Ways to Transfer Videos from iPhone to USB Flash Drive in 2026
Best Way to Transfer A YouTube Video to iMovie in 2026
by Christine Smith • 2026-01-21 18:52:12 • Proven solutions
Have you ever encountered this problem before: trying to import YouTube videos into iMovie without recording any success? Actually, the leading cause of this issue is due to the file format supported by the software. iMovie is a very useful video editing software created by Apple Inc. for users to record, edit, watch, and share videos on their macOS or iOS devices. But it does not support some formats, which are YouTube video file formats. However, all hope is not lost as you can still learn how to convert YouTube videos to iMovie format and how to transfer a YouTube video to iMovie for editing.
In this post, we will show you how to transfer a YouTube video to iMovie easily to view and edit it on your Mac computers or iOS devices.
Let’s begin!
- Part 1. How to Convert YouTube Video to iMovie Format with WondershareUniConverter
- Part 2. How to Import YouTube Video to iMovie
- Part 3. How to Transfer YouTube Video to iPhone
Part 1.How to Convert YouTube Video to iMovie Format with WondershareUniConverter
Like we side earlier, you may be unable to transfer a YouTube video to iMovie due to the supported file format restriction. That is why you need a reliable video converter to convert YouTube to a supported format by iMovie. The best tool we recommend as the YouTube to iMovie converter for Windows and Mac operating systems is Wondershare UniConverter (originally Wondershare Video Converter Ultimate), due to its loads of impressive, amazing, and easy-to-use features.
With this fantastic tool, you can download video clips from YouTube, Dailymotion, and over 10,000+ video sharing sites, edit them and convert them to MP4, QuickTime MOV, 3GP, and other supported formats iMovie without a hitch. Moreover, the tool can compress videos without affecting its quality. It also supports 1000+ file formats and offers a file conversion speed that is 30 times faster than other file converters.
Also, it downloads YouTube videos at a very high speed. It can transfer your downloaded, edited, or converted video files to mobile devices like smartphones, flash drives, camcorders, removable hard drives, and the likes. Moreover, with its free menu templates, you can burn videos to DVD/Blu-ray disc convert between different video formats such as VOB, MP4, FLV, AVI, MOV, etc.
Note that YouTube videos can be uploaded in diverse file formats, but iMovie does not support some file formats like WebM, AVI, FLV, and WMV. Hence, you need to convert these files with a powerful video converter such as the WondershareUniConverter.
 Wondershare UniConverter

- Transfer videos from PC to other external devices quickly.
- Convert videos to 1,000+ formats, including AVI, MKV, MOV, MP4, etc.
- Support 120X faster conversion speed than other common converters.
- Edit videos with trimming, cropping, merging, adding subtitles, and more.
- Burn video to playable DVD with attractive free DVD templates.
- Support Download or record videos from 10,000 video sharing sites.
- Versatile toolbox includes fixing video metadata, GIF maker, and screen recorder.
- Supported OS: Windows 10/8/7/XP/Vista, macOS 11 Big Sur, 10.15 (Catalina), 10.14, 10.13, 10.12, 10.11, 10.10, 10.9, 10.8, 10.7, 10.6.
Follow the steps below to learn how to convert a YouTube video to iMovie with WondershareUniConverter.
Step 1 Download the Wondershare UniConverter Software
Go to the Wondershare’s official website to download and install Wondershare UniConverter software.
Step 2 Download YouTube Video
Open your web browser, go to YouTube, find the content you want to download, and copy the YouTube’s video URL from the address bar on your web browser.
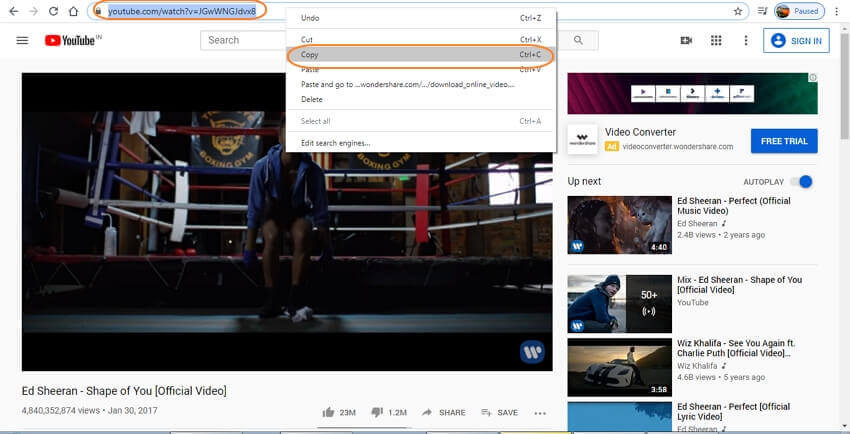
Start the Wondershare UniConverter and click on the Downloader tab from the user interface and click on the + Paste URL button. The YouTube video URL is detected automatically. Also, select your preferred video resolution and click on the Download button to start downloading the youtube video.
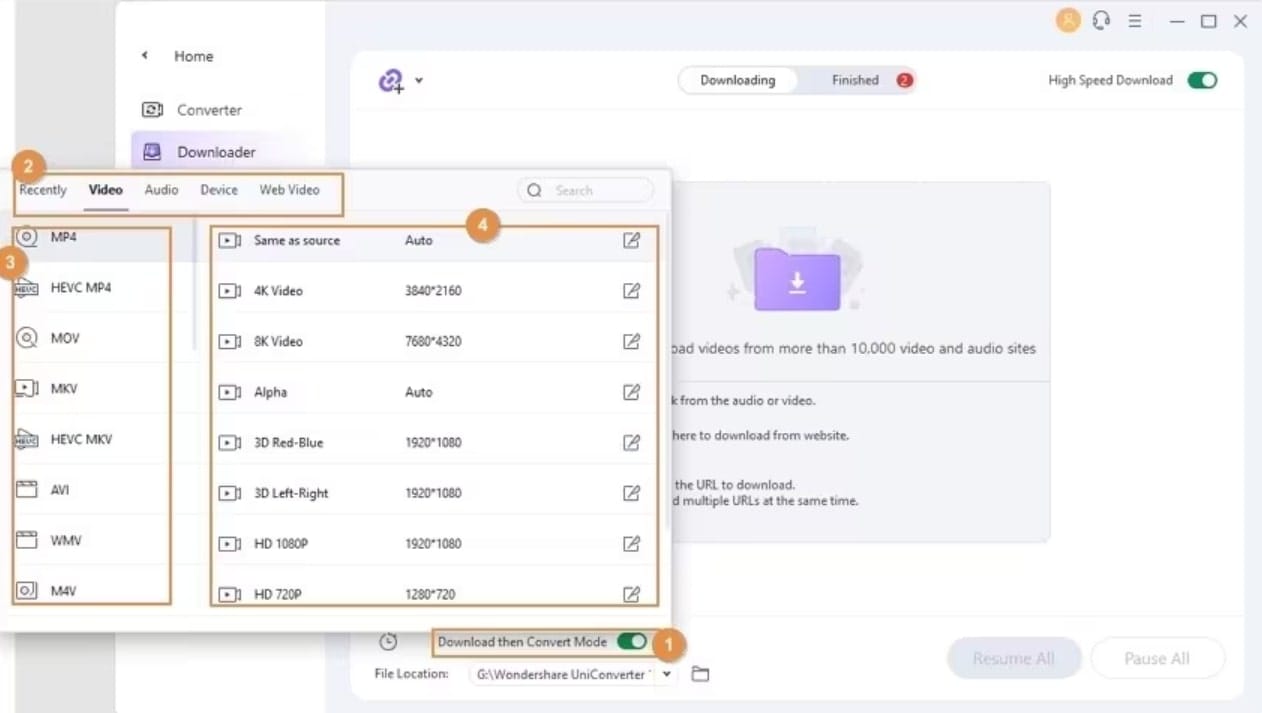
Step 3 Convert YouTube to iMovie.
Once the download begins, toggle the Download then Convert Mode. Then under the Video section, select MOV or MP4 since it is compatible with iMovie and set the video resolution. (For a fast Download, turn on the tab on the bottom left of the tool’s interface).
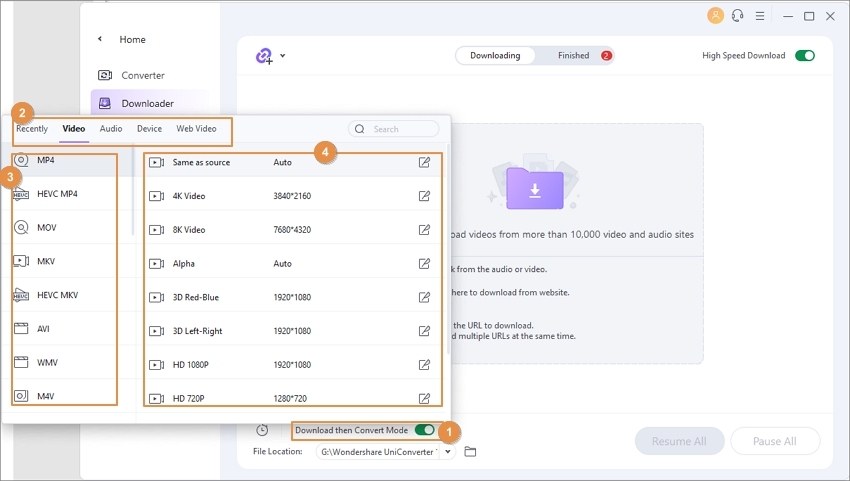
After WondershareUniConverter finishes downloading and converting the YouTube video file into MOV or Mp4, it is saved in the Finished tab. To locate the converted file, click on the Folder near the file you downloaded to open the file folder and see where the file is saved. Simple, isn’t it? That is how to convert a YouTube video to iMovie supported videos.
Part 2. How to Import YouTube Video to iMovie
If you have finished downloading a YouTube video you want to watch or edit on iMovie, you can now import that video to iMovie. Follow the steps below to import a YouTube video to iMovie.
Step 1: Create a new iMovie project or choose an existing project.
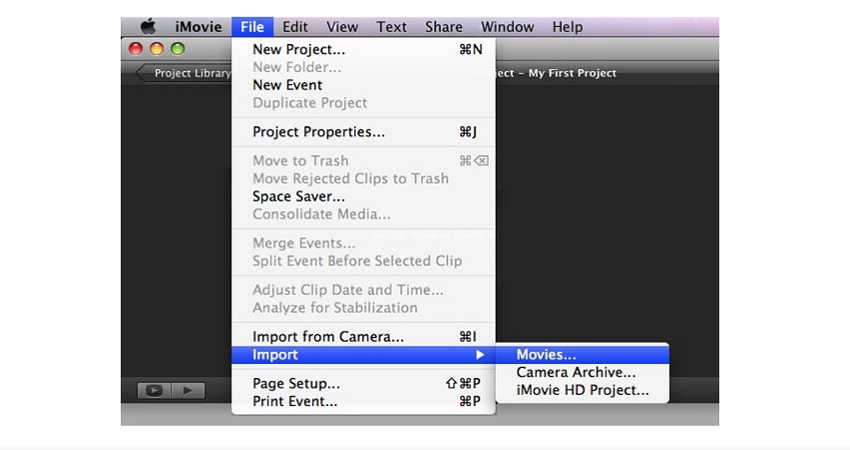
Begin by creating a new iMovie project or select an existing project in your computer. Next, click on File and point to import, then click on Movies. That command helps you find and imports the YouTube video clips to iMovie. That is how to transfer a YouTube video to iMovie by importing the video file.
Step 2: Add background music to the new video project or old project on iMovie
After importing the YouTube video, you can now edit it. To carry that action out,drag-n-drop the music into the project. Look out for the green + or the Add sign, and then drop the audio track at once. You will notice that this audio you added will appear in green, to signify that it is the background music clip. This music will begin from the place where your iMovie project started.
If you like, you may add a background track to a part of your video clip. To achieve that goal, drag the music to the spot on the clip where you want it to start playing.
Step 3: Regulate or edit the background music clip
Finally, regulate or edit the background music clip by right-clicking it and then selecting Show Clip Trimmer, Trim to PlayHead. From this point onwards, you can customize the audio, effects, set the volume, trim the videos, etc.
Part 3. How to Transfer YouTube Video to iPhone
For most users of streaming and sharing YouTube videos brings a smile to their faces. But downloading YouTube videos and transferring them to their iPhones can be a tough task.
However, we have the solution right here, and that entails the use of the Wondershare UniConverter. But before we process to the steps, follow the steps in Part 1 above to download your desired YouTube contents to your PC and then follow the steps below to transfer the YouTube videos to your iPhone devices.
Note: iPhones are compatible with a range of video file formats such as MP4, MOV, and M4V formats. Keep this in mind when downloading YouTube videos and selecting a compatible video format for your iPhone. If you cannot get a supported format, you can convert the available YouTube video format to a format supported by your iPhone device.
Step 1 Launch Wondershare UniConverter
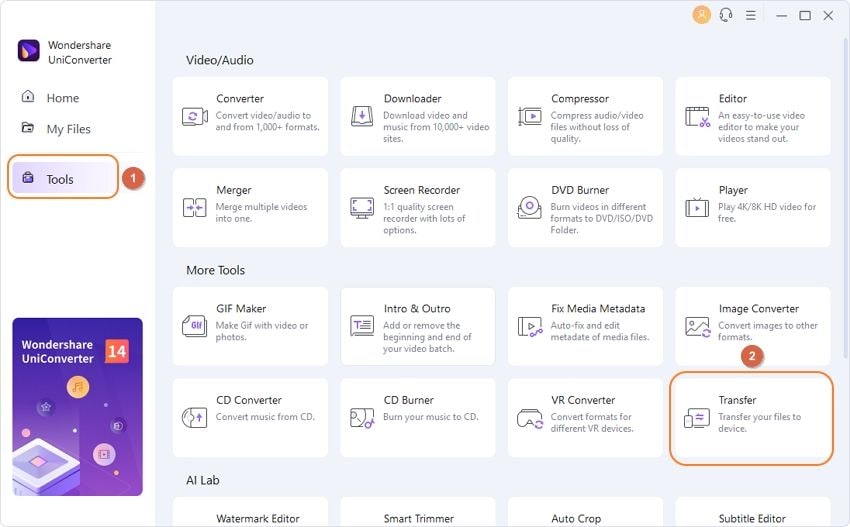
Run Wondershare UniConverter on your PC and go to the Transfer tab located on the tool’s interface.
Step 2 Connect your iPhone to your PC
Using your phone’s USB cable, connect your iPhone to your PC. The moment you connect your phone to your PC and the PC recognizes your phone, Wondershare UniConverter will download the iPhone drivers required for a smooth connection and transfer of files. Follow the prompt on your PC screen and enter your device’s passcode to confirm that you initiated the connection.
Step 3 Add YouTube videos.
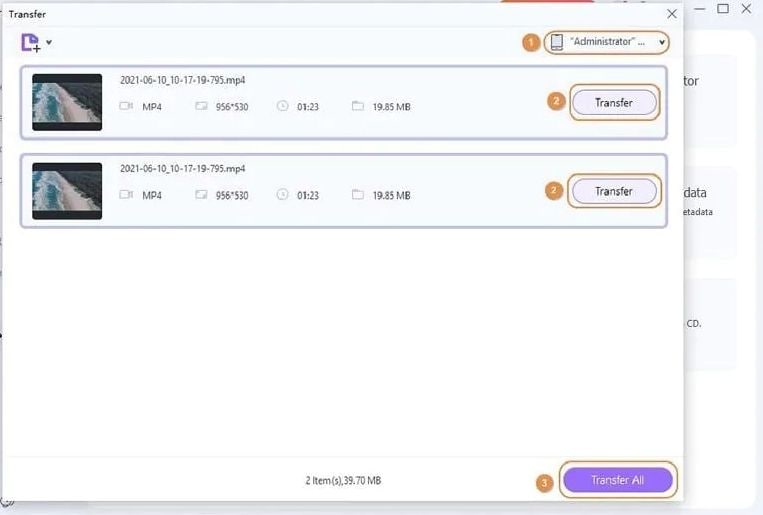
Click on the + Add Files at the top left region on your PC screen to add the YouTube videos that you want to transfer to your iPhone. From the pop-up screen, find and select all the videos you wish to transfer and click on Open to add the videos.

Step 4 Transfer YouTube videos.
Click on the Transfer button next to the video you wish to transfer or choose the Transfer All option if you want to send many YouTube videos to your iPhone all at once. When you’re done with the transfer, disconnect your phone and access the video in your device’s video app.
Conclusion
Downloading and transferring YouTube videos to iMovie or your iPhone device can be a very easy process when you use the right tools and follow the right procedures. In this article, we have opened your eyes to transferring a YouTube video to iMovie and the best tool to use to achieve your desired result. We have also shown you how to download and convert video content from YouTube to a supported format, as well as how you can transfer the downloaded videos to your iPhone for convenient offline viewing.
Now that you know these simple tricks follow them to transfer your favorite YouTube videos to iMovie and edit them as you need. If you find this piece resourceful and beneficial, feel free to share it with your friends.

Christine Smith
chief Editor