- Rip YouTube videos with subtitles in different languages.
- Extract subtitles from videos and save them in SRT, ASS, SSA, and other formats.
- Automatically add subtitles to downloaded videos in one click.
*Note: We resolutely oppose all forms of copyright-infringing downloads and recording. This tutorial is only for saving your personal or authorized videos.

Subtitles
- Try It Free Try It Free
- 1. Add Subtitles+
- 2. Extract Subtitles+
- 3. Download Subtitles+
- 4. Tips and Tricks+
-
- 4.1 Top 10 Subtitles Players
- 4.2 Play Dual Subtitles
- 4.3 Video Players with Subtitles
- 4.4 Convert IDX to SRT
- 4.5 Convert TXT to SRT
- 4.6 Convert SUB to SRT
- 4.7 Convert Video with subtitle
- 4.8 Best Subtitle Converters
- 4.9 Subtitle Editor Tools
- 4.1 Adjust Subtitle Delay in VLC
- 4.11 Best Subtitle Maker
- 4.12 Tips about Subtitle Editing
- 4.13 Synchronize Subtitle Tool
- 4.14 Best Font for Subtitles
- 4.15 How to Create SRT File
- 4.16 Turn On/Off Subtitles
- 4.17 Several Tips about Subtitles in Windows Media Player
Download YouTube Video with Subtitles: 13 Best Tools (2026)
by Kayla Morrison • 2026-07-02 14:56:31 • Proven solutions
"How to download videos with subtitles from YouTube? --- Question from Quora
Nothing beats YouTube when it comes to video collections. This online video streaming site collects videos of all genres and languages. Some videos on YouTube have subtitles to improve the video's accessibility and help improve your language skills. So, if you want to download these YouTube videos with subtitles, you are reading on the right page, because we are here to provide you with the most practical YouTube video downloader with subtitles to help you solve the problem of downloading YouTube subtitles.
If you are looking for options on how to download YouTube video with subtitles for free, a decent number of tools are available. Listed below are the 15 popularly used programs that facilitate downloading YouTube transcript.
![]() *A Legal Warning Note:
*A Legal Warning Note:
We resolutely oppose all forms of copyright-infringing downloads and recordings. The tools we recommend here are only for saving your personal or authorized videos.
In this article
- Why Do YouTube Subtitle Download Errors Happen?
- Quick Comparison Table of YouTube Subtitle Downloader Tools
- Desktop YouTube Video Downloader With Subtitle Support
- Online Web Tools to Download YouTube Video with Subtitles
- Command-line Tool to Download YouTube Video with Subtitles
- Bonus: How to Edit Downloaded YouTube SRT Subtitle Files
- Conclusion
- FAQs
Why Do YouTube Subtitle Download Errors Happen?
YouTube updates its JavaScript player and security algorithms every few weeks — and according to a 2026 report, over 50% of third-party download tools break after just one update. These constant changes create a hidden “arms race” between YouTube and downloader tools, leading to sudden failures, errors, and frustratingly slow downloads when users are seeking tools for YouTube subtitles video download with subtitle.
Why Do Errors Like 403, Parsing Failures, and Slow Speeds Happen?
Error 403 Forbidden: This occurs when your IP or request token is blocked because the tool fails to meet YouTube’s updated authentication requirements.
Parsing Errors: When YouTube modifies its page structure or code, outdated tools can no longer extract subtitle or video data correctly—free online tools are usually affected first.
Speed throttling: If your traffic is detected as non-browser activity, YouTube may limit download speeds to under 50 Kbps, making downloads nearly unusable.
Choose Subtitle Tools with Dedicated Update Cycles
Change Qualified Tools: Use tools that are actively maintained and can quickly adapt to YouTube’s backend changes. Reliable options like yt-dlp and Wondershare UniConverter release frequent updates to stay compatible. A professional desktop solution ensures stable performance, faster speeds, and fewer interruptions, making it a smarter long-term choice than free online tools.
Quick Comparison Table of YouTube Video and Subtitle Downloader Tools
Here comes a quick comparison table of above tools for you as a reference to make a prudent to which tool to choose:
How We Tested YouTube Subtitle Download Tools
For this guide, we reviewed tools based on subtitle format support, download stability, workflow simplicity, and whether the output is practical for playback, study, or editing.
Subtitle support
We checked support for subtitle formats such as SRT, VTT, and TXT.
Download reliability
We reviewed whether each tool still works consistently with YouTube links.
Workflow convenience
We compared ease of use for downloading subtitles with or without the video.
Editing usefulness
We considered whether the subtitle output is usable for editing or translation.
We gave extra weight to stable subtitle extraction and reusable output formats.
| Tool | Platform Type | Supported Devices / OS | Subtitle Support | Batch Downloads | Free / Paid | Key Pros / Cons |
|---|---|---|---|---|---|---|
| UniConverter Subtitle Downloader | Desktop | Windows, macOS | SRT / TXT extraction from YouTube | Yes | Freemium | Pros: High-quality subtitles; Cons: Watermarks on free version |
| VLC Video Downloader | Desktop | Windows, macOS, Linux, Android, iOS | Embedded subtitles via extensions | Limited | Free (open-source) | Pros: Versatile media player; Cons: Complex setup for downloading |
| MiniTool | Desktop | Primarily Windows | Subtitle handling via video tools | Yes | Freemium | Pros: Multi-tool video suite; Cons: Windows-focused |
| ByClick Downloader | Desktop | Windows | Automatic subtitles with video | Yes | Freemium | Pros: One-click downloads; Cons: Windows only |
| iTubeGo | Desktop | Windows, macOS | SRT subtitles with high-resolution videos | Yes | Freemium | Pros: Fast batch downloads; Cons: Mac version slightly limited |
| 4K Download | Desktop | Windows, macOS, Linux, Android | Embedded or separate SRT / VTT files | Yes | Freemium | Pros: Supports 4K/8K quality; Cons: Playlists require paid plan |
| Freemake Video Downloader | Desktop | Windows only | Basic SRT bundled with video | Yes | Freemium | Pros: Fast downloads; Cons: Bundled ads/software |
| WinX | Desktop | Windows, macOS | Subtitles included with video downloads | Yes | Freemium | Pros: High-resolution support; Cons: Trial limitations |
| ClipGrab | Desktop | Windows, macOS, Linux | Selectable subtitles during download | Yes | Free | Pros: Open-source and easy to use; Cons: No mobile version |
| DownSub | Web | Any browser | SRT / TXT / VTT subtitle download only | No | Free (ad-supported) | Pros: Very quick subtitle access; Cons: No video download |
| Noteey | Web / Desktop | Windows, macOS, browser | AI transcription and subtitles | Limited | Freemium | Pros: AI summaries and notes; Cons: Usage quotas |
| SaveFrom.net | Web | Any browser (all devices) | Basic subtitles bundled with video | No | Free (ad-supported) | Pros: No installation needed; Cons: Ads and quality limits |
| yt-dlp | Desktop | Windows, macOS, Linux, Android, iOS | support SRT, VTT, auto-generated captions, multi-language and video playlists | Yes | Free | Pros:support playlists, format control; Cons:not beginner-friendly |
Best Tool to Download YouTube Subtitles
The best option depends on whether you want subtitle files only, videos with subtitles, or tools for editing and translation.
Desktop YouTube Video Downloader With Subtitle Support
1. UniConverter Subtitle Downloader — best for downloading videos with subtitles on desktop
If you are looking for a simple yet effective tool to rip YouTube subtitles along with the video, UniConverter Subtitle Downloader is just the apt choice. This professional software is compatible with Windows and Mac systems and allows recording videos or downloading playlists from YouTube and other popular sites. The videos can be downloaded in an array of popular formats. Moreiover, it offers an easy to use YouTube Chrome extension for you to easily grab videos from YouTube streaming interface. You can save YouTube generated transcript or uploaded CC caption file. If your YouTube videos comes without a subtitle or you want bilingual subtitle, you can also try UniConverter Subtitle Generator as a ideal solution to add new subtitle for videos.
Step 1: Please download and install UniConverter Subtitle Downloader from the button above. Then launch it and choose 'Downloader' from the first interface.

Step 2.1: Go to the video site and make sure you have enable the 'CC' option while playing the video.

Step 2.2: Copy the video link that you want to download the subtitles from, go back to UniConverter and paste it.

Step 2.3: Then click the 'Settings' icon to make some settings. In the 'Subtitles' option, you can choose to download the subtitles in original languages or in other languages.

Step 3: Then you can click on 'Download' button to start the process.

Step 4: Once the process done, your downloaded files will show in 'Finished' tab. A 'CC' tab will attached to the video file which means you have successfully save videos with subtitles.

Step 5: Now you can right click on the mouse and choose 'Open File Location' to check the subtitles. The video subtitles will save in srt format. You can also use the 'Subtitle Editor' to do further editing on your subtitles.

Features:
- Import Video links and get videos and subtitles at the same time.
- Effortlessly translate your video script into multiple languages with AI.
- Re-edit downloaded videos with more AI editing tools.
- Free to Download Transcript Free to Download Transcript Try Free Online
2026 Status :✅ Working
Key Notes:UniConverter offers dedicated update cycle ensures ongoing compatibility with YouTube changes.
![]() *A Legal Warning Note:
*A Legal Warning Note:
We resolutely oppose all forms of copyright-infringing downloads and recordings. The tools we recommend here are only for saving your personal or authorized videos.

YouTube Video Downloader with Subtitle Format Options
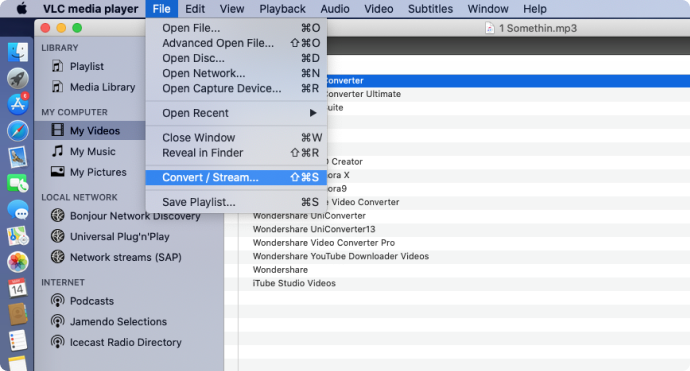
2. VLC Video Downloader — best for free manual YouTube video saving
VLC Media Player offers a built-in method to stream and convert YouTube videos via its network stream feature, allowing users to play or save clips without dedicated downloader software. Open VLC, go to Media > Open Network Stream, paste a YouTube URL, play it, then use Convert/Save to download in formats like MP4. This free, open-source tool excels in format versatility but requires manual steps for YouTube tasks. It's ideal for users already using VLC for playback who want occasional offline saves.
Pros
- Completely free and open-source with broad format support.
- No ads or extra software needed; lightweight on resources.
- Handles streaming and conversion in one app.
- Cross-platform availability (Windows, Mac, Linux, mobile).
Cons
- YouTube downloading is indirect and often unreliable due to updates.
- Steep learning curve for the process; no one-click interface.
- May produce empty files or fail on protected videos.
- Lacks modern UI and built-in playlist organization.
2026 Status :✅ Working
Key Notes:⚠️ YouTube streaming via VLC has been persistently broken in 2026–2026; requires manually updating the YouTube.lua script — too complex for most users.
3. MiniTool — best for simple Windows YouTube downloads
MiniTool YouTube Downloader is a Windows-based tool (accessible via simple web-like workflow) that fetches videos, playlists, and audio from YouTube and other sites in up to 8K, with format conversion options. Its free tier offers ad-free, high-speed downloads, appealing to users building local media libraries without watermarks or limits on basics. Its clean interface makes it an easy to use tool for YouTube subtitles video download with subtitle.

Pros
- Fast, ad-free in free version.
- Supports 8K, batches, and audio extraction.
- Stable and user-friendly interface.
- No watermarks on outputs.
Cons
- Windows-only availability.
- Premium needed for extras like unlimited speed.
- Fewer sites than some competitors.
- Occasional upgrade prompts.
2026 Status :✅ Working
Key Notes:MiniTool uTube Downloader is free, ad-free, and actively maintained.
4. ByClick — best for batch YouTube downloads with subtitles
ByClick Downloader is a Windows app with web-style ease, auto-detecting YouTube links from your clipboard to save in HD/4K/8K, including live streams and private videos. It monitors browsing for instant grabs, supports custom rules, and handles subscriptions efficiently for power users.

Pros
- Automatic clipboard detection for speed.
- Downloads live, private, and high-res content.
- Customizable quality and formats.
- Very fast processing.
Cons
- Windows-exclusive platform.
- Trial limited; full version paid.
- Busy interface for beginners.
- Rare site compatibility issues.
2026 Status :✅ Working
Key Notes:Still functional as of 2026 per user reports; Windows only, no Mac support.
5. iTubeGo — best for multi-site video and subtitle downloading
iTubeGo is a versatile desktop video downloader and converter available for Windows, macOS, and Android, excelling at grabbing YouTube content alongside 10,000+ sites like Facebook, Instagram, and TikTok. Users paste URLs or use its built-in browser to YouTube subtitles video download with subtitle up to 8K resolution, entire playlists, channels, or audio in formats such as MP4, MP3, MKV, and SRT subtitles. Ideal for offline archiving of high-quality media, music extraction, or educational content, it offers a user-friendly interface with password-protected folders for privacy, though the free version limits advanced use.

Pros
- Broad site support with subtitles.
- High-res batch downloads and converter.
- Works on Windows and Mac.
- Fast with integrated tools.
Cons
- Primarily paid after trial.
- Resource-intensive on older hardware.
- Steeper learning for advanced features.
- Free version has restrictions.
2026 Status :✅ Working
Key Notes:Actively updated; supports Windows, Mac, and Android.
6. 4K Download — best for YouTube playlists and subtitle files
4K Video Downloader is a desktop app (with web-like simplicity) for Windows, Mac, and Linux that captures YouTube videos, playlists, channels, and subtitles in up to 8K quality. Users paste URLs, select formats like MP4 or MP3, and download batches efficiently. The YouTube video downloader with captions stands out for high-res support, smart mode for presets, and ad-free experience in paid versions, making it great for archiving educational content or music collections offline.

Pros
- High-quality downloads up to 8K with subtitles.
- Handles playlists and channels seamlessly.
- Cross-platform with intuitive interface.
- Reliable and frequently updated.
Cons
- Free version limits daily downloads.
- Requires app installation, not purely web.
- Paid upgrade for unlimited use.
- No mobile app support.
2026 Status :✅ Working
Key Notes:The original 4K Video Downloader was discontinued on Feb 1, 2026 — you must use the Plus version.
4K Download vs UniConverter
Compared to 4K Download, UniConverter offers a more versatile solution with integrated editing, compression, and format conversion tools, while still supporting high-quality YouTube video and subtitle downloads in a more flexible workflow.
7. Freemake Video Downloader — best for basic Windows video downloads
Freemake Video Downloader is a Windows desktop app that simplifies grabbing YouTube videos, playlists, and channels in HD up to 4K, with options for MP3 audio extraction. Users paste URLs into its intuitive interface, select quality, and download quickly. The YouTube downloader with subtitle bundles basic editing like cutting clips and supports over 10,000 sites. Free with optional upgrades, it's popular for YouTube subtitles video download with subtitle but shows ads in the free version. Great for beginners needing fast, high-quality saves.

Pros
- Supports playlists, channels, and high resolutions.
- User-friendly interface with batch downloading.
- Converts to various formats including audio-only.
- Frequent updates for site compatibility.
Cons
- Free version includes ads and bundle offers.
- Windows-only; no Mac or Linux support.
- Occasional upselling for premium features.
- Privacy concerns from bundled installers.
2026 Status : ⚠️Limited
Key Notes:Still downloadable but YouTube downloading is restricted by platform changes; last major update was years ago — not recommended as primary tool
8. WinX — best for free YouTube video saving on Windows
WinX YouTube Downloader accelerates downloads from YouTube and 1,000+ sites at up to 10x speed, preserving 8K quality with no limits on videos or playlists. The Windows YouTube video downloader with subtitle auto-detects URLs, offers MP4/MP3 output, and includes ad-free playback. The YouTube video downloader with captions emphasizes hardware acceleration for fast processing YouTube subtitles video download with subtitle. Suited for power users archiving large collections efficiently.

Pros
- Extremely fast with hardware acceleration.
- Handles 8K, VR, and private videos well.
- No ads or watermarks in downloads.
- Lifetime license options available.
Cons
- Paid software after trial; Windows-exclusive.
- Overkill for simple single-video needs.
- Steeper price for full features.
- Limited mobile or web versions.
2026 Status :⚠️ Limited
Key Notes:Updated to v8.3 in Jan 2026, but user reviews note it is capped at 1080p and some features are restricted
9. ClipGrab — best for lightweight YouTube video downloads
ClipGrab is a free, open-source YouTube video downloader with subtitle for Mac, Windows, and Linux that fetches YouTube videos plus 40+ sites by pasting URLs. It auto-selects best quality, supports MP4 and audio, and runs without installation on some platforms. Simple and lightweight, it's perfect for casual users avoiding bloatware.

Pros
- Free, open-source, and multi-platform.
- Automatic quality detection simplifies use.
- No ads or registration required.
- Portable version available.
Cons
- Slower on bulk or high-res downloads.
- Occasional compatibility issues with new sites.
- Basic features; no advanced editing.
- Interface feels dated.
2026 Status :⚠️Limited
Key Notes:Sometimes downloads stall at 0% and fail with "no downloadable videos found".
Online Web Tools to Download YouTube Video with Subtitles
1. DownSub — best for downloading YouTube subtitles online
DownSub is a free web-based tool for quickly downloading subtitles from YouTube, Viki, Viu, Vlive, and other platforms directly in your browser. Users paste a video URL, select from available languages and formats like SRT, TXT, or VTT, and YouTube subtitles video download with subtitle instantly without software or sign-up. This YouTube video downloader with captions excels in speed and multi-site support, ideal for language learners, translators, or creators needing clean transcripts for offline use, editing, or study. Premium upgrades add playlist batching, auto-translation, and API access.

Pros
- Fast, no-install browser access for instant downloads.
- Supports multiple sites and languages beyond YouTube.
- Outputs standard formats like SRT for easy editing.
- Free basic use with simple paste-and-go workflow.
Cons
- Relies on video having subtitles available.
- Free version lacks batch or playlist support.
- Ads or premium upsells on site.
- No video download or editing features.
2026 Status :✅ Working
Key Notes:Official status page (status.downsub.com) confirmed: all services online as of March 19, 2026.
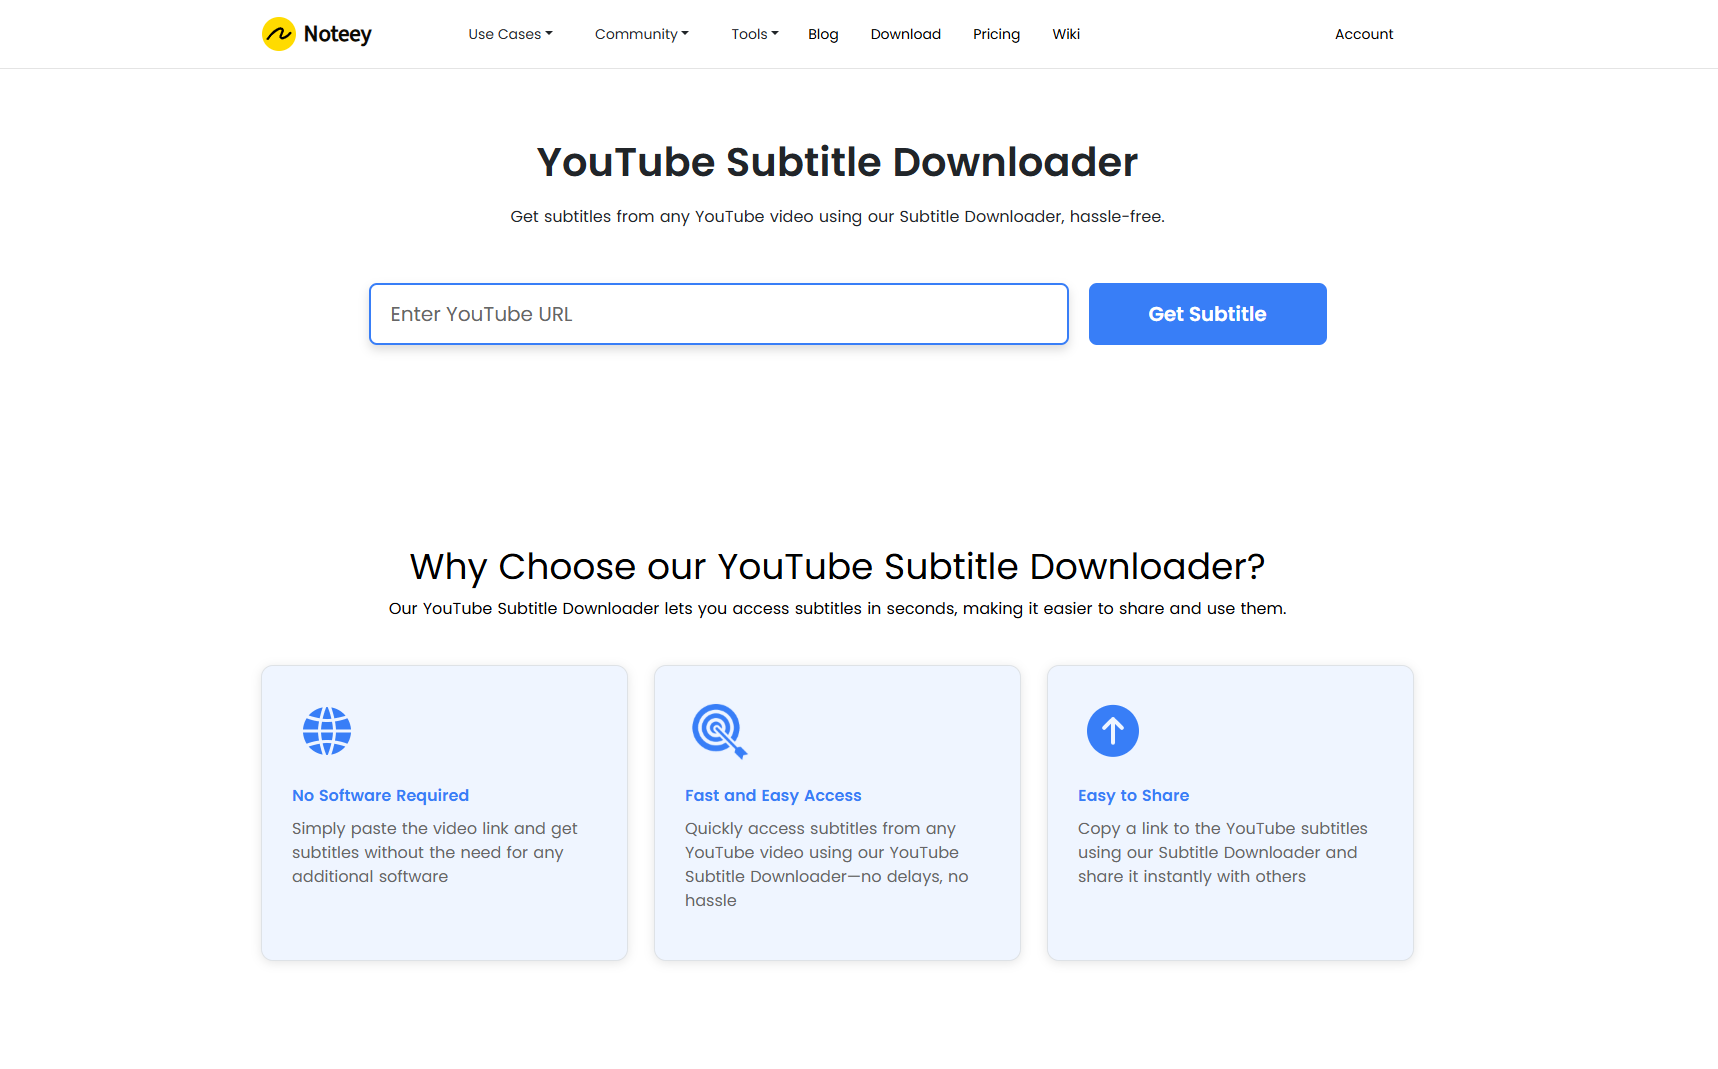
2. Noteey — best for saving YouTube transcripts and notes
Noteey's YouTube Subtitle Downloader is a free, browser-based tool that extracts subtitles and transcripts from any YouTube video without software installation. Users paste a video URL, and it auto-generates timed text in the browser's language, allowing instant viewing, copying to clipboard, or sharing via link. Part of Noteey's visual workspace ecosystem, the YouTube video downloader with subtitle supports efficient study by enabling note-taking from captions, content repurposing for blogs/social media, and accessibility for non-native speakers. Ideal for quick, hassle-free subtitle access in seconds.
Pros
- No software or sign-up needed; fully web-based.
- Fast generation with timestamps for easy navigation.
- Simple sharing via links or clipboard copy.
- Great for studying, quoting, or accessibility.
Cons
- Limited to subtitles/transcripts, no video downloads.
- Generates in browser language only.
- No batch processing for playlists.
- Dependent on YouTube's available captions.
2026 Status :✅ Working
Key Notes:Regularly updated Changelog; subtitle download function is stable.
3. SaveFrom.net — best for quick browser-based YouTube downloads
SaveFrom.net is a popular free online YouTube video downloader that lets users paste a video URL into its web interface to grab clips in various resolutions up to 4K, often without installing software. This YouTube video downloader with captions supports multiple sites beyond YouTube, like Facebook and Instagram, and offers browser extensions for quicker access. Ideal for quick, casual downloads on any device with a browser, it processes links rapidly but focuses on basic functionality rather than advanced editing or batch tools. Users appreciate its simplicity for offline viewing, though ad interruptions are common.

Pros
- Completely free with no software installation.
- Supports many sites and resolutions up to 4K.
- Browser extensions enable one-click downloads.
- Works on all devices via web browser.
Cons
- Heavy ads, pop-ups, and redirects.
- Slow download speeds and no batch option.
- Limited quality/format choices.
- Potential security risks from ads.
2026 Status :⚠️Limited
Key Notes:Some of YouTube downloads blocked; Instagram and TikTok also failing; aggressive fake download buttons and ad pop-up risks present.
Command-line Tool to Download YouTube Video with Subtitles
yt-dlp — best for advanced subtitle downloading and automation
yt-dlp is a powerful open-source command-line tool designed for downloading videos and subtitles from YouTube and hundreds of other platforms. As an actively maintained fork of YouTube-dl, the YouTube video downloader with subtitle is frequently updated to keep up with YouTube’s changing algorithms and security measures. This YouTube video downloader with captions supports advanced features like batch downloads, subtitle extraction, format selection, and playlist handling, making it ideal for power users and professionals.

Pros
- Actively updated to bypass YouTube changes
- Supports subtitles, playlists, and batch downloads
- Highly customizable with format and quality options
- Works across multiple platforms (Windows, Mac, Linux)
Cons
- Command-line interface may be difficult for beginners
- No built-in graphical UI (requires third-party frontends)
- Setup and usage require basic technical knowledge
- Overkill for simple, one-off downloads
2026 Status:✅ Working
Key Notes:🚀 One of the most reliable YouTube download solutions; frequently updated to stay functional
yt-dlp vs UniConverter
Compared to yt-dlp, UniConverter provides a user-friendly interface with one-click video and subtitle downloads, plus built-in editing and conversion tools, making it easier for users who prefer no-command workflows.
Bonus: How to Edit Downloaded YouTube SRT Subtitle Files
Master Subtitles with Wondershare UniConverter: A Step-by-Step Guide
Step 1: Import Your Video
Launch Wondershare UniConverter on your computer. From the Home interface, select Subtitle Editor, then click Add Video to import your file from local storage. Your video will begin playing automatically in the editor.
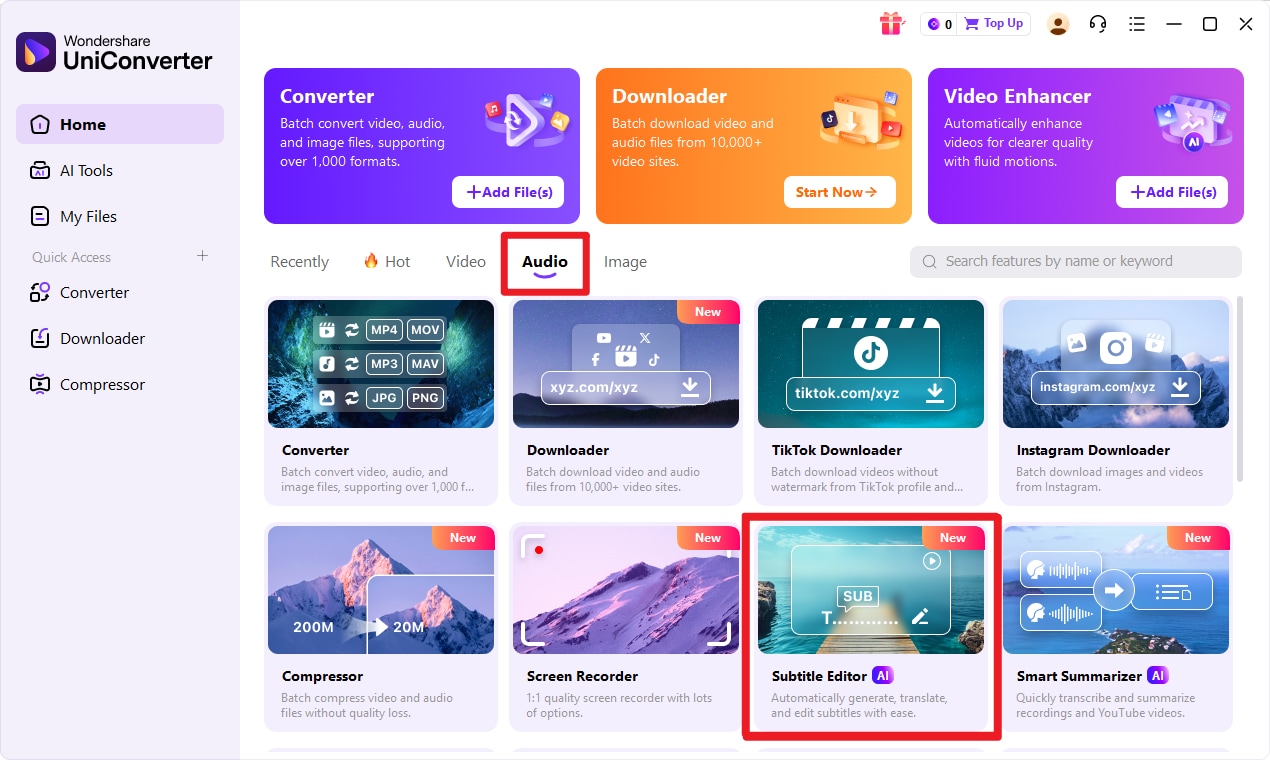
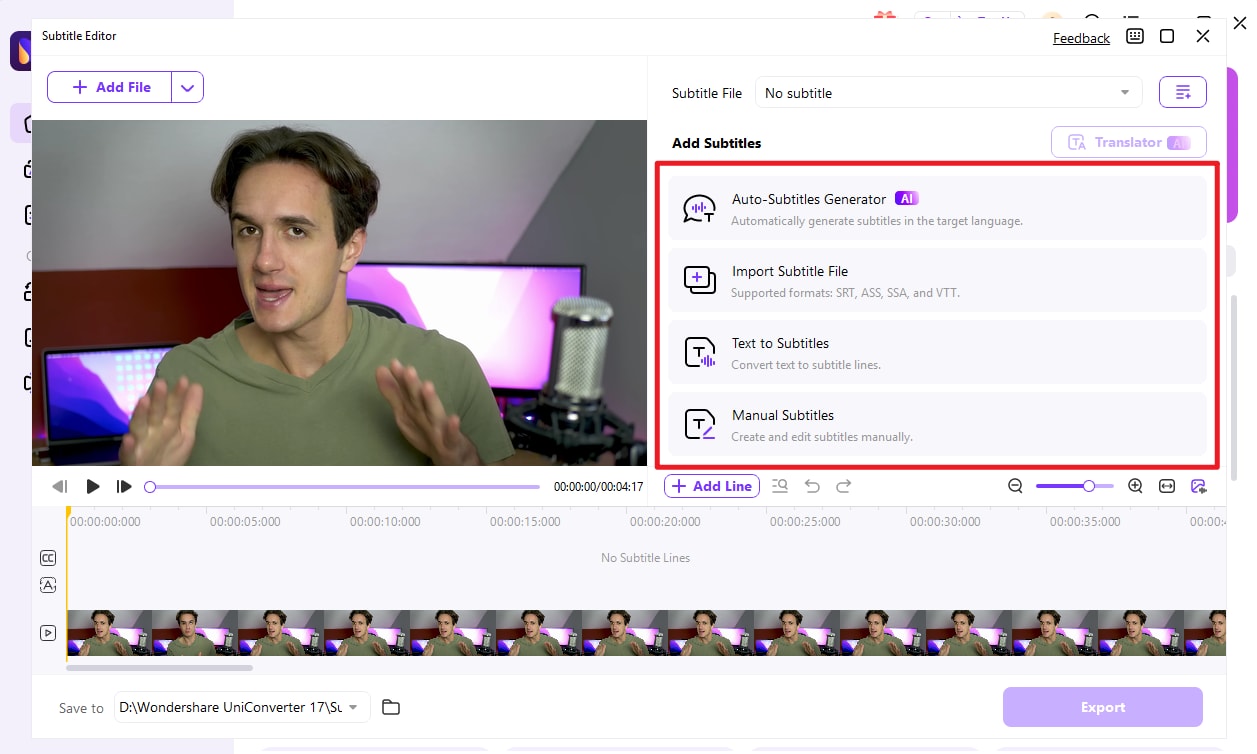
Step 2: Access Subtitle Tools
Navigate to the Subtitle tab to explore various subtitle options:
- Auto-Subtitle Generator: Create subtitles automatically in your chosen language.
- Import Subtitle File: Add an existing subtitle file to your video.
- Text to Subtitle: Convert text into subtitle lines.
- Manual Subtitle: Create or edit subtitles manually.
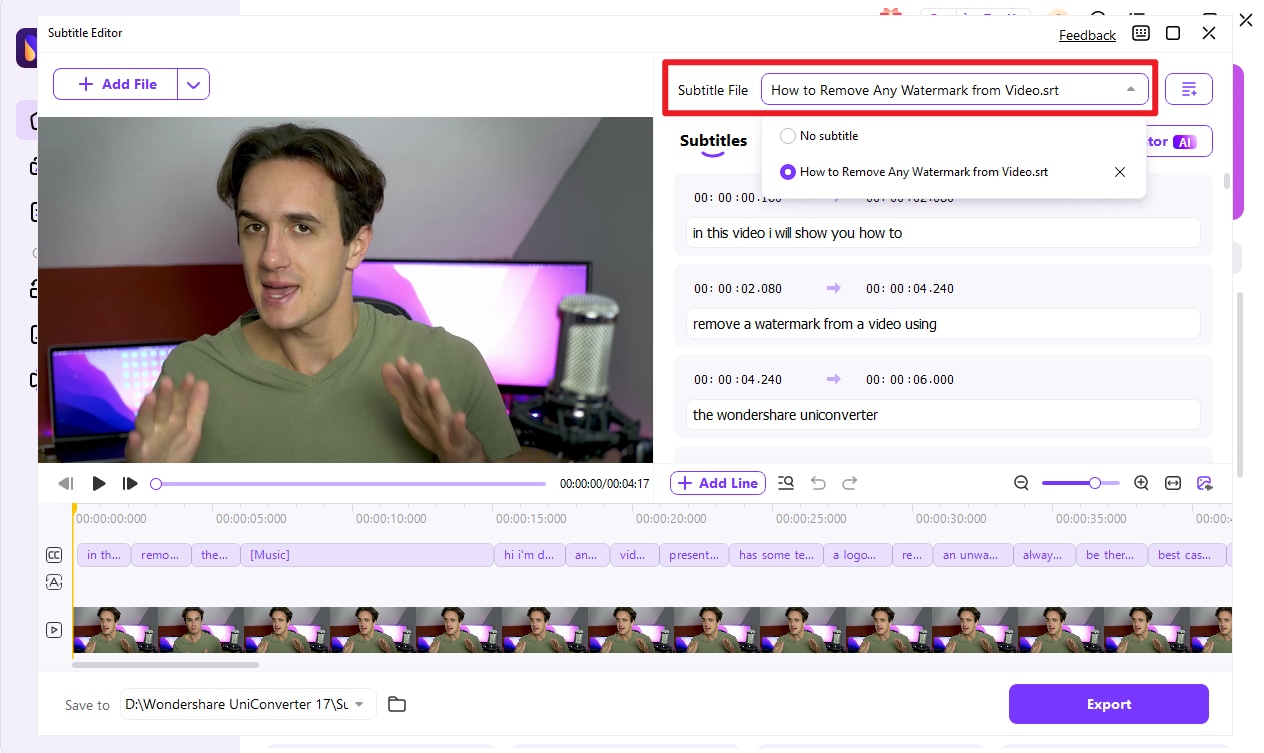
Step 3: Customize Your Subtitles
Click Import Subtitle File to load a locally saved subtitle track.
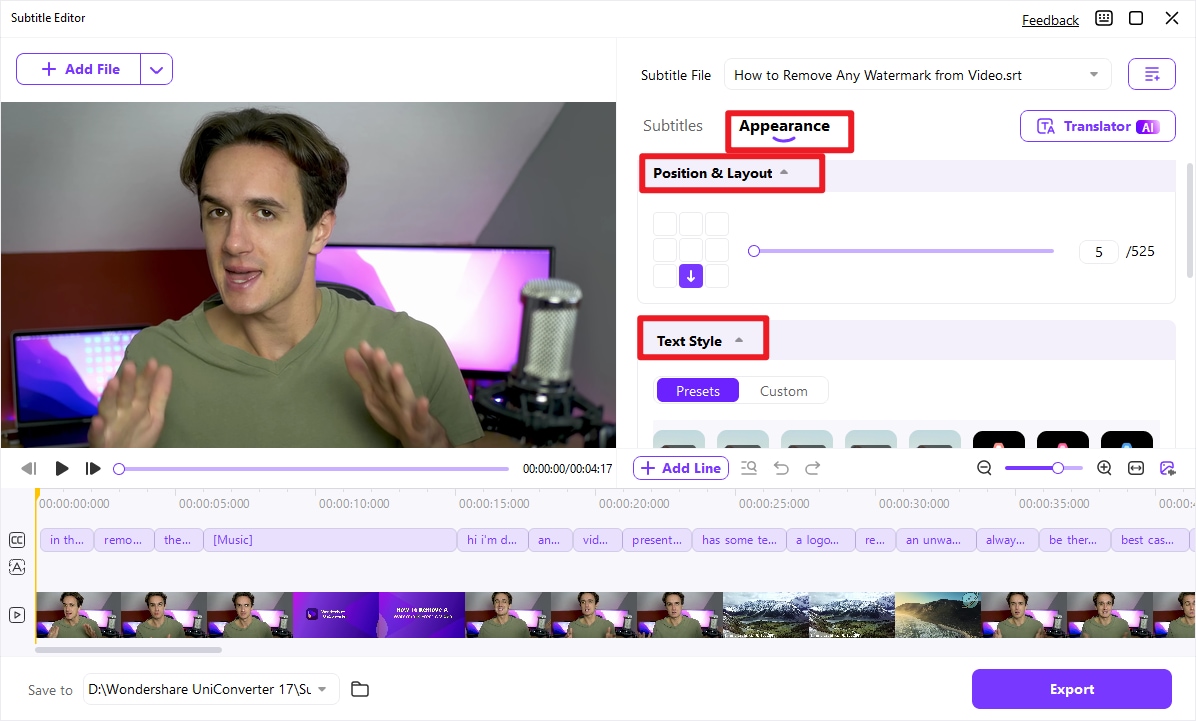
From there, personalize your subtitles with various fonts (Arial, Calibri, Lato, etc.) and apply formatting like Bold, Italic, or Underline. You can also modify text color, background color, outline width, transparency, and on-screen position. Save your favorite settings as a custom preset for quick reuse on future projects.
Tip: Adjust subtitle positioning by selecting a grid under the Position tab or by using the slide bar.
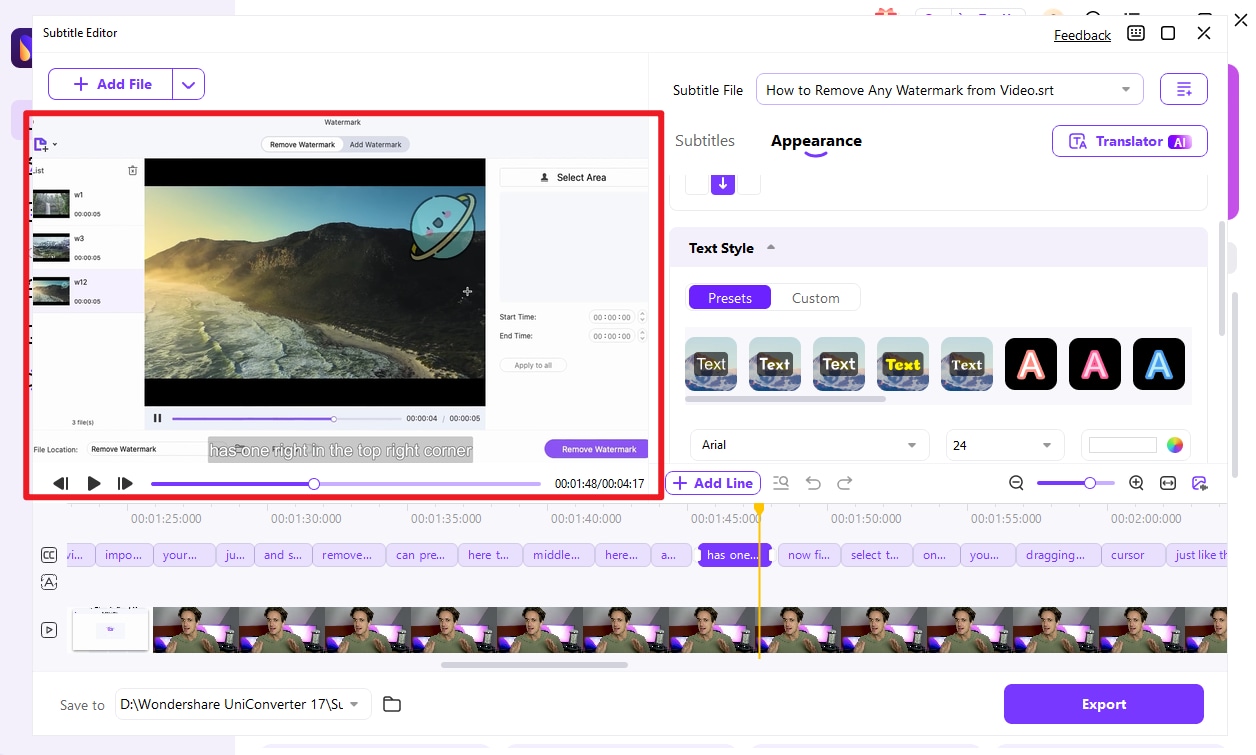
Step 4: Preview Your Video (Optional)
Before finalizing, preview your subtitled video to ensure perfect timing and styling. Hover over the video thumbnail and click the Play icon to watch it in the multimedia player. Close the window once you’re satisfied.
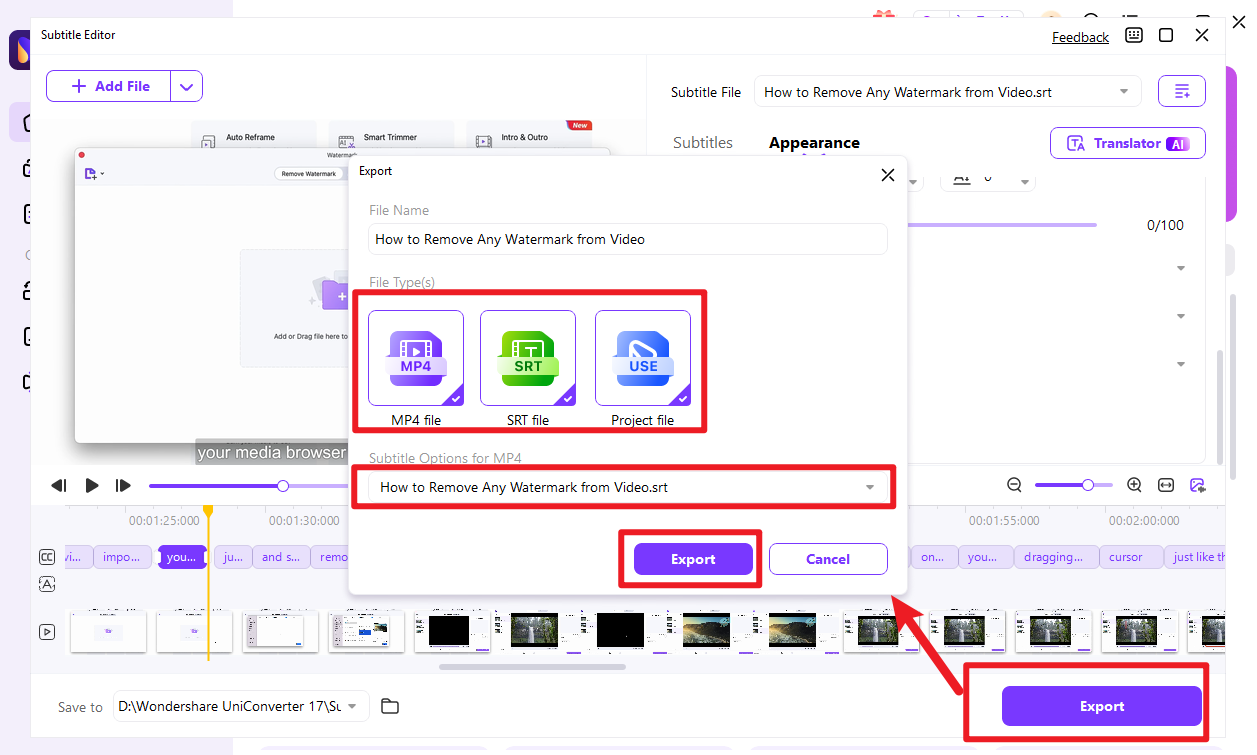
Step 5: Export Your Video
Click the Export Settings drop-down menu to select your desired output format (e.g., MP4 or MOV), then click Export to save your video with embedded subtitles.
Note: Wondershare UniConverter simplifies adding and editing subtitles while also offering advanced video conversion features. For more detailed capabilities, explore our guide on Advanced Subtitle Editing Features.
Conclusion
If you want to download YouTube videos with subtitles, the right tool depends on your goal. Some users need the video and subtitle files together, while others only need captions in SRT or VTT format.
Wondershare UniConverter is a strong option for users who want a simple all-in-one workflow, while online subtitle downloader tools are better for quick subtitle-only tasks. For batch downloads and advanced control, yt-dlp is still one of the most dependable choices.
Whichever method you choose, make sure the tool supports your preferred subtitle format and use it only for personal or authorized content.
FAQ
-
1. How can I download YouTube videos with subtitles?
To download YouTube videos with subtitles, copy the video URL and use a tool that supports both video download and subtitle extraction. Some tools let you save the video with subtitles embedded, while others let you download separate subtitle files such as SRT or VTT. -
2. What is the best YouTube video downloader with subtitles in 2026?
The best YouTube video downloader with subtitles depends on your needs. If you want a simple desktop solution for downloading videos and subtitle files together, Wondershare UniConverter is a practical option. If you need more advanced control, batch downloads, or command-line automation, yt-dlp is one of the most reliable choices. -
3. Can I download YouTube video with captions only, without saving the video?
Yes. If you only need captions, you can use subtitle-focused tools to download YouTube video captions as subtitle files without saving the full video. This is useful if you want transcript text for study, translation, repurposing, or subtitle editing. -
4. How do I convert YouTube to MP4 with subtitles?
To convert YouTube to MP4 with subtitles, choose a downloader that supports MP4 output and subtitle options at the same time. Depending on the tool, you may be able to keep subtitles as a separate SRT file or save the YouTube video with subtitles included for easier offline playback. -
5. What subtitle formats are available when I download a YouTube video with subtitle support?
Most tools that support YouTube video download with subtitle options provide formats such as SRT, VTT, or TXT. The available language options usually depend on whether the original YouTube video includes uploaded captions or auto-generated subtitles.
- How to Add Subtitles on Vimeo in an Easy Method
- All Ways to Open SRT File on Windows/Mac/Online/iPhone/Android
- 2026 Best 10 Subtitle App for Android/iPhone
- How to Convert Subtitles from SSA to SRT Easily?
- How to Auto Generate Subtitles from Video Easily and Quickly
- Top 2 Things You Must Know About Subtitle Editing
- 10 Video Players that can Embed and Play Subtitles


Kayla Morrison
staff Editor