
If you want to speed up your website’s loading time, save cloud or computer storage space, or simply have optimized images for any purpose, you must learn how to compress an image on Mac. Doing this is super easy and fast.
You can use its built-in tools such as Preview and Photos, or you can take things to another level and use third-party tools such as TinyPNG, UniConverter, or Photoshop.
Here is the full guide on the best and fastest ways to compress images on Mac.
In this article
- Why Compress Images on Mac?
-
How to Compress Images on Mac with Built-in Methods
-
Part 3. How to Compress a Photo on Mac with Third-Party Tools
- UniConverter [Batch Compression]
- TinyPNG
- Adobe Photoshop
- Tips for Compressing Images Without Losing Quality
- FAQs about Compressing Picture Mac
Part 1. Why Compress Images on Mac?
Briefly, before we begin, here are four reasons why you shouldn’t overlook doing this.
Whatever you’re doing online that involves images, compressing them the right way for the right purpose is essential.
Why? If you don’t compress images on Mac, you will:
- Reduce a website or an app’s loading time.
- Fill up your storage space super fast.
- Slow down download and upload times.
- And even ruin your website’s performance and SEO rankings.
The final result will almost always display a loss in sales, traffic, users, or whatever your main goal is.
So, if you want to save storage space, speed up load times, and improve your site’s performance, you must learn how to reduce image file size on Mac.
Part 2. How to Compress Images on Mac with Built-in Methods
MacOS provides several features and tools that allow basic image compression. Depending on your project, these methods might get the job done. If not, you can check out the more effective third-party solutions below.
Method 1: How to Decrease Image File Size on Mac Using Right-Click
One of the fastest ways to compress photos on Mac is the right-click method.
1. Find the image you want to compress in Finder or on your Desktop
2. Right-click the image file and select Compress “FILE NAME”.
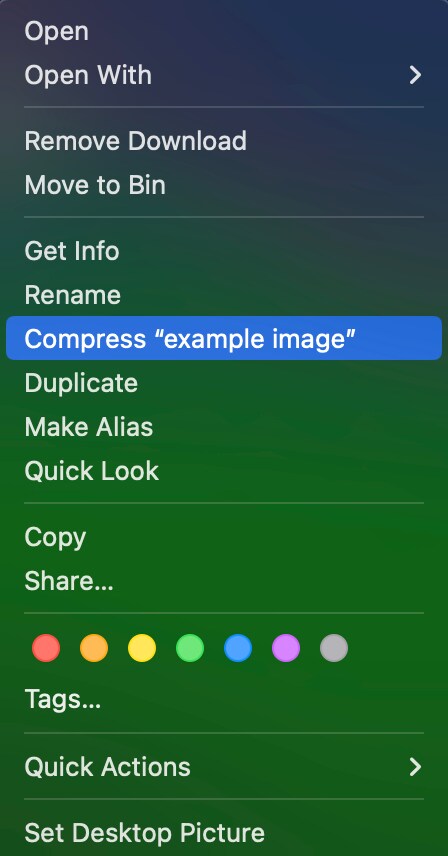
That's it! With this method, you will create a .zip file that’s much smaller than the original. This method offers a perfect solution for transferring files.
Method 2: How to Shrink Photo File Size on Mac Using Preview
The next best solution when learning how to compress a photo on Mac is the Preview feature.
This method is super fast and gives you a bit more control over the compression size and quality.
1. Open the image in Preview by double-clicking it
2. Click on File > Export
3. Choose a file format (JPEG, PNG, etc.) and adjust the quality slider
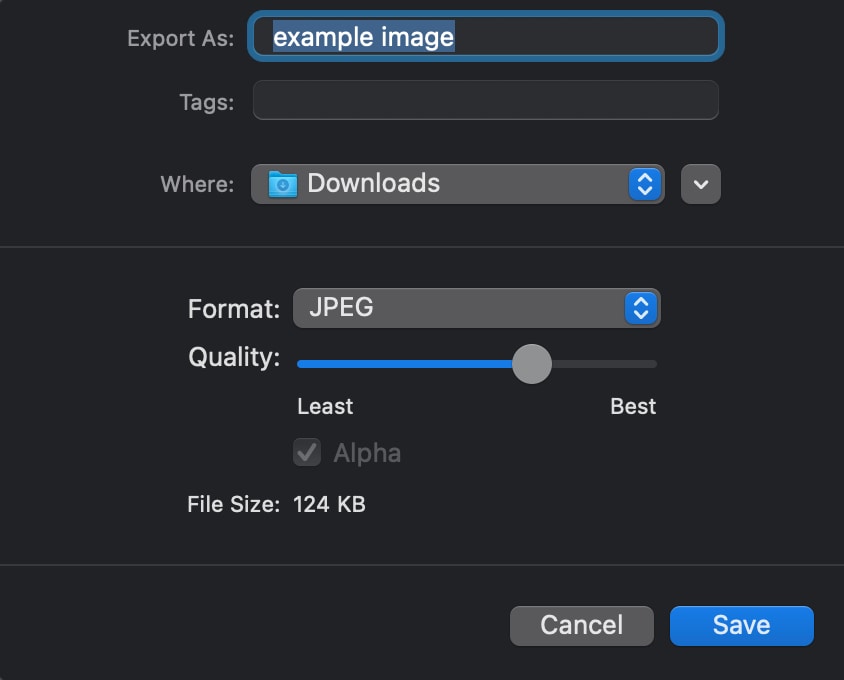
4. Click Save and you will have a new, compressed version of the image
Method 3: How to Reduce Picture File Size on Mac Using Photos App
The last built-in method to reduce image file size on Mac is to use the Photos app. Here’s how.
- Open the Photos app and select the image you want to compress.
- Click File > Export > Export 1 Photo.
- Adjust photo quality and format by clicking on the down arrow and then on Size.
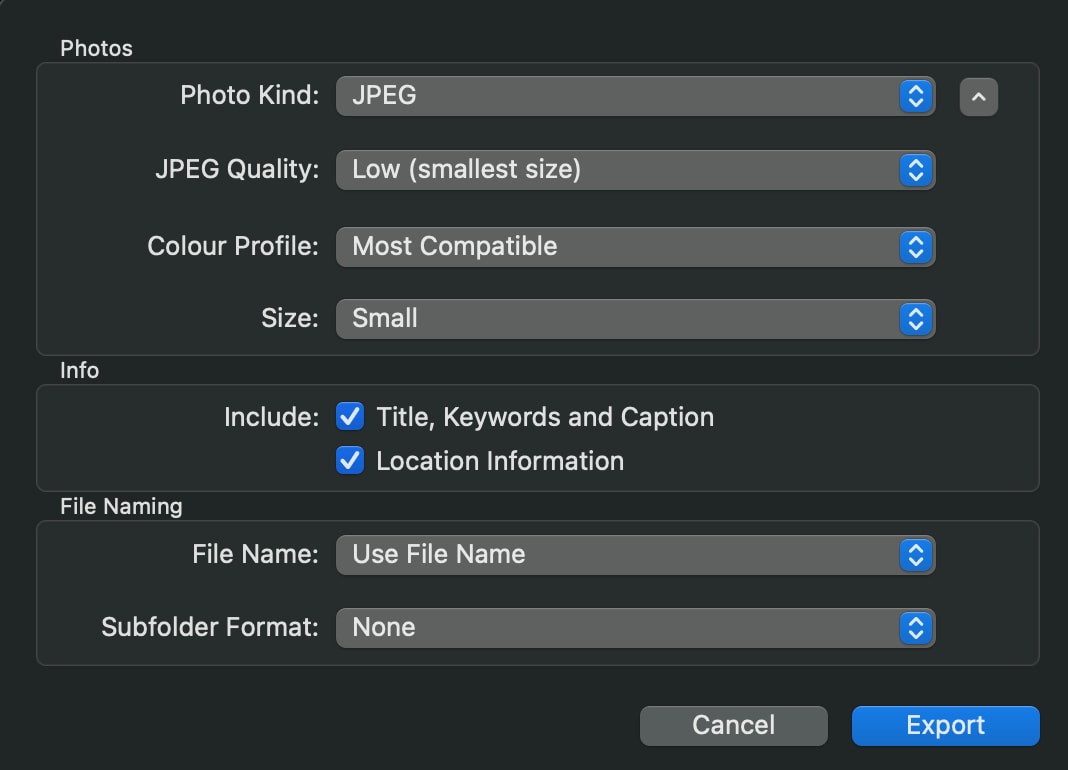
- Click Export, choose a destination, and save the image.
Part 3. How to Compress a Photo on Mac with Third-Party Tools
If you want to experience more freedom and control while you compress pictures on Mac, you will need to use third-party tools.
Before you start worrying, you should know that this method is just as simple as the others. You don’t need any experience and you will get to compress your images with complete control and preferences depending on your needs with ease.
Here are the best options to do this.
Tool 1: UniConverter
UniConverter is one of the most advanced and powerful video, audio, and image compressors out there. It allows you to compress various files in every possible format, control the quality of your compression, and do it in batches super fast.
Additionally, UniConverter can offer you the best possible compression method for your specific needs. Whether you want to know how to compress a picture on Mac for an email or for your website, this tool has the best settings for your needs.
Best of all, you don’t need any prior experience or knowledge to achieve the best possible compression on your images. UniConverter is simple to use and it gets things done fast.

Best Multimedia Compressor
Having said that, this might be the best possible solution regardless of your compression needs and requirements. It can do it all so you don’t have to test any other software and waste your time.
So, if you have your Mac ready, here are the simple steps to decrease image file sizes on Mac with UniConverter.
Steps:
- Go to the UniConverter website and click on the Download button.
- Once the installation file downloads, install the software on your Mac.
- Now, open the tool and click on “Converter”, NOT on “Compressor”.
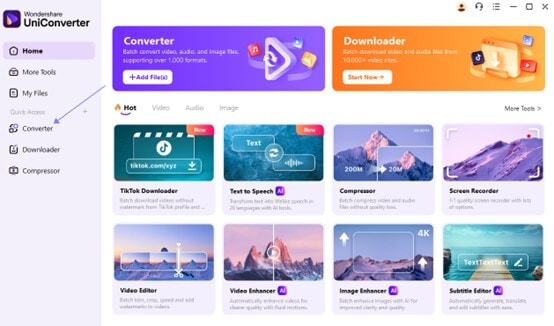
- Click on the “+Add File/Folder” button and select the image you want to compress.
- Now, adjust the size settings by clicking on this icon.

- Lastly, click on Convert and the new image will be saved automatically.
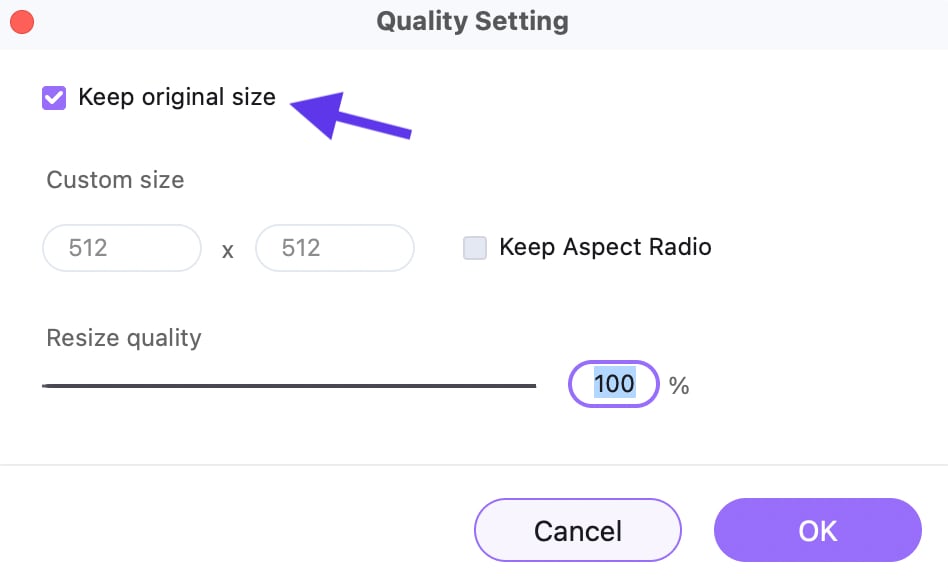
- If you want to keep the original size of the image, make sure that box is ticked. In this case, you can only adjust the quality which will reduce the image’s overall size.
- Most compression cases are for PNG images because they are usually the bigger format. In this case, make sure you convert the image to JPG or another smaller format and keep the other settings default. This will reduce the size but keep most of the quality.
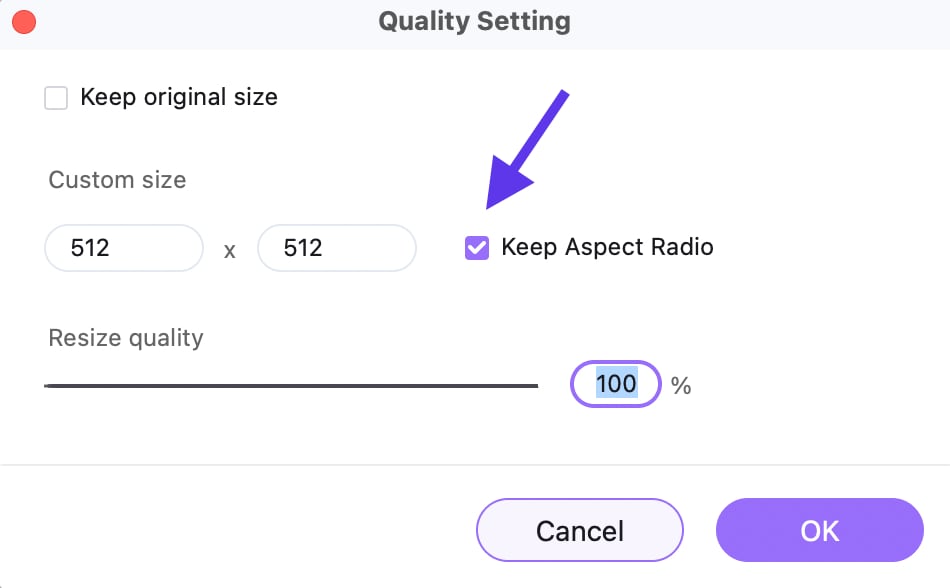
- Lastly, if you remove the original size but keep the aspect ratio box ticked, the image will still have the same shape but you can make it smaller or bigger. This does not only show you how to make a picture file smaller on Mac, but it also allows you to resize the image’s dimensions.
Tool 2: TinyPNG
TinyPNG is a web-based fast image compression tool that you can easily use to shrink image file sizes on Mac. Just like the previous software, TinyPNG also has a free and paid version but it’s much more limited in almost every way.
Unlike UniConverter, TinyPNG can only compress 20 images per batch and cannot compress more than 5 MB of images. This may prevent you from achieving your desired results, as images that require compression are usually much bigger than 5 MB.
On another note, TinyPNG can still convert your images to some of the most common formats out there. One of the best things about this tool is that you can integrate it with popular online platforms like WordPress. You can resize images and cut out objects. It also has a paid version that increases the number of images you can compress in each batch, as well as the size of each image to 150 MB max limit.
Now, let’s see how to use this online tool.
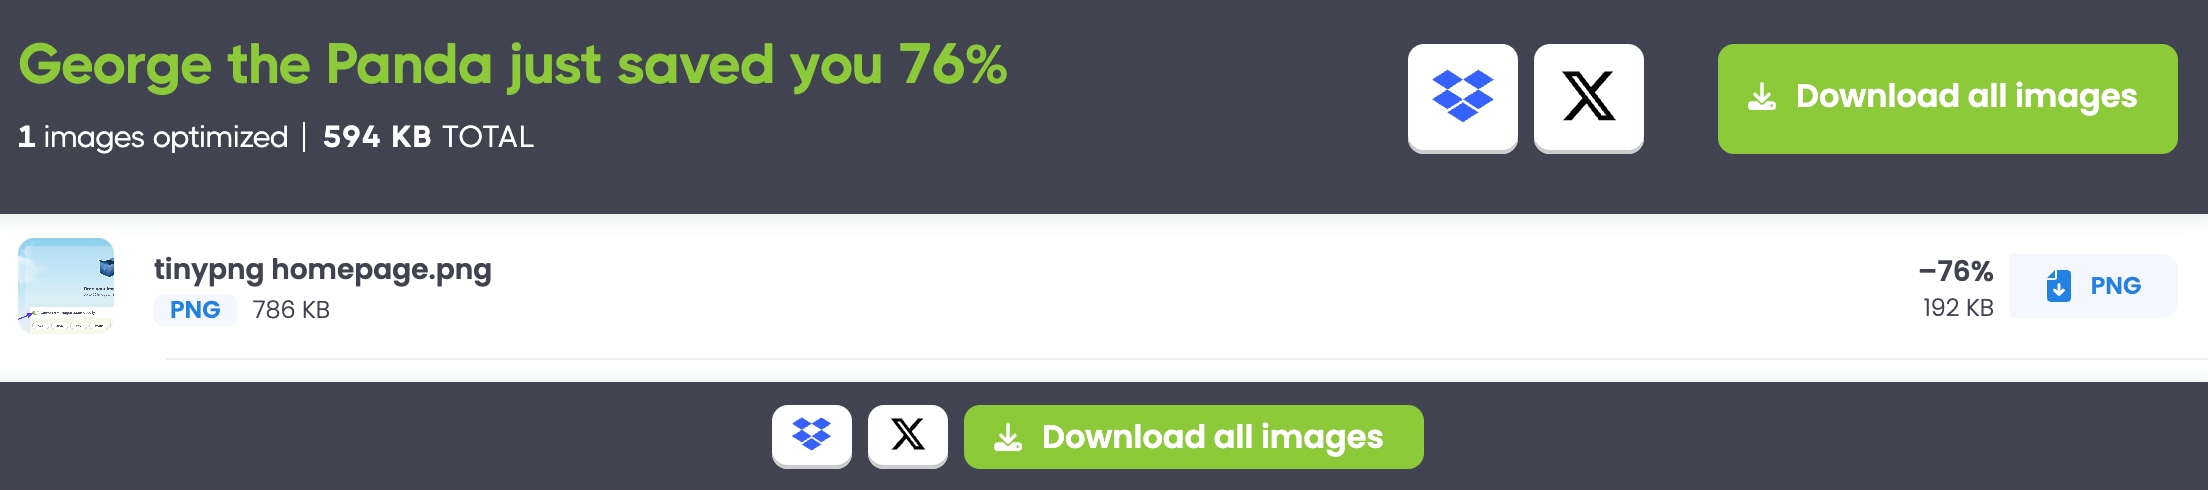
- First, go to TinyPNG.com
- Now, click on the big box on the screen or drag and drop the images that you want to compress.
- Next, you can choose to automatically convert all your images to another format if you want.

- Finally, click on “Download all images” and your results will be saved.
Tool 3: Adobe Photoshop
The last third-party tool on our list is the famous Photoshop. Even though it’s not exclusively designed for image compression, Photoshop can still get the job done. However, installing this tool solely for compressing images might not be worthwhile.
Photoshop is fairly expensive, complex, and requires a powerful computer to run smoothly. However, you can still use it to reduce photo file size on Mac if you want to or if you already have it installed.
Having said all that, Photoshop is still extremely effective for compressing images on Mac without losing quality.
Here's what you need to do:
- If you haven’t installed it already, go to the official link and download the free trial.
- Once it’s downloaded, run the installation on Mac and open Photoshop.
- Next, import the image you want to compress.
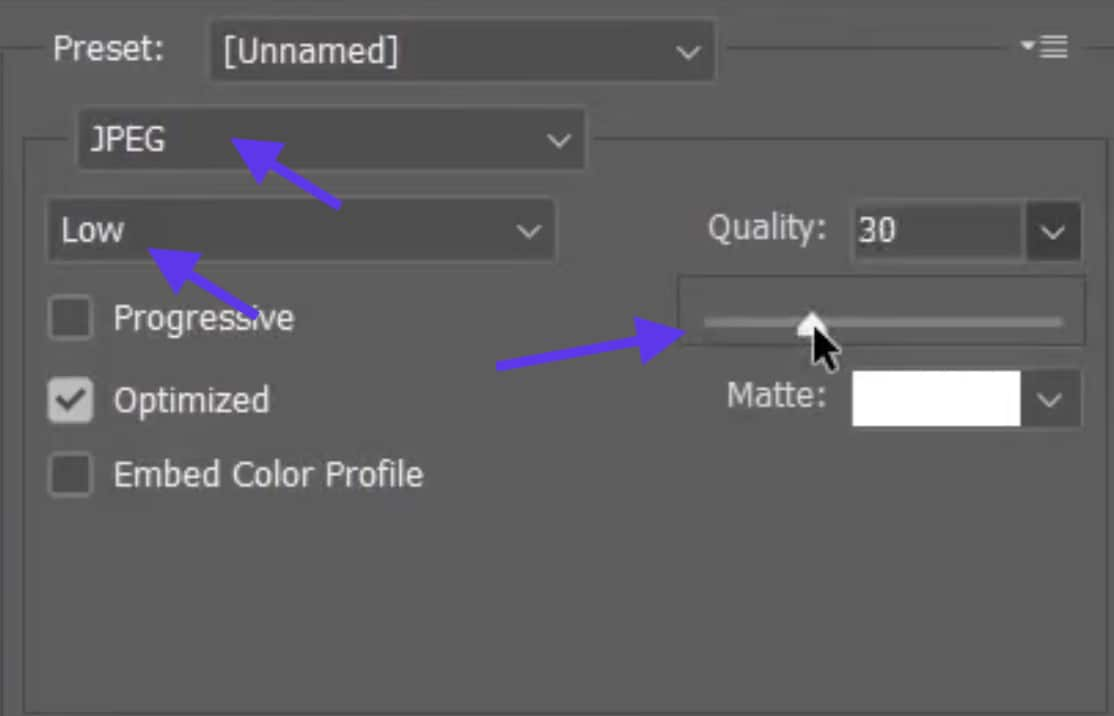
- Now, click on File > Export > Save for Web (Legacy)
- Then, tweak the settings in this box to adjust image quality, size, and format.
- Finally, click on “Save” and save your image on your Mac.
Part 4. Tips for Compressing Images Without Losing Quality
Getting everything right on your first try might not happen for you. However, once you see the result of your compression, you will know how to tweak the settings so that you get everything right on your next attempt.
Here are several tips to remember before you use your Mac to reduce image file size.
- Choose the right format: Use JPEG for small file sizes and PNG for images requiring transparency. You can also compress to webp (extremely small size) if quality is not too important.
- Adjust the resolution: Ideally, you don’t want to do this too often. Ensure you reduce the resolution only if it’s necessary for your project.
- Balance compression ratio and quality for best outcome: Try compressing your image a couple of times until you have all the knobs and buttons at the perfect position.
FAQs about Compressing Picture Mac
1. How do I reduce the MB size of a photo on Mac?
Use the Preview, Photos, or the Right-Click method as seen above.
2. How do I reduce the size of a picture on my Mac without losing quality?
The best way for your Mac to reduce photo file size is with a third-party app like UniConverter since it has the best settings and resources to provide the desired results.
3. How do you compress a large file on a Mac?
Depending on the purpose for your file, you can try any of the methods above. Try the right-click method to zip files for transferring, or a third-party tool to reduce the size greatly but still preserve the image quality.
4. What is the image compression app for Mac?
UniConverter is the best choice when it comes to learning how to reduce picture file size on Mac. It’s extremely powerful, fast, and effective. It allows you to bulk compress, adjust settings greatly, and provides plenty of freedom to get the perfect result every time.
Conclusion
The methods and tools you see above will always help you reduce picture file size on Mac. Each method is highly effective depending on your preferences and how you intend to use the compressed file. So, now that you know how to compress pictures on Mac, you can get your files ready for use in no time by following the simple instructions above.

