
Ever feel lazy to type or just wish you could type without actually typing? Well, this is what a dictation feature does. You speak, and it converts your speech into text.
Dictation is super useful for schoolwork, notes, emails, and even chatting with friends. But does Mac have a built-in dictation feature? That’s what many users wonder! Some aren’t sure if it exists, while others don’t know how to set it up.
But don’t worry! This guide will explore how to enable dictation on Mac and how to use it. We’ll also introduce a more reliable alternative if you want a smoother experience.
Let’s dive in!
In this article
Part 1. Is There Any Built-In Feature to Dictate on Mac?
Yes, there is a built-in dictation feature in Mac that converts your speech into text. It’s available on most MacOS devices. You can easily enable it through system settings. Dictation on Mac lets users talk to type in various apps. This feature works across various applications, including Notes, Messages, Safari, and more.
Mac users can start dictation with a simple keyboard shortcut. But first, they might need to set it up in system preferences. Once you turn it on, you will be able to type without using a keyboard.
Now, you must be wondering how to do that, right? Let’s walk through it together!
Part 2. How to Enable and Use Dictation on Mac?
Mac dictation is different from Voice Control and VoiceOver. Those features let you control your Mac with voice commands through Accessibility settings.
However, dictation is linked to your keyboard. You can access it through your keyboard settings and use it anywhere. Here is how you can activate dictation on Mac.
How to Enable Dictation on Mac:
Step 1: Open the "System Settings" on your MacOS.
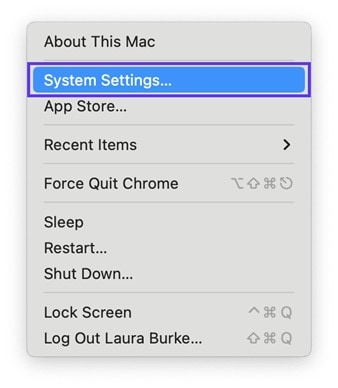
Step 2: Scroll down, find and click "Keyboard" on the left side menu.

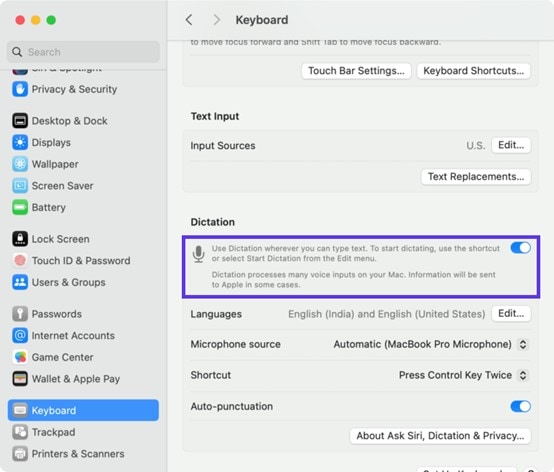
Step 3: Next, enable the toggle under the "Dictation" box to turn dictation on.
So, this is how you can enable dictation on Mac. Let's move forward and explore other relevant settings.
Additional Settings for Mac Dictation
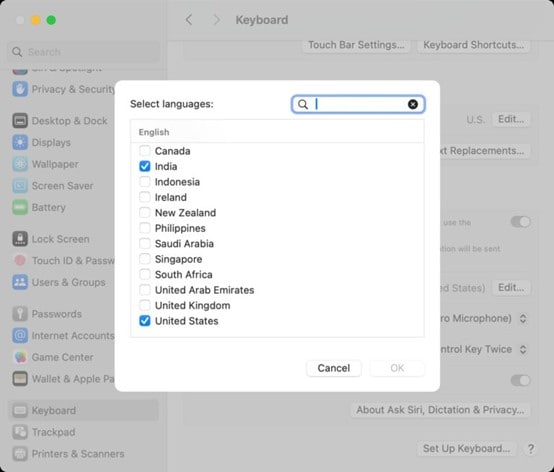
Step 1: Change Language
To change the dictation language, click "Edit" next to "Language." Pick your language and click "OK."
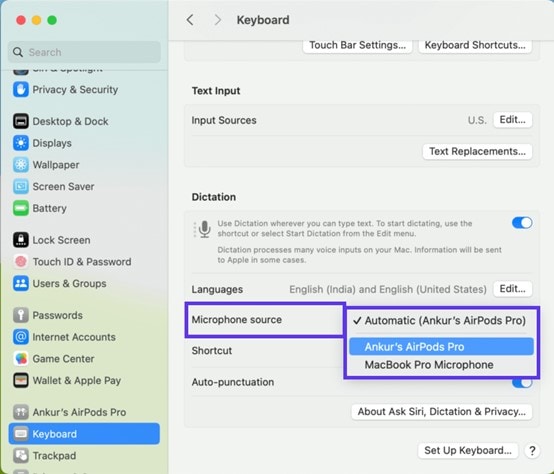
Step 2: Change Microphone Source
If you're using AirPods or another mic, you might need to switch sources. Just click the drop-down next to "Microphone" and pick your device.
However, "Automatic" is the best option.
Step 3: Change the Shortcut
The default Mac dictation shortcut is "Press Control Key Twice." To change it, click the drop-down list next to the shortcut and customize the keys. You can also select from the available shortcut keys if you like any.

You can also enable "Auto Punctuation" if you want the dictation feature to add punctuation correctly. Now that you are all set, let’s see how to do dictation on Mac.
How to Use Dictation on Mac
Step 1: Open any app in which you want to use the dictation feature. It could be notes, messages, or mail. (We are using notes as an example)
Step 2: To start dictation on Mac, use the default shortcut (Press Control Key Twice) or your custom shortcut. You will see a microphone icon indicating that dictation is active.
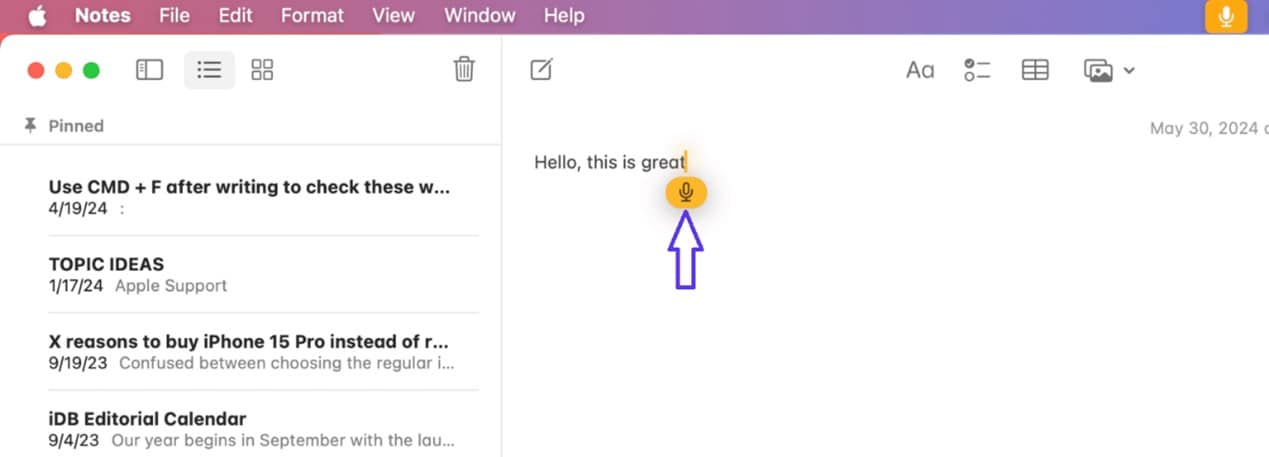
Step 3: Start speaking; your mic will detect your voice and convert it into text. But make sure to speak in intervals, like 30-40 seconds, for accurate results.
Once you are done with dictation, just click the microphone icon, and Mac will stop dictating.
Now that you know how to use dictation on Mac, you might run into some issues. Let’s look at common problems users face.
Part 3. Common Issues With Mac Built-in Dictation Feature
Mac's dictation feature is useful, but here are some common problems you might run into:
- Inaccuracy:
Sometimes, it types the wrong words, especially with tricky names or difficult terms. You have to rewrite and fix mistakes, which can be annoying.
- Limited Usage Time:
You can’t talk forever! Dictation turns off after a short time, so you’ll need to restart it often. That’s frustrating when you have a lot to say.
- Wrong Punctuation:
Want a period or a comma? You have to say it out loud, and even then, sometimes, it doesn’t always work properly. Your sentences can end up looking weird.
- Internet Dependency:
If you’re not connected to Wi-Fi, dictation might not work at all. That can be a problem if you're using it outside or somewhere without the internet.
- Background Noise:
If you're in a noisy place, dictation might hear the wrong words. It can mix up what you’re saying, which makes your text a mess.
Apart from these issues, Mac dictation is just limited to transcribing real-time voices while using the apps. If you ever want to turn an audio or video file into text, Mac dictation won't do that. But don’t worry, there is a dictation software - Uniconverter.

Best Dictation Software
Let's see how it works!
Part 4. Best Alternative for Fast and Accurate Dictation on Mac - Uniconverter
Wondershare UniConverter is one of the most reliable tools for converting audio/video files into text. It uses advanced AI technology to transcribe the voice with 95% accuracy. It makes sure that every word is captured correctly.
The best part is that Uniconverter supports 20+ languages and is very easy to navigate. All you need to do is upload the file and change some settings, and your transcription will be instantly ready to use anywhere. No setup or technical skills are required. Just download and start dictating.
Who Can Use UniConverter
- Students can transcribe lectures and study materials without taking notes manually.
- Teachers can convert recorded lessons into text for easy sharing.
- Content creators can generate subtitles for videos to improve engagement.
- Professionals can transcribe meetings and interviews for better documentation.
If you have already downloaded Wondershare UniConverter, follow the steps below.
Steps to Dictate on Mac Using Uniconverter
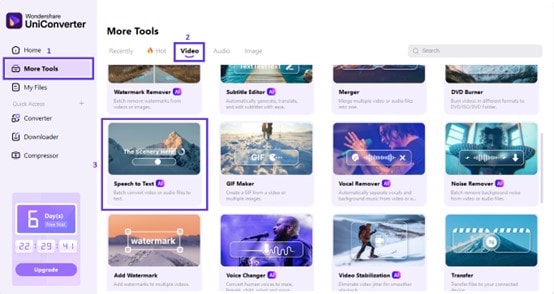
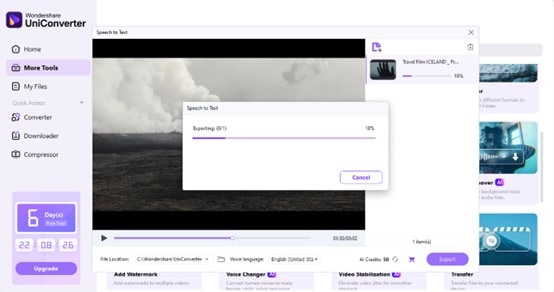
Step 1: Free Download Free Download and launch the uniConverter software on your Mac, and click "More Tools" on the left panel. Go to the "Video" section, look for the "Speech to Text" feature, and click it.
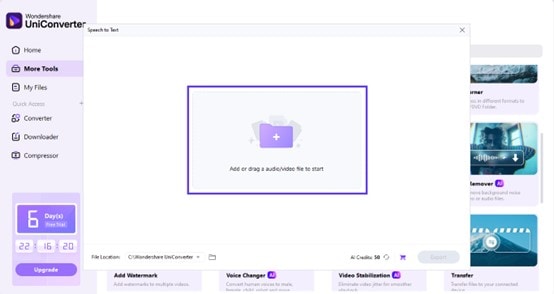
Step 2: After clicking speech to text, a window will pop up. Click the "+" icon to import your audio or video file. You can also drag and drop the file here.
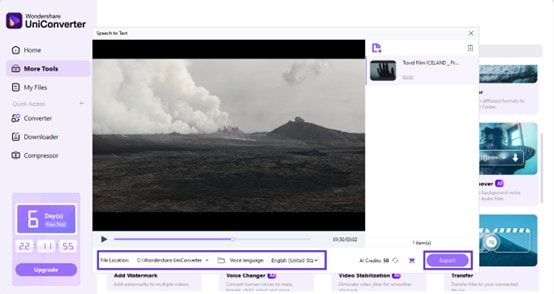
Step 3: Once your media file is imported to Uniconverter, select the location where you want to save the transcription. Also, select the voice language to generate accurate results. Once done, click "Export."
Step 4: After clicking "Export," the Uniconverter will start converting your speech to text, and the transcribed file will be saved in the selected location.
That's it! This is how you can convert your audio/video files into text with just a few clicks. Isn't it a useful tool?
Now, let’s see why UniConverter is a better choice compared to other speech-to-text options!
Part 5. Why is Uniconverter a Better Speech-to-Text Solution?
UniConverter makes transcribing audio and video files quick and hassle-free. Here’s why it’s a great choice for dictation on Mac:
- Instant Transcription With AI
No more struggling to write everything down! UniConverter uses AI to quickly convert audio/video into text with just one click. You can download the text instantly and use it however you want. It’s fast, simple, and super accurate!
- Turn Videos into Editable Text
Need to take notes from a video? UniConverter can turn video content into text, making information easier to manage. This way, you can easily go back and review important details without rewatching everything!
- Supports various Languages
UniConverter supports around 20+ languages. This means you can transcribe video even if it is in Spanish, English, or another language. It helps you cover a wider audience and practice different languages.
- Boost Content Visibility
If you make videos for social media or school, subtitles help. They make videos more interesting and easier to find online.
Best Dictation Software
FAQs on Mac Dictation
Q. Is Mac dictation different from Siri?
Yes, it is different! Mac dictation turns your speech into text so that you can type hands-free. Siri is a virtual assistant that sets reminders opens apps, and answers questions.
Q. Are there any commands to use in MacOS dictation?
Yes! Here are some of the commands that you can use while dictating on Mac:
- Caps on – Set up the phrase in the title case.
- Caps off – Resume the default case for the above phrase.
- All caps – Format a word in all uppercase letters.
- All caps on – Format an entire phrase in all uppercase letters.
- All caps off – Resume the default case for the above phrase.
- Tab key – Move to the next tab stop.
- Numeral – Format the text as a number.
- Roman numeral – Format the text as a Roman numeral.
- New paragraph – Start a new paragraph.
- New line – Start a new line.
Q. Is Wondershare UniConverter free to use on Mac?
Yes, UniConverter has a free trial for speech-to-text on Mac. But to use it without limits, you’ll need a paid plan.
Conclusion
Wrapping it up! Mac's built-in dictation is useful, but of course, it has its limits. You cannot convert audio or video files into text using Mac dictation. For that, UniConverter is a much better choice.
Instead of watching videos and listening to audio again and again to type manually, use UniConverter. It will save you time and effort and will generate accurate results. Moreover, it offers plenty of other useful features.
So what are you waiting for? Why not give it a try? Download UniConverter and maker transcribing easier than ever!

