If your compressed video is bigger than the original, the word “compression” can be misleading. Most video tools decode the source and encode it again with the settings you choose. They do not simply remove a fixed percentage from the existing file. A larger output alone cannot tell you which setting caused the increase.
First, compare the original and compressed video
Windows: check file properties first
- In File Explorer, right-click the original video and select Properties. Note the file size on the General tab.
- Open the Details tab and note the length, frame dimensions and total bitrate if Windows displays them.
- Repeat for the compressed file. Windows may not show every codec or audio track, depending on the file and system.
Mac: check file size and duration
- In Finder, select the original video and choose File > Get Info (or press Command-I). Note the size and duration if shown.
- Repeat for the output. Get Info may not list complete bitrate, codec or track details; use a media-inspection tool for those.
For codec, bitrate and tracks: inspect both files in MediaInfo
- Open the desktop MediaInfo application and open the original video.
- Choose View > Tree or View > Text. Under General, find duration, file size and Overall bit rate when available. Under Video, check format/codec, bitrate, frame size and frame rate.
- Review every Audio section for its format, bitrate and language, and any Text sections for subtitles. Open the output file and compare the same fields.
Some fields may be unavailable or estimated for a particular file. Compare overall bitrate with overall bitrate and video bitrate with video bitrate; do not compare a total rate to a video-only rate.
| Compare | What to look for | Next action |
|---|---|---|
| Duration and total bitrate | Longer output or higher average total bitrate | Confirm the same segment and length; then review video and audio rates. |
| Video codec and bitrate | Different encoder or higher output video bitrate | Check compatibility; test a lower bitrate or a less demanding quality setting. |
| Audio and subtitle tracks | Extra audio tracks or a high-bitrate track | Keep needed languages and accessibility tracks; remove only extras you do not need. |
| Resolution and frame rate | Output has been upscaled or given a higher frame rate | Avoid accidental increases; lower resolution only when it suits the viewing device. |
| Source and output quality | Source already looks soft or blocky | Test carefully: a larger re-encode cannot restore detail that was already lost. |
5 Reasons a Compressed Video Is Bigger Than the Original
When the duration is the same, the file with the higher average total bitrate is usually larger. The checks below identify where that extra data comes from.
1. The output bitrate is higher than the source
Compare overall bitrate for both files first, then compare the video streams separately. In HandBrake discussion #4487, a user reported that an 824 MB MP4 became a 962 MB M4V; a project collaborator explained that using less compression than the original produces a larger file.
Next step: Check whether the output uses a higher overall or video bitrate, then test a lower target from the original. Do not compare an overall bitrate with a video-only bitrate.
2. Constant Quality controls quality, not the output size
With HandBrake's Constant Quality mode, the encoder chooses how much data to use to meet the selected quality level. In one Reddit case, a 2.97 GB source became 3.05 GB after 3 hours and 40 minutes using x264, RF 22 and the Placebo encoder preset. Those details alone do not identify a single cause.
Next step: Check the source codec, quality setting and audio tracks, then preview a representative section. A very slow encoder preset increases processing time; it is not a file-size target. See the HandBrake checks below.
3. H.265 uses different settings from the H.264 source
H.265 is generally more efficient at a comparable visual quality, but the actual result depends on source and encoding settings. A Jellyfin user found that some H.264 files grew while others shrank after conversion. An already efficient source, a demanding quality target, grain or changed audio tracks can explain the difference. The same RF number does not represent equivalent quality across x264 and x265.
Next step: Compare representative samples, retain needed audio tracks and test H.265 direct playback on your target device before processing an entire library.
4. Audio tracks take a larger share of the budget
File size includes video, every retained audio track, subtitles and container overhead. A 448 kbps surround track uses about 22% of a 2 Mbps total bitrate budget; two audio tracks use more. Removing a track changes the available languages or playback options, so keep the tracks you need.
Next step: Inspect each track in MediaInfo or the encoder's Audio tab. Remove redundant tracks only, or choose a supported lower audio bitrate after listening to the result.
5. The editor exported at different settings
A shorter clip can still be bigger if an editor re-encodes it at a substantially higher bitrate or adds higher-bitrate audio. Check the export codec, average bitrate, resolution, frame rate and duration against the original; changing the container name alone is not a size target.
Next step: Re-export from the original project using a suitable bitrate and matching resolution. For a practical overview of ways to reduce video file size, compare the trade-offs before committing to another export.
How to fix a HandBrake file bigger than the original
- Open the original source and choose a suitable preset. Confirm the same title and duration; avoid accidental upscaling or a higher frame rate.
- Check the Video tab. If using constant quality, make a small adjustment toward lower quality and test. With x264 and x265, a higher RF number means lower quality; other encoders can use different scales. Do not compare RF numbers across encoders as equivalent quality.
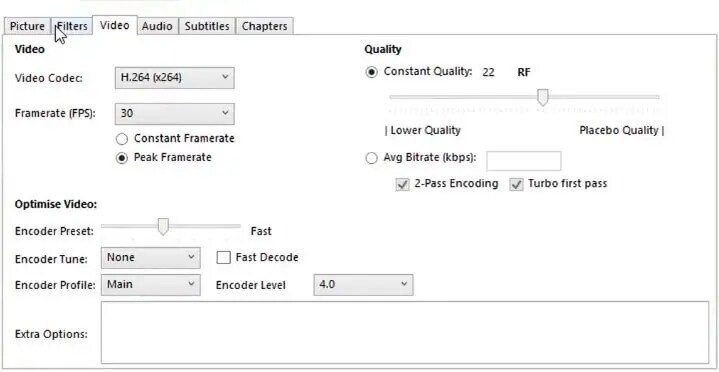
Example of HandBrake Video settings showing Constant Quality and Average Bitrate. This screenshot comes from an older interface; labels and layout may differ in current versions. Source: Wondershare tutorial. - Inspect the Audio and Subtitles tabs. Keep necessary tracks, including accessibility tracks, and remove only redundant ones. Check whether a high-bitrate audio track is being passed through.
- Preview a representative short section. Check fine text, movement and sound. Adjust one setting at a time, then encode the full video from the original when the trade-off is acceptable.
HandBrake documents its quality controls and preview workflow. For a related walkthrough, see how to compress video with HandBrake and compare alternatives. A short segment is useful for comparing quality; its size may not predict the whole file accurately when scene complexity varies.
Estimate the Bitrate for a 1 GB Target
When a platform sets a strict upload limit, calculate the total bitrate budget before spending time on a full encode. Use a target below the maximum to leave headroom.
Average total bitrate (Mbps) ≈ target size (MB) × 8 ÷ duration (seconds).
Video budget ≈ total bitrate − all audio bitrates − container overhead.
Hypothetical example: A 60-minute video (3,600 seconds) with a 1,000 MB target has an average total bitrate budget of about 2.22 Mbps. Subtract one 128 kbps audio track and the remainder is below 2.09 Mbps for video after overhead. Additional audio tracks reduce it further. Decimal MB and MiB differ, so confirm how your destination measures its limit.
In one HandBrake thread, a user targeting under 1 GB reported 1.14 GB after the fifth pass and 1.16 GB or more in later attempts. The example above illustrates the calculation; it does not represent that user's actual duration or settings. Changing encoder speed alone does not specify a size.
If you would rather skip the calculation, enter a maximum file size in UniConverter, preview the picture and check the completed file. If the target makes the video too soft, raise it, shorten the video, lower resolution where appropriate, or use a delivery method with a larger limit. For a detailed walkthrough, learn how to adjust video bitrate.
How to Reduce Video File Size With UniConverter: 4 Steps
If the previous result grew, reopen the original and choose a target below its current size; preview before accepting the quality trade-off. If you prefer a desktop workflow with a visible size goal, UniConverter 18's Windows Compressor guide documents Size Ratio, Max. File Size and Quality Level, plus a preview. The controls can vary by version, operating system and source. This is an alternative after diagnosing the problem, not a guarantee that every source can become smaller without visible loss.
- Step 1. Open Compressor and add the original. Launch UniConverter 18 on Windows, select Compressor, and use Add Files to import the source.
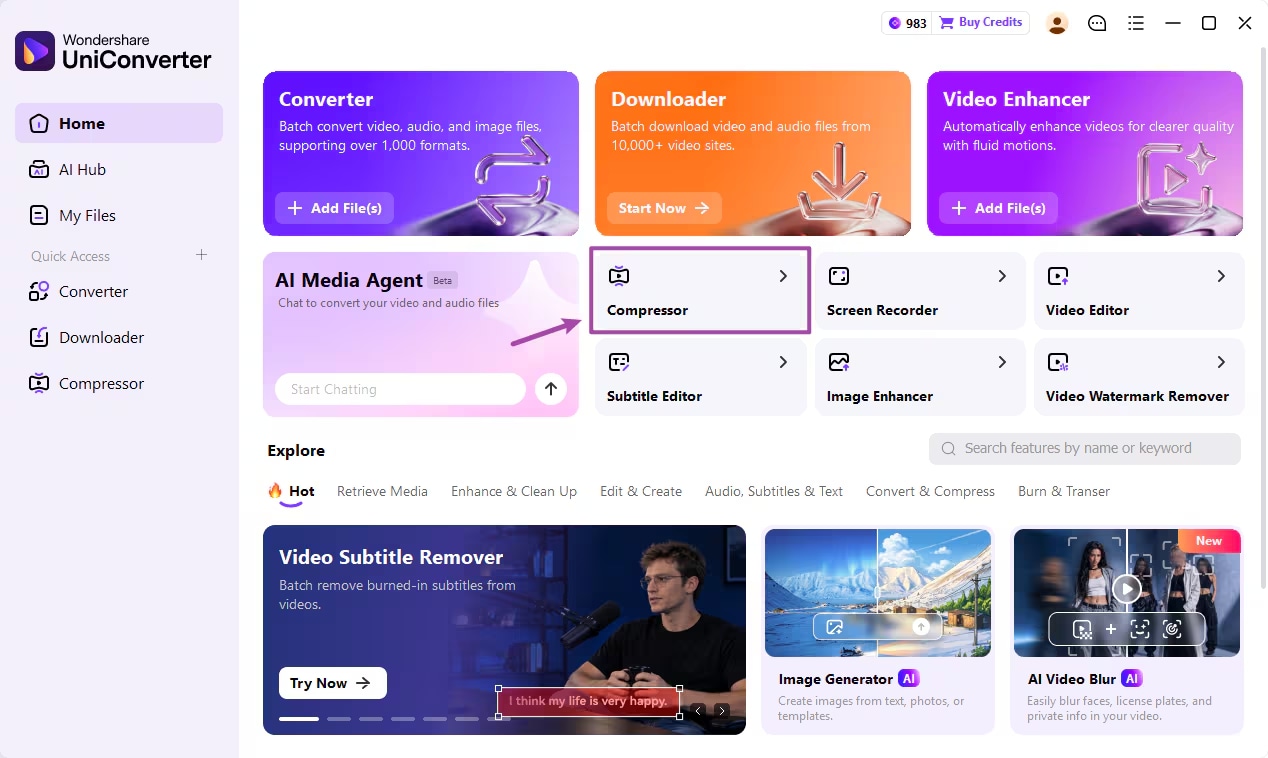
Open Compressor from the UniConverter 18 home screen. Source: Wondershare user guide. - Step 2. Set a target file size. Open Compression Settings and select Max. File Size or Size Ratio. Leave room below a strict upload limit; check output format and available advanced settings for compatibility.
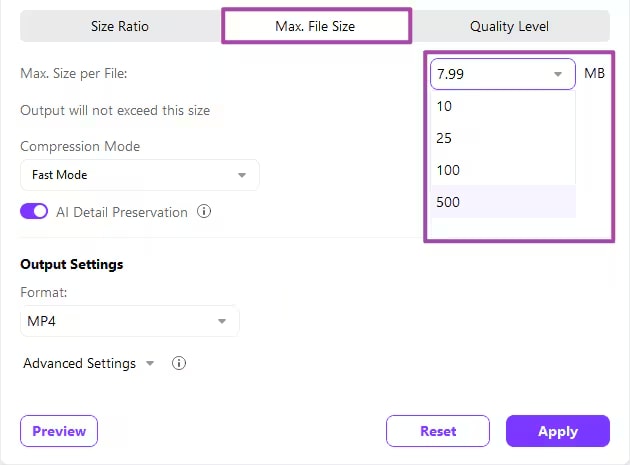
Choose Max. File Size and review the output settings before previewing. Source: Wondershare user guide. - Step 3. Preview the compressed video. Select Preview, inspect important detail and motion, and adjust the target if the result is too soft. Choose Apply when satisfied.
- Step 4. Compress and check the result. Choose Save to, select Compress All, and inspect the output in Finished. Compare size, picture and audio with the original before deleting anything.
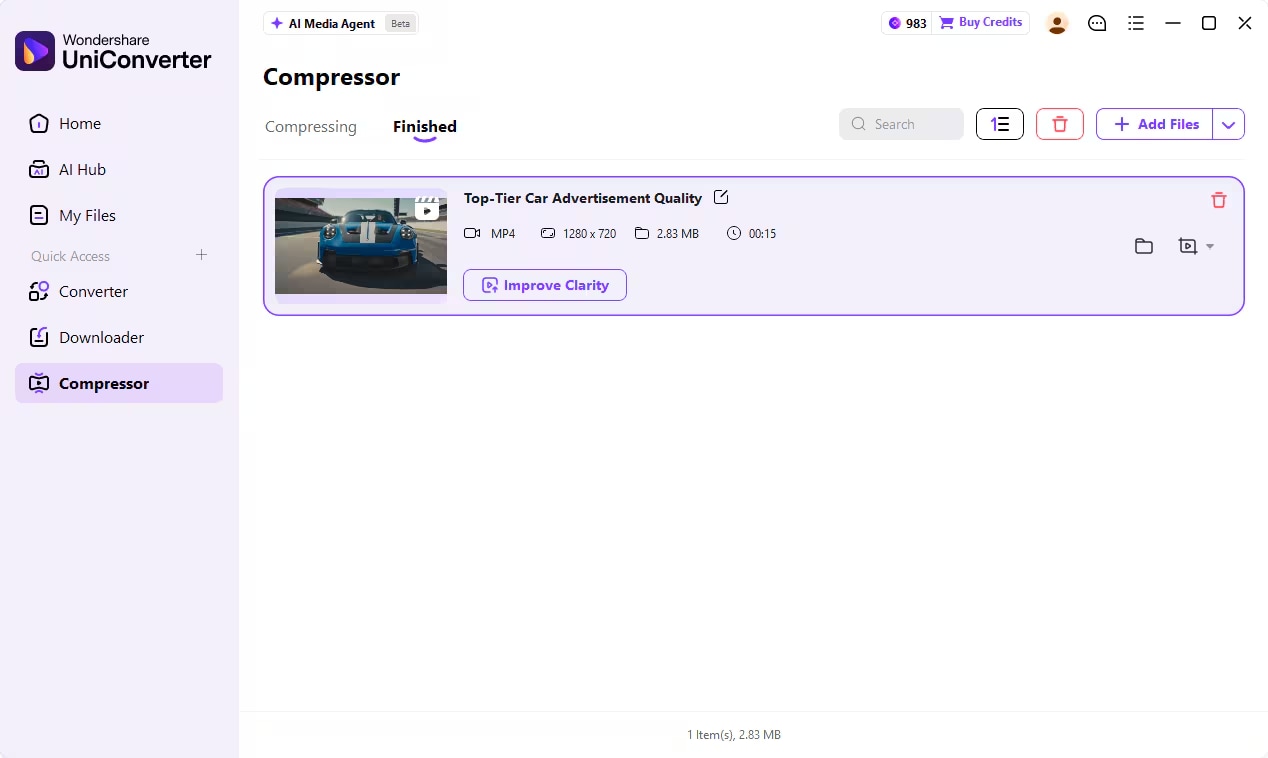
Open the Finished tab to review the completed file. Source: Wondershare user guide.
Explore UniConverter Video Compressor
Have several files to process? Learn how to compress multiple videos in a desktop queue. For other approaches, explore these ways to reduce video file size, or follow the FFmpeg video compression guide if you prefer command-line controls.
Steps follow the official UniConverter 18 Windows guide.
Check the result before replacing your original
- Confirm the finished file is under the destination limit and has the expected duration.
- Play a fast-moving scene and a scene with small text at the intended viewing size.
- Listen for audio problems and check every required language, subtitle and accessibility track.
- Test playback on the recipient device or platform, particularly after switching to H.265.
- Keep the original until the new file has passed all checks.
The best next step
Start with the original and compare its duration, total bitrate, video settings and audio tracks with the output. Test one short section before a full encode. If a target size makes text, motion or audio unacceptable, raise the target or change the delivery plan. Choose UniConverter when a visible size target and preview help your workflow; keep the original until the new copy plays correctly on its destination device.
FAQ: Video Files Bigger After Compression
Why does HandBrake make files bigger?
It re-encodes using the selected settings, which may produce a higher total bitrate than the source. Constant-quality mode does not aim for a specific file size. Compare the tracks and test a small quality adjustment.
Is H.265 always smaller than H.264?
No. H.265 may deliver similar quality at a lower bitrate, but a particular encode can be larger because of its settings, encoder, content or audio. Test equivalent visual quality and device compatibility.
Does compression always reduce quality?
Lossy video re-encoding discards some picture information, even when the difference is hard to see. Lossless encoding preserves the decoded picture but often produces a larger file than a lossy source; it does not recover detail lost in an earlier encode.
Will changing MP4 to MKV make the video smaller?
Not necessarily. MP4 and MKV are containers; the video and audio streams inside them account for most of the size. Remuxing without re-encoding may slightly change overhead, but changing the extension alone does not compress a video.
Should I compress the output again if it is too large?
For another lossy attempt, start from the original and adjust the settings. Repeatedly encoding the previous output can accumulate quality loss without reliably reaching the target.