

If your video files are too large and you want a professional way to make them smaller, FFmpeg compress video commands are one of the best solutions. FFmpeg is a free and open-source tool that works on macOS, Windows, and Linux, allowing you to compress MP4 or other formats without significant quality loss. Although its use and installation process are quite complex, requiring a separate learning curve, you can find an easy alternative that is discussed later in the article. Let's first learn how to compress video in FFmpeg step by step.
In this article
Part 1. Steps Guide to Compress Video in FFmpeg
Here's a complete step-by-step guide to help you reduce your video file sizes using the macOS Terminal app:
Step 1: Install the FFmpeg app and open the file. Click right, then select "Get info" and copy the pathname of the image.

Step 2: In the terminal, type "cd," paste the path, and hit the enter button. Now, type "ls" and it will display the complete details, then ask for access to the gallery.

Step 3: Now give another command and type "ffmpeg -i (complete name of file), then space and paste the complete file name again with a different file format. Suppose you have an MP4 file; then mention another format, such as .mov. The process will take a few minutes, and your compressed video will be in the same location as the original video.

How to Compress Video in FFmpeg H3 on Windows
Here are the textual commands you need to put for compressing the video in Windows without any complexity:
Step 1: After installing FFmpeg, you can open CMD. Video was in this path: E:\Samsung Galaxy S23 FE\DCIM\Daman. So to change the directory in CMD, use this command:
"E: cd "Samsung Galaxy S23 FE\DCIM\Daman"
Step 2: Choose the video and give this command:
“ffmpeg -i input.mp4 -vcodec h264 -acodec mp2 output.mp4”
Step 3: Replace "input.mp4" with your video's name and "output.mp4" with what you want the compressed file to be called.
Note: During the process, do not open or run any other applications, as this may slow down your laptop.

Easy to Use FFmpeg Converter Alternative
Part 2. Pros and Cons of Using FFmpeg to Compress Videos
Using FFmpeg to compress videos has both advantages and some drawbacks. It's a powerful tool that professionals love, but beginners may find it tricky at first. Let's examine the key pros and cons in detail so you can determine if it's the right choice for you.
Pros
- Unparalleled Control and Flexibility: With FFmpeg, you're not limited to fixed presets. You can control every detail, including bitrate, resolution, codec, and frame rate. This flexibility allows you to adjust the video size exactly as needed, without relying on third-party apps.
- High Efficiency and Performance: FFmpeg uses optimized codecs such as H.264 and H.265, which compress video without wasting resources. It runs directly in the terminal, so you get fast processing speeds even when working with large 4K or HD files.
- Excellent for Automation and Scripting: If you need to compress multiple videos regularly, FFmpeg is ideal. You can write simple batch scripts or commands to automate the process, saving hours compared to manually compressing videos one by one.
- Consistency and Reliability: FFmpeg works the same way across macOS, Windows, and Linux. Once you learn the commands, you can expect consistent results without unexpected crashes or errors. This makes it a trusted tool for professionals worldwide.
- Vast Format and Codec Support: Unlike many tools that only work with MP4 or AVI, FFmpeg supports almost every video and audio format. From MOV to MKV or even less common formats, you'll never face compatibility issues.
Cons
- Steep Learning Curve: Installing FFmpeg and using it via the command line can be challenging for some users. Unlike tools with buttons and menus, you must type commands correctly. A small mistake can cause errors or poor results.
- Not User-Friendly Interface: FFmpeg doesn't have a graphical interface. All operations happen in the Terminal or the Command Prompt. For users who prefer drag-and-drop apps, this text-based interface feels intimidating and time-consuming to learn.
- Potential for Poor Results: If you don't understand how codecs, bitrate, or CRF values work, you may end up with pixelated videos or unnecessarily large files. Quality depends on the right balance, which takes practice to achieve.
- No Built-in Batch GUI: Although FFmpeg can batch compress videos with scripts, there's no ready-made graphical tool for it. Beginners who want to select multiple files at once and compress with a click may feel limited.
- Trial and Error Required: Finding the perfect command often means experimenting with settings. You may run tests several times before getting the right size and quality. This can be frustrating if you're seeking a quick and straightforward solution.
Part 3. A More User-Friendly FFmpeg Alternative to Compress Videos
Wondershare UniConverter can be a great alternative to FFmpeg, as it is easy to use, requires no prior experience, and allows for batch video compression. It supports over 1000 formats and offers AI-powered compression features. While FFmpeg offers powerful compression capabilities, many users find its command-line interface challenging. Wondershare UniConverter offers a simpler alternative, available in both desktop and online versions, making video compression accessible to everyone.
How to Compress Videos with the Desktop App of Wondershare UniConverter
Take these simple steps to compress batch videos quickly:
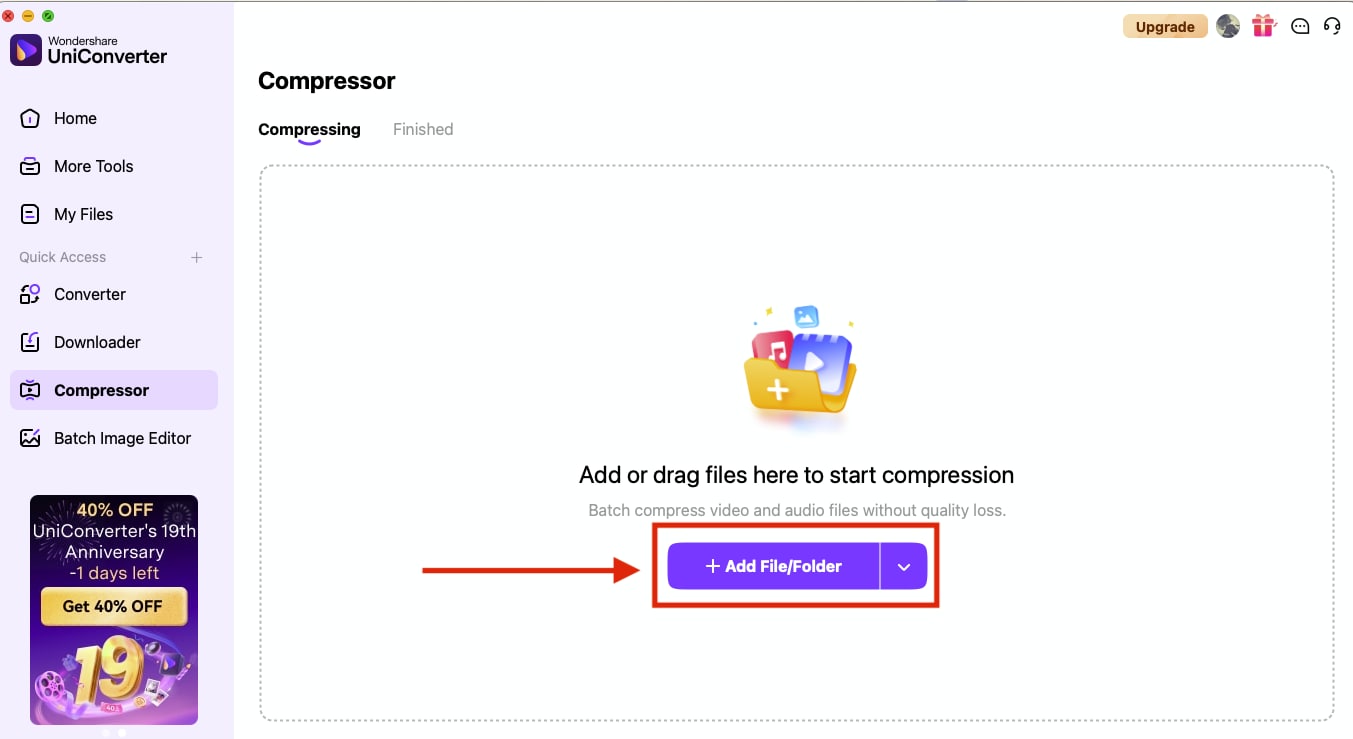
Step 1: On the homepage, click “Compressor.”

Step 2: Click “Add Files/Folder” and upload your videos.
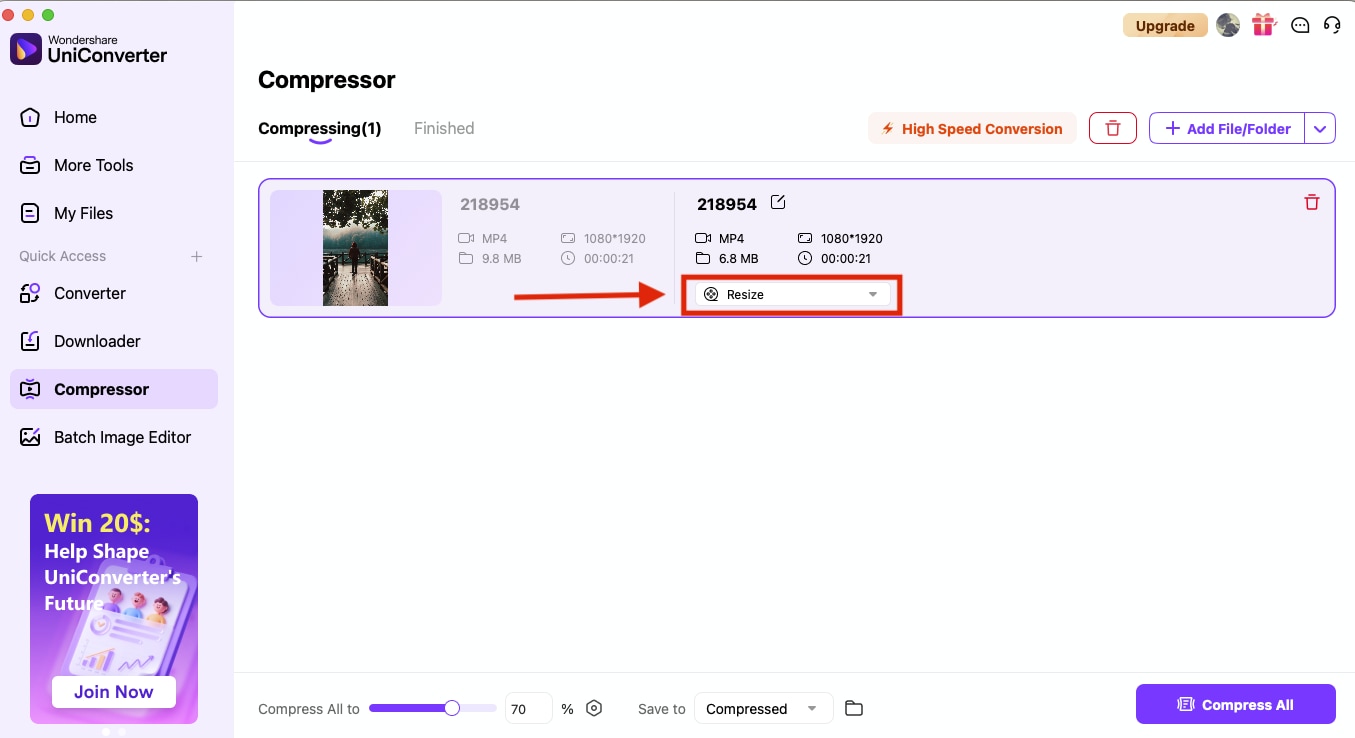
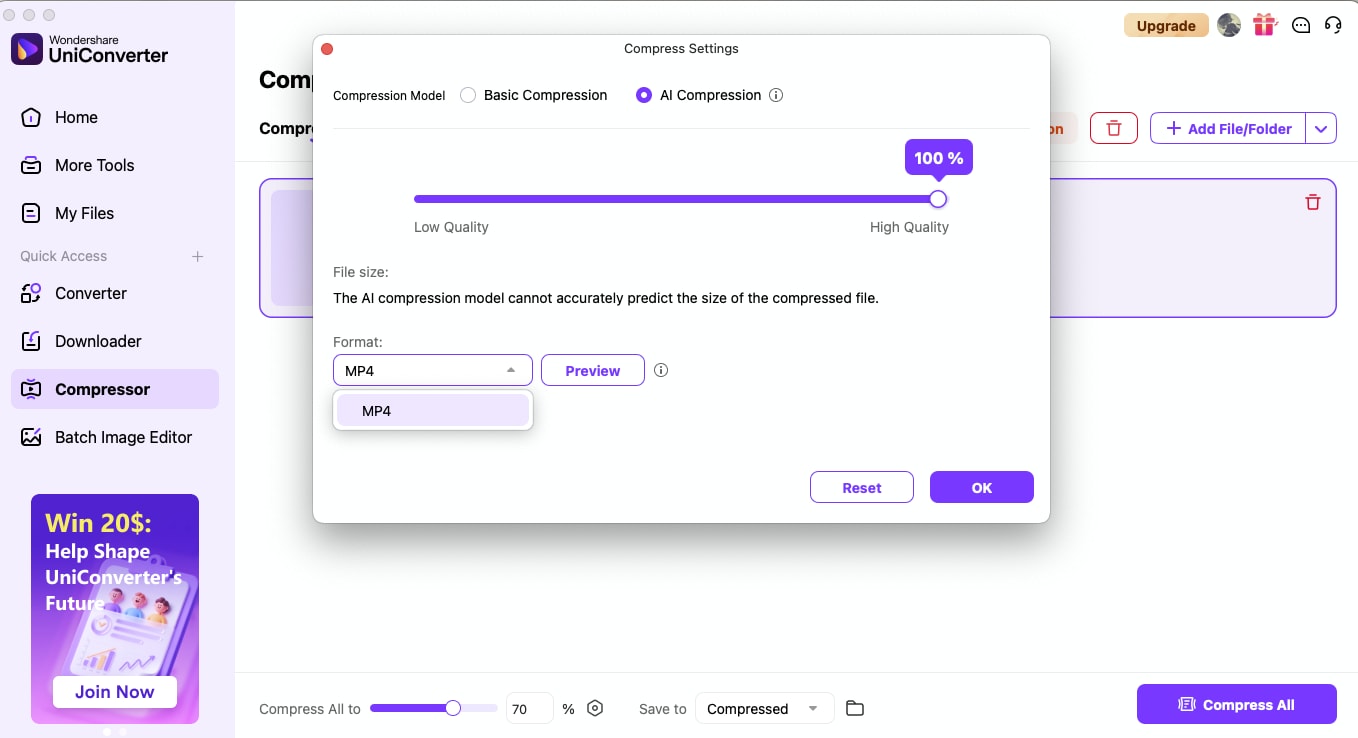
Step 3: After uploading the video, click the dropdown menu next to the “Resize” option.
Step 4: Here you can adjust the compression in percentage, choose format, adjust the advanced settings, and click “OK” Now click “Compress All” to save the compressed video.
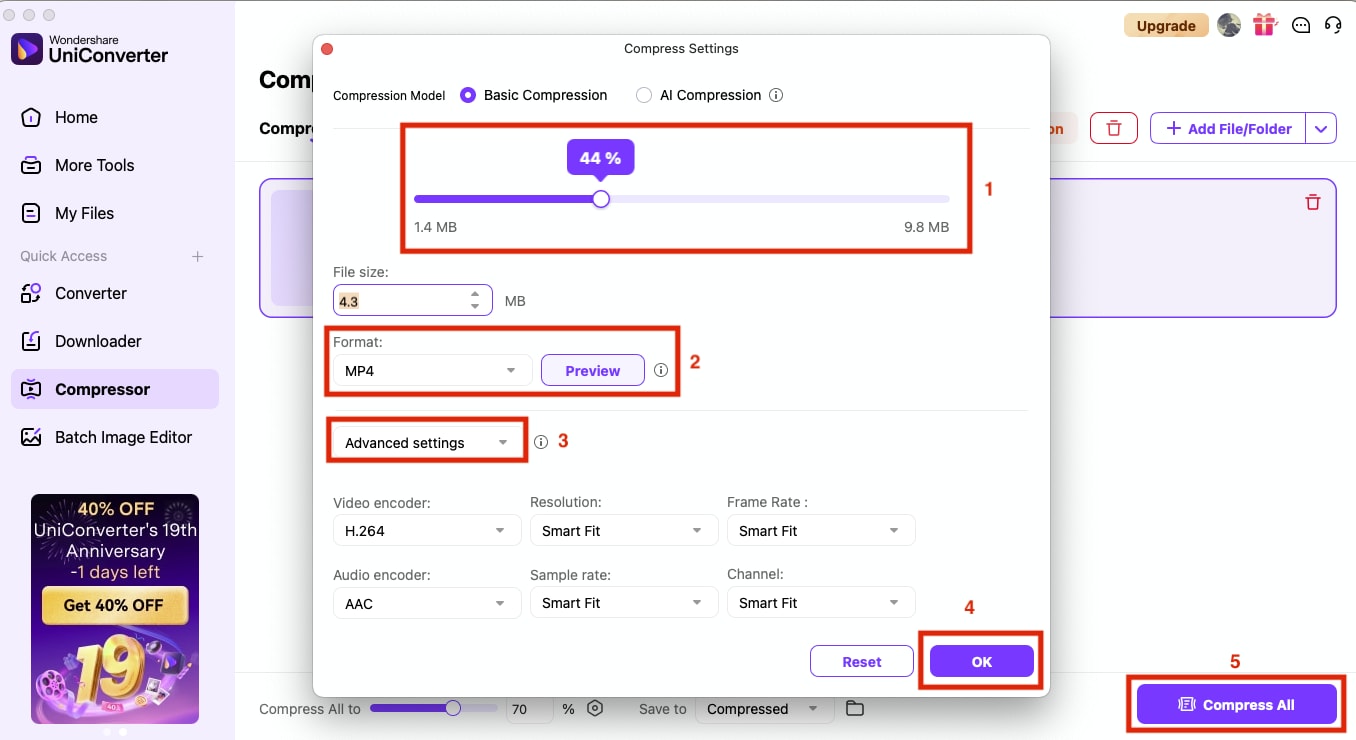
Note: If you do not want to compress the video manually, you can try its AI compression.
How to Compress Videos Online with Wondershare UniConverter
By taking 2 simple steps, you can compress video onlines easily:
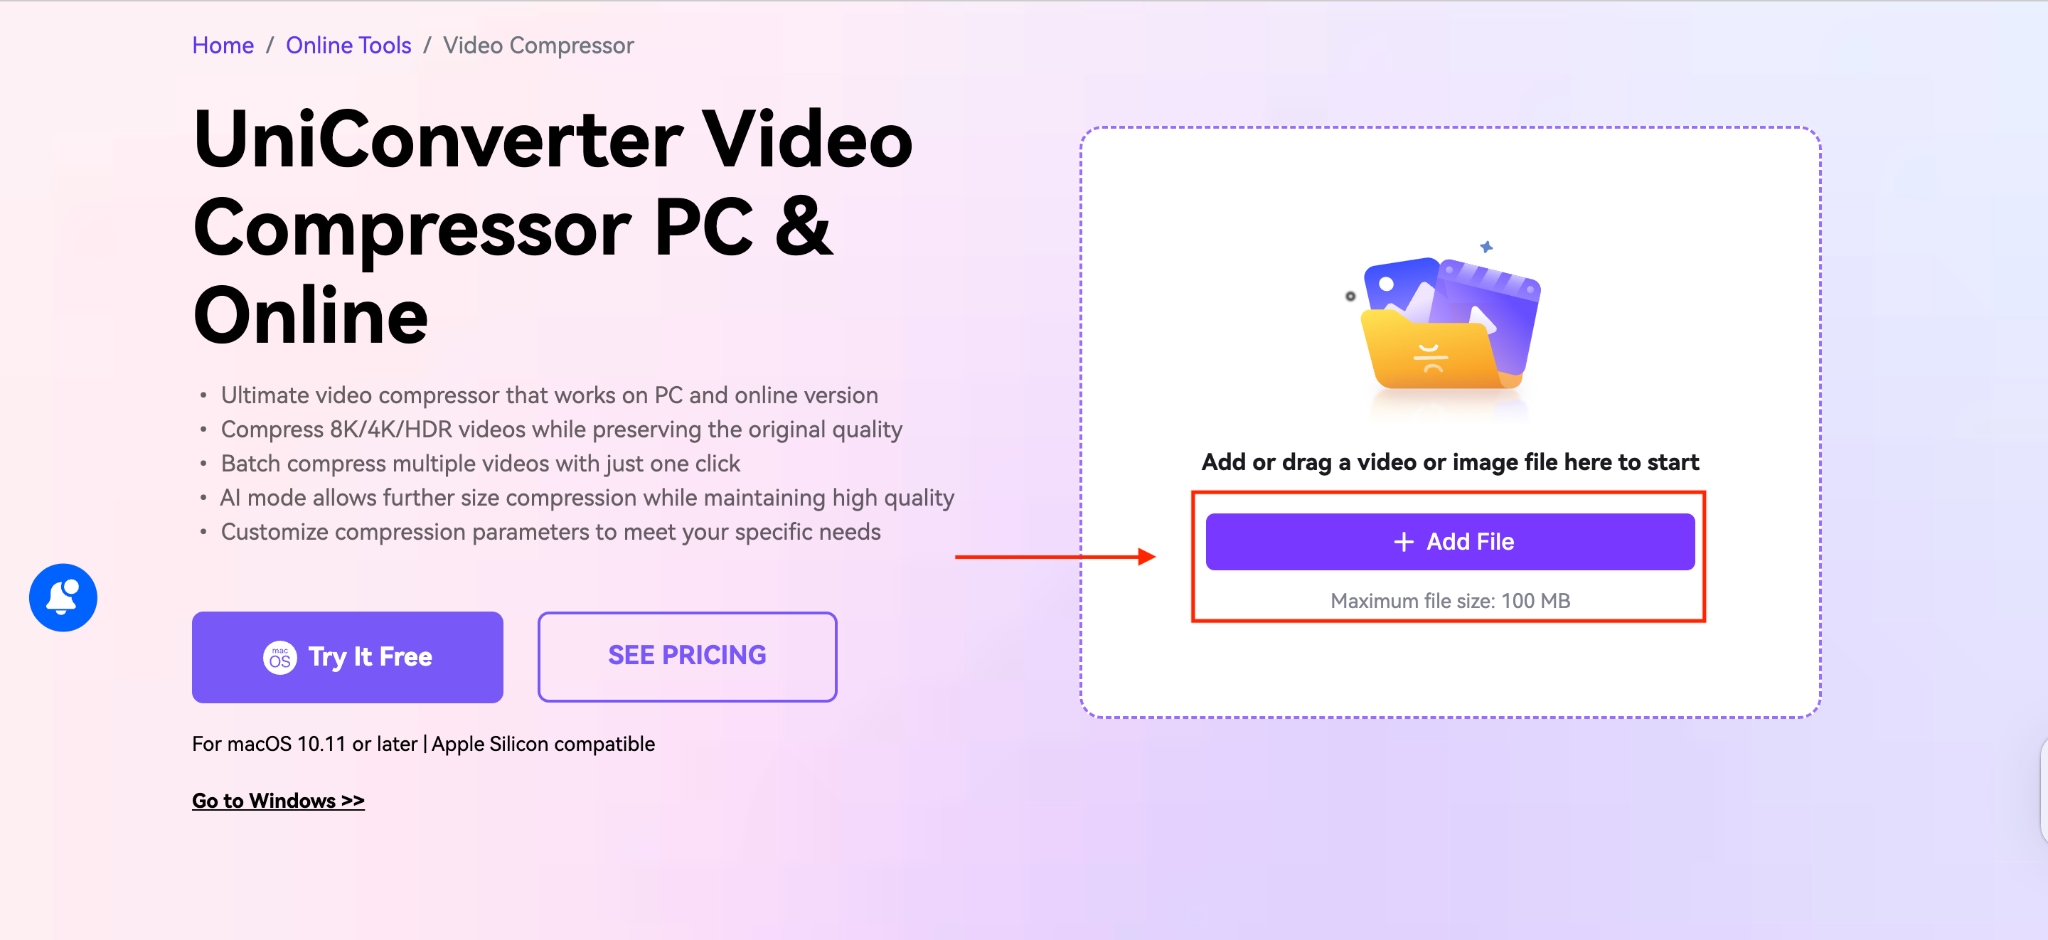
Step 1: Visit the UniConverter Video Compressor website and click “Add File.”
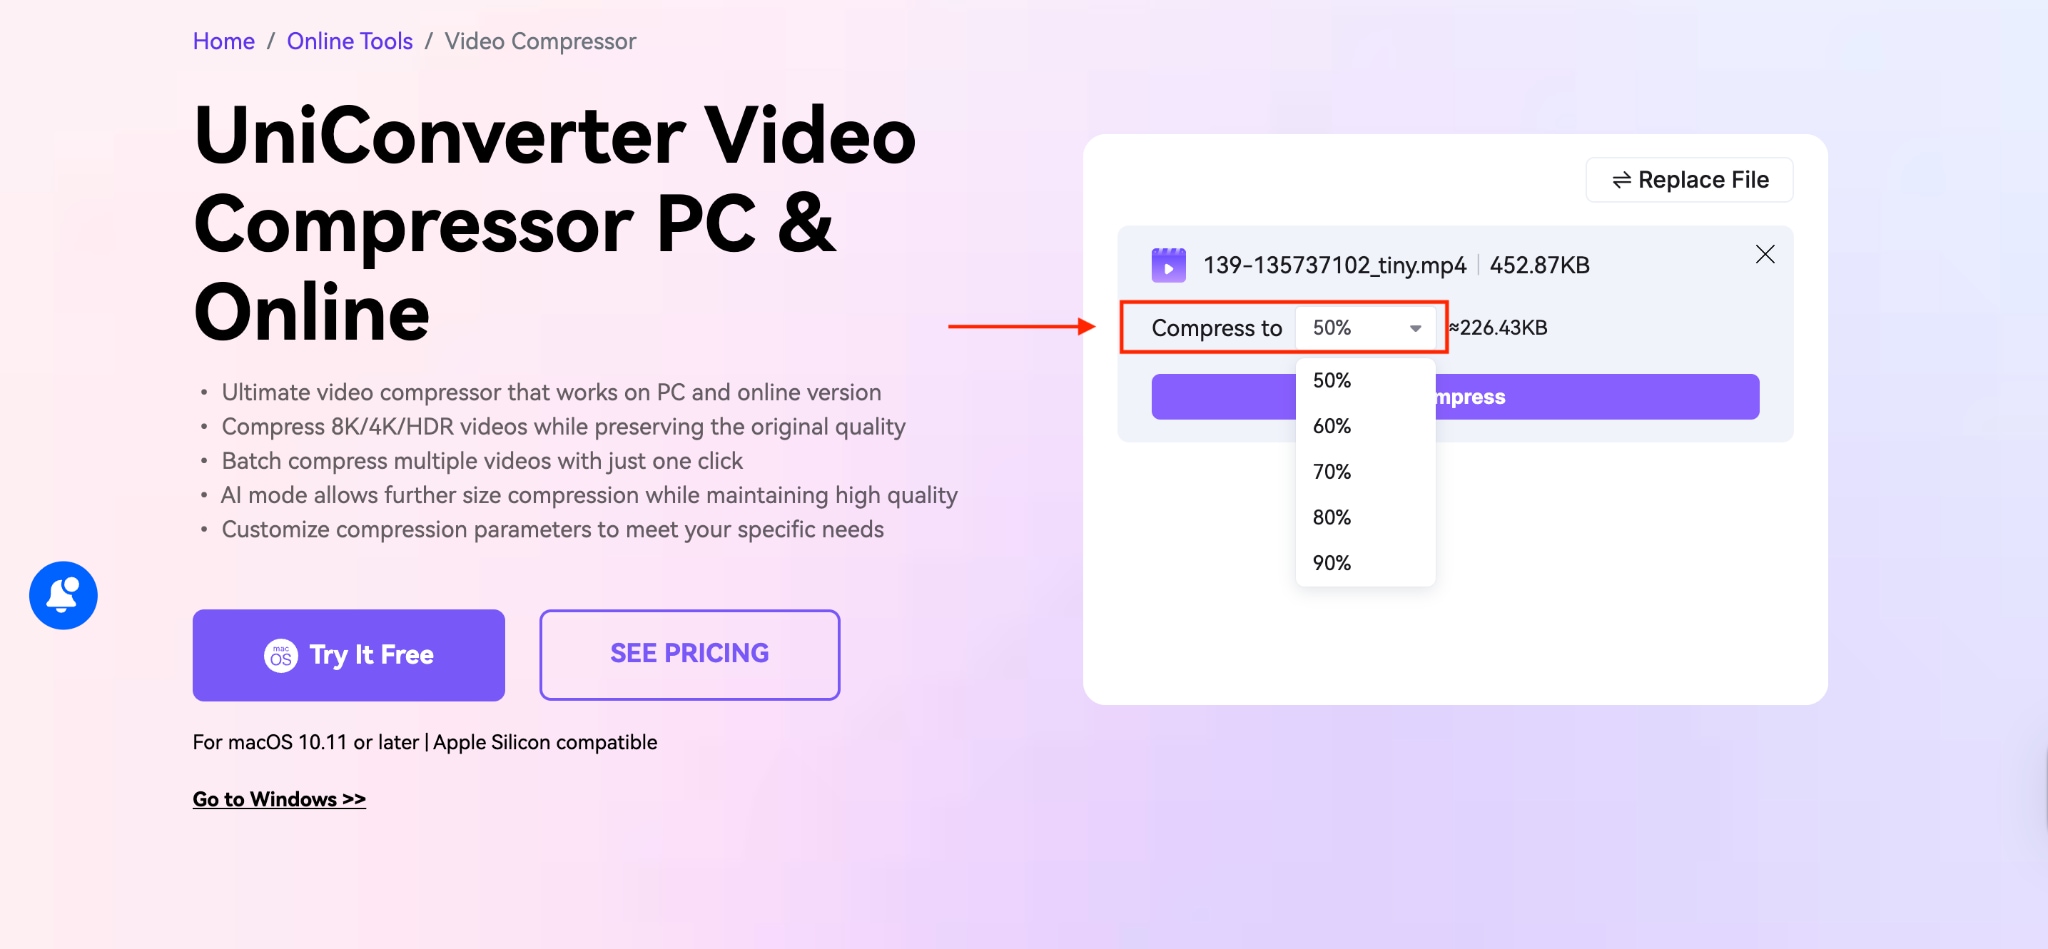
Step 2: Adjust the compression percentage.
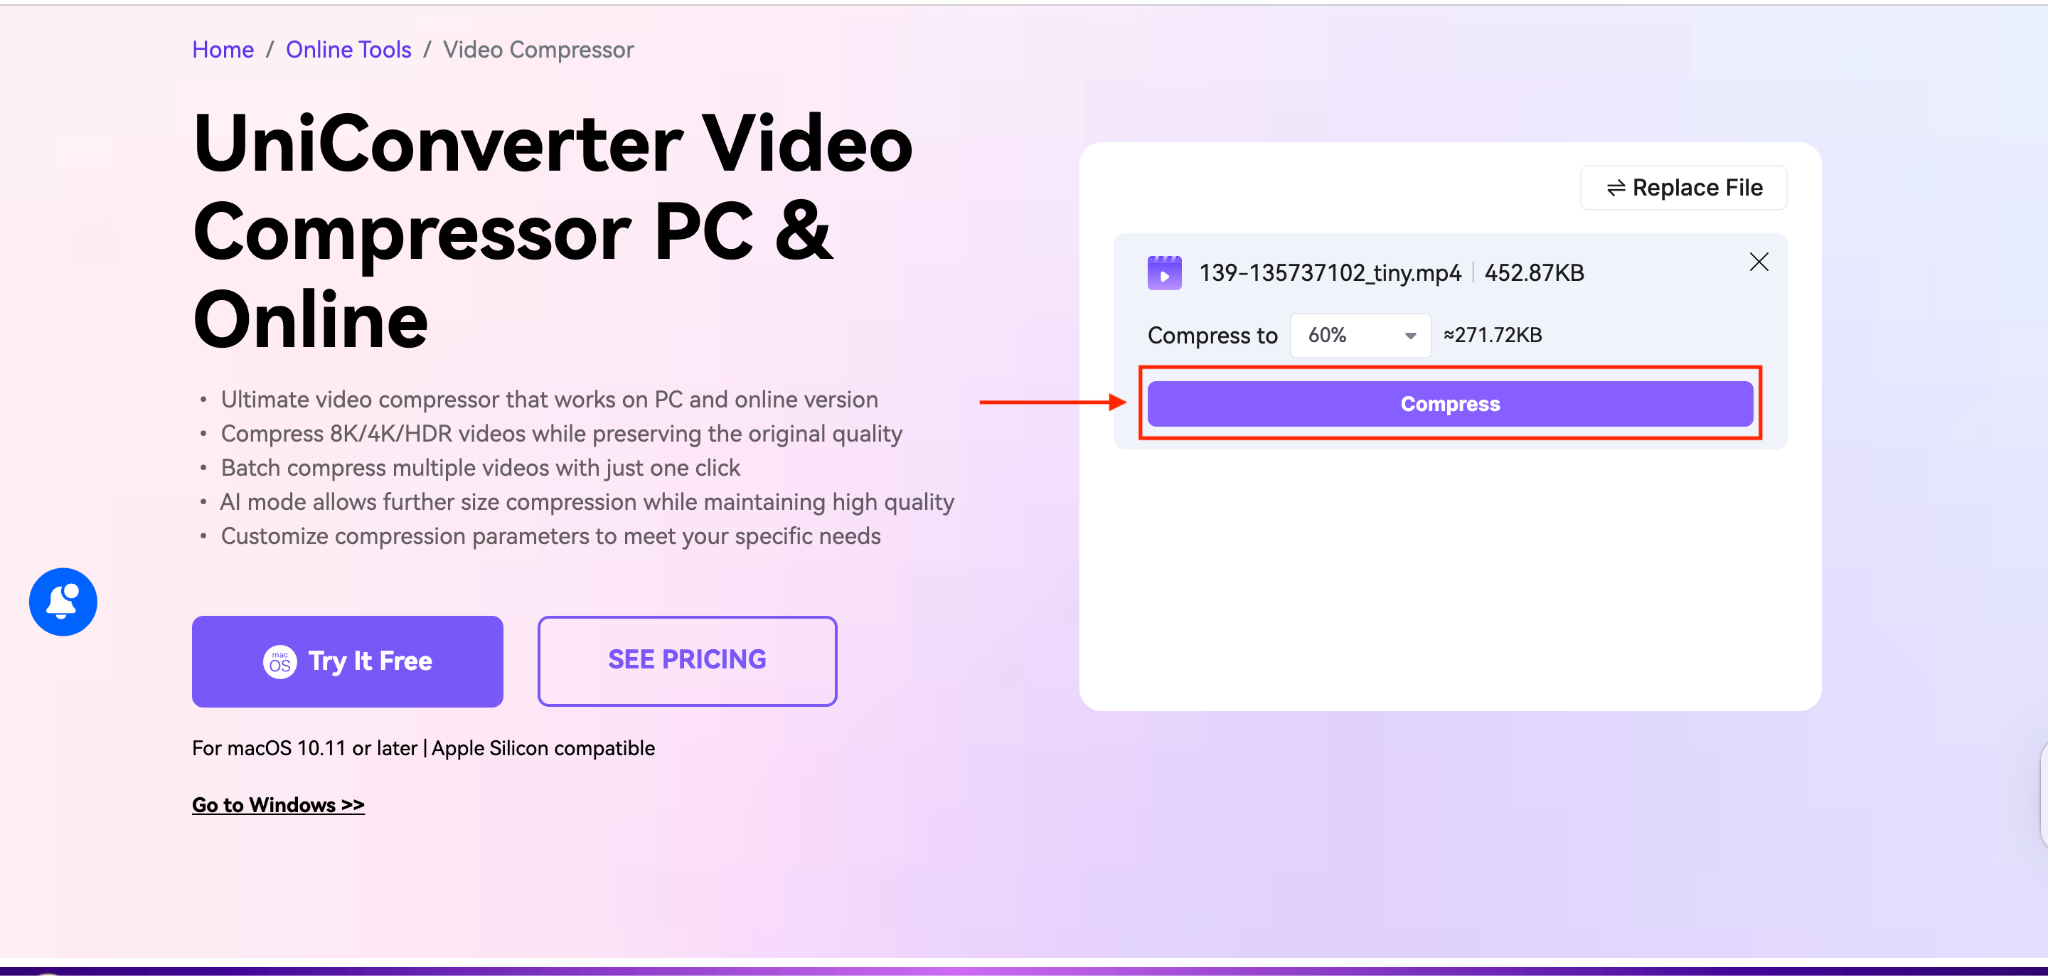
Step 3: Click “Compress” and download the video.
Here is the comparison table of FFmpeg and WonderShare UniConverter, so you can make the right choice for your video compression:
| Feature | Wondershare UniConverter | FFmpeg |
| Batch conversion support | Yes, with a GUI interface | Yes, with scripting required |
| Ease of use | Very easy, simple drag and drop with a visual interface | Complex, command-line only |
| Supported formats | 1000+ video/audio formats | All popular formats of audio, video, and image |
| Product type | Desktop app + Online service | Command line tool only |
| Best for | Beginner, content creators, quick tasks | Developers, advanced users, automation |
Easy to Use FFmpeg Converter Alternative
Conclusion
Compressing videos with FFmpeg provides unmatched control and flexibility for users who are comfortable with command-line tools. Through various techniques, such as CRF values, bitrate control, and resolution scaling, you can achieve significant file size reductions while maintaining quality. However, FFmpeg's steep learning curve and command-line interface can be challenging for beginners.
For users who prefer a more accessible approach, tools like Wondershare UniConverter offer similar compression capabilities, along with intuitive graphical interfaces, batch processing features, and real-time previews. The choice between FFmpeg and user-friendly alternatives ultimately depends on your technical expertise, specific needs, and preference for control versus convenience.
FAQs
-
1. What CRF value should I use for good quality compression?
Use CRF values between 23 and 28 for a good balance of quality and file size. CRF 23 is the default and works well for most content, while CRF 28 provides smaller files with slightly lower quality. -
2. How can I compress a video to exactly 25MB for email?
You can compress a video to exactly 25MB with the following steps: A: Calculate the required bitrate using: (25 MB × 8192) ÷ video duration in seconds, then use two-pass encoding with that bitrate value. For example, for a 5-minute video: (25 × 8192) ÷ 300 = 683 bitrate units. -
3. Why is my FFmpeg compression taking so long?
Compression speed depends on preset settings, video length, and your computer's processing power. Use faster presets, such as-preset fastor-preset ultrafast, for quicker results; however, this may result in larger file sizes. -
4. Can I compress video without losing quality?
Yes, use CRF values between 18-23 with H.264 codec, or switch to H.265, which provides better compression. Example:ffmpeg -i input.mp4 -c:v libx265 -crf 20 output.mp4. -
5. What's the difference between CRF and bitrate control?
CRF maintains consistent quality throughout the video while varying bitrate, whereas bitrate control maintains constant bitrate while quality may vary. CRF is generally recommended for better overall quality.

