
Social media has asserted itself as a significant part of everyone’s life in today’s era, bringing users to the need to select easy content-creation techniques. While it has brought convenience to everyone’s door, there are multiple issues involved in managing the content. When uploading an image across any social media platform, an unsupported image frame size is among the most common problems.
Therefore, it is important to pick an editor that helps you create ready-to-post images to avoid hassle. To help you find the right techniques and tools for macOS to reduce image size, this article will discuss different perspectives.
In this article
- Why Reduce Image Size on Mac
-
Reduce Picture Size on Mac with Built-in Tools
-
How to Make JPEG Smaller on Mac with Third-Party Tools
- UniConverter [Free Batch Resizing]
- Squoosh
- Adobe Photoshop
- Tips to Reduce Image Size Without Losing Quality
- FAQs About macOS Reduce Image Size
Part 1. Why Reduce Image Size on Mac?
To create an image that has an ideal size for a social platform, it is important to know the significance of this practice. The following discussion features the reasons why you might need to reduce size of image on Mac:
- Optimize Storage Space: Reducing image size can help you free up storage on your Mac, as high-resolution images can take up lots of space.
- Speedy Email Attachments: Smaller images are quicker to upload and download, making them ideal for sharing across social media websites or via email.
- Optimize for Social Platforms: As each social platform has a different file size requirement, Mac's reduced picture size may help you optimize the images for specific platforms.
- Easy Management: Organizing a library of reduced-sized images can be more efficient, making it easier to find files when needed.
Part 2. Reduce Picture Size on Mac with Built-in Tools
Before using third-party file optimization tools, it is better to look into the built-in apps and tools of Mac. The following section is about the effective Mac tools that effectively reduce your file size:
Method 1. Reduce Size of Picture on Mac with Preview App
The first built-in app on our list is the Preview App, which offers basic image editing features. It provides comprehensive size-reducing features to help you post your content easily. Besides size compression, it helps you optimize pictures by adjusting image dimensions. To learn how to shrink photo size on Mac using the Preview App, follow the guide below:
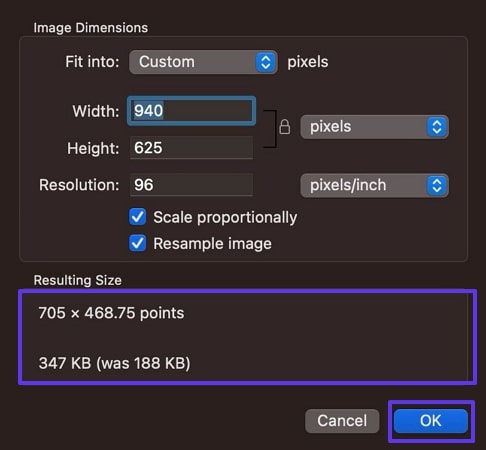
Step 1. To start, open an image on the Preview App and access the “Markup Tools” from the top-right corner. Using the protruding toolbar, select the “Adjust Size” button to begin the process.

Step 2. From the “Image Dimensions” window, locate the bottom section and click on the displayed “Points” to see a file size option. Each time you click, you will see a different file size suggestion. When your desired file size is displayed on the screen, click the “OK” button.
Method 2. How to Downsize a Photo on Mac with Photos App
Another method to modify the file size of your image is using the built-in Photos App offered by this device. Users can select from multiple size options to adjust the size of their photos. Moreover, you can also change the image quality before exporting through this platform. To learn how to reduce photo size on a MacBook using this built-in function, read the steps mentioned below:
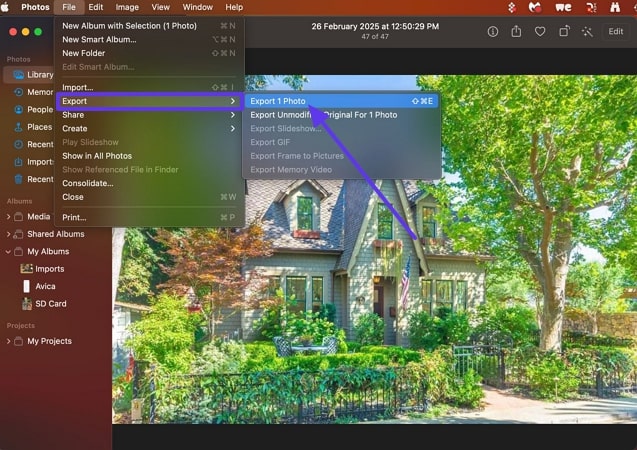
Step 1. Begin the process by opening the image that needs to be resized and accessing the “File” tab. Using the extended menu, hover over “Export” and click the “Export 1 Photo” option.
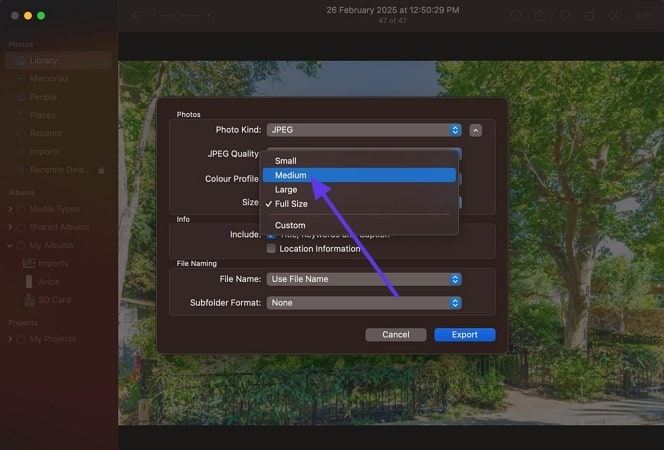
Step 2. When the next window opens, select the desired “JPEG Quality” and export the picture in an appropriate size.
Method 3. How to Decrease Photo Size on Mac via Quick Actions in Finder
The last built-in method to reduce picture size on Mac is the Quick Actions technique. This method is effective when you are looking for a quick way to achieve the desired photo size. By using this option to shrink image size, you can preserve the metadata of the original picture. To learn how to use this method to reduce image file size, follow the steps below:
Step 1. Firstly, open Finder on Mac and right-click on the desired image in the respective folder. Using the next menu, hover the mouse over “Quick Actions” and select the “Convert Image” option.
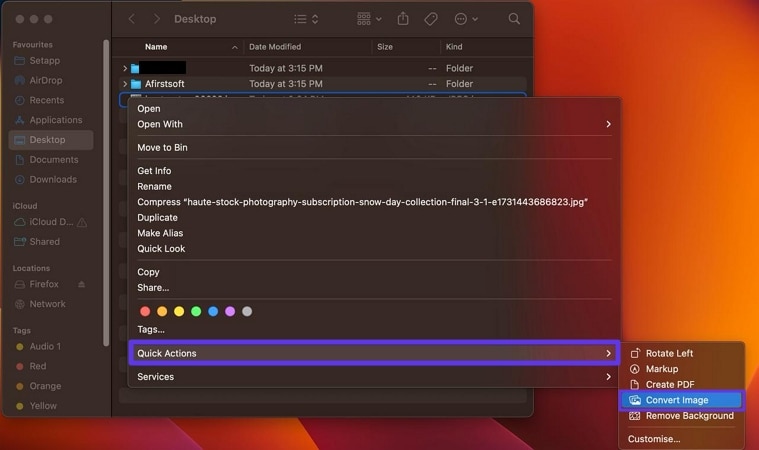
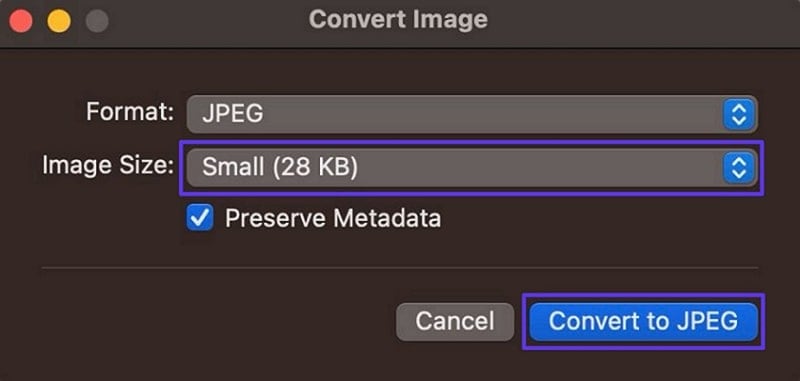
Step 2. Using the “Convert Image” window, select the desired “Image Size” and click the “Convert” button to save the compressed photo.
Part 3. Mac Shrink Image Size with Third-Party Apps
Having explored the built-in Mac tools to compress, you must have noticed that they lack advanced functionalities. To get more features besides Mac reducing picture size, you will need third-party apps. The following applications offer precise image compression alongside other features:
1. How to Reduce a Photo Size on Mac with Wondershare UniConverter
The first Mac image size reducer on our list is the one and only Wondershare UniConverter. This platform offers a designated compressor to reduce the file size of your photos by percentage. Although the size gets shrunk, the original quality is preserved. Besides optimizing the file by compression, you can adjust its frame size to cut the size. This can be done by selecting a custom aspect ratio to obtain platform-specific content.
This image compressor supports 15 popular image formats, including JPG, PNG, TIFF, and more. In addition to compressing files, users can select the format in which they want to export the compressed file. This platform lets you select the file destination on your device to help locate it easily. As you reduce image size on Mac, the compressed files can be accessed and edited in the designated storage.

Best Batch Picture Resizer Mac
Step 1. Advance to the Image Converter to Start
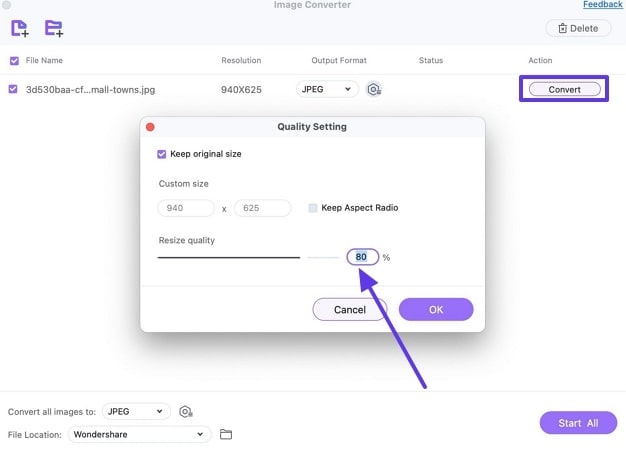
First, open UniConverter on Mac and click the “Image Converter” button within the “Image” section. Using the Finder window, select the desired photo and import it for compression.

Step 2. Select the Image Size to Compress the Picture
When the imported file appears on the next interface, go for the “Gear” icon to open the “Quality Setting” window. On the following screen, define the output size with the “Resize Quality” slider. Now, hit OK to “Convert” the image file while compressing its file size.
2. How to Reduce the Size of a Photo on Mac with Squoosh
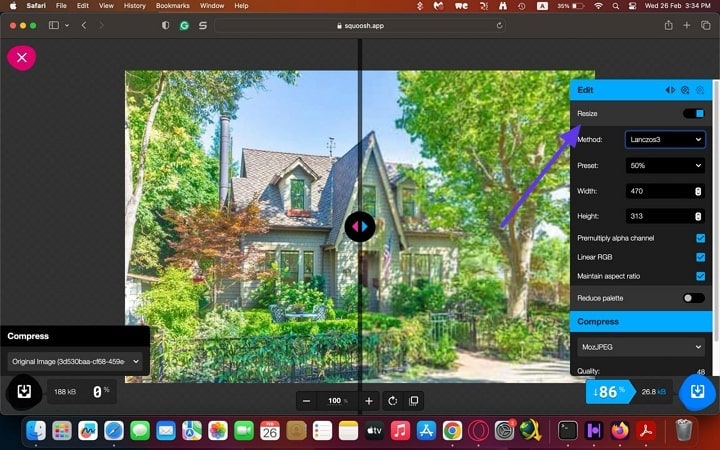
If you need to compress an image online while maintaining content privacy, Squoosh can be your go-to platform. This website offers various modes of picture compression to help you optimize the file. You can adjust the preset resizing in percentage to create an output that has predefined quality settings. During the compression, users can maintain the original aspect ratio of the uploaded files.
When looking for different algorithms to scale down an image while maintaining visual quality and minimizing distortions, you can select Lanczos3 or other options. Besides, users can enable the Linear RGB option to maintain better color accuracy and prevent artifacts. File size optimization through Squoosh can be achieved by adjusting the height and width of the picture. To learn how to minimize picture size on Mac using Squoosh, follow the guide below:
Step 1. Once you have opened Squoosh on the browser, upload an image and access the right panel to unfold the “Compress” section. Here, you can set the compression by dragging the designated sliders.
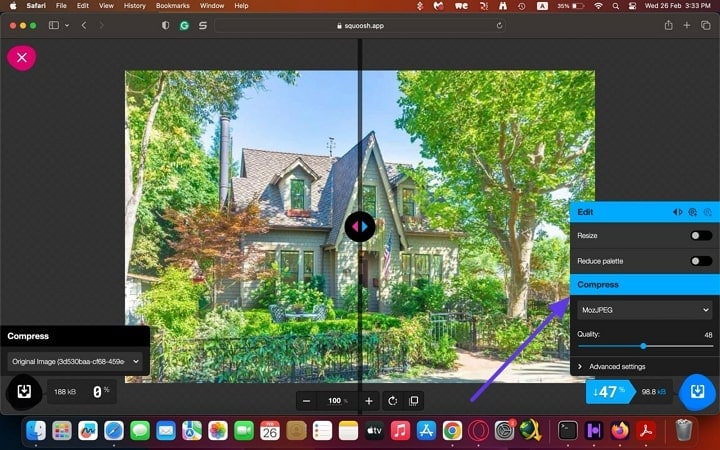
Step 2. Enable the “Resize” button and enter the preset compression percentage from the respective menu. After adjusting the width and height of the picture, enable the “Linear RGB” option. Once you have entered all the compression settings, export the image using the top right corner of the page.
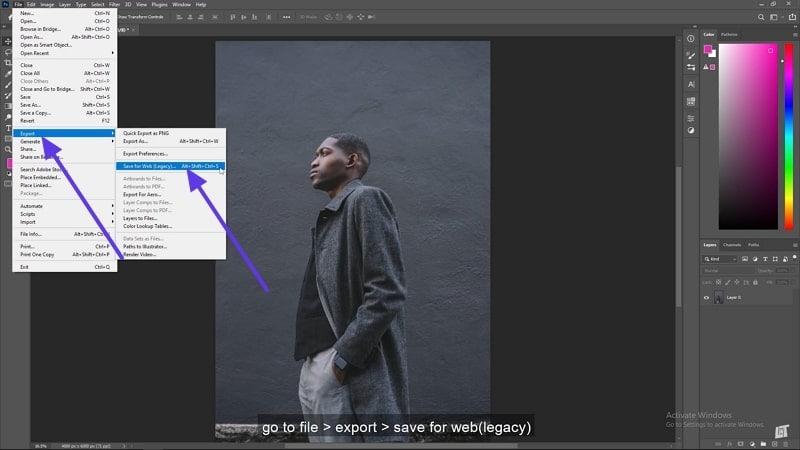
3. How to Decrease Picture Size on Mac with Adobe Photoshop
When in search of an advanced image resizer, Adobe Photoshop is a decent choice. Among its many image-related features, it offers a comprehensive Mac reducing picture size feature. For precise compression, it allows you to select the desired image size in percentage. After selecting the percentage compression, you can also set the image quality as high, medium, or low.
For obtaining enhanced image quality despite the compression, this tool allows you to save the file as a JPEG. This facility also helps you preserve the original colors of the imported images. You can convert the compressed file to sRGB to encode colors, making them perceptually uniform for human vision. Explore the following guide to learn how you can compress an image file for optimization:
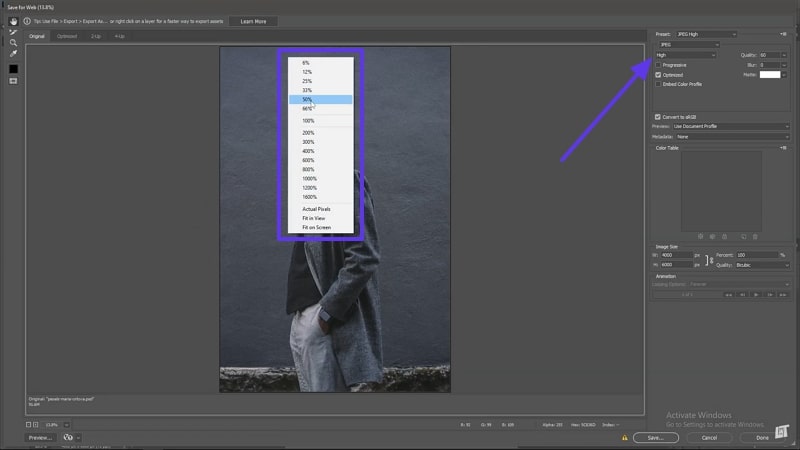
Step 1. To begin with, open Adobe Photoshop on your Mac and import the desired image. Using the “File” tab on the top left, hover over the “Export” option to select “Save for Web.”
Step 2. Right-click on the imported image to select the desired compression percentage using the pop-up menu. To adjust the image quality, refer to the right panel to set the compression rate as “High.”
Part 4. Pro Tips to Reduce Image Size Without Losing Quality
Reducing the size of an image Mac without noticeable quality loss requires smart optimization techniques. Here are some professional tips to achieve the best balance between file size and image quality:
- Pick the Right Format: Many image formats promote high-quality preservation despite compression. JPEG is best for photos that have extensive colors and need to be compressed.
- Resize and Compress Smartly: Reduce image dimensions if high resolution isn’t necessary, as smaller images require less storage. Convert images to linear RGB before resizing to avoid color artifacts.
- Using an Image Enhancer: If the compressed image file is blurry, use an image enhancer to uplift its quality. UniConverter has a comprehensive image enhancer that upscales your pictures with a single click.
- Apply Lossless Compression: Lots of image compressors reduce your image size without deteriorating the original quality. If your compression tool has a lossless compression option, remember to enable it.
FAQs About macOS Reduce Image Size
1. How do I reduce the MB size of a photo on my Mac?
If you want to reduce the MB size of a photo on your macOS device, use UniConverter. This tool allows you to compress your images without compromising on the original quality.
2. How do I resize an image on a Mac?
You can benefit from Mac’s built-in resize tools for file size optimization, but UniConverter is a better alternative. Avail of the batch processing feature to compress multiple images with a single click.
3. How do I reduce the size of a photo in Mac Mail?
Before you share a photo via email on Mac, it is ideal to compress the picture using UniConverter. Using this compression tool, you can also select the desired file format in which you need to export the picture.
Conclusion
Wrapping up, this article was an extensive guide on the significance of reducing image sizes on a Mac. We started off by exploring the built-in Mac tools and techniques to shrink image size on Mac. After finding out their cons, we looked into some third-party solutions for better size compression.
Among these third-party tools, Wondershare UniConverter stood out as a reliable photo compression platform. Besides preserving the original picture quality, this tool promotes batch processing to perform multiple compression tasks simultaneously.

